Ecosyste.ms: Awesome
An open API service indexing awesome lists of open source software.
https://github.com/AceroM/khiphop-stack
https://github.com/AceroM/khiphop-stack
clerk edgedb netlify reactjs remix remix-stack tailwindcss typescript
Last synced: about 1 month ago
JSON representation
- Host: GitHub
- URL: https://github.com/AceroM/khiphop-stack
- Owner: AceroM
- Created: 2022-08-10T04:03:05.000Z (almost 2 years ago)
- Default Branch: main
- Last Pushed: 2022-09-23T05:45:15.000Z (almost 2 years ago)
- Last Synced: 2024-01-14T05:59:30.565Z (6 months ago)
- Topics: clerk, edgedb, netlify, reactjs, remix, remix-stack, tailwindcss, typescript
- Language: TypeScript
- Homepage: https://khiphop-stack.netlify.app
- Size: 2.12 MB
- Stars: 9
- Watchers: 1
- Forks: 0
- Open Issues: 0
-
Metadata Files:
- Readme: README.md
Lists
- awesome-edgedb - Remix K-Hip Hop Stack - An application built with Remix & EdgeDB and deployed using Netlify. (Applications)
README
# Remix K-Hip Hop Stack
Remix + EdgeDB + Netlify 🕺
[](https://app.netlify.com/sites/khiphop-stack/deploys)
Deployed Site: [khiphop-stack.netlify.app](https://khiphop-stack.netlify.app/)
Heavily Inspired By:
- [K-Pop Stack](https://github.com/netlify-templates/kpop-stack)
- This stack also uses Netlify :), hence another korean music genre
- [Remix Chop Suey Stack](https://github.com/jkcorrea/remix-chop-suey-stack)
- Used a lot of the edge db / clerk setup
Learn more about [Remix Stacks](https://remix.run/stacks).
```
npx create-remix --template acerom/khiphop-stack
```
Click this button to create a new Github repo, new Netlify project and deploy this stack to a [CDN](https://jamstack.org/glossary/cdn/).
[](https://app.netlify.com/start/deploy?repository=https://github.com/acerom/khiphop-stack)
### What's in the stack
- [Netlify](https://netlify.com/) Deployment to the [Edge](https://www.netlify.com/products/edge) + deploy previews and CI/CD
- [Clerk](https://clerk.dev/) For simple user authentication
- [EdgeDB](https://www.edgedb.com/) Next generation graph-relational database with [access policies](https://www.edgedb.com/docs/datamodel/access_policies) for object level security
- [Tailwind](https://tailwindcss.com/) For styling and [DaisyUI](https://daisyui.com/) for quick UI prototyping
- [Cypress](https://cypress.io) End-to-end testing
- [Prettier](https://prettier.io) Code formatting
- [ESLint](https://eslint.org) Linting
- [TypeScript](https://typescriptlang.org)
### Other Stuff
- [Clsx](https://www.npmjs.com/package/clsx) For conditional styling
- [Headless UI](https://headlessui.com/) Essential component primitives used for modals, popovers etc.
- [Zod](https://github.com/colinhacks/zod) + [Remix Params Helper](https://github.com/kiliman/remix-params-helper) Server-sided form validation
- [Conform](https://github.com/edmundhung/conform) Great client sided form validation package by [edmundhung](https://github.com/edmundhung) using the [Constraint Validation API](https://developer.mozilla.org/en-US/docs/Web/API/Constraint_validation)
- [Tiny Invariant](https://www.npmjs.com/package/tiny-invariant) Handy tool for validating the existence of variables
- [Remix Flat Route](https://github.com/kiliman/remix-flat-routes) Flat file directory structure
Don't like what's in this stack? Feel free to [create an issue](https://github.com/AceroM/khiphop-stack/issues/new/choose), [fork](https://github.com/AceroM/khiphop-stack/fork) this repo, or clone and make it your own!
### Why?
- Netlify has a lot of great features for CICD, DX and you also can opt in for usage on the [Edge](https://www.netlify.com/products/edge/)
- Supabase/Prisma is great, but I think edge db does a slightly better job with [migrations](https://www.edgedb.com/showcase/migrations), and overall has a smoother developer experience. Since the release of [EdgeDB 2.0](https://www.edgedb.com/blog/edgedb-2-0), it has been easier to visualize the db layer and create queries using the `edgedb ui` command
- I want to share my personal codebase preferences :)
This repo is still in active development! To get an idea of what I'm working on, feel free to look at my [TODO](./TODO.md)
### App Demo
https://user-images.githubusercontent.com/21187304/184076115-8073acc6-b6fa-4856-a193-cca4eacf096f.mov
### Project Setup
- Install all dependencies & the [Netlify CLI](https://docs.netlify.com/cli/get-started/):
```sh
npm install
npm install netlify-cli -g
```
- Create or connect to your Netlify project by running through the Netlify `init` script:
```sh
netlify init
```
#### Local Development
For local development, first make sure you have edgedb installed (follow the [quickstart](https://www.edgedb.com/docs/guides/quickstart#initialize-a-project))
- Initialize your project
```sh
edgedb project init
```
- Now we need to create and apply the migrations to our new database
```sh
edgedb migration create
edgedb migration apply
```
- Generate the edgedb types required for your project. All your types will now be located in `./app/db/edgeql`
> Note that the generated types are not in the .gitignore since netlify uses them to build your app
```sh
npm run generate:eql
```
Make sure you installed all the packages
```sh
npm install
```
The Remix dev server starts your app in development mode, rebuilding assets on file changes. To start the Remix dev server:
```sh
npm run dev
```
The Netlify CLI builds a production version of your Remix App Server and splits it into Netlify Functions that run locally. This includes any custom Netlify functions you've developed. The Netlify CLI runs all of this in its development mode.
It will pull in all the [environment variables](https://docs.netlify.com/configure-builds/environment-variables/#declare-variables) of your Netlify project. You can learn more about this project's EdgeDB environment variables in [the environment variables section](#environment-variables).
To start the Netlify development environment:
```sh
netlify dev
```
With Netlify Dev you can also:
- test functions
- test redirects
- share a live session via url with `netlify dev --live`
- [and more](https://cli.netlify.com/netlify-dev/) :)
Note: When running the Netlify CLI, file changes will rebuild assets, but you will not see the changes to the page you are on unless you do a browser refresh of the page. Due to how the Netlify CLI builds the Remix App Server, it does not support hot module reloading.
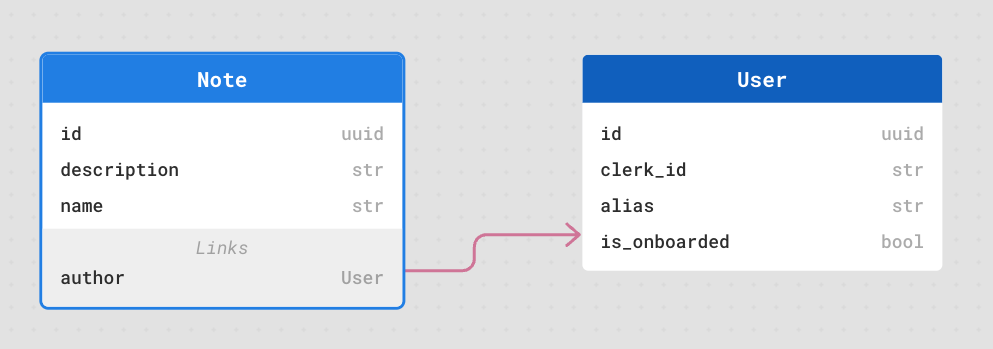
### Database Setup
```esdl
module default {
global current_user -> str;
type User {
required property clerk_id -> str { constraint exclusive };
required property alias -> str { constraint exclusive };
required property is_onboarded -> bool { default := false };
}
type Note {
required link author -> User;
required property name -> str;
property description -> str;
access policy insert_notes allow insert;
access policy own_notes allow select, delete, update using (
.author ?= (select User filter .clerk_id = global current_user)
);
}
}
```
- When creating a new User, we only store their `clerk_id` and username
- We have an `is_onboarded` field that we set true once user passes onboarding. If onboarded a signed in user will always redirect to the app and vice versa.
- We define _object-level security_ using [access policies](https://www.edgedb.com/docs/datamodel/access_policies) such that users can only query, delete, and update _their own_ notes based on their `clerk_id`
### Relevant code:
This is a pretty simple CRUD note-taking app, but it's a good example of how you can build a full stack app with Remix, EdgeDB, and Netlify
### Features
- Clerk Routes
- Sign in [./apps/routes/\_auth](./apps/routes/_auth)
- Onboarding [./apps/routes/onboarding](./apps/routes/onboarding)
- After a user creates an account with clerk, we store the clerk_id and require the username/alias from the user before having access to our main app
- CRUD operations in edgedb [./app/models](./app/models)
- App Home (Placeholder dashboard home route incase the app gets more complex with more models/routes)
- [./app/routes/app.index.tsx](./app/routes/app.index.tsx)
- Right now this route will have one button to lead to the notes page
- View Notes (With Note Search and Remove Note Option) [./app/routes/app.notes.index.tsx](./app/routes/app.notes.index.tsx)
- View Note [./app/routes/app.note.\$noteId.tsx](./app/routes/app.note.$noteId.tsx)
- New Note [./app/routes/app.notes.new.tsx](./app/routes/app.notes.new.tsx)
- Edit Note [./app/routes/app.note.edit.\$noteId.tsx](./app/routes/app.note.edit.$noteId.tsx)
---
### Environment Variables
To set environment variables, you can use the Netlify UI:
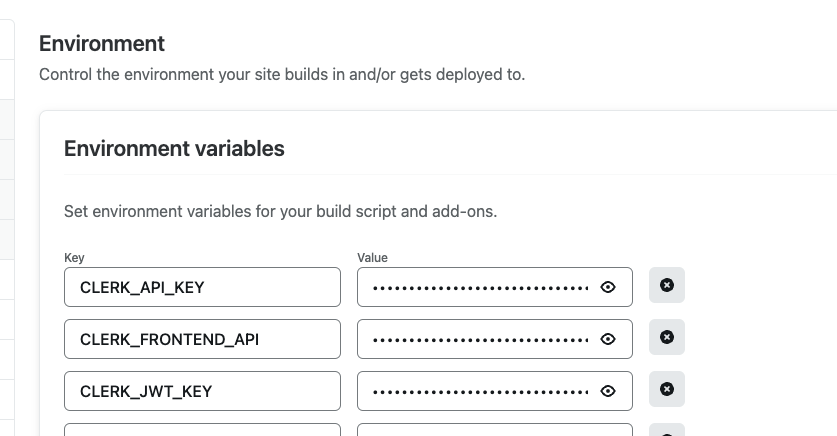
Or you can add your environment variables to an `.env` file (like shown in the sample [`.env.sample`](./.env.sample)) which will not be committed publicly because it is added to the `.gitignore` file. Or you can add it to your Netlify project environment variables (Site settings/Build & deploy/Environment) as shown in the [Development section](#development) so that they can be [easily shared with teammates](https://www.netlify.com/blog/2021/12/09/use-access-and-share-environment-variables-on-netlify).
> You will need these 2 environment variables to connect to your EdgeDB fly.io instance
Please refer to [Connecting Netlify Deployment to a Fly Instance](###connecting-netlify-deployment-to-a-fly-instance) to learn how to get these variables
- `EDGEDB_DSN`:
- This is your main database URL link for your remote deployment. For local development you will just need to setup an edgedb instance offline
- `EDGEDB_TLS_CA`:
- This is the TLS certificate key used to connect to your fly.io instance. [Documentation](https://www.edgedb.com/docs/reference/connection)
- You can grab this value with the following command
```sh
flyctl ssh console -a $EDB_APP -C "edgedb-show-secrets.sh --format=shell EDGEDB_SERVER_TLS_CERT"
```
> For some reason, setting environment variables in the Netlify UI does [NOT WORK](https://answers.netlify.com/t/long-environment-variable-with-line-breaks-n/8514) for new lines (\n). To circumvent this, define your `EDGEDB_TLS_CA` variable inside your `netlify.toml` file or use a service like [Doppler](https://www.doppler.com/)
---
### Netlify Deployment
This stack has the Netlify [configuration file (netlify.toml)](./netlify.toml) that contains all the information needed to deploy your project to Netlify's [edge nodes](https://www.netlify.com/products/edge).
Want to deploy immediately? Click this button
[](https://app.netlify.com/start/deploy?repository=https://github.com/netlify-templates/nextjs-toolbox)
Clicking this button will start the setup for a new project and deployment.
### Deploy from the Command Line
Clone this repo with the `git clone` command. Then install the [Netlify CLI](https://docs.netlify.com/cli/get-started/) tool and run `netlify init`.
```sh
git clone https://github.com/netlify-templates/kpop-stack
npm install netlify-cli -g # to install the Netlify CLI tool globally
netlify init # initialize a new Netlify project & deploy
```
### Connecting Netlify Deployment to a Fly instance
- Deploy an EdgeDB instance to [fly.io](https://fly.io/) by following the setup instructions here: [Deploying EdgeDB to Fly.io](https://www.edgedb.com/docs/guides/deployment/fly_io)
- Save your current fly config
```
flyctl config save -a $EDB_APP
```
- Make sure your services section looks like this:
```toml
[[services]]
http_checks = []
internal_port = 8080
processes = ["app"]
protocol = "tcp"
script_checks = []
[services.concurrency]
hard_limit = 25
soft_limit = 20
type = "connections"
[[services.ports]]
port = 5656
[[services.tcp_checks]]
grace_period = "1s"
interval = "15s"
restart_limit = 0
timeout = "2s"
```
- Then run
```sh
flyctl deploy --image=edgedb/edgedb --remote-only --app $EDB_APP
```
- Your public EdgeDB DSN will be
```sh
edgedb://edgedb:$PASSWORD@$EDB_APP.fly.dev:5656
```
You will also need to set `EDGEDB_CLIENT_TLS_SECURITY=insecure`, but the secure way is to fetch the EdgeDB TLS certificate and specify it as `EDGEDB_TLS_CA` on Netlify. To grab the cert:
```sh
flyctl ssh console -a $EDB_APP -C "edgedb-show-secrets.sh --format=raw EDGEDB_SERVER_TLS_CERT"
```
### CI/CD
Using the 'Deploy to Netlify' button or the `init` process will also set up continuous deployment for your project so that a new build will be triggered & deployed when you push code to the repo (you can change this from your project dashboard: Site Settings/Build & deploy/Continuous Deployment).
You can also use `netlify deploy` or `netlify deploy --prod` to manually deploy then `netlify open` to open your project dashboard.
> 💡 If you don't use `--prod` on the deploy command you will deploy a preview of your application with a link to share with teammates to see the site deployed without deploying to production
---
## Testing
This project uses [Vite](https://vitest.dev/) for unit tests
### Cypress
We have set up the basic configuration files for [Cypress](https://go.cypress.io/) End-to-End tests in this project. You'll find those in the `cypress` directory. As you make changes, add to an existing file or create a new file in the `cypress/integrations` directory to test your changes.
We use [`@testing-library/cypress`](https://testing-library.com/cypress) for selecting elements on the page semantically.
To run these tests in development, run `npm run e2e-test` which will start the dev server for the app as well as the Cypress client.
To other example of Cypress tests specifically on Remix stacks, check out the `cypress` directory in the [Remix Grunge Stack example](https://github.com/remix-run/grunge-stack/tree/main/cypress).
### Type Checking
This project uses TypeScript. It's recommended to get TypeScript set up for your editor to get a really great in-editor experience with type checking and auto-complete. To run type checking across the whole project, run `npm run typecheck`.
### Linting
This project uses ESLint for linting. That is configured in `.eslintrc.js`.
### Formatting
We use [Prettier](https://prettier.io/) for auto-formatting in this project. It's recommended to install an editor plugin (like the [VSCode Prettier plugin](https://marketplace.visualstudio.com/items?itemName=esbenp.prettier-vscode)) to get auto-formatting on save. There's also a `npm run format` script you can run to format all files in the project.