Ecosyste.ms: Awesome
An open API service indexing awesome lists of open source software.
https://github.com/funkia/turbine
Purely functional frontend framework for building web applications
https://github.com/funkia/turbine
framework frp functional-reactive-programming javascript pure typescript
Last synced: about 1 month ago
JSON representation
Purely functional frontend framework for building web applications
- Host: GitHub
- URL: https://github.com/funkia/turbine
- Owner: funkia
- License: mit
- Created: 2016-09-02T12:23:51.000Z (almost 8 years ago)
- Default Branch: master
- Last Pushed: 2023-01-07T02:23:08.000Z (over 1 year ago)
- Last Synced: 2024-05-01T08:01:36.385Z (2 months ago)
- Topics: framework, frp, functional-reactive-programming, javascript, pure, typescript
- Language: TypeScript
- Homepage:
- Size: 4.5 MB
- Stars: 684
- Watchers: 26
- Forks: 27
- Open Issues: 64
-
Metadata Files:
- Readme: README.md
- License: LICENSE
Lists
- my-awesome-stars - turbine
- awesome-stars - funkia/turbine - Purely functional frontend framework for building web applications (TypeScript)
- awesome-stars - funkia/turbine - Purely functional frontend framework for building web applications (typescript)
README

# Turbine
A purely functional frontend framework based on functional reactive
programming. Experimental.
[](https://gitter.im/funkia/General)
[](https://travis-ci.org/funkia/turbine)
[](https://codecov.io/gh/funkia/turbine)
# Table of contents
- [Why Turbine?](#why-turbine)
- [Examples](#examples)
- [High-level overview](#high-level-overview)
- [Principles](#principles)
- [Installation](#installation)
- [More examples](#more-examples)
- [Tutorial](#tutorial)
- [API](#api)
- [Contributing](#contributing)
## Why Turbine?
The JavaScript world is full of frameworks. So why another one?
Because we want something _different_. We want something that is
purely functional without compromises. Something that takes the best
lessons from existing JavaScript frameworks and couples them with the
powerful techniques found in functional languages like Haskell. We
want a framework that is highly expressive. Because when functional
programming is at its best it gives you more power, not less. Turbine
is supposed to be approachable for typical JavaScript developers while
still preserving the benefits that comes from embracing purely
functional programming.
We have done our best to realize our goal. But we are not done yet. We
hope you will find Turbine interesting, try it and maybe even help us
making it even better.
## Examples
### Email validator
[See the example live and editable here.](https://codesandbox.io/s/xenodochial-williams-xok6q)
```js
const isValidEmail = (s: string) => /.+@.+\..+/i.test(s);
const app = component((on) => {
const isValid = on.email.map(isValidEmail);
return [
span("Please enter an email address: "),
input().use({ email: "value" }),
div(["The address is ", isValid.map((b) => (b ? "valid" : "invalid"))])
];
});
// `runComponent` is the only impure function in application code
runComponent("#mount", main);
```
### Counter
[See the example live and editable here.](https://codesandbox.io/s/pedantic-frog-beisw)
```js
const counter = component((on, start) => {
const count = start(accum((n, m) => n + m, 0, on.delta));
return E.div([
"Counter ",
count,
E.button({ class: "btn btn-default" }, " + ").use(o => ({
delta: o.click.mapTo(1)
})),
E.button({ class: "btn btn-default" }, " - ").use(o => ({
delta: o.click.mapTo(-1)
}))
]);
});
// `runComponent` is the only impure function in application code
runComponent("#mount", counter);
```
[See more examples here](#more-examples).
## High-level overview
Here our some of our key features.
- Purely functional. A Turbine app is made up of only pure functions.
- Leverage TypeScript and runtime checking to improve the developing
experience.
- Based on classic FRP. Behaviors represents values that change over
time and streams provide reactivity. Turbine uses the FRP
library [Hareactive](https://github.com/funkia/hareactive).
- A component-based architecture. Components are immutable,
encapsulated and composable. Components are monads and are typically
used and composed with do-notation (we implement do-notation with
generators).
- Constructed DOM elements reacts directly to behaviors and streams.
This avoids the overhead of using virtual DOM and should lead to
great performance.
- Side-effects are expressed with a declarative IO monad. This allows
for easy testing of code with side-effects. Furthermore, the
IO-monad is integrated with FRP.
- The entire data flow through applications is explicit and easy to
follow.
- Our libraries are available both as CommonJS and ES2015 modules.
This allows for tree-shaking.
Here are some of the features we want to implement and goals we're
working towards.
- Declarative and concise testing of time-dependent FRP code.
- Performance. We think Turbine can be made very efficient. But we are
not yet at a point where we focus on performance.
- Support for server side rendering.
- Browser devtools for easier development and debugging.
- Hot-module replacement (if possible given our design).
## Principles
This section describes some of the key principles and ideas underlying
the design of Turbine.
### Purely functional
Turbine is purely functional. We mean that in the most strict sense of
the term. In a Turbine app, every single expression is pure. This
gives a huge benefit in how easy it is to understand and maintain a
Turbine app is.
One benefit of the complete purity is that every function in Turbine
supports what is called "referential transparency". This means that an
expression can always be replaced with its value.
As a simple example, say you have the following code:
```js
const view = div([
myComponent({ foo: "bar", something: 12 }),
myComponent({ foo: "bar", something: 12 })
]);
```
One may notice that `myComponent` is called twice with the exact same
arguments. Since all functions in a Turbine app are pure `myComponent`
is no exception. Hence, we can make the following simple refactoring.
```js
const component = myComponent({foo: "bar", something: 12}),
const view = div([
component,
component
]);
```
Such refactorings can always be safely done in Turbine.
### Completely explicit data flow
One significant challenge when writing an interactive frontend
application is how to manage the data flow through an application.
In Turbine we have strived to create an architecture where the data
flow is easy to follow and understand. For us, this means that when
looking at any piece of code it should be possible to see what other
parts of the application it affects and what other parts it is
affected by.
One manifestation of this principle is that in Turbine it is very
simple to see how the model affects the view and how the view affects
the model. The figure below illustrates this.
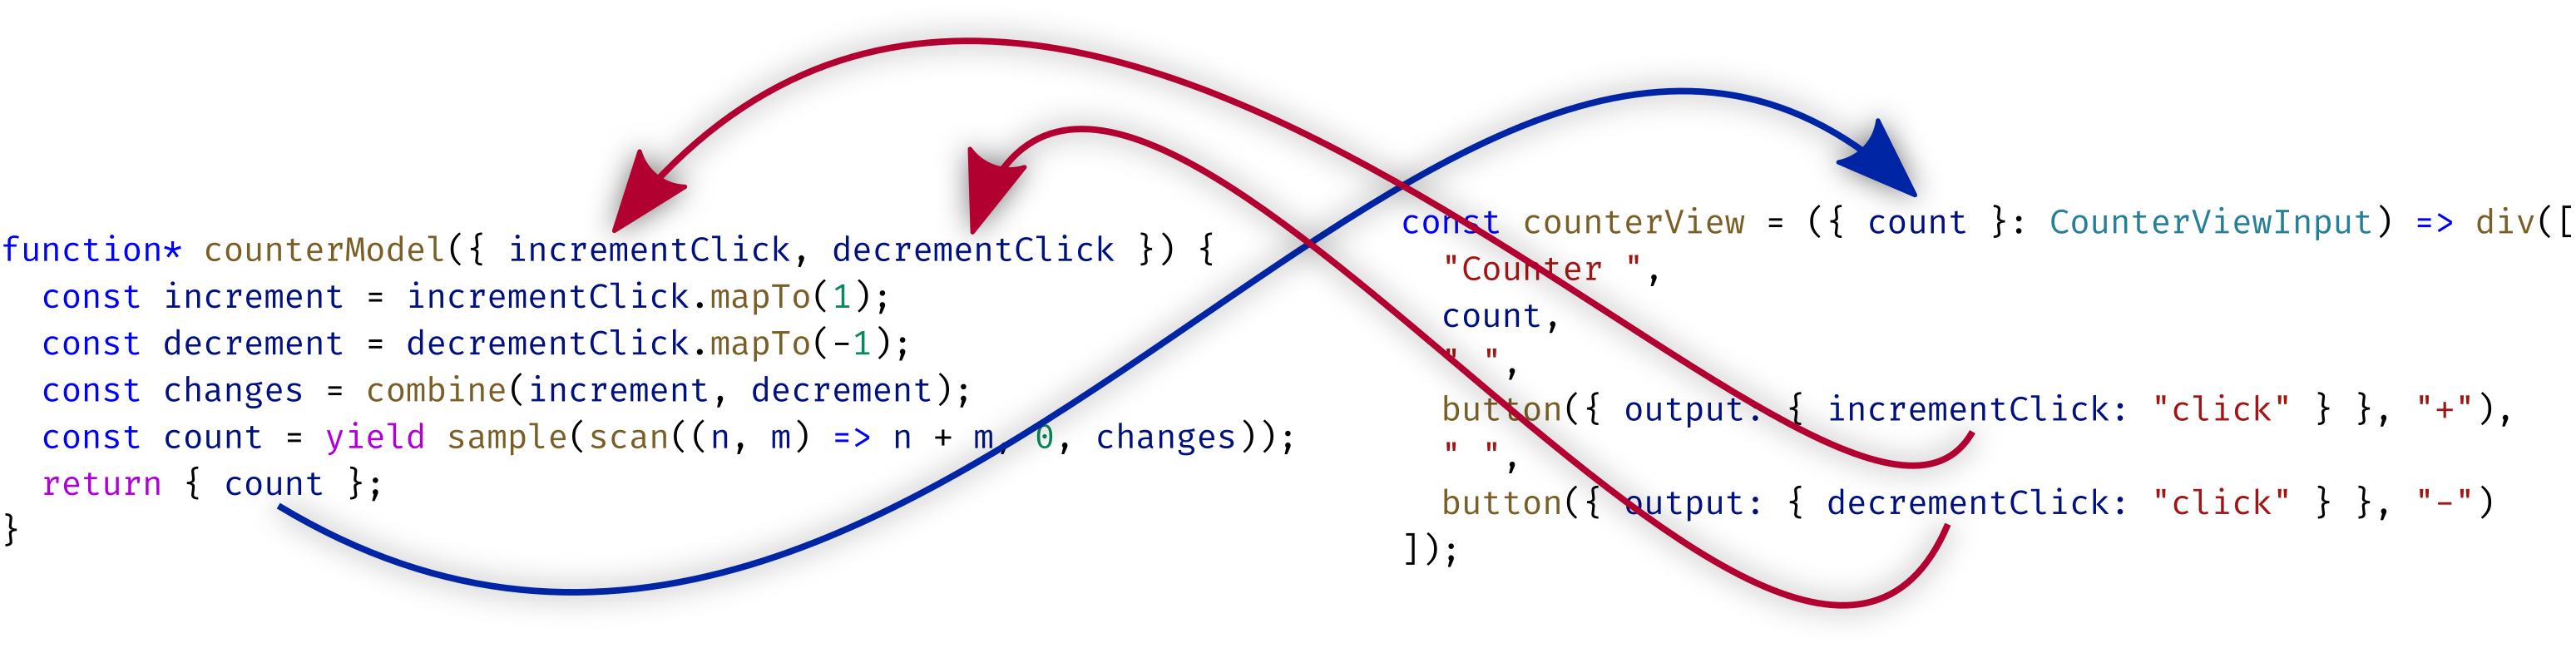
The arrows represent data flow between the model and the view. Note
how these "conceptual arrows" are clearly expressed in the code. For
instance, by looking at the buttons we can see exactly what output
they produce.
### Declarative models
Imperative programming is about _doing_. Functional programming is
about _being_. This mean that ideally a functional program should be
about defining what things are. That property is what makes functional
programs declarative.
Below is a model from the [counters example](/examples/counters).
Notice how the model consists of nothing but a series of `const`
statements.
```js
function* counterModel({ incrementClick, decrementClick, deleteClick }) {
const increment = incrementClick.mapTo(1);
const decrement = decrementClick.mapTo(-1);
const deleteS = deleteClick.mapTo(id);
const count = yield accum(add, 0, combine(increment, decrement));
return { count, deleteS };
}
```
Each line is a declaration of a piece of the state. All models in
Turbine follows this pattern. This makes state in a Turbine app very
easy to understand. One can look at a single definition and be certain
that it tells everything there is to know about that specific piece of
state.
This is in sharp contrast to frameworks that mutate state or
frameworks where state is stepped forward by reducer functions. With
such approaches a single piece of state can potentially be affected
and changed in several places. That can make it hard to understand how
the state evolves. The benefits of having a definition as a
single source of truth is lost.
## Installation
```sh
npm install @funkia/turbine @funkia/hareactive
```
[Hareactive](https://github.com/funkia/hareactive) is a peer
dependency. It is the FRP library that that Turbine is based upon.
Alternatively, for quickly trying out Turbine you may want to see our
[Turbine starter kit](https://github.com/funkia/turbine-starter).
## More examples
Here is a series of examples that demonstrate how to use Turbine.
Approximately listed in order of increasing complexity.
- [Email validator](/examples/email-validator) — Very simple example of an email
validator.
- [Fahrenheit celsius](/examples/fahrenheit-celsius) — A converter
between fahrenheit and celsius.
- [Zip codes](/examples/zip-codes) — A zip code validator. Shows one
way of doing HTTP-requests with the IO-monad.
- [Continuous time](/examples/continuous-time) — Shows how to utilize
continuous time.
- [Counters](/examples/counters) — A list of counters. Demonstrates
nested components, managing a list of components and how child
components can communicate with parent components.
- [Todo](/examples/todo) — An implementation of the classic
TodoMVC application.
## Tutorial
In this tutorial, we will build a simple application with a list of
counters. The application will be simple but not completely trivial.
Along the way, most of the key concepts in Turbine will be explained.
We will see how to create HTML, how to create custom components, how a
component can be nested and how it can share state with its parent.
Please open an issue if you have questions regarding the tutorial or
ideas for improvements.
The final result and the intermediate states can be seen by cloning
this git repository, going into the directory with the counters
example and running webpack to serve the application.
```
git clone https://github.com/funkia/turbine/
cd turbine/examples/counters
npm run start
```
### FRP
Turbine builds on top of the FRP library Hareactive. The two key
concepts from FRP are _behavior_ and _stream_. They are documented in
more detail in the [Hareactive
readme](https://github.com/funkia/hareactive). But the most important
things to understand are behavior and stream.
- `Behavior` represents values that change over time. For instance,
the position of the mouse or the number of times a user has clicked
a button.
- `Stream` represents discrete events that happen over time. For
instance click events.
### What is `Component`
On top of the FRP primitives Turbine adds `Component`. Component is the
key concept in Turbine. Once you understand `Component`—and how to use
it—you understand Turbine. A Turbine app is just one big component.
Here is a high-level overview of what a component is.
- Components can **contain logic** expressed through operations on
behaviors and streams.
- Components are **encapsulated** and have completely private state.
- Components **contain output** through which they selectively decide
what state they share with their parent.
- Components **write DOM elements** as children to their parent. They
can write zero, one or more DOM elements.
- Components can **declare side-effects** expressed as `IO`-actions.
- Components are **composable**—one component can be combined with
another component and the result is a third component.
A `Component` in Turbine is pure and immutable. A `Component` can be
thought of as a huge description of all of the above mentioned things.
For instance, a `Component` contains a description about what its DOM
look like. That part is a bit like virtual DOM. But, on top op that
the description also explain how the DOM changes over time. The
description also tells what output the `Component` contains. More on
that later.
### Creating HTML-elements
Turbine includes functions for creating components that represent
standard HTML-elements. When you create your own components they will
be made of these.
The element functions accept two arguments, both of which are
optional. The first is an object describing various things like
attributes, classes, etc. The second argument is a child component.
For instance, to create a div with a span child we would write.
```typescript
const myDiv = div({ class: "foo" }, span("Some text"));
```
The element functions are overloaded. So instead of giving `span` a
component as child we can give it a string. The element functions also
accept an array of child elements like this.
```typescript
const myDiv = div({ class: "foo" }, [h1("A header"), p("Some text")]);
```
Using this we can build arbitrarily complex HTML. As an example we
will build a simple view for a counter in our counter-application.
```ts
import { elements, runComponent } from "@funkia/turbine";
const { br, div, button } = elements;
// Counter
const counterView = div(["Counter ", 1, " ", button("+"), " ", button("-")]);
runComponent("body", counterView);
```
We define `counterView` as div-element with some text and two buttons
inside. Since `div` returns a component `counterView` is a component.
And a Turbine application is just a component so we have a complete
application. We run the application on the last line when we call
`runComponent`. It is an impure function that takes a selector, a
component and runs the component with the found element as parent. You
can view the entire code in `version1.ts`.
### Dynamic HTML
The `counterView` above is completely static. The buttons do nothing
and we hard-coded the value `1` into the view. Our next task is to
make the program interactive.
Anywhere where we can give the element functions a constant value of a
certain type we can alternatively give them a behavior with a value of
that type. For instance, if we have a string-valued behavior we can
use it like this
```ts
const mySpan = span(stringBehavior);
```
This will construct a component representing a span element with text
content that is kept up to date with the value of the behavior.
To make the count in our counter view dynamic we turn it into a
function that takes a behavior of a number and inserts it into the
view.
```ts
const counterView = ({ count }: CounterViewInput) =>
div(["Counter ", count, " ", button("+"), " ", button("-")]);
```
Because it will be easier going forward `counterView` takes an object
with a `count` property.
### Output from components
The above covers the _input_ to the counter view. We now need to get
_output_ from it.
Remember that we mentioned how a Turbine component is a description
about what the component will behave and look like. Part of that
description also explains what output will come from the component.
To get a feel for what "output" means it may be helpful to mention a
few examples.
- A button outputs, among other things, a stream of click events. So
part of its output is a stream of the type `Stream>`.
- An input box's output includes a behavior of the text inside the
input. The type would be `Behavior`.
- A checkbox might output a behavior representing whether it is
checked or not. It would have type `Behavior`.
One way of looking at the output is that it is the information we
would like to get from the view.
In practice a component will almost always output more than a single
stream or behavior. By convention the output is therefore almost alway
an object.
Components are represented by a generic type `Component`. The
`A` represents the _available_ output of the component and the `O`
represents the _selected_ out of the component. The difference
between selected and available output is highlighted in the example
below.
Constructing an input element looks like this
```ts
const usernameInput = input({ placeholder: "Username" });
```
The type of the component constructed above is as follows ( the `...`
refer to the fact that we have omitted a lot of the output to keep
things simple).
```ts
Component<{}, { value: Behavior, click: Stream, ... }>
```
Among its available output an `input` element produces a string valued
behavior named `value` that contains the current content of the
`input` element.
Like this input component a newly constructed component always have
`{}` as its selected output. This means that initially no output is
selected. We can move output from the available output into the
selected output by using the `output` method on components.
```ts
const usernameInput = input({
attrs: { placeholder: "Username" }
}).output({ username: "value" });
```
Here `usernameInput` has the type
```ts
Component<{ username: Behavior }, ...>
```
In the above code the invocation to `output` means: from the object of
available output take the `value` property and add it to the object of
selected output with the property name `username`.
The difference between available output and selected output matters
when components are combined. In most cases, when components are
composed or combined all their available output is discarded and only
the selected output becomes part of the combined component.
For instance, in the code below the `div` is given two children.
```ts
div([
button("Click me").output({ firstButtonClick: "click" }),
button("Don't click me")
]);
```
The `div` element composes the two buttons. When doing so all output
from the buttons except for the `click` stream from the first button
is discarded.
Using the `output` method is a bit like adding event handlers in other
UI frameworks. There are many events that one can add handlers to but
on any given element only a few events are actually of interest and
for these one will add event handlers. Similarly, in Turbine
components have a lot of available output but only the piece of it
that gets selected will be output in the end.
Back to the counters app. We want our counter view to produce two
streams as output. One stream should be from whenever the first button
is clicked and the other stream should contain clicks from the second
button. That is, the view's output should have the type
```ts
{
incrementClick: Stream,
decrementClick: Stream
}
```
We can achieve that by using the `output` method in each button.
```ts
const counterView = ({ count }) =>
div([
"Counter ",
count,
" ",
button("+").output({ incrementClick: "click" }),
" ",
button("-").output({ decrementClick: "click" })
]);
```
The call to `output` on each `button` tells them what output we are
interested in. The first buttons selected output is then object with a
stream named `incrementClick` and the later and object with one named
`decrementClick`.
The `div` function then combines the selected output from the
components in the array passed to it and output that as its own
selected output. The result is that `counterView` returns a component
that produces two streams as its output.
### An analogy with promises
As mentioned above using the `output` method is a bit like adding
event listeners in other frameworks. However, there are fundamental
differences between the two things. If you are familiar with how
asynchronous functions that takes callbacks differ from asynchronous
function that returns promises then the following analogy may help
understand this difference.
An asynchronous function for reading a file may look like this
```js
readFileCallback("foo.txt", (file) => ...)
```
A similar function based on promises looks like
this.
```js
readFilePromise("foo.txt").then((file) => ...)
```
Notice that the `readFileCallback` function does not return the file
that it reads. The file is instead passed to a callback that it gets
as an argument. The `readFilePromise` function on the other hand
returns the file wrapped in a promise of the type `Promise`.
Most UI frameworks are similar to the `readFileCallback` function. In
order to know when a button is pressed you do something like this.
```tsx
...}>Click me
```
The click events on the button are not returned from the `button`
function. Instead they are passed to a callback (or event handler)
that the `button` function gets as an argumen.
The same thing in Turbine looks like this.
```ts
button("Click me").output({ click: "click" });
```
This is similar to the `readFilePromise` function. The `button`
function does not take any callbacks but returns a stream of clicks
wrapped in a component of the type `Component<{ click: Stream }, ...>`.
This example should give some intuition about how Turbine differs from
most other frameworks. Other frameworks handle events similar to doing
asynchronous computations with callbacks but Turbine handle events
similarly to doing asynchronous computations with promises. In
particular when creating components the output is _returned_ as part
of the component.
### Adding a model
We now need to add a model with some logic to our counter view. The
model needs to handle the increment and decrement stream and turn them
into a behavior that represents the current count.
Turbine offers the function `modelView` for creating components with
logic. `modelView` takes two arguments. The first describes the logic
and the second the view. This keeps the logic neatly separated from
the view.
The second argument to `modelView`, the view, is a function that
returns a component. We already have such a function: `counterView`.
The first argument is a function that returns a `Now`-computation. You
don't have to fully understand `Now`. One of the things it does is to
make it possible to create stateful behaviors. The model function will
as input receive the output from the component that the view function
returns. The result of the `Now`-computation will be passed on to the
view function and will be the output of the component that `modelView`
returns. Here is how we use to create our counter component.
```ts
function* counterModel({ incrementClick, decrementClick }: CounterModelInput) {
const increment = incrementClick.mapTo(1);
const decrement = decrementClick.mapTo(-1);
const changes = combine(increment, decrement);
const count = yield accum((n, m) => n + m, 0, changes);
return { count };
}
const counter = modelView(counterModel, counterView)();
```
Note that there is a cyclic dependency between the model and the view.
The figure below illustrates this.

We now have a fully functional counter. You have now seen how to
create a simple component with encapsulated state and logic. The
current code can be seen in `version2.ts`.
### Creating a list of counters
Our next step is to create a list of counters. To do that we will
create a new component called `counterList`. The component will
contain a list of `counter` components as well as a button for adding
counters to the list.
Let's begin by defining a view function that creates a header and a
button.
```js
function* counterListView() {
yield h1("Counters");
const { click: addCounter } = yield button(
{ class: "btn btn-primary" },
"Add counter"
);
return { addCounter };
}
```
We hook the view up to a model using `modelView`. Again, the model
function receives the return value from the view function.
```js
const counterList = modelView(counterListModel, counterListView);
const counterListModel = fgo(function*({ addCounter, listOut }) {
const nextId = yield scan(add, 2, addCounter.mapTo(1));
const appendCounterFn = map(
(id) => (ids: number[]) => ids.concat([id]),
nextId
);
const counterIds = yield accum(apply, [0], appendCounterFn);
return { counterIds };
});
const counterListView = ({ sum, counterIds }) => [
h1("Counters"),
button({ class: "btn btn-primary" }, "Add counter").output({
addCounter: "click"
}),
ul(list(counter, counterIds).output((o) => ({ listOut: o })))
];
const counterList = modelView(counterListModel, counterListView);
```
To create a dynamic list of counters we have to use the `list` function.
## Documentation
### Understanding generator functions
Turbine's use of generator functions may seem a bit puzzling at first.
For instance, it may seem like generator functions serve two different
purposes. One when they're used in the model and another when they're
used in the view
But, what they do under the hood is exactly the same in both cases.
The key to understand is that generator functions is just sugar for
calling [`chain`](#componentchain) several times in succession.
When we use `chain` on components we can combine elements and pipe
output from one component into the next. The code below combines two
`input` elements with a `span` element that shows the concatenation of
the text in the two input fields.
```typescript
input({ attrs: { placeholder: "foo" } }).chain(({ value: aValue }) =>
input().chain(({ value: bValue }) => {
const concatenated = lift((a, b) => a + b, aValue, bValue);
return span(["Concatenated text: ", concatenated]).mapTo({ concatenated });
})
);
```
However, the above code is very awkward as each invocation of `chain`
adds an extra layer of nesting. To solve this problem we use
generators.
```typescript
go(function*() {
const { value: aValue } = yield input();
const { value: bValue } = yield input();
const concatenated = lift((a, b) => a + b, aValue, bValue);
yield span(["Concatenated text: ", concatenated]);
return { concatenated };
});
```
The above code does exactly the same as the previous example. But it
is a lot easier to read!
The `go` function works like this. We yield a value with a `chain`
method. `go` then calls `chain` on the yielded value. `go` calls
`chain` with a function that continues the generator function with the
value that `chain` passes it. The end result is a value of the same
type that we yield inside the generator function. When we `yield` a
`Component` we will get an `A` back inside the generator function.
Finally we `return` a value and that value will be the output of the
component that `go` returns.
Here is another example. The following code uses `chain` explicitly.
```ts
const view = button("Accept").chain(({ click: acceptClick }) =>
button("Reject").map(({ click: rejectClick }) => ({
acceptClick,
rejectClick
}))
);
```
The above code is equivalent to the following.
```ts
const view = go(function*() {
const { click: acceptClick } = yield button("Accept");
const { click: rejectClick } = yield button("Reject");
return { acceptClick, rejectClick };
});
```
Again, the code that uses generator functions is a lot easier to read.
This is why they're useful in Turbine.
`Component` is not the only type in Turbine that has a `chain` method.
`Now` and `Behavior` does as well. And since `go` is only sugar for
calling `chain` it works with these types as well.
## API
The API documentation is incomplete. See also the
[examples](#examples), the [tutorial](#tutorial), the [Hareactive
documentation](https://github.com/funkia/hareactive) and this tutorial
about [IO](https://github.com/funkia/io).
### Component
#### `Component#map`
Mapping over a component is a way of applying a function to the output
of a component. If a component has output of type `A` then we can map
a function from `A` to `B` over the component and get a new component
whose output is of type `B`.
In the example below `input` creates a component with an object as
output. The object contains a behavior named `value`. The
function given to `map` receives the output from the component.
We then call `map` on the behavior `value` and take the length of
the string. The result is that `usernameInput` has the type
`Component>` because it's mapped output is a
number-valued behavior whose value is the current length of the text
in the input element.
```ts
const usernameInput = input({ class: "form-control" }).map((output) =>
output.value.map((s) => s.length)
);
```
#### `Component#chain`
`map` makes it possible to transform and change the output from a
component. However, it does not make it possible to take output from
one component and pipe it into another component. That is where
`chain` enters the picture. The type of the `chain` method is as
follows.
```typescript
chain((output: Output) => Component): Component;
```
The `chain` method on a components with output `Output` takes a
function that takes `Output` as argument and returns a new component.
Here is an example. An invocation `component.chain(fn)` returns a new
component that works like this:
- The output from `component` is passed to `fn`.
- `fn` returns a new component, let's call it `component2`
- The DOM-elements from `component` and `component2` are both added to
the parent.
- The output is the output from `component2`.
Here is an example.
```typescript
input().chain((inputOutput) => span(inputOutput.value));
```
The above example boils down to this:
```typescript
Create input component Create span component with text content
↓ ↓
input().chain((inputOutput) => span(inputOutput.value));
↑ ↑
Output from input-element Behavior of text in input-element
```
The result is an input element followed by a span element. When
something is written in the input the text in the span element is
updated accordingly.
### `loop`
Sometimes situations arise where there is a cyclic dependency between
two components.
For instance, you may have a function that creates a component that
shows the value of an input string-value behavior and outputs a
string-valued behavior.
```typescript
const myComponent = (b: Behavior) => span(b).chain((_) => input());
```
Now we'd have a cyclic dependency if we wanted to construct two of
these views so that the first showed the output from the second and
the second showed output from the first. With `loop` we can do it like
this:
```typescript
loop(({ output1, output2 }) =>
go(function*() {
const output1_ = yield myComponent(output2);
const output2_ = yield myComponent(output1);
return { output1: output1_, output2: output2_ };
})
);
```
The `loop` functional seems pretty magical. It has the following
signature (slightly simplified):
```ts
loop(f: (a: A) => Component): Component
```
I.e. `loop` takes a function that returns a component whose output has
the same type as the argument to the function. `loop` then passes the
output in as argument to the function. That is, `f` will as argument
receive the output from the component it returns. The only restriction
is that the output from the component must be an object with streams
and/or behaviors as values.
Visually it looks like this.

### `modelView`
The `modelView` functions makes it possible to create components where
the view is decoupled from the model and its logic.
`modelView` takes two arguments:
- The model which is a function that returns a `Now` computation. The
`Now` computation is run when the component is being created.
- The view which is a function that returns a `Component`.
`modelView` establishes a circular dependency between the model and
the view. The model returns a `Now` computation and the result of this
computation is passed into the view function. The view function then
returns a component. The output of the component is passed to the
model function.
Visually the circular dependency looks like this.

`modelView` returns a _function_ that returns a component. The
arguments given to this function will be passed along to both the
model and the view functions. This makes it easy to create components
that take input.
```js
const myComponent = modelView(
(outputFromView, arg1, arg2) => ...,
(outputFromModel, arg1, arg2) => ...
);
myComponent("foo", "bar");
```
### `list`
The `list` function is used to create _dynamic_ lists in the UI.
> **Note:** If you are familiar with frameworks like Angular or Vue then you can
> think of `list` as being similar to `ngRepeat` in Angular 1, `ngFor` in
> Angular 2, and `v-for` in Vue.
The list function has the following type.
```ts
function list(
componentCreator: (a: A) => Component,
listB: Behavior,
getKey: (a: A, index: number) => number | string = id
): Component<{}, Behavior>;
```
The first parameter, `componentCreator`, is a function that takes a value of
type `A` and returns a component. This function will be invoked to create the
elements of the dynamic list. The second argument, `listB`, is a behavior of an
array where the elements in the array are of some type `A`.
The `list` function will return a component that at any given point is time is
equivalent to applying `componentCreator` to the current array in `listB` and
then showing the resulting components one after another.
Whenever `listB` changes the component returned by `list` will react to those
changes and keep the displayed list up-to-date. To do this, the last argument,
the `getKey` function, is used to figure out how elements are moved, removed, or
added. Therefore `getKey` should return a value that is _unique_ for each element.
The following example illustrates the above. Let us say we have a list of users
where each user is an object with an `id` and a `username`:
```ts
type User = {
id: number;
username: string;
};
```
The current list of users is represented by a behavior `users: Behavior`. We want to display the users in a list with their username
being editable. This can be achieved with the list function.
```ts
list((user) => input({ value: user.username }), users, (user) => user.id);
```
If the `users` behavior starts out with the value
```js
[{ username: "foo", id: 1 }, { username: "bar", id: 2 }];
```
Then the component created by calling `list` will produce HTML like this
```html
```
Now, if the value of `users` changes into
```js
[
{ username: "baz", id: 3}
{ username: "bar", id: 2 }
{ username: "foo", id: 1 },
]
```
Then `list` will _reorder_ the two existing `input` elements and insert a new
`input` element in the beginning. Thanks to the `getKey` function `list` can
efficiently do this by applying `getKey` to the old and the current value of the
list and figure out how the elements have moved around.
### SVG
You can use embed SVG in Turbine in much the same way you'd embed it in HTML:
```js
svg({ height: "100", width: "100" }, [
circle({
cx: "50",
cy: "50",
r: "40",
fill: "red"
}),
svgText({ x: 100, y: 30 }, "Hello SVG!")
]);
```
The only element with a different name is `svgText` because `text` in Turbine is an HTML Text Node.
## Contributing
Turbine is developed by Funkia. We write functional libraries. You can
be a part of it too. Share your feedback and ideas. We also love PRs.
Run tests once with the below command. It will additionally generate
an HTML coverage report in `./coverage`.
```sh
npm test
```
Continuously run the tests with
```sh
npm run test-watch
```