Ecosyste.ms: Awesome
An open API service indexing awesome lists of open source software.
https://github.com/microsoftgraph/windowsupdates-webapplication-sample
https://github.com/microsoftgraph/windowsupdates-webapplication-sample
devxsample
Last synced: 11 days ago
JSON representation
- Host: GitHub
- URL: https://github.com/microsoftgraph/windowsupdates-webapplication-sample
- Owner: microsoftgraph
- License: mit
- Created: 2023-02-10T20:51:24.000Z (over 1 year ago)
- Default Branch: main
- Last Pushed: 2024-02-09T05:54:17.000Z (4 months ago)
- Last Synced: 2024-04-24T06:32:07.262Z (about 2 months ago)
- Topics: devxsample
- Language: JavaScript
- Size: 907 KB
- Stars: 15
- Watchers: 7
- Forks: 4
- Open Issues: 6
-
Metadata Files:
- Readme: README.md
- Contributing: CONTRIBUTING.md
- License: LICENSE
- Code of conduct: CODE_OF_CONDUCT.md
- Security: SECURITY.md
Lists
- awesome-stars - microsoftgraph/windowsupdates-webapplication-sample - (JavaScript)
README
# Windows Update for Business Deployment Service Web App
Welcome to the Windows Update for Business deployment service Web Application. The Web Application was designed to teach you how to interact with our API and is meant to be a sample implementation for driver management. We chose to use React for our implementation but it can be done in many ways, please note that we do not support using React to integrate with our API. The Web Application also provides an opportunity to help you manage cloud-based updates for enterprise devices.
Current functionality includes:
- Create manual and automatic cloud-managed driver update policies
- Add/remove Azure AD devices to your policies
- Browse driver and firmware updates that are available for your devices
- Approve and schedule driver updates
- Suspensions of approvals
- Unenroll devices from driver management
## Prerequisites
1. Download and install Node.js LTS package [here](https://nodejs.org/en/download/)
> **Note**
> **Ensure that the LTS version is selected**

2. Download and install code editor of your choice (We recommend Visual Studio Code, free download link [here](https://code.visualstudio.com/download))
3. To work with the deployment service, devices must meet all these requirements:
- Devices must be [Azure AD joined](https://learn.microsoft.com/en-us/azure/active-directory/devices/concept-azure-ad-join) or [hybrid Azure AD joined](https://learn.microsoft.com/en-us/azure/active-directory/devices/concept-azure-ad-join-hybrid)
- Run one of the following operating systems:
- Windows 11, verify supported versions [here](https://learn.microsoft.com/en-us/windows/release-health/windows11-release-information).
- Windows 10, verify supported versions [here](https://learn.microsoft.com/en-us/windows/release-health/release-information).
- Have one of the following Windows 10 or Windows 11 editions installed:
- Pro
- Enterprise
- Education
- Pro Education
- Pro for Workstations
- Additionally, your organization must have one of the following subscriptions:
- Windows 10/11 Enterprise E3 or E5 (included in Microsoft 365 F3, E3, or E5)
- Windows 10/11 Education A3 or A5 (included in Microsoft 365 A3 or A5)
- Windows Virtual Desktop Access E3 or E5 Microsoft 365 Business Premium
## Resources
- API Reference Docs can be found [here](https://learn.microsoft.com/en-us/graph/api/resources/adminwindowsupdates?view=graph-rest-beta) and conceptual documents [here](https://learn.microsoft.com/en-us/graph/windowsupdates-concept-overview)
- Conceptual overview of [driver management](https://learn.microsoft.com/en-us/graph/windowsupdates-manage-driver-update) utilizing our API in Microsoft Graph
- Code examples for how the Web Application integrates with our API in Microsoft Graph can be found in the src > api folder
- createPolicy.js - Create an [update policy](https://learn.microsoft.com/en-us/graph/api/resources/windowsupdates-updatepolicy?view=graph-rest-beta)
- getMembers.js - Get members of a [deployment audience](https://learn.microsoft.com/en-us/graph/api/resources/windowsupdates-deploymentaudience?view=graph-rest-beta)
- getPolices.js - Get a [list of all policies](https://learn.microsoft.com/en-us/graph/api/adminwindowsupdates-list-updatepolicies?view=graph-rest-beta)
- getUpdates.js - Get all [driver updates available](https://learn.microsoft.com/en-us/graph/windowsupdates-manage-driver-update#get-inventory-of-driver-updates) for devices in a policy.
- updateDeploymentAudience.js [Add or remove members](https://learn.microsoft.com/en-us/graph/api/windowsupdates-deploymentaudience-updateaudience?view=graph-rest-beta) from a deployment audience.
- createApproval.js - Create an [content approval](https://learn.microsoft.com/en-us/graph/api/windowsupdates-updatepolicy-post-compliancechanges-contentapproval?view=graph-rest-beta) for devices in a deployment audience.
- suspendApproval.js - [Suspend Approval](https://learn.microsoft.com/en-us/graph/windowsupdates-manage-driver-update#during-a-driver-deployment) for a driver deployment.
- deletePolicy.js - [Delete an update policy](https://learn.microsoft.com/en-us/graph/api/windowsupdates-updatepolicy-delete?view=graph-rest-beta).
- removeDeviceFromService.js - [Unenroll](https://learn.microsoft.com/en-us/graph/api/windowsupdates-updatableasset-unenrollassets?view=graph-rest-beta) a device from driver management
- Driver Deployment workbook in Windows Update for Business Reports - Track the status and progress of all your driver deployments through our new workbook. Find out more and how you can get started by [enrolling in Windows Update for Business Reports](http://aka.ms/wufbreportsGA).
### Troubleshooting and Tips
> **Note**
> **Ensure devices are first enrolled in driver management before making policy changes**
- **Approved content not installing on my device**
It is possible for the service to receive scan events from Windows Update, make an approval, but the content not get installed on the device because of a Group Policy or Registry setting on a Windows 10 device with version 1607 and later.
- Group Policy setting: If *Computer Configuration\Administrative Templates\Windows Components\Windows update\Do not include drivers with Windows Updates* is set to enabled, driver updates will be dropped by the device.
- Registry key: Under path *HKEY_LOCAL_MACHINE\Software\Policies\Microsoft\Windows\WindowsUpdate\ExcludeWUDriversInQualityUpdate* with a REG_DWORD set to 1 will also drop driver updates offered by Windows Update.
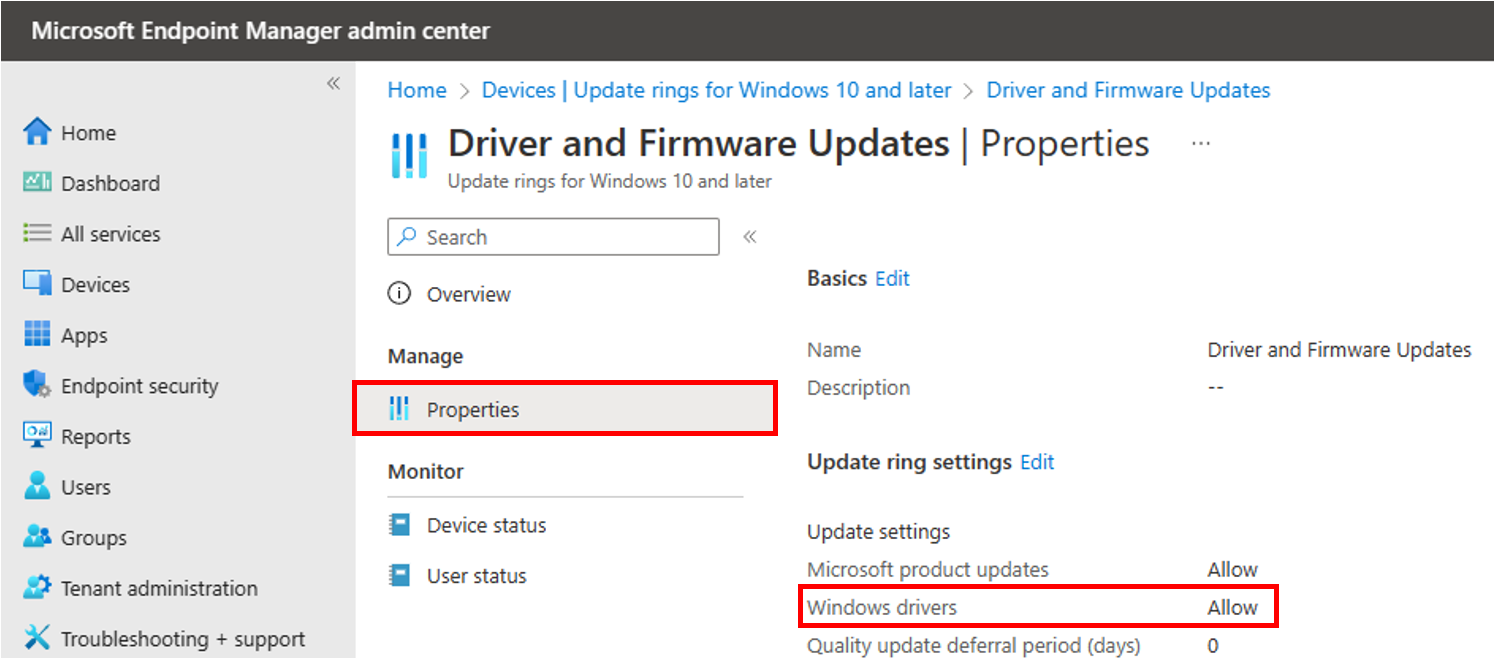
- Intune policy setting under *Devices | Update rings for Windows 10 and later* controls the above registry value. Make sure that Windows drivers is set to Allow for approved driver and firmware content to be installed on your devices.
- **Getting drivers and firmware from Windows Update for Business deployment service while using WSUS**
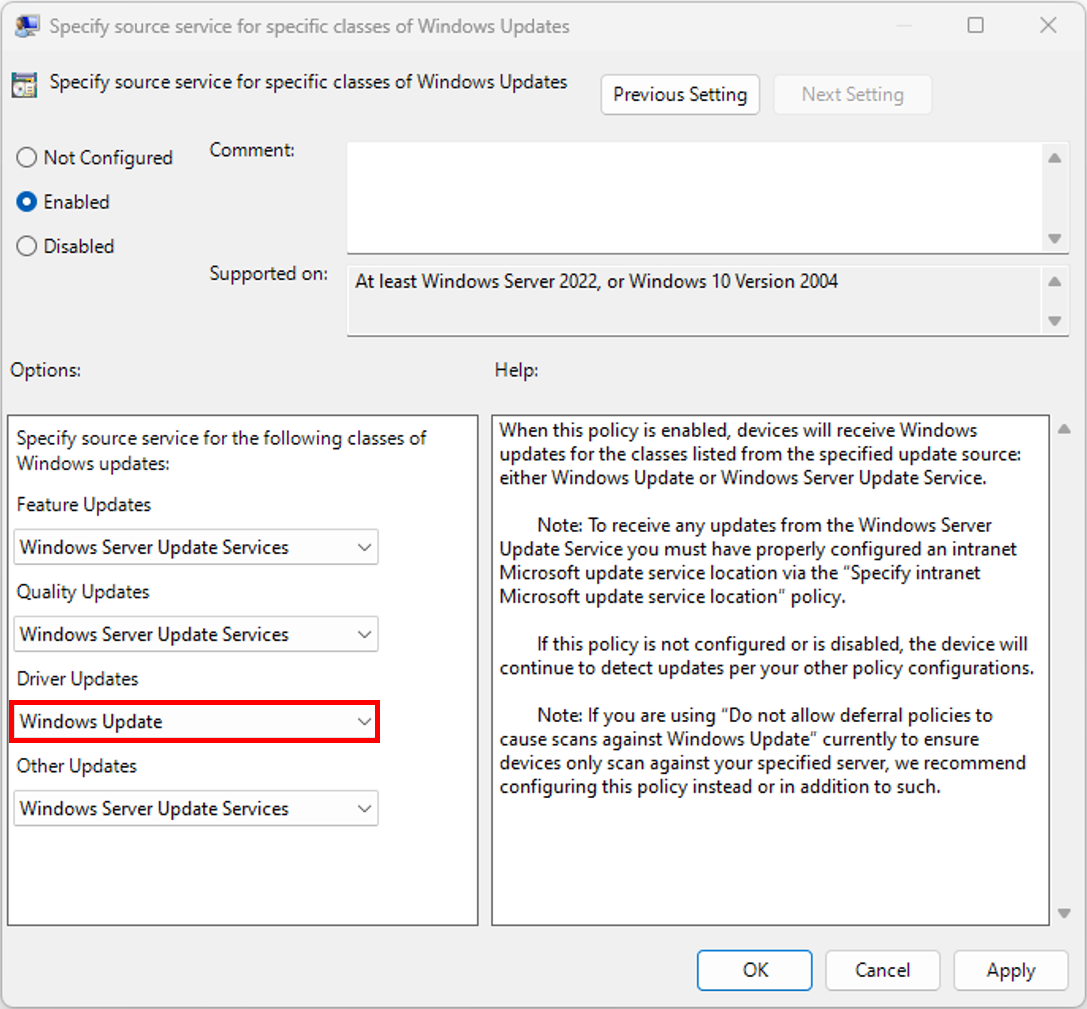
Windows update [scan source policy](https://learn.microsoft.com/en-us/windows/deployment/update/wufb-wsus) enables you to choose what types of updates to get from either WSUS or Windows Update for Business service. The scan source policy allows you to specify whether your device gets updates from Windows Update or WSUS for each update type (Feature updates, Quality updates, Driver and Firmware Updates, and Other Microsoft product updates). To enable the deployment service to control the driver content offered to your devices, Driver Updates must be set to Windows Update. This policy can be configured using two methods:
- Group Policy Path: Computer Configuration\Administrative Templates\Windows Components\Windows Update\Manage updates offered from Windows Server Update Service\Specify source service for specific classes of Windows Updates
- Configuration Service Provider (CSP) Policies: [SetPolicyDrivenUpdateSourceForDriverUpdates](https://learn.microsoft.com/en-us/windows/client-management/mdm/policy-csp-update#setpolicydrivenupdatesourcefordriverupdates) to 0
> **Note**
> **Once a device is enrolled in drivers management through the Windows Update for Business deployment service, enabling this policy and choosing to receive Driver updates through Windows Update achieves the same results as turning off driver updates. The service will not offer any driver content unless approved and you have the benefit of browsing applicable driver content that is available to your managed devices.**
### Support
For issues, please send email to [email protected] with the following information:
- Description of the issue.
- AAD Tenant ID.
- AAD Device ID (this can be found by issuing this command locally through PowerShell: `dsregcmd /status`).
- Please attach the log generated by the [Windows Update Log Collection Tool](http://aka.ms/WUCopyLogs) just after checking for updates in Windows Update. These logs contain information that will allow us to search for related service events and device settings.
- Policy ID created in the web application.
- Screenshots relevant to the issue.
## Application Onboarding
### Azure App Registration
This section walks through the one time registration process with Azure in order to generate an Application (client) ID and Directory (tenant) ID needed during the installation of the web application. Global admin role is required to complete these steps.
1. Sign in to the [Azure portal](https://portal.azure.com/) using an account with administrator permission. You must use an account in the same Microsoft 365 subscription (tenant) as you intend to register the app with.
2. Select Azure Active Directory.

3. Under Manage, select App registrations > New registration
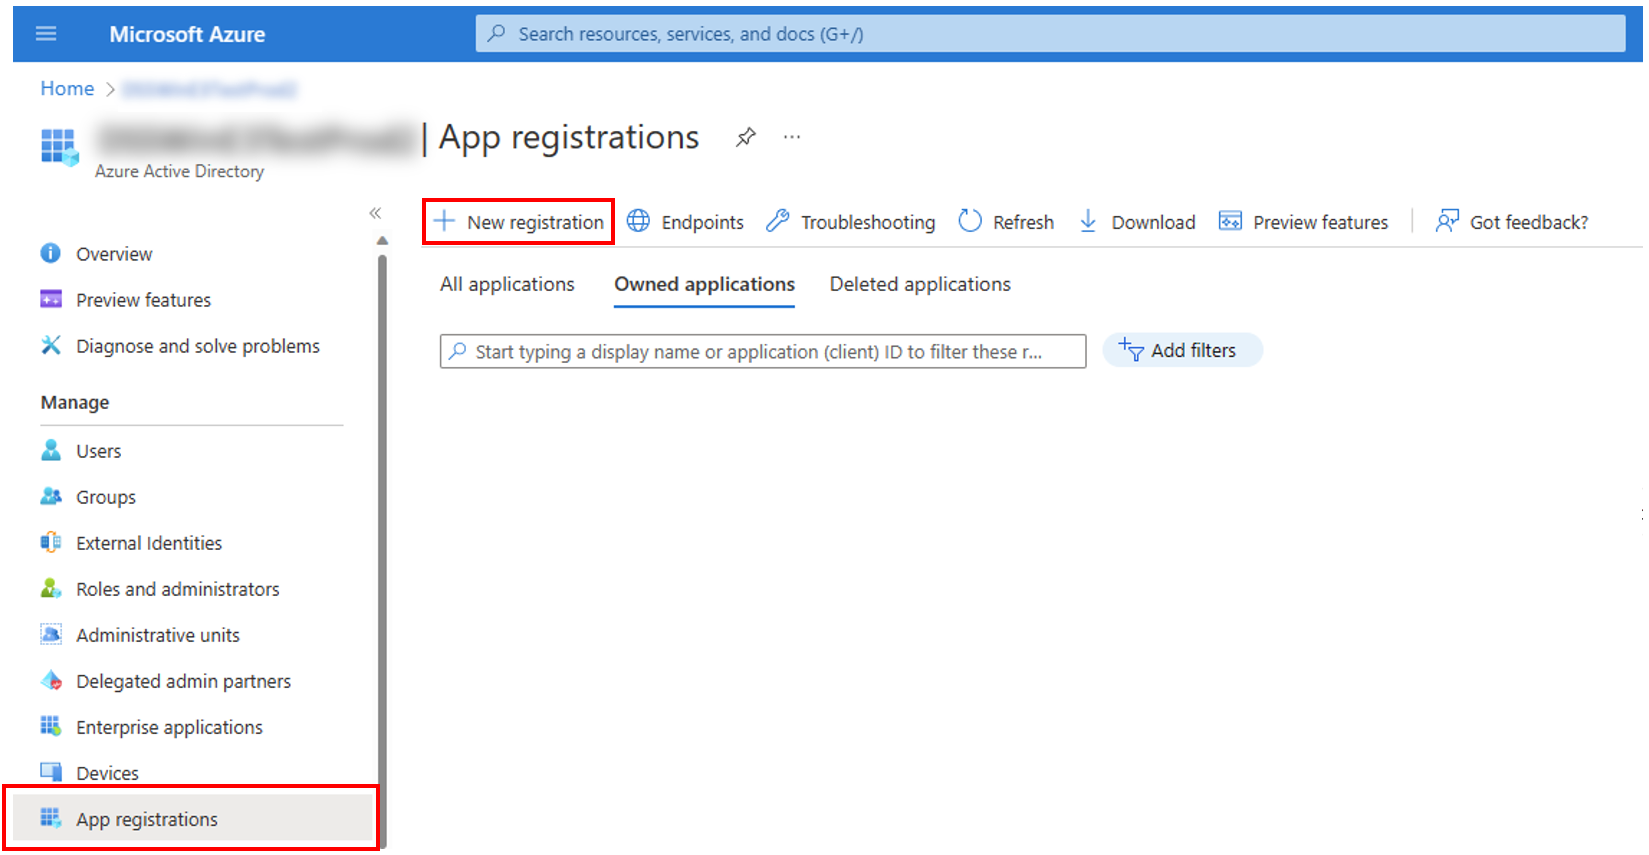
4. Register an application
- Provide the user-facing display name for this application.
- For Supported account types, select Accounts in this organization directory only.
- Select Register.

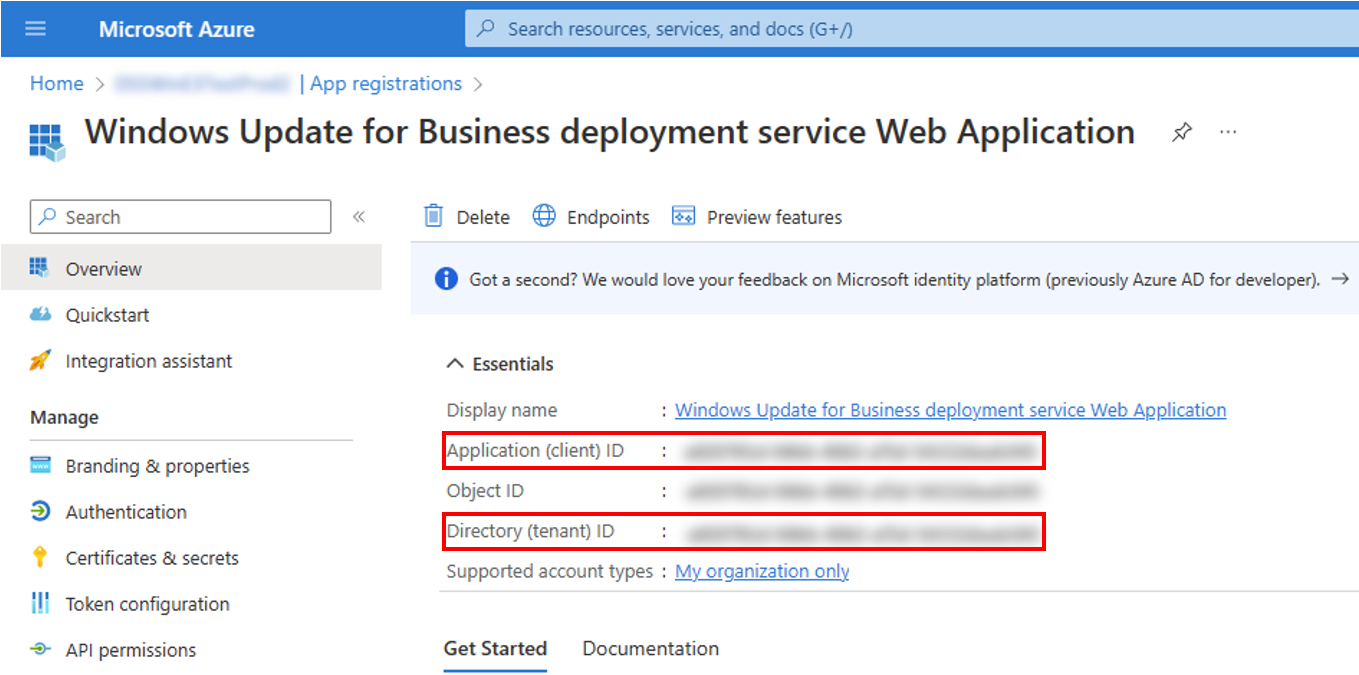
5. After registering a new application, you can find the application (client) ID and Directory (tenant) ID from the overview menu option. **Make a note of the values for use later.**
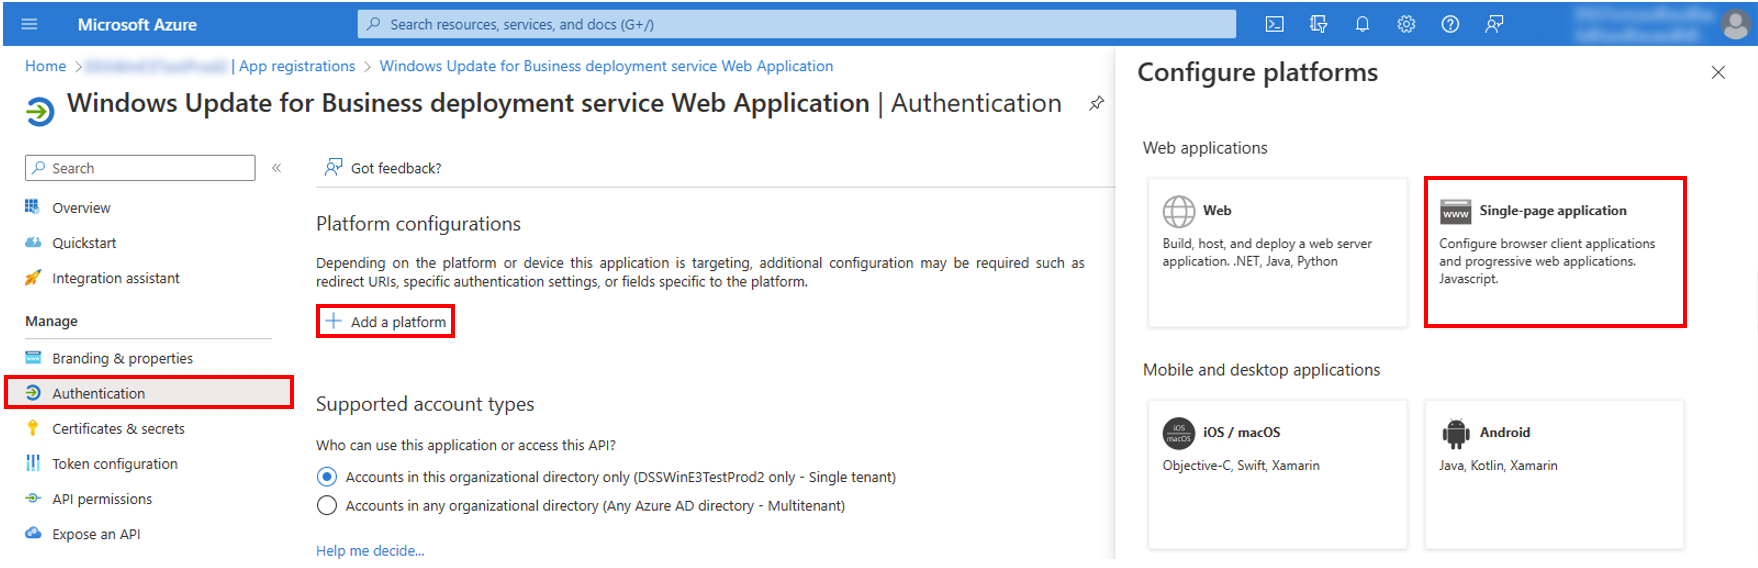
### Configure Authentication and Permissions
This section is for a one time configuration of the redirect URI and tokens for the web application. It will also walk you through granting consent and authorizing permissions to access our API in Microsoft Graph.
1. Under Mange, select Authentication > Add a platform> Single-page-application
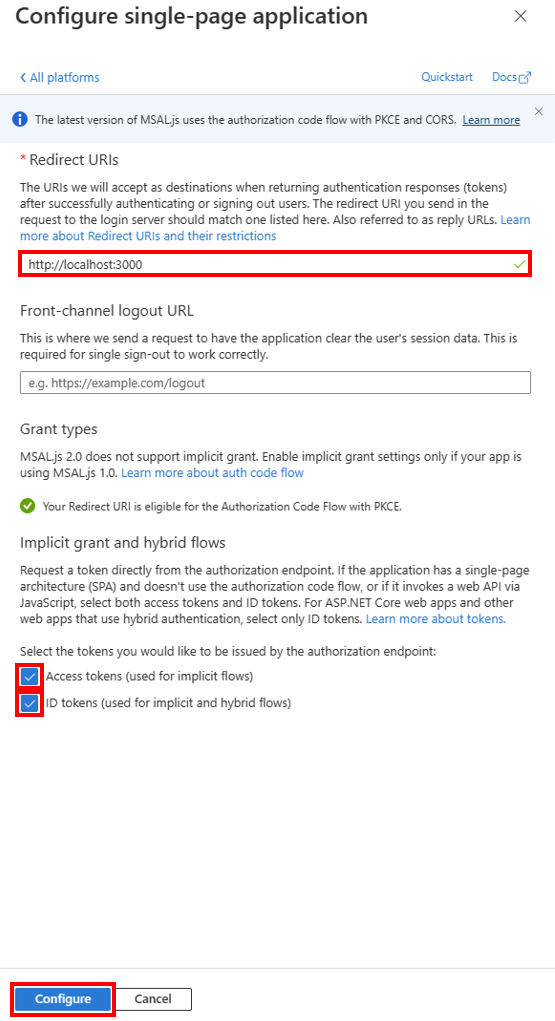
2. Configure Single-page application
- For Redirect URIs enter http://localhost:3000.
- Check Access tokens and ID tokens.
- Select Configure.
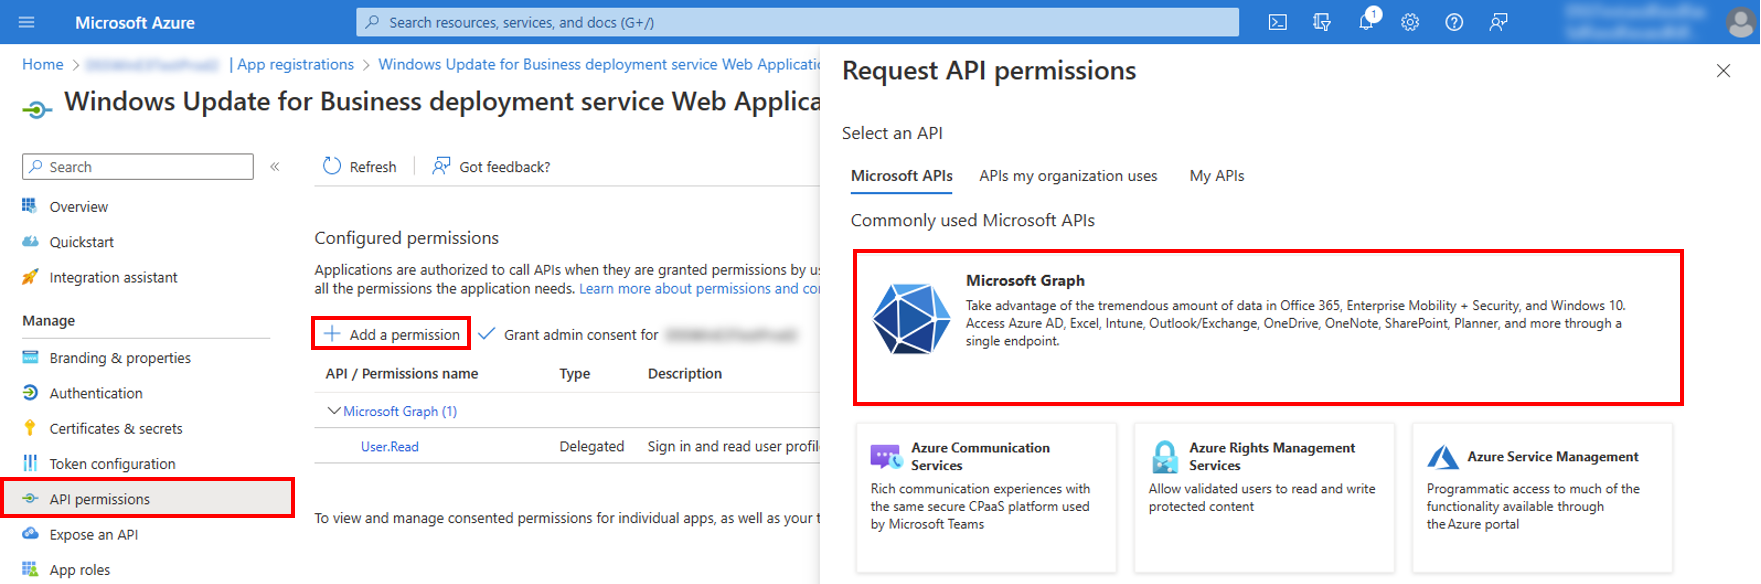
3. Under Mange, select API permissions > Add a permission > Microsoft Graph
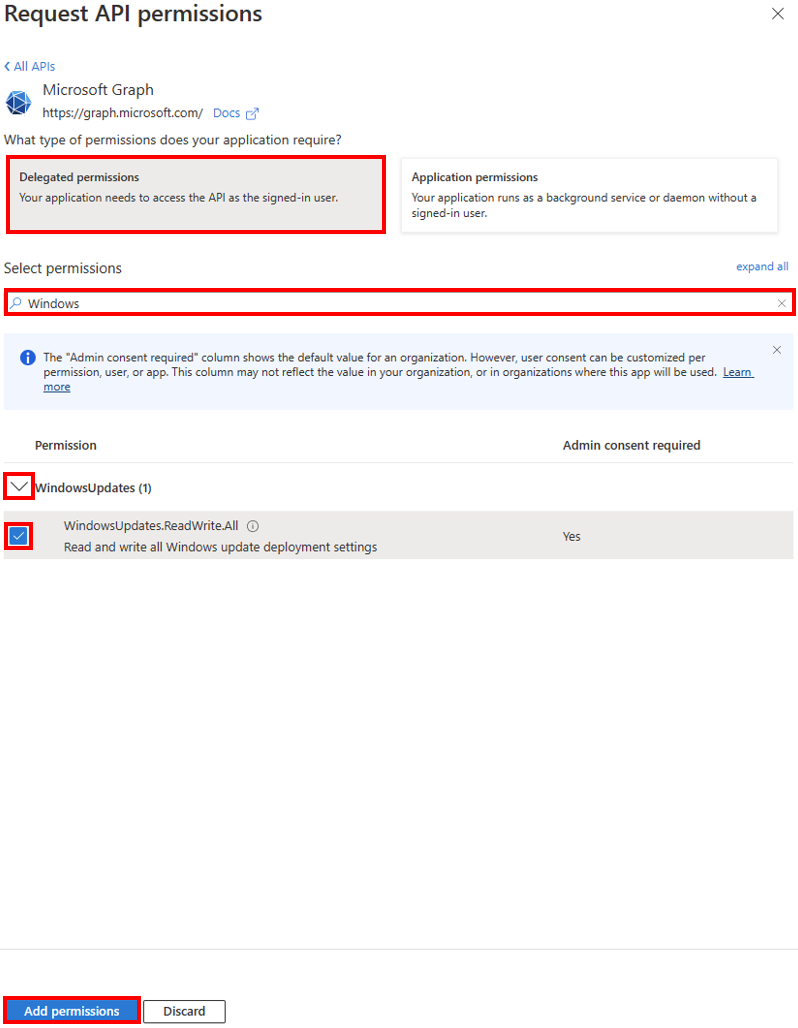
4. Request API permissions
- Select Delegated permissions.
- For Select permissions, enter Windows.
- Select arrow next to WindowsUpdates (1).
- Check WindowsUpdates.ReadWrite.All.
- Select Add permissions.
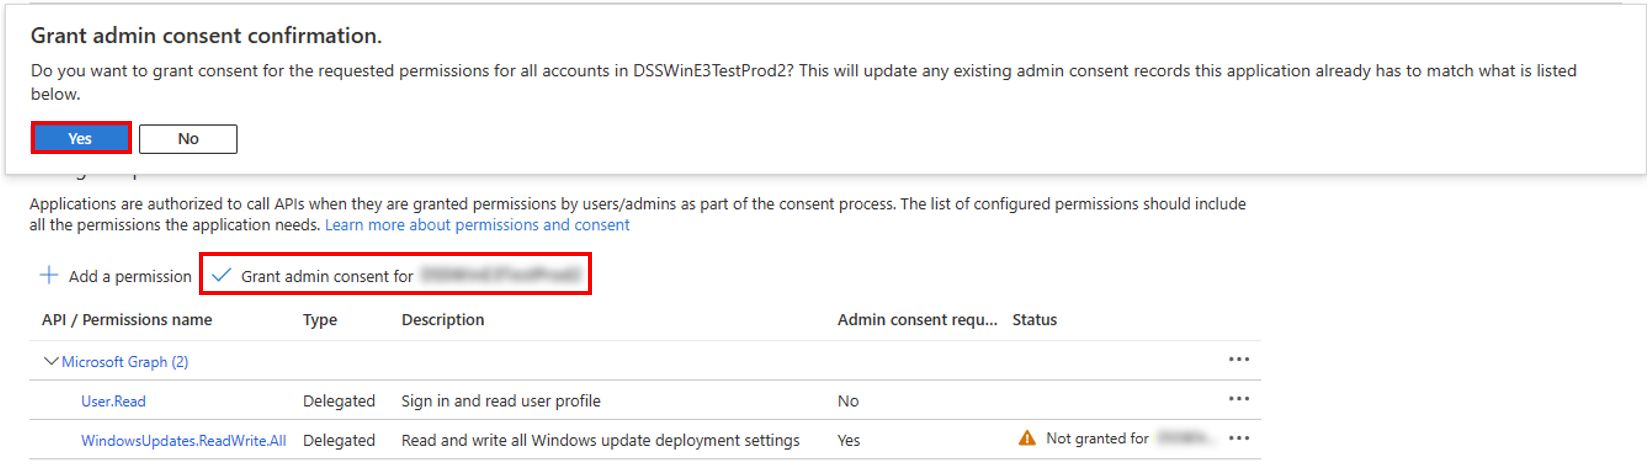
5. Grand admin consent
- Select Grand admin consent for
- In the Grant admin consent confirmation pop up, select Yes
### Access Control
This section is where you configure the web application to only allow access to assigned users and select users or groups that will have access. Follow steps 3 and 4 for continued management of user access to the web application.
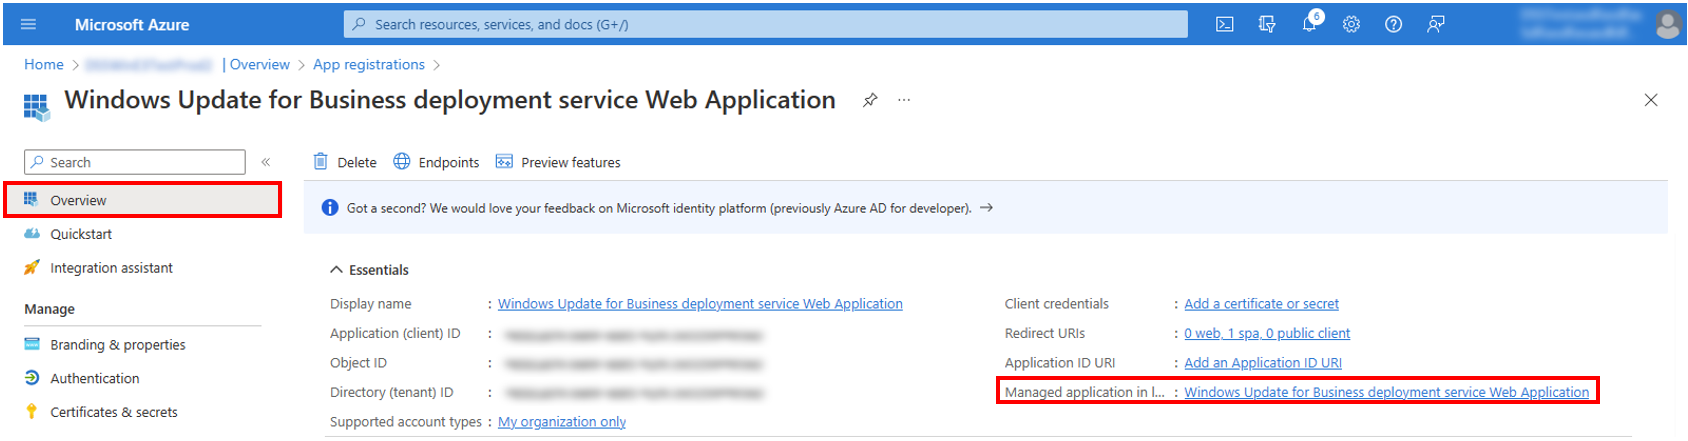
1. Navigate to your web app resource > Overview > select the hyperlink next to Managed application in local directory.
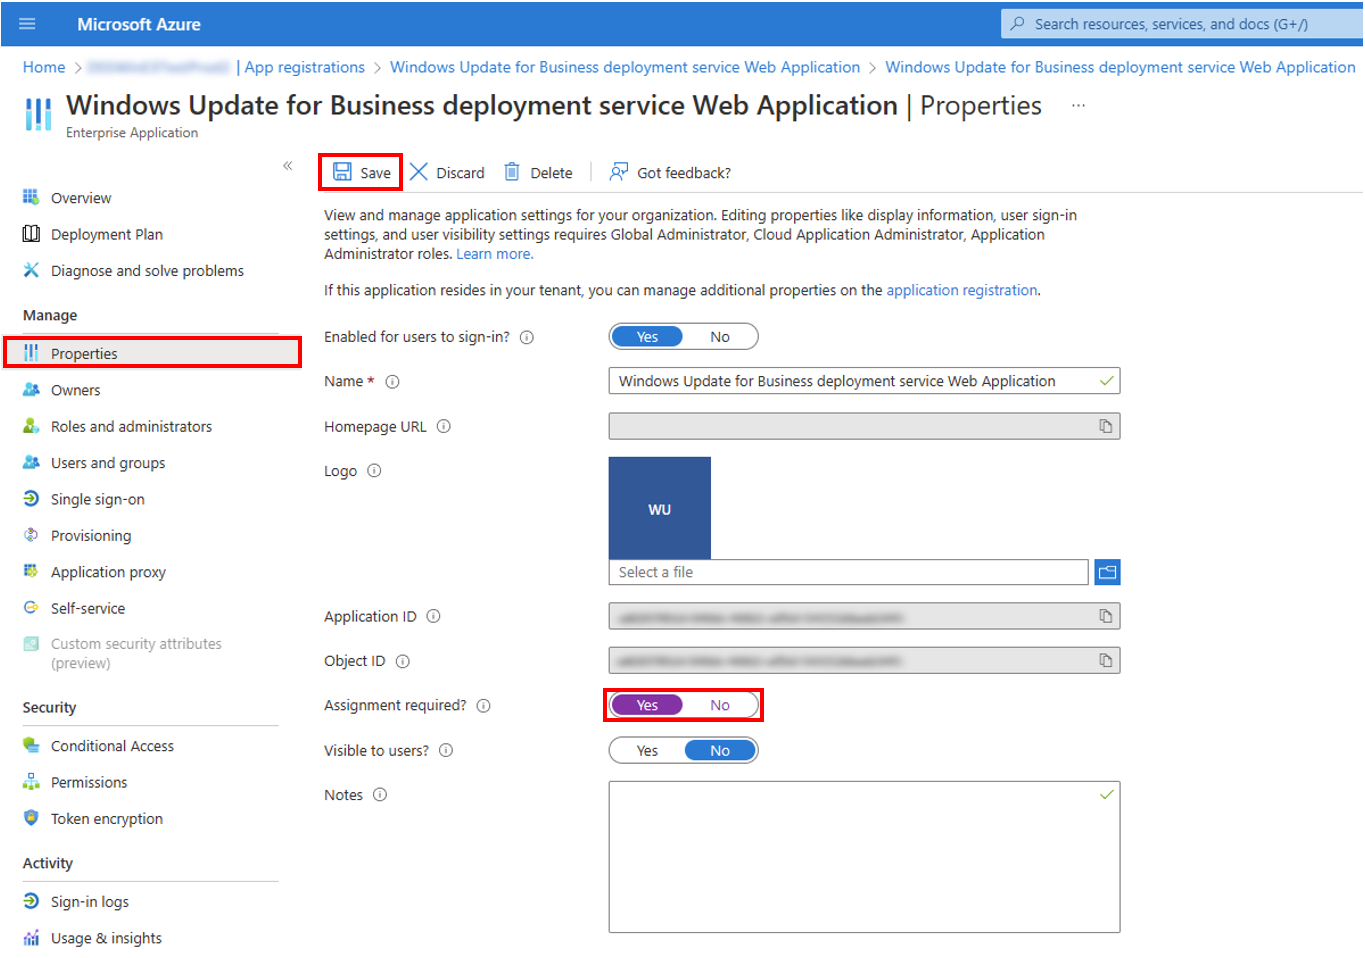
2. Under manage, select Properties, select Yes next to Assignment required, and save.
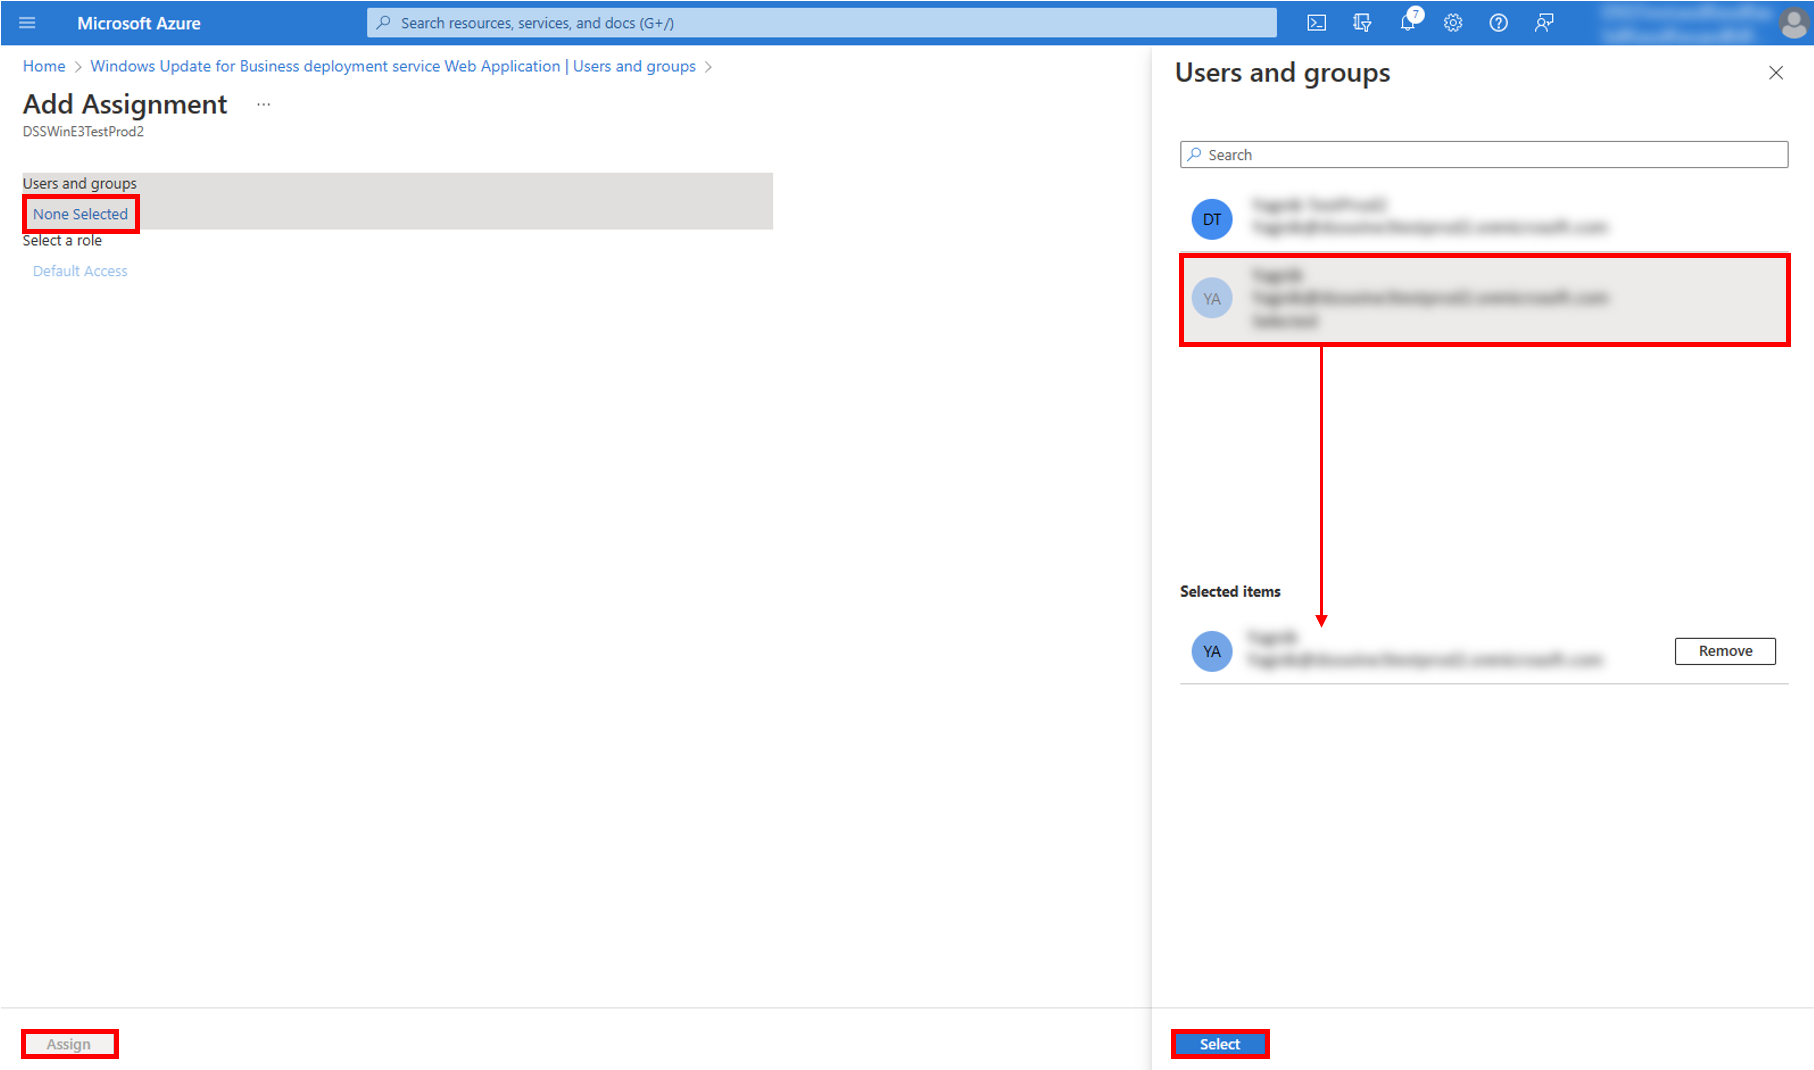
3. Under manage, select Users and groups > Add user/group
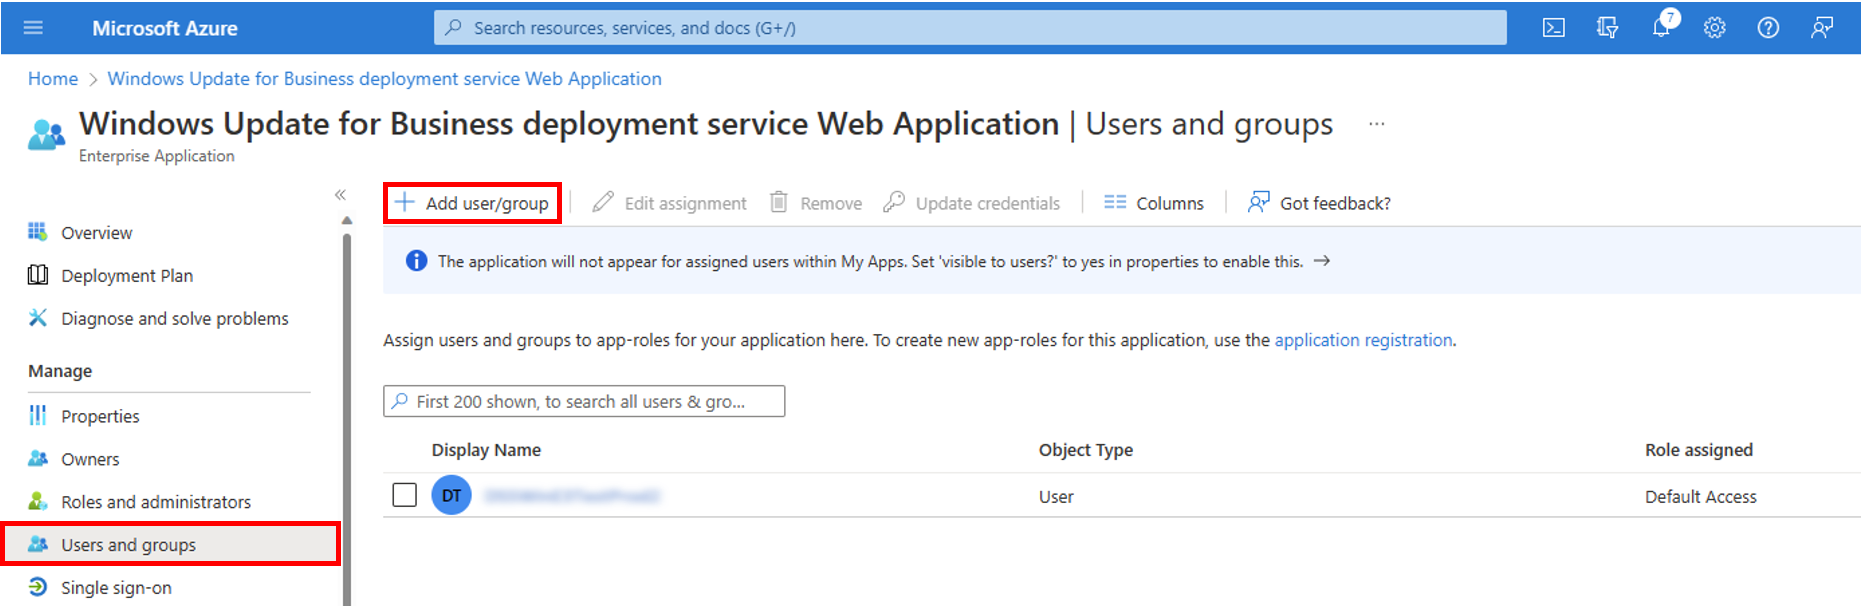
4. Select None Selected > select users for access to the Web Application (users should have either Intune Admin role or Global Admin role which can be set in Azure AD) > users will be added to the Selected Items > Select Select > Select Assign
## Installing and Running the Web Application
This section covers modifying the Web Application to use your application (client) ID and Directory (tenant) ID, how to install the Web Application, and then how to run it.
1. Download this code repo as a ZIP file
2. Extract ZIP
3. Open root folder in your code editor (e.g. Visual Studio Code)
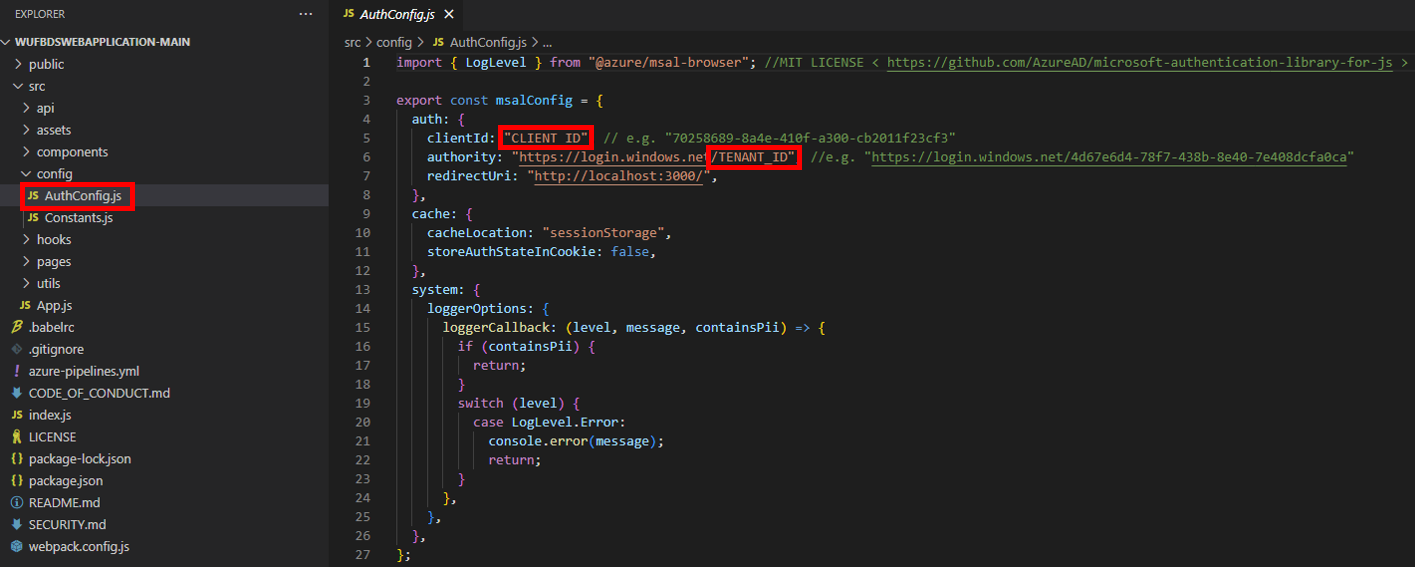
3. Navigate to src > config > and open authConfig.js. Replace placeholders under msalConfig with your Application (client) Id and Directory (tenant) Id from your Azure App Registration
4. Open terminal and navigate to your root folder (if using VS Code, you can do this by easily clicking View > Terminal in the top-left menu bar)
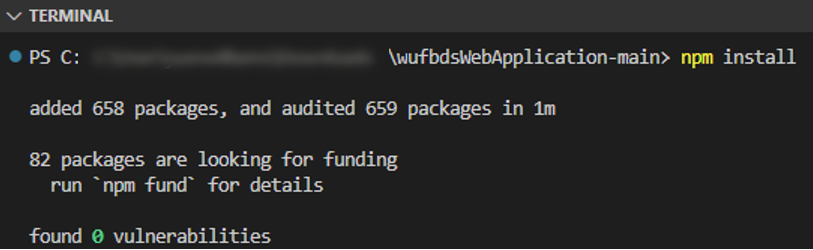
5. Once in terminal, run `npm install`.
6. Once install is completed, run `npm start`.
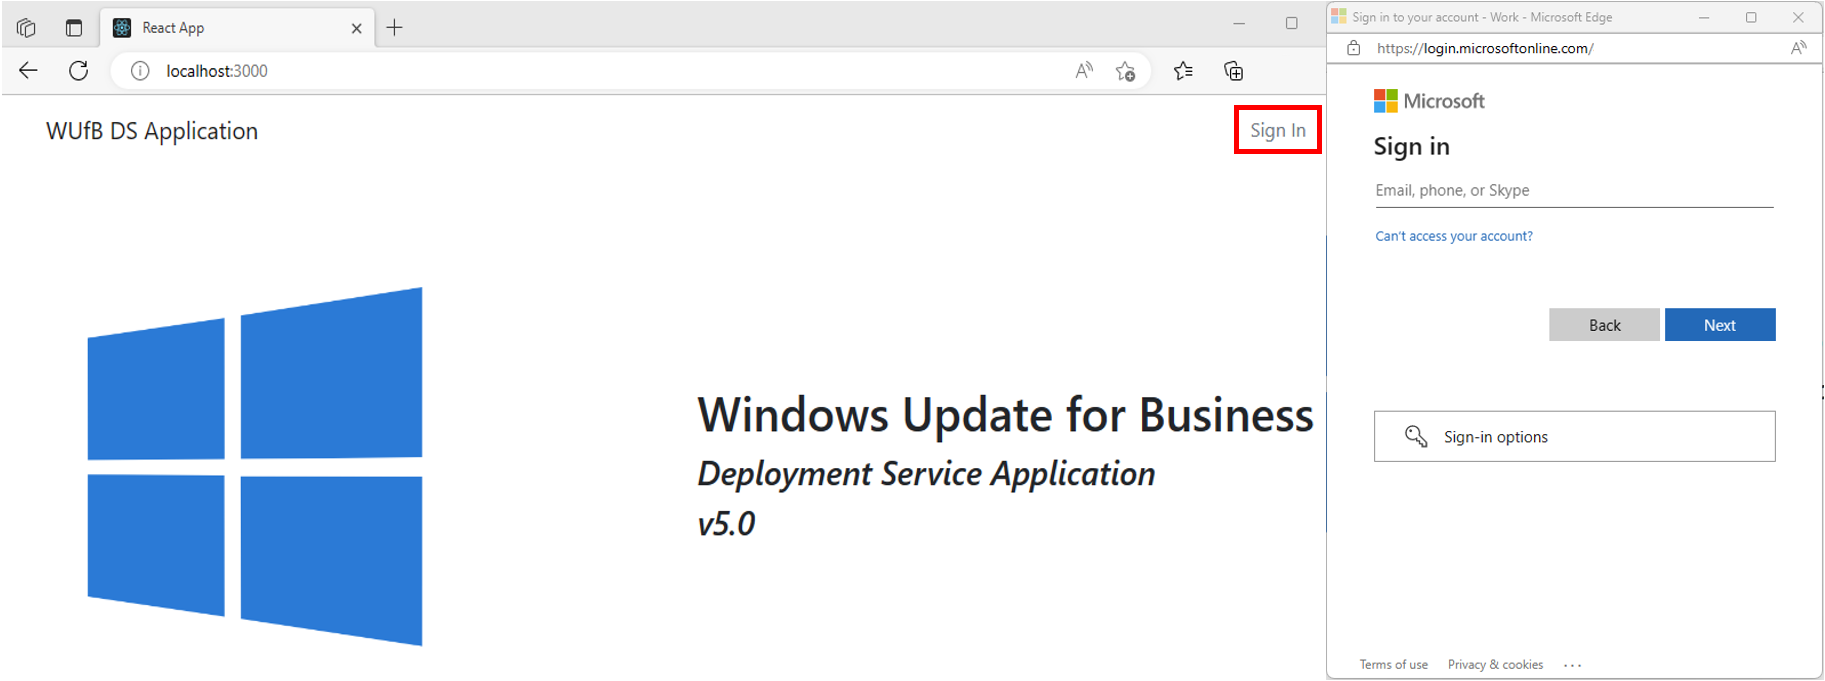
7. An Edge window will automatically open to http://localhost:3000. Sign In to begin using the web app
*After this initial onboarding, simply navigate to your root folder and run `npm start` to use the app*
## How To Use the the Web Application
This section walks through using the web application to manage driver updates along with some insights on how it is integrating with our API. It will provide an explanation of some of the terminology and nuanced behavior going on behind the scenes.
### Sign In
The Windows Update for Business deployment service Web Application loads into a browser at URL localhost:3000. At the top right, select Sign in and provide credentials for a user that has been granted access to the web application.
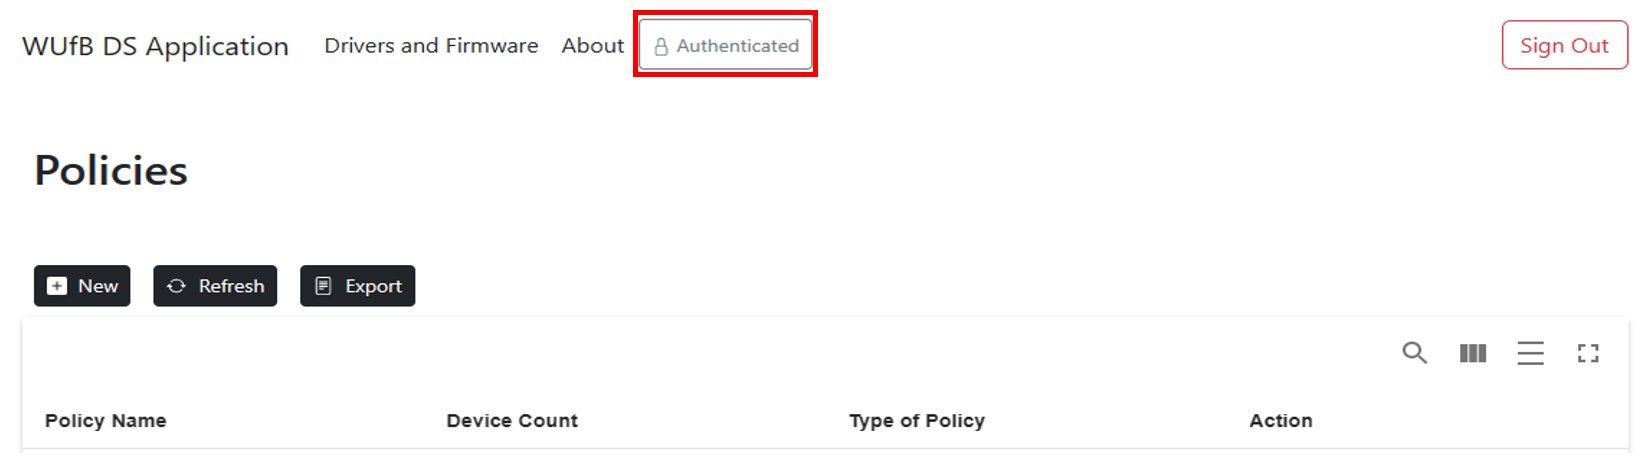
On the Polices page, you can verify that that the credentials have been authenticated and the user has access to utilize the Microsoft Graph API.
### Create a driver update policy
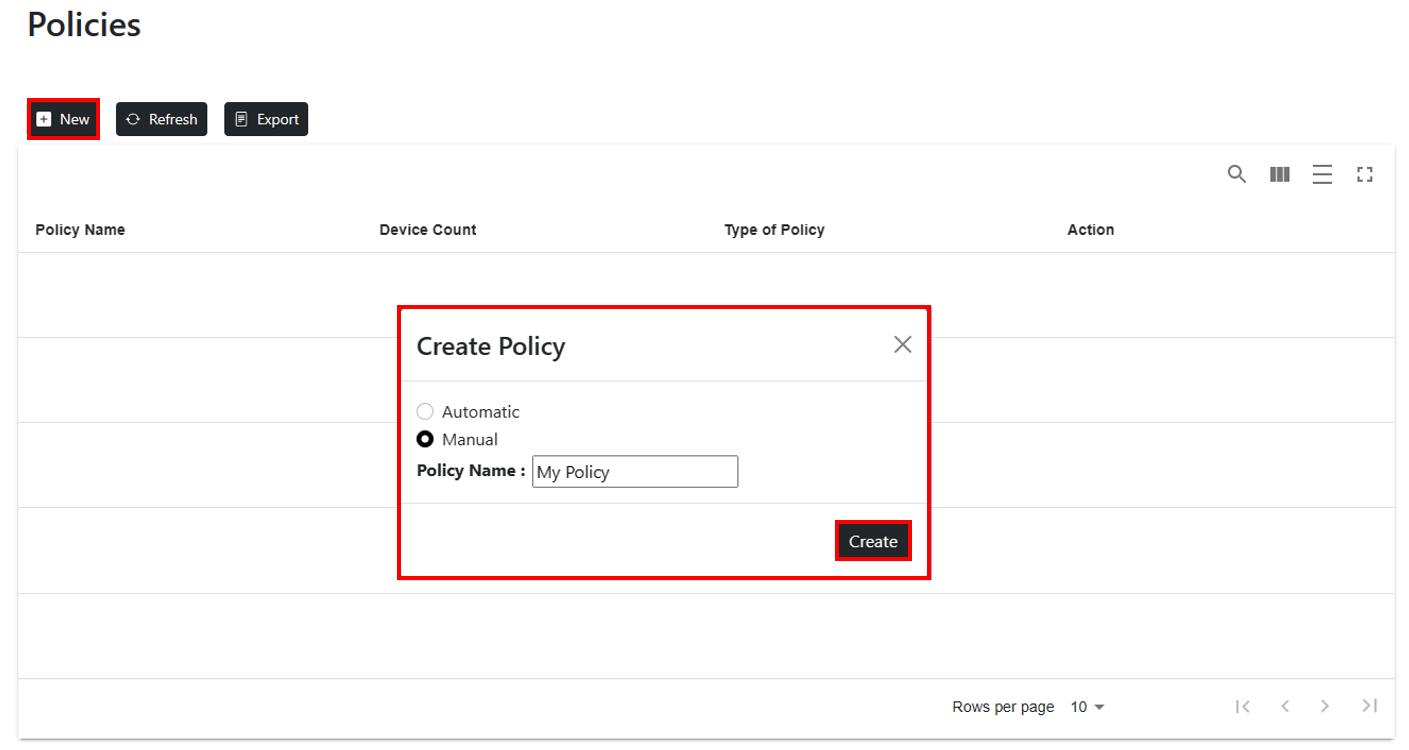
To create a driver policy, select New. A Create Policy modal will appear allowing you to create an Automatic or Manual policy. Enter a friendly name for the policy and select Create. Friendly names are stored in the browser cache on the device where the policy was created. The policy Id GUID will be shown instead of the friendly name if the Web Application is accessed on another device or the browser cache is cleared. During policy creation, the web application first creates a deployment audience and then creates the update policy with the newly created deployment audience assigned to the policy.
- Manual policy - All driver updates require manual approval.
- Automatic policy - Recommended drivers are automatically approved.
> **Note**
> **A recommended driver means that it is the highest ranking driver that was published as Automatic**
### Adding Devices to a policy and enrolling them driver management
At the top of the modal, the Policy's friendly name is displayed and right below that is the Policy Id created in the previous step. Devices can be added to a policy either with Batch Add or Single Device. The deployment audience is updated with the Azure Active Directory device Id of each device, a window will appear at the top right of the screen notifying users that the deployment audience was updated successfully or it will return an error if the request was not successful. Once the device is added to the deployment audience it will be added to the list of devices under Device ID near the bottom of the modal. Select close at the bottom right of the modal once all devices have been added to the policy.
When devices are added to a driver policy for the first time, the web application automatically calls the enrollment API to enroll that device in the service for driver management. We have documented [explicit enrollment](https://learn.microsoft.com/en-us/graph/windowsupdates-manage-driver-update#step-1:enroll-devices-in-driver-management) but the web application performs this implicitly today. We recommend using explicit enrollment for implementing enrollment capabilities with our API.
- Batch Add: A CSV file (formatting requirements are documented in the about section of the web application for easy reference) with up to 200 devices can be used by selecting Choose File > select the CSV file > select Add. Create multiple files if more than 200 devices need to be added. A refresh is required after large batch device adds to accurately portray devices and device counts.
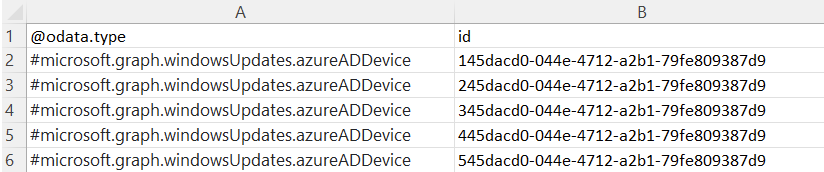
**Formatting Requirements:**
- All fields need to be included: @odata.type, id, #microsoft.graph.windowsUpdates.azureADDevice
- Add Azure AD device Ids - all values are case sensitive
- Save file as CSV - only CSV files can be uploaded for batch changes
- Limit each CSV to less than 200 devices - create multiple files if needed
> **Note**
> **Adding or removing up to 200 devices at a time with batch is an illustration of how to utilize the API and not a limitation**
- Single Device: Individual devices can be added one at a time by entering the Azure Active Directory device Id and selecting Add.
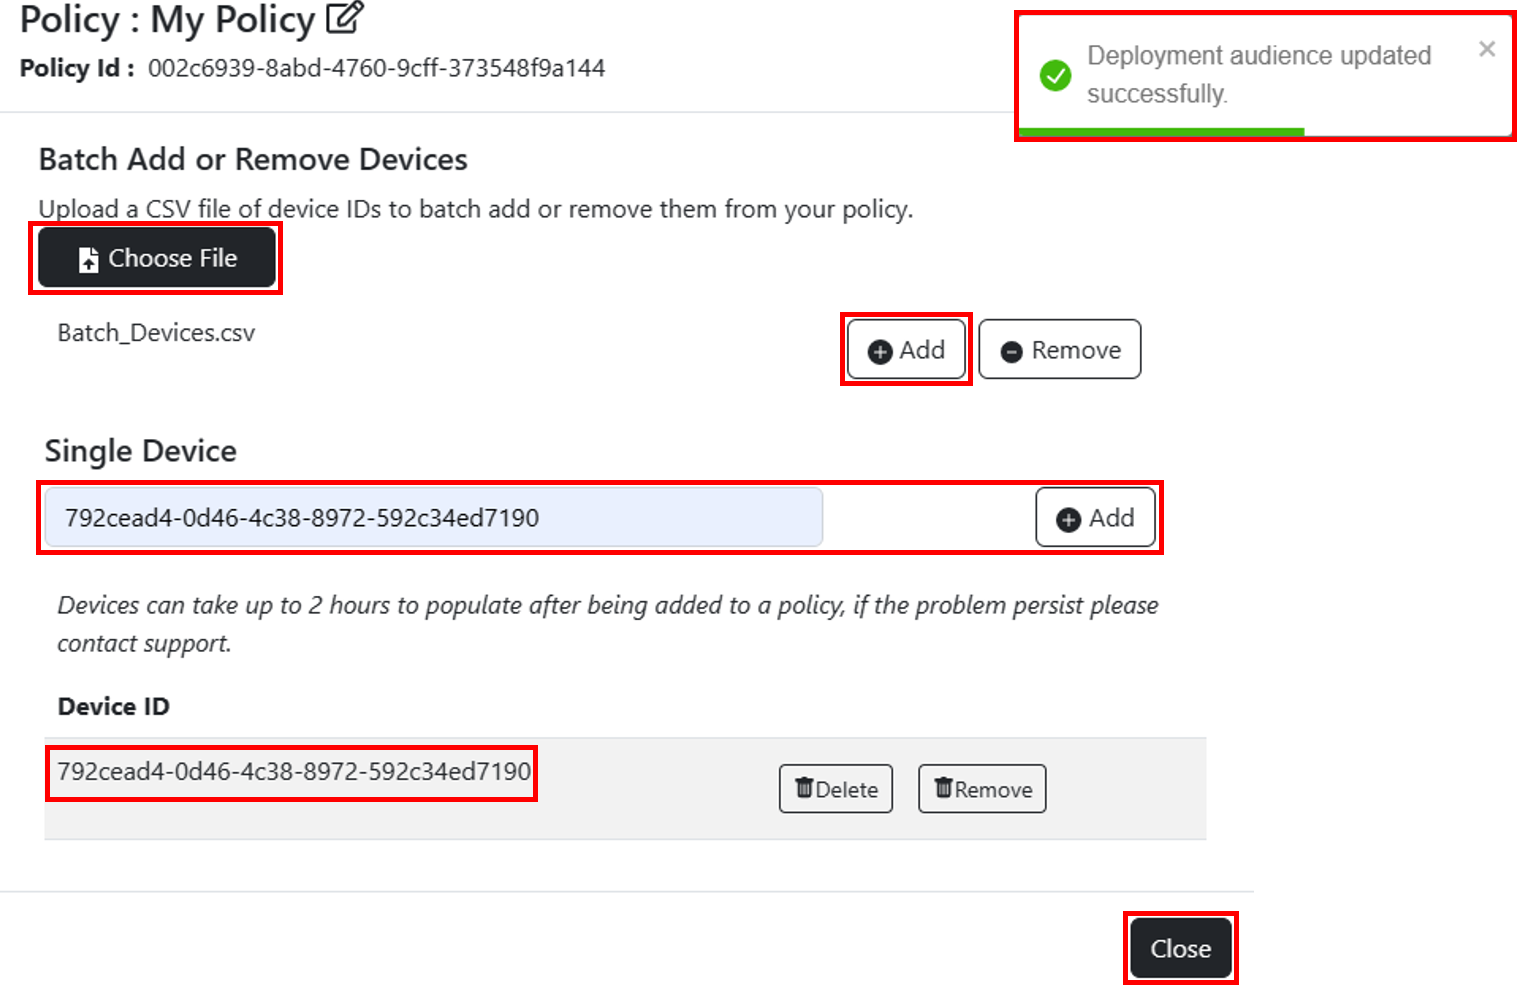
> **Note**
> **Devices can take up to 2 hours to populate after being added to a policy**
### Browse driver content
From the Policies page, the web application shows the Policy Name, Device Count, and the Type of Policy that was created. To edit the Policy name or add/remove devices, select Edit under the Action column. Once devices are added to the policies deployment audience, the Windows Update for Business deployment service will start collecting scan results from Windows Update to build a catalog of applicable drivers to be browsed, approved, and scheduled for deployment. To browse drivers that are available for the devices in a policy, select View.
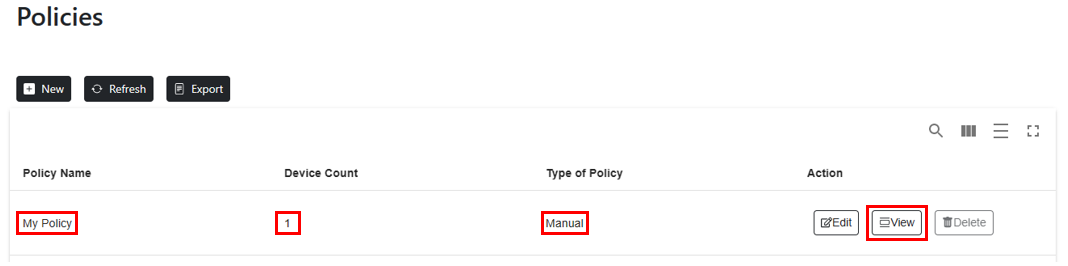
Drivers are displayed in two different tabs, Recommended Updates and Other Updates. Only drivers that are better than what is currently installed on devices in the policy will be cataloged to browse. The web application shows the Update Name of the driver, its Release Date, the number devices in the policy that the driver is applicable for, and the Driver Class.
- Recommended Updates: Only the highest ranking drivers that are published as Automatic will be shown in the Recommended Updates tab. Microsoft recommends that content only be approved for drivers in the recommended tab unless you have a good reason to approve a driver in the Other Updates tab. See the Drivers 101 content at [aka.ms/drivers-as-a-service](https://aka.ms/drivers-as-a-service) for more information about driver publishing. Automatic policies automatically approve all drivers from the Recommended Updates tab.
- Other Updates: All lower ranking drivers that are published as Automatic and all drivers that are published as manual will be cataloged in the Other Updates tab.
>**Note**
> **The Other Updates tab is grayed out in an Automatic Policy. To make approvals on drivers in the Other Updates tab a manual policy is required.**
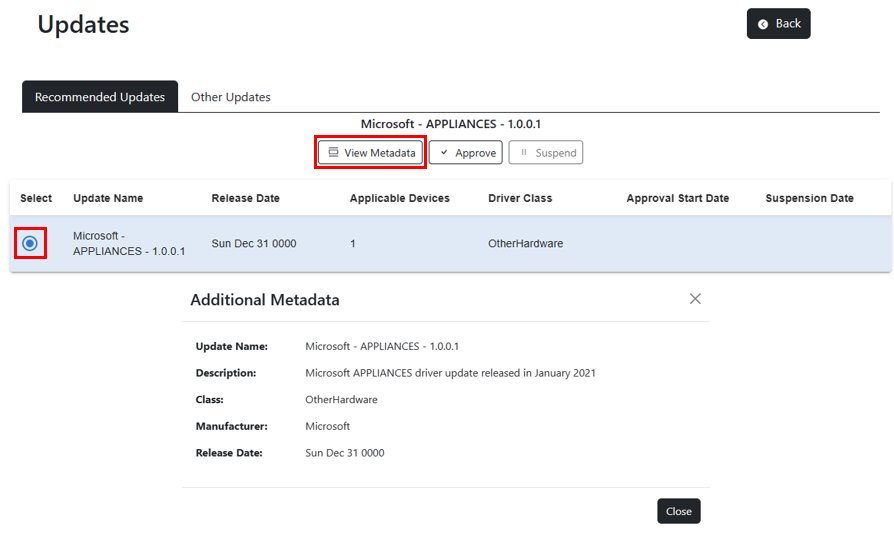
To see more information about each driver, select the driver and then select View MetaData. This modal provides additional information provided by the drivers publisher, including driver Description and Manufacturer.
### Approving a driver update
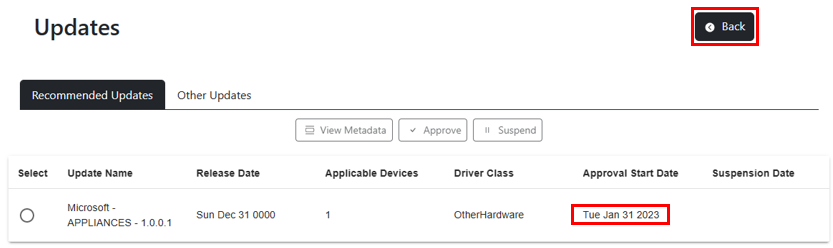
Select a driver to approve and then select Approve. In the Approval Settings modal, enter the date you want the service to start offering the driver to devices and then select Submit Approval. Drivers approved in the Recommended Updates tab will only be offered to devices where the driver is seen as recommended. Drivers approved from the Other Updates tab will be offered to any applicable device in the policy and be auto promoted so devices will automatically install the update when the driver is offered.

Drivers that have been approved will show the Approval Start Date in the Updates page for as long as there are devices in the policy that the driver is applicable for. Once all applicable devices have received the driver update, the approval will no longer be visible in either Updates tab. A record of all content approvals is kept in the complianceChanges document for the driver policy. For easy navigation back to the Policies page, select the back button.
### Suspending a driver approval
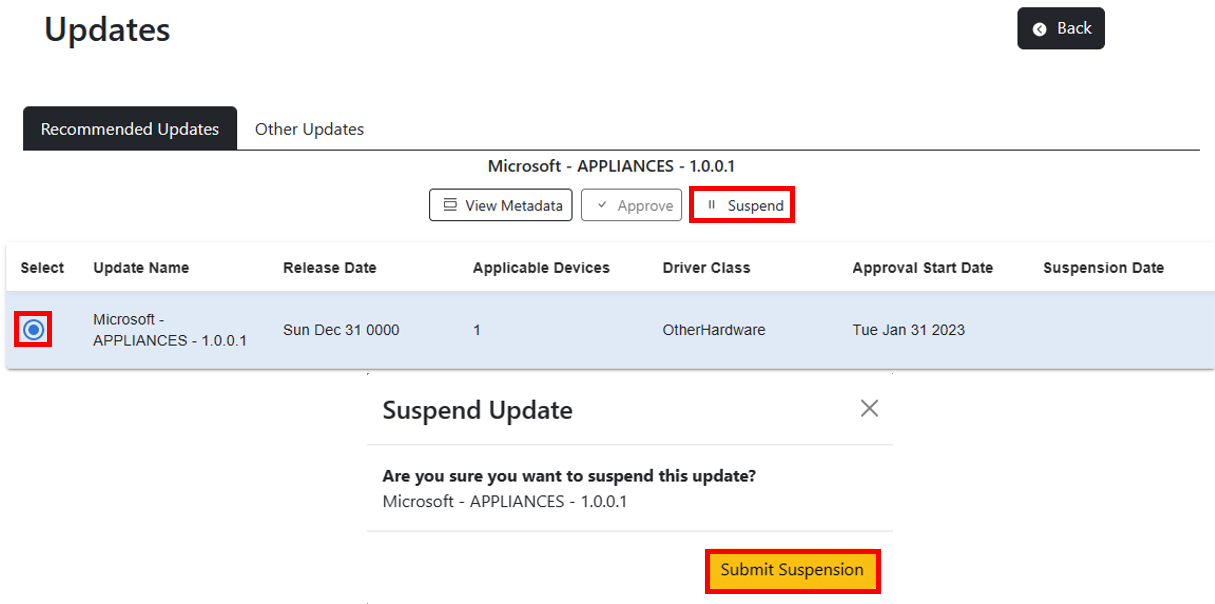
While a deployment is in progress, you can prevent the content from being offered to devices if they haven't already received the update by suspending the approval. Select the driver you want to suspect, then select Suspend. In the Suspend Update modal, confirm the suspension by selecting Submit Suspension. The web application is setting the the [isRevoked](https://learn.microsoft.com/en-us/graph/windowsupdates-manage-driver-update#during-a-driver-deployment) property to true in the content approval. This is the auditable way to pause a deployment and will automatically populate the revokedBy and revokedDateTime properties. To resume offering the content, a new approval will need to be created.
### Deleting devices from a Policy and Unenrolling devices from driver management
Select Edit from the Policies page to make changes to the devices. Selecting Delete next to a Device ID will remove that device from the policy, the deployment audience associated to that policy, and any deployments created for that device in the policy. This will not impact any other policy the device is a member of. Selecting Remove will unenroll the device from driver management in the service. The device is no longer managed by the deployment service and may start receiving other updates from Windows Update based on its policy configuration. The unenrolled device is removed from **all** audiences and deployments that contains driver content. The device remains registered with the service and is still enrolled and receiving content for other update categories (if applicable).
### Trademarks
Trademarks This project may contain trademarks or logos for projects, products, or services. Authorized use of Microsoft trademarks or logos is subject to and must follow [Microsoft’s Trademark & Brand Guidelines](https://www.microsoft.com/en-us/legal/intellectualproperty/trademarks/usage/general). Use of Microsoft trademarks or logos in modified versions of this project must not cause confusion or imply Microsoft sponsorship. Any use of third-party trademarks or logos are subject to those third-party’s policies.