Ecosyste.ms: Awesome
An open API service indexing awesome lists of open source software.
https://github.com/watson-developer-cloud/swift-sdk
:iphone: The Watson Swift SDK enables developers to quickly add Watson Cognitive Computing services to their Swift applications.
https://github.com/watson-developer-cloud/swift-sdk
hacktoberfest ibm-watson-services ibm-watson-speech swift-4
Last synced: 2 months ago
JSON representation
:iphone: The Watson Swift SDK enables developers to quickly add Watson Cognitive Computing services to their Swift applications.
- Host: GitHub
- URL: https://github.com/watson-developer-cloud/swift-sdk
- Owner: watson-developer-cloud
- License: apache-2.0
- Created: 2015-09-22T13:07:37.000Z (almost 9 years ago)
- Default Branch: master
- Last Pushed: 2023-12-05T13:27:41.000Z (7 months ago)
- Last Synced: 2024-04-08T17:20:45.796Z (3 months ago)
- Topics: hacktoberfest, ibm-watson-services, ibm-watson-speech, swift-4
- Language: Swift
- Homepage: https://watson-developer-cloud.github.io/swift-sdk/
- Size: 152 MB
- Stars: 879
- Watchers: 66
- Forks: 224
- Open Issues: 3
-
Metadata Files:
- Readme: README.md
- Changelog: CHANGELOG.md
- Contributing: .github/CONTRIBUTING.md
- License: LICENSE
- Code of conduct: .github/CODE_OF_CONDUCT.md
Lists
- awesome-ibmcloud - swift-sdk - 📱 The Watson Swift SDK enables developers to quickly add Watson Cognitive Computing services to their Swift applications. (Data & AI)
- awesome-stars - watson-developer-cloud/swift-sdk - :iphone: The Watson Swift SDK enables developers to quickly add Watson Cognitive Computing services to their Swift applications. (Swift)
- awesome-stars - watson-developer-cloud/swift-sdk - :iphone: The Watson Swift SDK enables developers to quickly add Watson Cognitive Computing services to their Swift applications. (Swift)
README
# Watson Developer Cloud Swift SDK
[](https://github.com/watson-developer-cloud/swift-sdk/actions/workflows/build-test.yml)
[](https://github.com/watson-developer-cloud/swift-sdk/actions/workflows/deploy.yml)

[](https://github.com/Carthage/Carthage)
[](http://watson-developer-cloud.github.io/swift-sdk)
[](https://cla-assistant.io/watson-developer-cloud/swift-sdk)
[](http://wdc-slack-inviter.mybluemix.net/)
## Deprecated builds
[](https://travis-ci.org/watson-developer-cloud/swift-sdk)
## Overview
The Watson Developer Cloud Swift SDK makes it easy for mobile developers to build Watson-powered applications. With the Swift SDK you can leverage the power of Watson's advanced artificial intelligence, machine learning, and deep learning techniques to understand unstructured data and engage with mobile users in new ways.
There are many resources to help you build your first cognitive application with the Swift SDK:
- Review a [Featured Project](#featured-projects)
- Browse the [Documentation](https://watson-developer-cloud.github.io/swift-sdk/)
### Services
This SDK provides classes and methods to access the following Watson services.
- [Assistant](https://www.ibm.com/cloud/watson-assistant/)
- [Discovery](https://www.ibm.com/cloud/watson-discovery)
- [Language Translator V3](https://www.ibm.com/watson/services/language-translator)
- [Natural Language Understanding](https://www.ibm.com/cloud/watson-natural-language-understanding)
- [Speech to Text](https://www.ibm.com/cloud/watson-speech-to-text)
- [Text to Speech](https://www.ibm.com/cloud/watson-text-to-speech)
## Announcements
### Tone Analyzer Deprecation
As of this major release, 5.0.0, the Tone Analyzer api has been removed in preparation for deprecation. If you wish to continue using this sdk to make calls to Tone Analyzer until its final deprecation, you will have to use a previous version.
On 24 February 2022, IBM announced the deprecation of the Tone Analyzer service. The service will no longer be available as of 24 February 2023. As of 24 February 2022, you will not be able to create new instances. Existing instances will be supported until 24 February 2023.
As an alternative, we encourage you to consider migrating to the Natural Language Understanding service on IBM Cloud. With Natural Language Understanding, tone analysis is done by using a pre-built classifications model, which provides an easy way to detect language tones in written text. For more information, see [Migrating from Watson Tone Analyzer Customer Engagement endpoint to Natural Language Understanding](https://cloud.ibm.com/docs/natural-language-understanding?topic=natural-language-understanding-tone_analytics).
### Natural Language Classifier Deprecation
As of this major release, 5.0.0, the NLC api has been removed in preparation for deprecation. If you wish to continue using this sdk to make calls to NLC until its final deprecation, you will have to use a previous version.
On 9 August 2021, IBM announced the deprecation of the Natural Language Classifier service. The service will no longer be available from 8 August 2022. As of 9 September 2021, you will not be able to create new instances. Existing instances will be supported until 8 August 2022. Any instance that still exists on that date will be deleted.
As an alternative, we encourage you to consider migrating to the Natural Language Understanding service on IBM Cloud that uses deep learning to extract data and insights from text such as keywords, categories, sentiment, emotion, and syntax, along with advanced multi-label text classification capabilities, to provide even richer insights for your business or industry. For more information, see [Migrating to Natural Language Understanding](https://cloud.ibm.com/docs/natural-language-classifier?topic=natural-language-classifier-migrating).
## Before you begin
- You need an [IBM Cloud][ibm-cloud-onboarding] account.
## Requirements
- Xcode 10.2+
- Swift 5.0+
- iOS 10.0+
## Installation
The IBM Watson Swift SDK can be installed with [Swift Package Manager](https://swift.org/package-manager/), [Cocoapods](http://cocoapods.org/), or [Carthage](https://github.com/Carthage/Carthage).
### Swift Package Manager
New in version 4.0.2, the Watson Developer Cloud Swift SDK now supports all services through Swift Package Manager.
On the XCode menu bar at the top of your screen click `File -> Swift Packages -> Add Package Dependencies`, follow the prompts by pasting the github url `https://github.com/watson-developer-cloud/swift-sdk` and using the most recent major version if appropriate. Make sure to only click on the services you plan on using otherwise you may face long build times
To import a service into your project:
```swift
import AssistantV2
import DiscoveryV2
.
.
.
```
**(Speech To Text and Text To Speech only)**
The use of the `libogg` and `opus` libraries by these services requires extra steps to be taken BEFORE the package is installed.
1. You will need [Homebrew](http://brew.sh/) installed
2. Install `libogg` and `opus`
```bash
$ brew install libogg opus
```
3. Packaged dynamic libraries must be removed according to current library versions.
libogg version as of writing: 1.3.4.
opus version as of writing: 1.3.1
```bash
$ rm -f /usr/local/Cellar/libogg/1.3.4/lib/*.dylib
```
```bash
$ rm -f /usr/local/Cellar/opus/1.3.1/lib/*.dylib
```
4. The static libraries installed must be replaced with libraries compiled for multiple architectures. These libraries can be downloaded from this github repo for libogg [here](https://github.com/watson-developer-cloud/swift-sdk/blob/master/Sources/SupportingFiles/Dependencies/Libraries/libogg.a) and opus [here](https://github.com/watson-developer-cloud/swift-sdk/blob/master/Sources/SupportingFiles/Dependencies/Libraries/libopus.a)
5. Replace the currently installed `libogg` and `libopus` libraries
```bash
rm -f /usr/local/Cellar/libogg/1.3.4/lib/libogg.a && cp ~/Downloads/libogg.a /usr/local/Cellar/libogg/1.3.4/lib
```
```bash
rm -f /usr/local/Cellar/opus/1.3.1/lib/libopus.a && cp ~/Downloads/libopus.a /usr/local/Cellar/opus/1.3.1/lib
```
6. If you run into any build errors or imported the package before performing the above steps, the project may need to be reindexed. Remove the `WatsonDeveloperCloud` package from your XCode project file under `Swift Packages`; then, from the XCode menu bar on the top of the screen click `Product -> Clean Build Folder` and lastly reinstall the package.
7. You're ready to go!
### Cocoapods
You can install Cocoapods with [RubyGems](https://rubygems.org/):
```bash
$ sudo gem install cocoapods
```
If your project does not yet have a Podfile, use the `pod init` command in the root directory of your project. To install the Swift SDK using Cocoapods, add the services you will be using to your Podfile as demonstrated below (substituting `MyApp` with the name of your app). The example below shows all of the currently available services; your Podfile should only include the services that your app will use.
```ruby
use_frameworks!
target 'MyApp' do
pod 'IBMWatsonAssistantV1', '~> 5.0.0'
pod 'IBMWatsonAssistantV2', '~> 5.0.0'
pod 'IBMWatsonDiscoveryV1', '~> 5.0.0'
pod 'IBMWatsonLanguageTranslatorV3', '~> 5.0.0'
pod 'IBMWatsonNaturalLanguageUnderstandingV1', '~> 5.0.0'
pod 'IBMWatsonSpeechToTextV1', '~> 5.0.0'
pod 'IBMWatsonTextToSpeechV1', '~> 5.0.0'
end
```
Run the `pod install` command, and open the generated `.xcworkspace` file. To update to newer releases, use `pod update`.
When importing the frameworks in source files, exclude the `IBMWatson` prefix and the version suffix. For example, after installing `IBMWatsonAssistantV1`, import it in your source files as `import Assistant`.
For more information on using Cocoapods, refer to the [Cocoapods Guides](https://guides.cocoapods.org/using/index.html).
### Carthage
**NOTE**: The release of Apple's new M1 chip has caused issues in Carthage for XCode versions 11+. For the foreseeable future, we are unable to support XCode 11 through Carthage. We would recommend installing through Swift Package Manager (preferable) or upgrading to XCode 12 (where there is a workaround).
**NOTE**: Our frameworks cannot currently be run on the new Apple Silicon Macs through Carthage. Again, we recommend the use of Swift Package Manager instead.
You can install Carthage with [Homebrew](http://brew.sh/):
```bash
$ brew update
$ brew install carthage
```
If your project does not have a Cartfile yet, use the `touch Cartfile` command in the root directory of your project. To install the IBM Watson Swift SDK using Carthage, add the following to your Cartfile.
```
github "watson-developer-cloud/swift-sdk" ~> 5.0.0
```
Follow the remaining Carthage installation instructions for the XCode 12 workaround [here](https://github.com/Carthage/Carthage/blob/master/Documentation/Xcode12Workaround.md#how-to-make-it-work). Then run the following command to build the dependencies and frameworks:
```bash
$ carthage.sh bootstrap --platform iOS
```
Note that the above command will download and build all of the services in the IBM Watson Swift SDK and does take awhile.
Follow the next steps to link the frameworks to your XCode project:
1. Make sure to drag-and-drop the built frameworks (only for the services your app requires) into your app target under `General -> Frameworks, Libraries, and Embedded Content` (XCode <= 10.x: `General -> Linked Frameworks and Libraries` ) and import them in the source files that require them. You will find the .framework files under `./Carthage/Build/iOS` from your source directory.
2. The following frameworks need to be added to your app:
`IBMSwiftSDKCore.framework`
Whichever services your app will be using (`AssistantV1.framework`, `DiscoveryV1.framework`, etc.)
(**Speech to Text only**) `Starscream.framework`. Be sure to add this framework to your `input.xcfilelist` and `output.xcfilelist` which will be detailed below
3. XCode 12 only: Under the `Embed` column make sure each framework is set to `Do Not Embed`
4. On your application targets’ Build Phases settings tab, click the + icon and choose New Run Script Phase. Create a Run Script in which you specify your shell (ex: /bin/sh), add the following contents to the script area below the shell:
```
/usr/local/bin/carthage copy-frameworks
```
5. Create a file named `input.xcfilelist` and a file named `output.xcfilelist`
6. Add the paths to the frameworks you want to use to your `input.xcfilelist`. For example:
```
$(SRCROOT)/Carthage/Build/iOS/IBMSwiftSDKCore.framework
$(SRCROOT)/Carthage/Build/iOS/DiscoveryV1.framework
```
7. Add the paths to the copied frameworks to the `output.xcfilelist`. For example:
```
$(BUILT_PRODUCTS_DIR)/$(FRAMEWORKS_FOLDER_PATH)/IBMSwiftSDKCore.framework
$(BUILT_PRODUCTS_DIR)/$(FRAMEWORKS_FOLDER_PATH)/DiscoveryV1.framework
```
With output files specified alongside the input files, XCode only needs to run the script when the input files have changed or the output files are missing. This means dirty builds will be faster when you haven't rebuilt frameworks with Carthage.
8. Add the path to `input.xcfilelist` to the "Input File Lists" section of the Carthage run script phase. This will usually be `$(SRCROOT)/input.xcfilelist`
9. Add the path to `output.xcfilelist` to the "Output File Lists" section of the Carthage run script phase. This will usually be `$(SRCROOT)/output.xcfilelist`
If your app fails to build because it is built with a different version of Swift than the downloaded SDK, then re-run the `carthage.sh bootstrap` command with the `--no-use-binaries` flag added.
## Authentication
In order to use an IBM Watson service in a Swift application, you will need to authenticate. The following describes the typical path you need to take to do so.
### Step 1: Getting credentials
Credentials to use an IBM Watson service are obtained via IBM Cloud. You will need an active account and a service instance for the service that you wish to use prior to authenticating in your Swift app.
You can access the service credentials for your instance by taking the following steps:
1. Go to the IBM Cloud [Dashboard](https://cloud.ibm.com/) page.
1. Either click an existing Watson service instance in your [resource list](https://cloud.ibm.com/resources) or click [**Create resource > AI**](https://cloud.ibm.com/catalog?category=ai) and create a service instance.
1. Click on the **Manage** item in the left nav bar of your service instance.
On this page, you will see your credentials to use in the SDK to access your service instance.
### Step 2: Authenticating in Code
The Watson Swift SDK manages authentication using an `Authenticator` class. There are multiple types of Authenticators depending on your preferred method.
#### WatsonIAMAuthenticator (most common)
The `WatsonIAMAuthenticator` allows you to authenticate with using an IAM API key. This is the most common form of authentication within IBM Cloud. The `WatsonIAMAuthenticator` requires an `apikey` string in its initialization method.
Example:
```swift
let authenticator = WatsonIAMAuthenticator(apiKey: "{apikey}")
let assistant = Assistant(version: "{version}", authenticator: authenticator)
...
```
#### WatsonBearerTokenAuthenticator
You may want to provide a bearer token to authenticate with a service. On IBM Cloud this would be done using the IAM service to generate a token based on your service credentials. On Cloud Pak for Data this would be available within an individual service instance.
To authenticate in a Swift app using an access token, you can use the `WatsonBearerTokenAuthenticator`, and provide the token.
Example:
```swift
let authenticator = WatsonBearerTokenAuthenticator(bearerToken: "{token}")
let assistant = Assistant(version: "{version}", authenticator: authenticator)
...
```
#### WatsonCloudPakForDataAuthenticator
If you are using IBM Cloud Pak for Data (CP4D) instead of the public IBM Cloud, you can use the `WatsonCloudPakForDataAuthenticator` to authenticate with your CP4D cluster. As opposed to `WatsonBearerTokenAuthenticator` which accepts a bearer token, the `WatsonCloudPakForDataAuthenticator` accepts the username and password for the CP4D cluster itself.
Example:
```swift
let authenticator = WatsonCloudPakForDataAuthenticator(username: "{username}", password: "{password}", url: "https://{cpd_cluster_host}{:port}")
let assistant = Assistant(version: "{version}", authenticator: authenticator)
...
```
#### Detecting authentication from environment variables
The SDK can extract service credentails from the environment, e.g. the VCAP_SERVICES environment variable, or a local credentials file.
To use credentials stored in a local file, go to the Manage tab of your service instance on IBM Cloud, and click on the button to download the credentials. The file will be called `ibm-credentials.env`. Add this file to a location that is accessible from your project. For iOS apps, make sure to add it to the application target.
```swift
let assistant = Assistant(version: "your-version") // by calling the init method without an authenticator, the SDK will search for environment variables
...
```
If your project is using multiple Watson services, you can merge the contents of the `ibm-credentials.env` files into a single file. Lines in the file can be added, deleted, or reordered, but the content of each line must not be changed.
#### Further info on authentication methods
To see further details and additional, but less common, forms of authentication, see the [IBM Swift SDK Core code for Authenticator.](https://github.com/IBM/swift-sdk-core/tree/master/Sources/IBMSwiftSDKCore/Authentication)
## Custom Service URLs
You can set a custom service URL by modifying the `serviceURL` property. A custom service URL may be required when running an instance in a particular region or connecting through a proxy.
For example, here is how to connect to a Watson Assistant instance that is hosted in Germany:
```swift
let authenticator = WatsonIAMAuthenticator(apiKey: "{apikey}")
let assistant = Assistant(version: "{version}", authenticator: authenticator)
assistant.serviceURL = "https://api.eu-de.assistant.watson.cloud.ibm.com"
```
## Disable SSL certificate verification
For Watson Cloud Pak for Data (CP4D), you may need to disable SSL hostname verification if you are using self-signed certificates. Each service class has a `disableSSLVerification` method which allows you to do so.
```swift
let authenticator = WatsonCloudPakForDataAuthenticator(username: "{username}", password: "{password}", url: "https://{cpd_cluster_host}{:port}")
let assistant = Assistant(version: "{version}", authenticator: authenticator)
assistant.disableSSLVerification()
```
Note: `disableSSLVerification()` is currently not supported on Linux.
## Obtaining Transaction IDs
When debugging an issue with IBM support, you may be asked to provide a `transaction ID` to help IBM identify an API call that needs to be debugged.
Every SDK call returns a response with a transaction ID in the `X-Global-Transaction-Id` header. Together the service instance region, this ID helps support teams troubleshoot issues from relevant logs.
You can access the header following the pattern below:
```swift
import AssistantV1
let authenticator = WatsonIAMAuthenticator(apiKey: "{apikey}")
let assistant = Assistant(version: "2020-04-01", authenticator: authenticator)
assistant.serviceURL = "{url}"
let input = MessageInput(text: "Hello")
// let's say this request isn't working and you need the transaction ID
assistant.message(workspaceID: "{workspace_id}", input: input) {
response, error in
print(response?.headers["X-Global-Transaction-Id"]!)
...
}
```
However, the transaction ID isn't available when the API doesn't return a response for some reason. In that case, you can set your own transaction ID in the request. For example, replace `` in the following example with a unique transaction ID.
```swift
let authenticator = WatsonIAMAuthenticator(apiKey: "{apikey}")
let assistant = Assistant(version: "2020-04-01", authenticator: authenticator)
assistant.serviceURL = "{url}"
let input = MessageInput(text: "Hello")
assistant.message(workspaceID: "{workspace_id}", input: input, headers: ["X-Global-Transaction-Id": ""]) {
response, error in
print(response?.headers["X-Global-Transaction-Id"]!)
...
}
```
## Custom Headers
There are different headers that can be sent to the Watson services. For example, Watson services log requests and their results for the purpose of improving the services, but you can include the `X-Watson-Learning-Opt-Out` header to opt out of this.
We have exposed a `defaultHeaders` public property in each class to allow users to easily customize their headers:
```swift
let authenticator = WatsonIAMAuthenticator(apiKey: "{apikey}")
let assistant = Assistant(version: "{version}", authenticator: authenticator)
assistant.defaultHeaders = ["X-Watson-Learning-Opt-Out": "true"]
```
Each service method also accepts an optional `headers` parameter which is a dictionary of request headers to be sent with the request.
## Questions
If you have issues with the APIs or have a question about the Watson services, see [Stack Overflow](https://stackoverflow.com/questions/tagged/ibm-watson+swift).
## Featured Projects
We love to highlight cool open-source projects that use this SDK! If you'd like to get your project added to the list, feel free to make an issue linking us to it.
- [Simple Chat (Swift)](https://github.com/watson-developer-cloud/simple-chat-swift)
- [Speech to Text](https://github.com/watson-developer-cloud/speech-to-text-swift)
- [Text to Speech](https://github.com/watson-developer-cloud/text-to-speech-swift)
## Synchronous Execution
By default, the SDK executes all networking operations asynchronously. If your application requires synchronous execution, you can use a `DispatchGroup`. For example:
```swift
let dispatchGroup = DispatchGroup()
dispatchGroup.enter()
assistant.message(workspaceID: workspaceID) { response, error in
if let error = error {
print(error)
}
if let message = response?.result else {
print(message.output.text)
}
dispatchGroup.leave()
}
dispatchGroup.wait(timeout: .distantFuture)
```
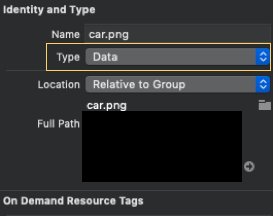
## Handling PNG and CgBI Files in XCode
When working with iOS projects, you may need to add PNG images to your XCode resource bundle. By default, XCode converts PNG files to Apple's [CgBI file format](http://iphonedevwiki.net/index.php/CgBI_file_format) as an optimization step.
### How to bypass CgBI Encoding for Resource Files
In order to bypass CgBI encoding and keep the PNG files in a format that will operate well with Watson services, select the PNG file in XCode, and modify the `Type` attribute to `Data` in the File Inspector.
Ex:
### Future plans for handling CgBI
In the future, we will explore our options to handle conversion between CgBI and PNG within the Swift SDK, but this is currently not available.
## Objective-C Compatibility
Please see [this tutorial](https://watson-developer-cloud.github.io/swift-sdk/docs/objective-c) for more information about consuming the Watson Developer Cloud Swift SDK in an Objective-C application.
## Linux Compatibility
To use the Watson SDK in your Linux project, please follow the [Swift Package Manager instructions.](#swift-package-manager). Note that Speech to Text and Text to Speech are not supported because they rely on frameworks that are unavailable on Linux.
## Contributing
We would love any and all help! If you would like to contribute, please read our [CONTRIBUTING](https://github.com/watson-developer-cloud/swift-sdk/blob/master/.github/CONTRIBUTING.md) documentation with information on getting started.
## License
This library is licensed under Apache 2.0. Full license text is
available in [LICENSE](https://github.com/watson-developer-cloud/swift-sdk/blob/master/LICENSE).
This SDK is intended for use with an Apple iOS product and intended to be used in conjunction with officially licensed Apple development tools.
[ibm-cloud-onboarding]: http://cloud.ibm.com/registration?target=/developer/watson&cm_sp=WatsonPlatform-WatsonServices-_-OnPageNavLink-IBMWatson_SDKs-_-Swift