Ecosyste.ms: Awesome
An open API service indexing awesome lists of open source software.
https://github.com/pharo-iot/PharoThings
Live programming platform for IoT projects based on Pharo
https://github.com/pharo-iot/PharoThings
arduino ide iot-platform live-programming pharo pharothings raspberry-pi telepharo
Last synced: 2 months ago
JSON representation
Live programming platform for IoT projects based on Pharo
- Host: GitHub
- URL: https://github.com/pharo-iot/PharoThings
- Owner: pharo-iot
- License: mit
- Created: 2017-07-31T13:01:06.000Z (almost 7 years ago)
- Default Branch: master
- Last Pushed: 2020-12-16T16:52:31.000Z (over 3 years ago)
- Last Synced: 2024-03-24T13:10:16.172Z (3 months ago)
- Topics: arduino, ide, iot-platform, live-programming, pharo, pharothings, raspberry-pi, telepharo
- Language: Smalltalk
- Homepage:
- Size: 1.08 MB
- Stars: 89
- Watchers: 20
- Forks: 16
- Open Issues: 3
-
Metadata Files:
- Readme: README.md
- License: LICENSE
Lists
- awesome-iot - PharoThings ★ 37 ⧗ 29 - is a Live programming platform for IoT projects based on Pharo. (Platform / Android Things)
- awesome-pharo - PharoThings - Live programming platform for IoT projects based on Pharo. (IOT)
- awesome-iot - PharoThings - Live programming platform for IoT projects based on [Pharo](https://pharo.org/) (a pure object-oriented programming language and a powerful environment, focused on simplicity and immediate feedback). (Table of Contents / Software)
- awesome_iot - PharoThings ★ 37 ⧗ 29 - is a Live programming platform for IoT projects based on Pharo. (Platform / Android Things)
- awesome-iot-master - PharoThings - is a Live programming platform for IoT projects based on Pharo. (Platform / Android Things)
- awesome-iot - PharoThings ★ 37 ⧗ 29 - is a Live programming platform for IoT projects based on Pharo. (Platform / Android Things)
README
# PharoThings
[](https://travis-ci.org/pharo-iot/PharoThings)
Live programming platform for IoT projects based on [Pharo](http://pharo.org).
It includes:
- development tools to lively program, explore and debug remote boards (based on [TelePharo](https://github.com/dionisiydk/TelePharo))
- board modeling library which simplifies board configuration
- Raspberry driven by [WiringPi library](http://wiringpi.com)
- Arduino driven by [Firmata](https://github.com/firmata/arduino), soon
- Beaglebone, soon
Now PharoThings is in beta stage together with documentation and videos. It will be improved constantly.
## PharoThings Booklet
You can access the **PharoThings Booklet** with many examples and lessons from the official repository:
https://github.com/SquareBracketAssociates/Booklet-APharoThingsTutorial
## Installation on Raspberry
1) Download Pharo 6 and install the server part of PharoThings:
```Smalltalk
Metacello new
baseline: 'PharoThings';
repository: 'github://pharo-iot/PharoThings/src';
load: #(RemoteDevServer Raspberry).
```
Then configure image to disable slow browser plugins (instead remote browser will be much slower):
```Smalltalk
ClySystemEnvironmentPlugin disableSlowPlugins
```
At the end save the image.
2) Download ArmVM http://files.pharo.org/vm/pharo-spur32/linux/armv6/latest.zip. It will run Pharo on your board
3) Copy saved image, changes, sources and ArmVM files into your Raspberry (files should be in same directory)
4) Install [WiringPi library](http://wiringpi.com) in Raspberry
If you use the latest desktop version of Raspbian skip this step (WiringPi is included). The Light Raspbian version is required manual installation of WiringPi.
PharoThings uses WiringPi to control Raspberry pins. You need install it in your board. There is a convenient prebuilt package [here](https://github.com/hamishcunningham/wiringpi/tree/master/package/2.13/unstable). Follow [install](https://github.com/hamishcunningham/wiringpi/blob/master/INSTALL) instructions or do it your own way.
You can test the WiringPi library in terminal. More information [here](http://wiringpi.com/the-gpio-utility/)
```
gpio readall
```
If you receive any error, you should update the WiringPi library:
```
cd /tmp
wget https://unicorn.drogon.net/wiringpi-2.46-1.deb
sudo dpkg -i wiringpi-2.46-1.deb
```
5) Start Pharo on Raspberry with the server option:
```bash
pharo --headless Server.image remotePharo --startServerOnPort=40423
```
It will listen for remote IDE connections on port 40423.
You can also prepare an image with a running server. Evaluate the following code in a playground and save the image:
```Smalltalk
TlpRemoteUIManager registerOnPort: 40423
```
In that case command line option --startServerOnPort is not needed. Just start Pharo with --no-quit option:
```bash
pharo --headless Server.image --no-quit
```
## Connecting to the board
Install the client part of PharoThings in the development (client) Pharo image:
```Smalltalk
Metacello new
baseline: 'PharoThings';
repository: 'github://pharo-iot/PharoThings/src';
load: 'RemoteDev'
```
Connect to remote Pharo running on Raspberry using playground:
```Smalltalk
remotePharo := TlpRemoteIDE connectTo: (TCPAddress ip: #[193 51 236 167] port: 40423)
```
Notice that you should know the IP address of your Raspberry and port where running Pharo is waiting for remote IDE connection. In this example we used port 40423.
With the remotePharo instance you can open many different tools to develop and explore remote Pharo images. It is part of [TelePharo project](https://github.com/dionisiydk/TelePharo). Look at it for details.
Here we are using specialized Raspberry tools. They require auto refresh feature of inspector which is not enabled by default in Pharo 6. To activate it evaluate:
```Smalltalk
GTInspector enableStepRefresh
```
## Inspecting the board
To inspect the board you need to know the concrete model of your Raspberry. Currently only model B is supported (with revision 1 and 2). But you can play with the following code on other boards too to get a feeling of this project. In that case pins could point to the wrong physical pins of your board. But tools will not break and will show the same working UI. Also you are always able to work with a board by using the low level library (like WiringPi) using the powerfull remote tools from [TelePharo](https://github.com/dionisiydk/TelePharo).
By the way, the implementation of a specific Raspberry model is very simple task (will be explained later). Feel free to implement support for it and contribute the code to the project.
So for your board model you need to choose an appropriate board class. For Raspberry it will be one of the RpiBoard subclasses.
With the choosen class evaluate the following code to open an inspector:
```Smalltalk
remoteBoard := remotePharo evaluate: [ RpiBoardBRev1 current].
remoteBoard inspect
```
In this case we work with Raspberry model B revision 1.
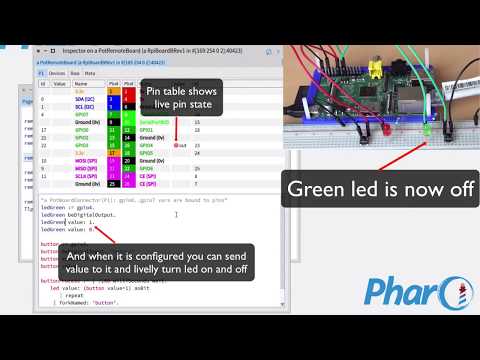
## The board inspector

The board inspector provides a scheme of pins similar to Raspberry Pi docs.
But here it is a live tool which represents the current pins state.
In the picture the board is shown with two configured pins: gpio3 and gpio4 which are connected to physical button and led accordingly.
Digital pins are shown with green/red icons which represent high/low (1/0) values. In case of output pins you are able to click on the icon to toggle the value. Icons are updated according to pin value changes. If you click on physical button on your board the inspector will show the updated pin state by changing its icon color.
The evaluation pane in the bottom of the inspector provides bindings to gpio pins which you can script by #doIt/printIt commands. The example shows expressions which were used to configure a button and led.
For the led we first introduced named variable #led which we assigned to gpio4 pin instance:
```Smalltalk
led := gpio4
```
Then we configured the pin to be in digital output mode and set the value:
```
led beDigitalOutput.
led value: 1
```
It turned the led on.
For button we did the same but with digital input mode and extra resistor configuration:
```Smalltalk
button := gpio3.
button beDigitalInput. "button"
button enablePullDownResister.
```
You can notice that gpio variables are not just numbers/ids. PharoThings models boards with first class pins. They are real objects with behaviour. For example you can ask pin to toggle a value:
```
led toggleDigitalValue
```
Or ask a pin for current value if you want to check it:
```Smalltalk
led value.
button value
```
The following demo shows an inspector in live:
[](https://www.youtube.com/watch?v=0H9of7PQet0)
## The device model
Pin scripting is cool and powerful feature but when you need real logic for your pins it is better to put it in objects.
PharoThings provides simple high level model of devices which you can use to implement complex interaction with your board.
For example with button device you can subscribe on #press/release events:
```Smalltalk
button := board installDevice: (PotButton named: 'button' fromPowerTo: gpio3).
button when: PotButtonReleased send: #toggleDigitalValue to: led.
```
It will connect the physical button to the led as a switch device which turns the led on and off on button click.
Devices incapsulate pin configuration logic. You don't need to configure an input pin manually when you create a button instance. Just install the device and the pin will work.
Notice that in example the physical button is connected to the gpio pin from power. That is why we use "named:fromPowerTo:" selector when we create a button instance. But a button can be connected another way, too. And in that case we would use the selector #named:fromGroundTo:. It is important to create an instance in the same way as it is connected in the real world because otherwise the button will not work. The reason will be explained later. This logic is hidden by PotButton class and users do not need to think about it.
Now to toggle the led we still use a script inside inspector. We can replace it with another device PotSwitch:
```Smalltalk
button unsubscribe: led. "disable previous script behaviour"
board installDevice: (PotSwitch named: 'led switch' for: gpio4 using: button).
```
(first line is required because instead toggle will be performed twice which will not change anything)
The board inspector provides extra tab to manage installed devices:

This tab shows the live state of devices. You can click on output pins to modify values.
From the context menu you can disable and remove devices. And you can also browse the implementation.
The following demo shows devices in live:
[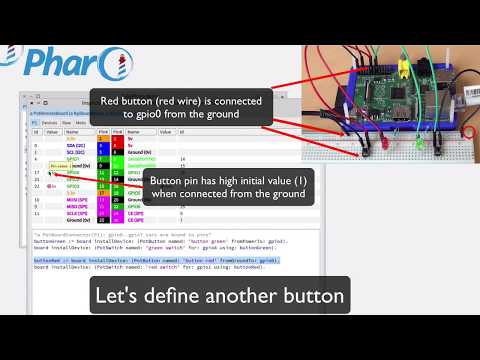](https://www.youtube.com/watch?v=ezfjditHjq4)
## Implementing new devices
This topic will be described in details later. Now look at following demo as a simple example how develop and debug the live Raspberry remotely:
[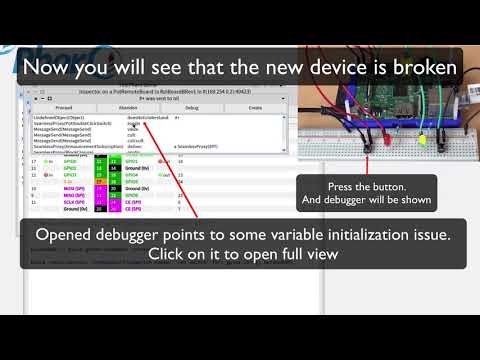](https://www.youtube.com/watch?v=5i0tsgFtlOg)
## Persist board changes
If the board is configured you can save the remote image to persist board changes:
```Smalltalk
remotePharo saveImage
```
When you restart the image board pins will restore the saved state and installed devices will continue working.
For example, try to save the board with an led on. Then turn the led of and restart the Pharo. When Pharo will start, the led will be on (because the image was saved in that state).
All processes running in Pharo are also persistent. For example from the inspector you can connect the button pin to the led with a simple process:
```Smalltalk
[ [100 milliSeconds wait.
led value: (button value=1) asBit
] repeat
] forkNamed: 'button process'.
```
It will turn the led on when the button is pressed.
Now if you save the image this process will continue working after Pharo restart.
All videos above show persistence in live.
## I2C devices
To interract with I2C device the I2C connection must be opened:
```Smalltalk
i2cConnection := board connectToI2CDevice: addressInt
```
The argument is address/id of target device which is physically connected to the board.
For Rassperry board the result is an instance of WiringPiI2CConnection. It provides i/o functions which are available in WiringPi library. For example:
```Smalltalk
i2cConnection read8BitsAt: 16rA1.
i2cConnection write8BitsAt: 16rF2 data: 16r01.
```
In future the connection interface will be improved to be common for different kind of boards.
To implement model of I2C device the subclass of PotI2CDevice should be implemented. PotI2CDevice provides prepared i2cConnection.
Subclases should implement device initialization in connection method. And they should provide required methods to communicate with target devices.
### MCP9808
PotMCP9808Device implements model of temperature sensor MCP9808.
The code for initialization and sensors reading is copied from [Python example](https://github.com/ControlEverythingCommunity/MCP9808/blob/master/Python/MCP9808.py).
The method #readTemperature returns the value in Celsius
To use:
- board inspector
```sensor := board installDevice: PotMCP9808Device new.```
- playground. change the board model to your board
```sensor := (RpiBoard3B current) installDevice: PotMCP9808Device new.```
### BME280
PotBME280Device implements temperature/pressure/humidity sensor BME280.
The code for initialization and sensors reading is copied from [Python example](https://github.com/ControlEverythingCommunity/BME280/blob/master/Python/BME280.py).
The method #readParameters returns three values: Celsius, hPa, humidity percents.
In addition there is method #readTemperature to get single value.
To use:
- board inspector
```sensor := board installDevice: PotBME280Device new.```
- board playground. change the board model to your board
```sensor := (RpiBoard3B current) installDevice: PotBME280Device new.```
### ADXL345
PotADXL345Device implements accelerometer ADXL345.
The code for initialization and sensors reading is copied from [sunfolder example](https://www.sunfounder.com/learn/Super_Kit_V2_for_RaspberryPi/lesson-14-adxl345-super-kit-for-raspberrypi.html).
The method #readCoordinates returns three values array.
To use:
- board inspector
sensor := board installDevice: PotADXL345Device new.
- playground. change the board model to your board
sensor := (RpiBoard3B current) installDevice: PotADXL345Device new.
### HCSR-04 ultrasonic
PotHCSR04Device implements HCSR-04 ultrasonic sensor
To use:
- board inspector
```ultrasonic := board installDevice: (PotHCSR04Device triggerPin: 17 gpio echoPin: 27 gpio).```
- playground, change the board model to your board
```ultrasonic := (RpiBoard3B current) installDevice: (PotHCSR04Device triggerPin: 17 gpio echoPin: 27 gpio).```
To read the distance use one of the method below.
```
readDistance. "It will return a number".
printDistance. "It will return a string".
```
Reboot the sensor:
```
rebootSensor.
```
### HD44780 LCD chipset
PotLCDHD44780 implements LCD controller to all devices using this chipset.
PotLCD1602Device and PotLCD1602DeviceI2C implements LCD1602 display using GPIOs and I2C interface.
To use:
- board inspector
```lcd := board installDevice: PotLCD1602Device new.```
or to I2C
```lcd := board installDevice: PotLCD1602DeviceI2C new.```
- playground. change the board model to your board
```lcd := (RpiBoard3B current) installDevice: PotLCD1602Device new.```
or to I2C
```lcd := (RpiBoard3B current) installDevice: PotLCD1602DeviceI2C new.```
API:
```
showMessage: 'Hello
Pharo IoT'.
clearDisplay.
disableBlinkCursor.
disableDisplay.
disableUnderlineCursor.
enableBlinkCursor.
enableDisplay.
enableUnderlineCursor.
moveCursorLeft.
moveCursorRight.
returnHome.
setCursorAtRow:2.
setCursorAtRow:1 column:1.
setLeftAutoScroll.
setLeftToRight.
setRightAutoScroll.
setRightToLeft.
```