Ecosyste.ms: Awesome
An open API service indexing awesome lists of open source software.
https://github.com/ericzhang-cn/ailingbot
One-stop solution to empower your IM bot with AI.
https://github.com/ericzhang-cn/ailingbot
ai bot chatgpt langchain
Last synced: 2 months ago
JSON representation
One-stop solution to empower your IM bot with AI.
- Host: GitHub
- URL: https://github.com/ericzhang-cn/ailingbot
- Owner: ericzhang-cn
- License: mit
- Created: 2023-06-13T06:39:39.000Z (about 1 year ago)
- Default Branch: main
- Last Pushed: 2023-07-28T03:12:27.000Z (11 months ago)
- Last Synced: 2024-03-29T08:02:53.146Z (3 months ago)
- Topics: ai, bot, chatgpt, langchain
- Language: Python
- Homepage:
- Size: 4.65 MB
- Stars: 53
- Watchers: 2
- Forks: 6
- Open Issues: 1
-
Metadata Files:
- Readme: README.md
- License: LICENSE
Lists
- awesome-langchain - AilingBot
- awesome-langchain-zh - AilingBot - cn/ailingbot?style=social): 一个基于langchain的AI聊天机器人,可以集成的im如slack,企业微信,飞书,钉钉 (工具 / 服务)
README
🇬🇧[English](https://github.com/ericzhang-cn/ailingbot/blob/main/README.md)
🇨🇳[简体中文](https://github.com/ericzhang-cn/ailingbot/blob/main/README_zh_CN.md)
---


AilingBot - One-stop solution to empower your IM bot with AI.
# Table of Contents
* [What is AilingBot](#what-is-ailingbot)
* [Features](#features)
* [Quick Start](#-quick-start)
* [Start an AI chatbot in 5 minutes](#start-an-ai-chatbot-in-5-minutes)
* [Using Docker](#using-docker)
* [Using PIP](#using-pip)
* [Installation](#installation)
* [Generate Configuration File](#generate-configuration-file)
* [Start the Chatbot](#start-the-chatbot)
* [Start API Service](#start-api-service)
* [Using Docker](#using-docker-1)
* [Using PIP](#using-pip-1)
* [Installation](#installation-1)
* [Generate Configuration File](#generate-configuration-file-1)
* [Start the Service](#start-the-service)
* [Integrating with WeChat Work](#integrating-with-wechat-work)
* [Using Docker](#using-docker-2)
* [Using PIP](#using-pip-2)
* [Installation](#installation-2)
* [Generate Configuration File](#generate-configuration-file-2)
* [Modify Configuration File](#modify-configuration-file)
* [Start the Service](#start-the-service-1)
* [Integrating with Feishu](#integrating-with-feishu)
* [Using Docker](#using-docker-3)
* [Using PIP](#using-pip-3)
* [Installation](#installation-3)
* [Generate Configuration File](#generate-configuration-file-3)
* [Modify Configuration File](#modify-configuration-file-1)
* [Start the Service](#start-the-service-2)
* [Integrating with DingTalk](#integrating-with-dingtalk)
* [Using Docker](#using-docker-4)
* [Using PIP](#using-pip-4)
* [Installation](#installation-4)
* [Generate Configuration File](#generate-configuration-file-4)
* [Modify Configuration File](#modify-configuration-file-2)
* [Start the Service](#start-the-service-3)
* [Integrating with Slack](#integrating-with-slack)
* [Using Docker](#using-docker-5)
* [Using PIP](#using-pip-5)
* [Installation](#installation-5)
* [Generate Configuration File](#generate-configuration-file-5)
* [Modify Configuration File](#modify-configuration-file-3)
* [Start the Service](#start-the-service-4)
* [📖User Guide](#user-guide)
* [Main Process](#main-process)
* [Main Concepts](#main-concepts)
* [Configuration](#configuration)
* [Configuration Methods](#configuration-methods)
* [Configuration Mapping](#configuration-mapping)
* [Configuration Items](#configuration-items)
* [General](#general)
* [Built-in Policy Configuration](#built-in-policy-configuration)
* [conversation](#conversation)
* [document_qa](#document_qa)
* [Model Configuration](#model-configuration)
* [OpenAI](#openai)
* [Command Line Tools](#command-line-tools)
* [Initialize Configuration File (init)](#initialize-configuration-file-init)
* [Usage](#usage)
* [Options](#options)
* [View Current Configuration (config)](#view-current-configuration-config)
* [Usage](#usage-1)
* [Options](#options-1)
* [Start Command Line Bot (chat)](#start-command-line-bot-chat)
* [Usage](#usage-2)
* [Options](#options-2)
* [Start Webhook Service (serve)](#start-webhook-service-serve)
* [Usage](#usage-3)
* [Options](#options-3)
* [Start API Service (api)](#start-api-service-api)
* [Usage](#usage-4)
* [Options](#options-4)
* [🔌API](#api)
* [💻Development Guide](#development-guide)
* [Development Guidelines](#development-guidelines)
* [Developing Chat Policy](#developing-chat-policy)
* [Developing Channel](#developing-channel)
* [🤔Frequently Asked Questions](#frequently-asked-questions)
* [🎯Roadmap](#roadmap)
# What is AilingBot
AilingBot is an open-source engineering development framework and an all-in-one solution for integrating AI models into
IM chatbots. With AilingBot, you can:
- ☕ **Code-free usage**: Quickly integrate existing AI large-scale models into mainstream IM chatbots (such as WeChat
Work, Feishu, DingTalk, Slack etc.) to interact with AI models through IM chatbots and complete business
requirements. Currently, AilingBot has built-in capabilities for multi-turn dialogue and document knowledge Q&A, and
more capabilities will be added in the future.
- 🛠️**Secondary development**: AilingBot provides a clear engineering architecture, interface definition, and necessary
basic components. You do not need to develop the engineering framework for large-scale model services from scratch.
You only need to implement your Chat Policy and complete end-to-end AI model empowerment to IM chatbots through simple
configurations. It also supports expanding to your own end (such as your own IM, web application, or mobile
application) by developing your own channel.
# Features
- 💯 **Open source & Free**: Completely open source and free.
- 📦 **Ready to use**: No need for development, with pre-installed capabilities to integrate with existing mainstream IM
and AI models.
- 🔗 **LangChain Friendly**: Easy to integrate with LangChain.
- 🧩 **Modular**: The project is organized in a modular way, with modules dependent on each other through abstract
protocols. Modules of the same type can be implemented by implementing the protocol, allowing for plug-and-play.
- 💻 **Extensible**: AilingBot can be extended to new usage scenarios and capabilities. For example, integrating with new
IMs, new AI models, or customizing your own chat policy.
- 🔥 **High performance**: AilingBot uses a coroutine-based asynchronous mode to improve system concurrency performance.
At the same time, system concurrency processing capabilities can be further improved through multi-processes.
- 🔌 **API Integration**: AilingBot provides a set of clear API interfaces for easy integration and collaboration with
other systems and processes.
# 🚀 Quick Start
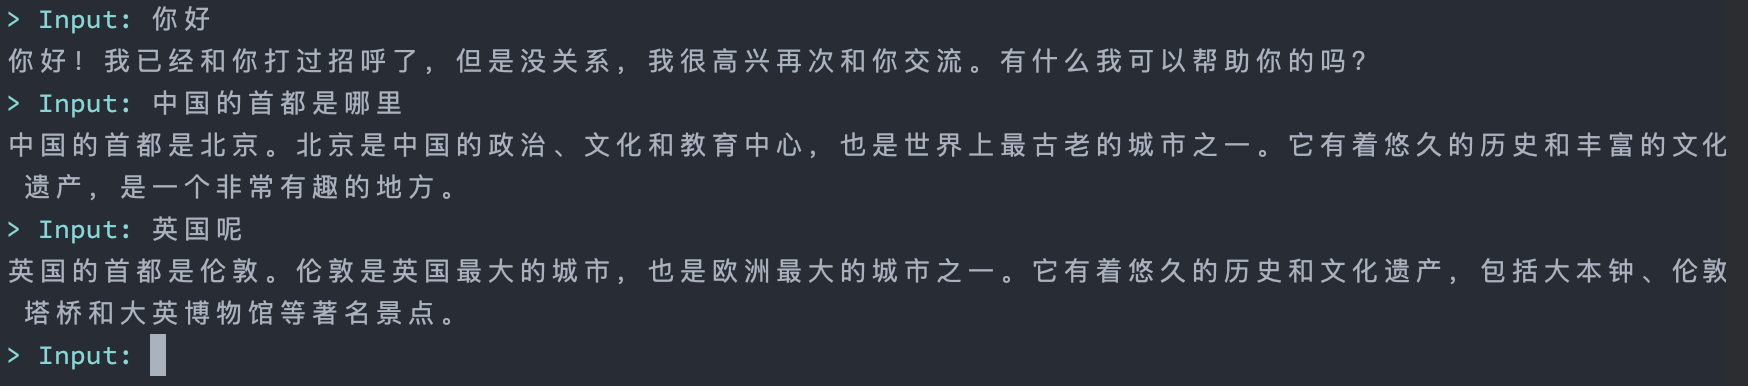
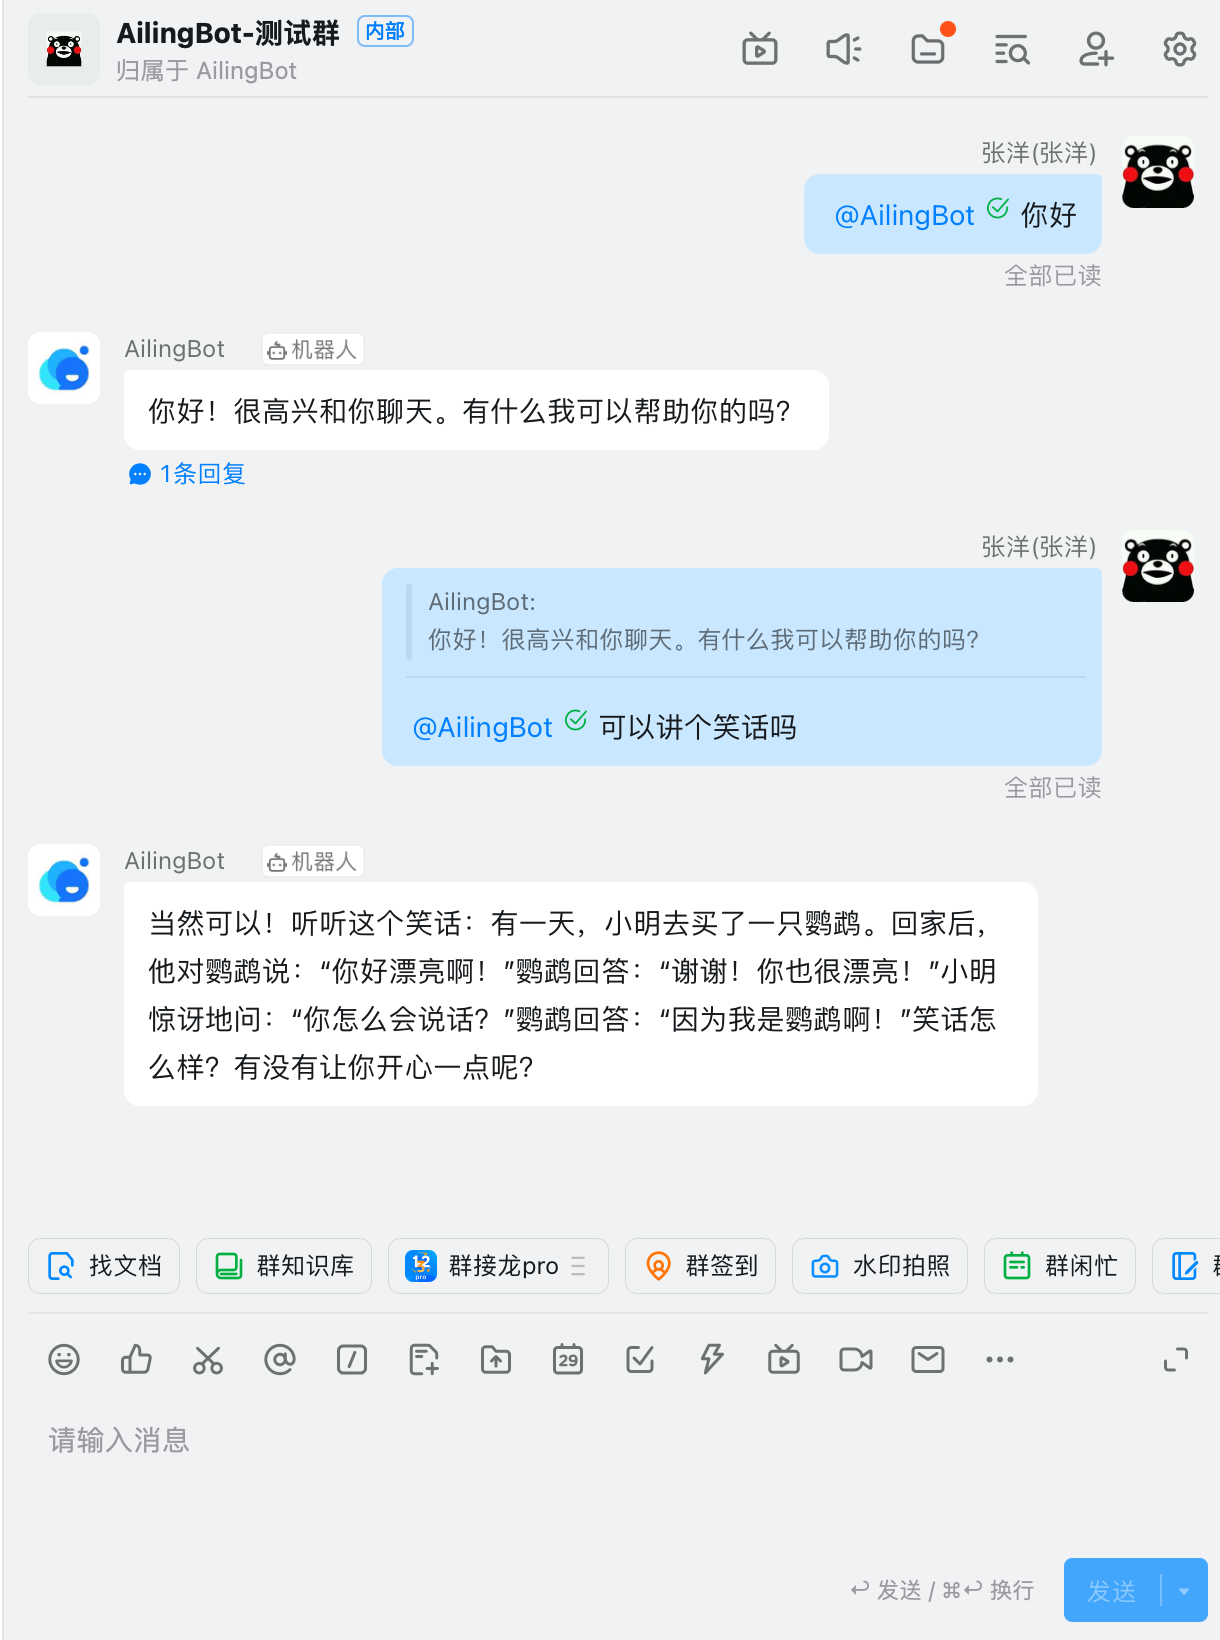
## Start an AI chatbot in 5 minutes
Below is a guide on how to quickly start an AI chatbot based on the command-line interface using AilingBot. The effect
is shown in the following figure:
> 💡 First, you need to have an OpenAI API key. If you don't have one, refer to relevant materials on the Internet to
> obtain it.
### Using Docker
```shell
git clone https://github.com/ericzhang-cn/ailingbot.git ailingbot
cd ailingbot
docker build -t ailingbot .
docker run -it --rm \
-e AILINGBOT_POLICY__LLM__OPENAI_API_KEY={your OpenAI API key} \
ailingbot poetry run ailingbot chat
```
### Using PIP
#### Installation
```shell
pip install ailingbot
```
#### Generate Configuration File
```shell
ailingbot init --silence --overwrite
```
This will create a file called `settings.toml` in the current directory, which is the configuration file for AilingBot.
Next, modify the necessary configurations. To start the bot, only one configuration is needed. Find the following
section in `settings.toml`:
```toml
[policy.llm]
_type = "openai"
model_name = "gpt-3.5-turbo"
openai_api_key = ""
temperature = 0
```
Change the value of `openai_api_key` to your actual OpenAI API key.
#### Start the Chatbot
Start the chatbot with the following command:
```shell
ailingbot chat
```
## Start API Service
### Using Docker
```shell
git clone https://github.com/ericzhang-cn/ailingbot.git ailingbot
cd ailingbot
docker build -t ailingbot .
docker run -it --rm \
-e AILINGBOT_POLICY__LLM__OPENAI_API_KEY={your OpenAI API key} \
-p 8080:8080 \
ailingbot poetry run ailingbot api
```
### Using PIP
#### Installation
```shell
pip install ailingbot
```
#### Generate Configuration File
Same as starting the command line bot.
#### Start the Service
Start the bot using the following command:
```shell
ailingbot api
```
Now, enter `http://localhost:8080/docs` in your browser to see the API documentation. (If it is not a local start,
please enter `http://{your public IP}:8080/docs`)
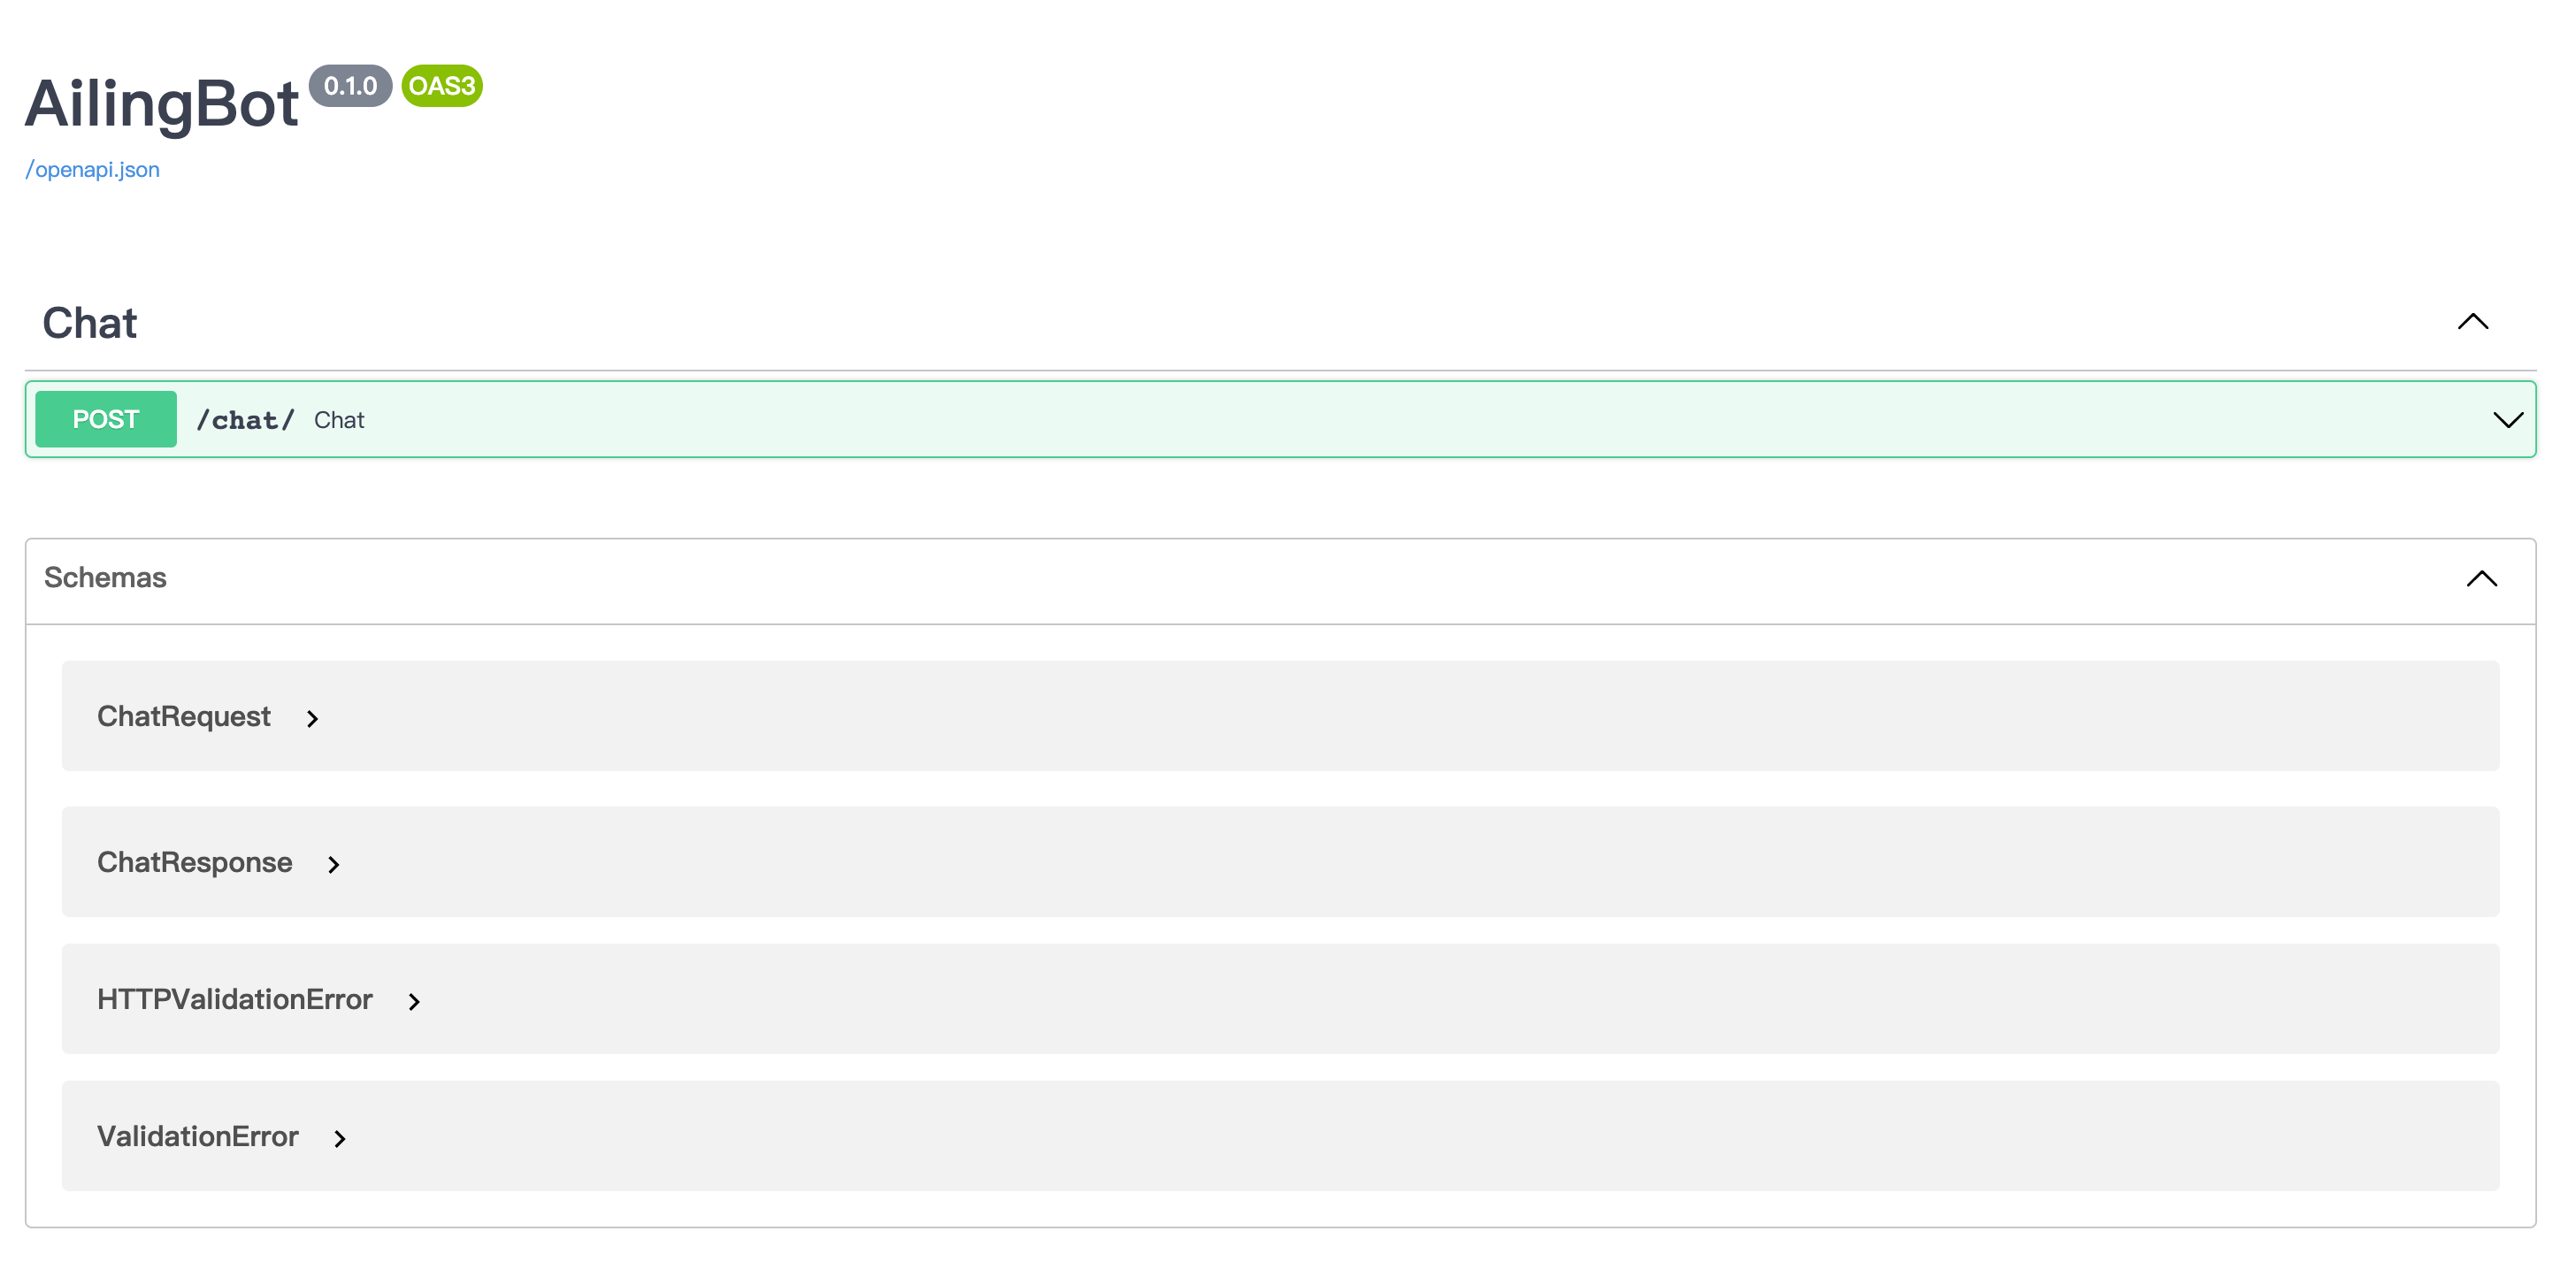
Here is an example request:
```shell
curl -X 'POST' \
'http://localhost:8080/chat/' \
-H 'accept: application/json' \
-H 'Content-Type: application/json' \
-d '{
"text": "你好"
}'
```
And the response:
```json
{
"type": "text",
"conversation_id": "default_conversation",
"uuid": "afb35218-2978-404a-ab39-72a9db6f303b",
"ack_uuid": "3f09933c-e577-49a5-8f56-fa328daa136f",
"receiver_id": "anonymous",
"scope": "user",
"meta": {},
"echo": {},
"text": "你好!很高兴和你聊天。有什么我可以帮助你的吗?",
"reason": null,
"suggestion": null
}
```
## Integrating with WeChat Work
Here's a guide on how to quickly integrate the chatbot with WeChat Work.
### Using Docker
```shell
git clone https://github.com/ericzhang-cn/ailingbot.git ailingbot
cd ailingbot
docker build -t ailingbot .
docker run -d \
-e AILINGBOT_POLICY__NAME=conversation \
-e AILINGBOT_POLICY__HISTORY_SIZE=5 \
-e AILINGBOT_POLICY__LLM__OPENAI_API_KEY={your OpenAI API key} \
-e AILINGBOT_CHANNEL__NAME=wechatwork \
-e AILINGBOT_CHANNEL__CORPID={your WeChat Work corpid} \
-e AILINGBOT_CHANNEL__CORPSECRET={your WeChat Work corpsecret} \
-e AILINGBOT_CHANNEL__AGENTID={your WeChat Work agentid} \
-e AILINGBOT_CHANNEL__TOKEN={your WeChat Work webhook token} \
-e AILINGBOT_CHANNEL__AES_KEY={your WeChat Work webhook aes_key} \
-p 8080:8080 \
ailingbot poetry run ailingbot serve
```
### Using PIP
#### Installation
```shell
pip install ailingbot
```
#### Generate Configuration File
```shell
ailingbot init --silence --overwrite
```
#### Modify Configuration File
Open `settings.toml`, and fill in the following section with your WeChat Work robot's real information:
```toml
[channel]
name = "wechatwork"
corpid = "" # Fill in with real information
corpsecret = "" # Fill in with real information
agentid = 0 # Fill in with real information
token = "" # Fill in with real information
aes_key = "" # Fill in with real information
```
In the `llm` section, fill in your OpenAI API Key:
```toml
[policy.llm]
_type = "openai"
model_name = "gpt-3.5-turbo"
openai_api_key = "" # Fill in with your real OpenAI API Key here
temperature = 0
```
#### Start the Service
```shell
ailingbot serve
```
Finally, we need to go to the WeChat Work admin console to configure the webhook address so that WeChat Work knows to
forward the received user messages to our webhook.
The webhook URL is: `http(s)://your_public_IP:8080/webhook/wechatwork/event/`
After completing the above configuration, you can find the chatbot in WeChat Work and start chatting:
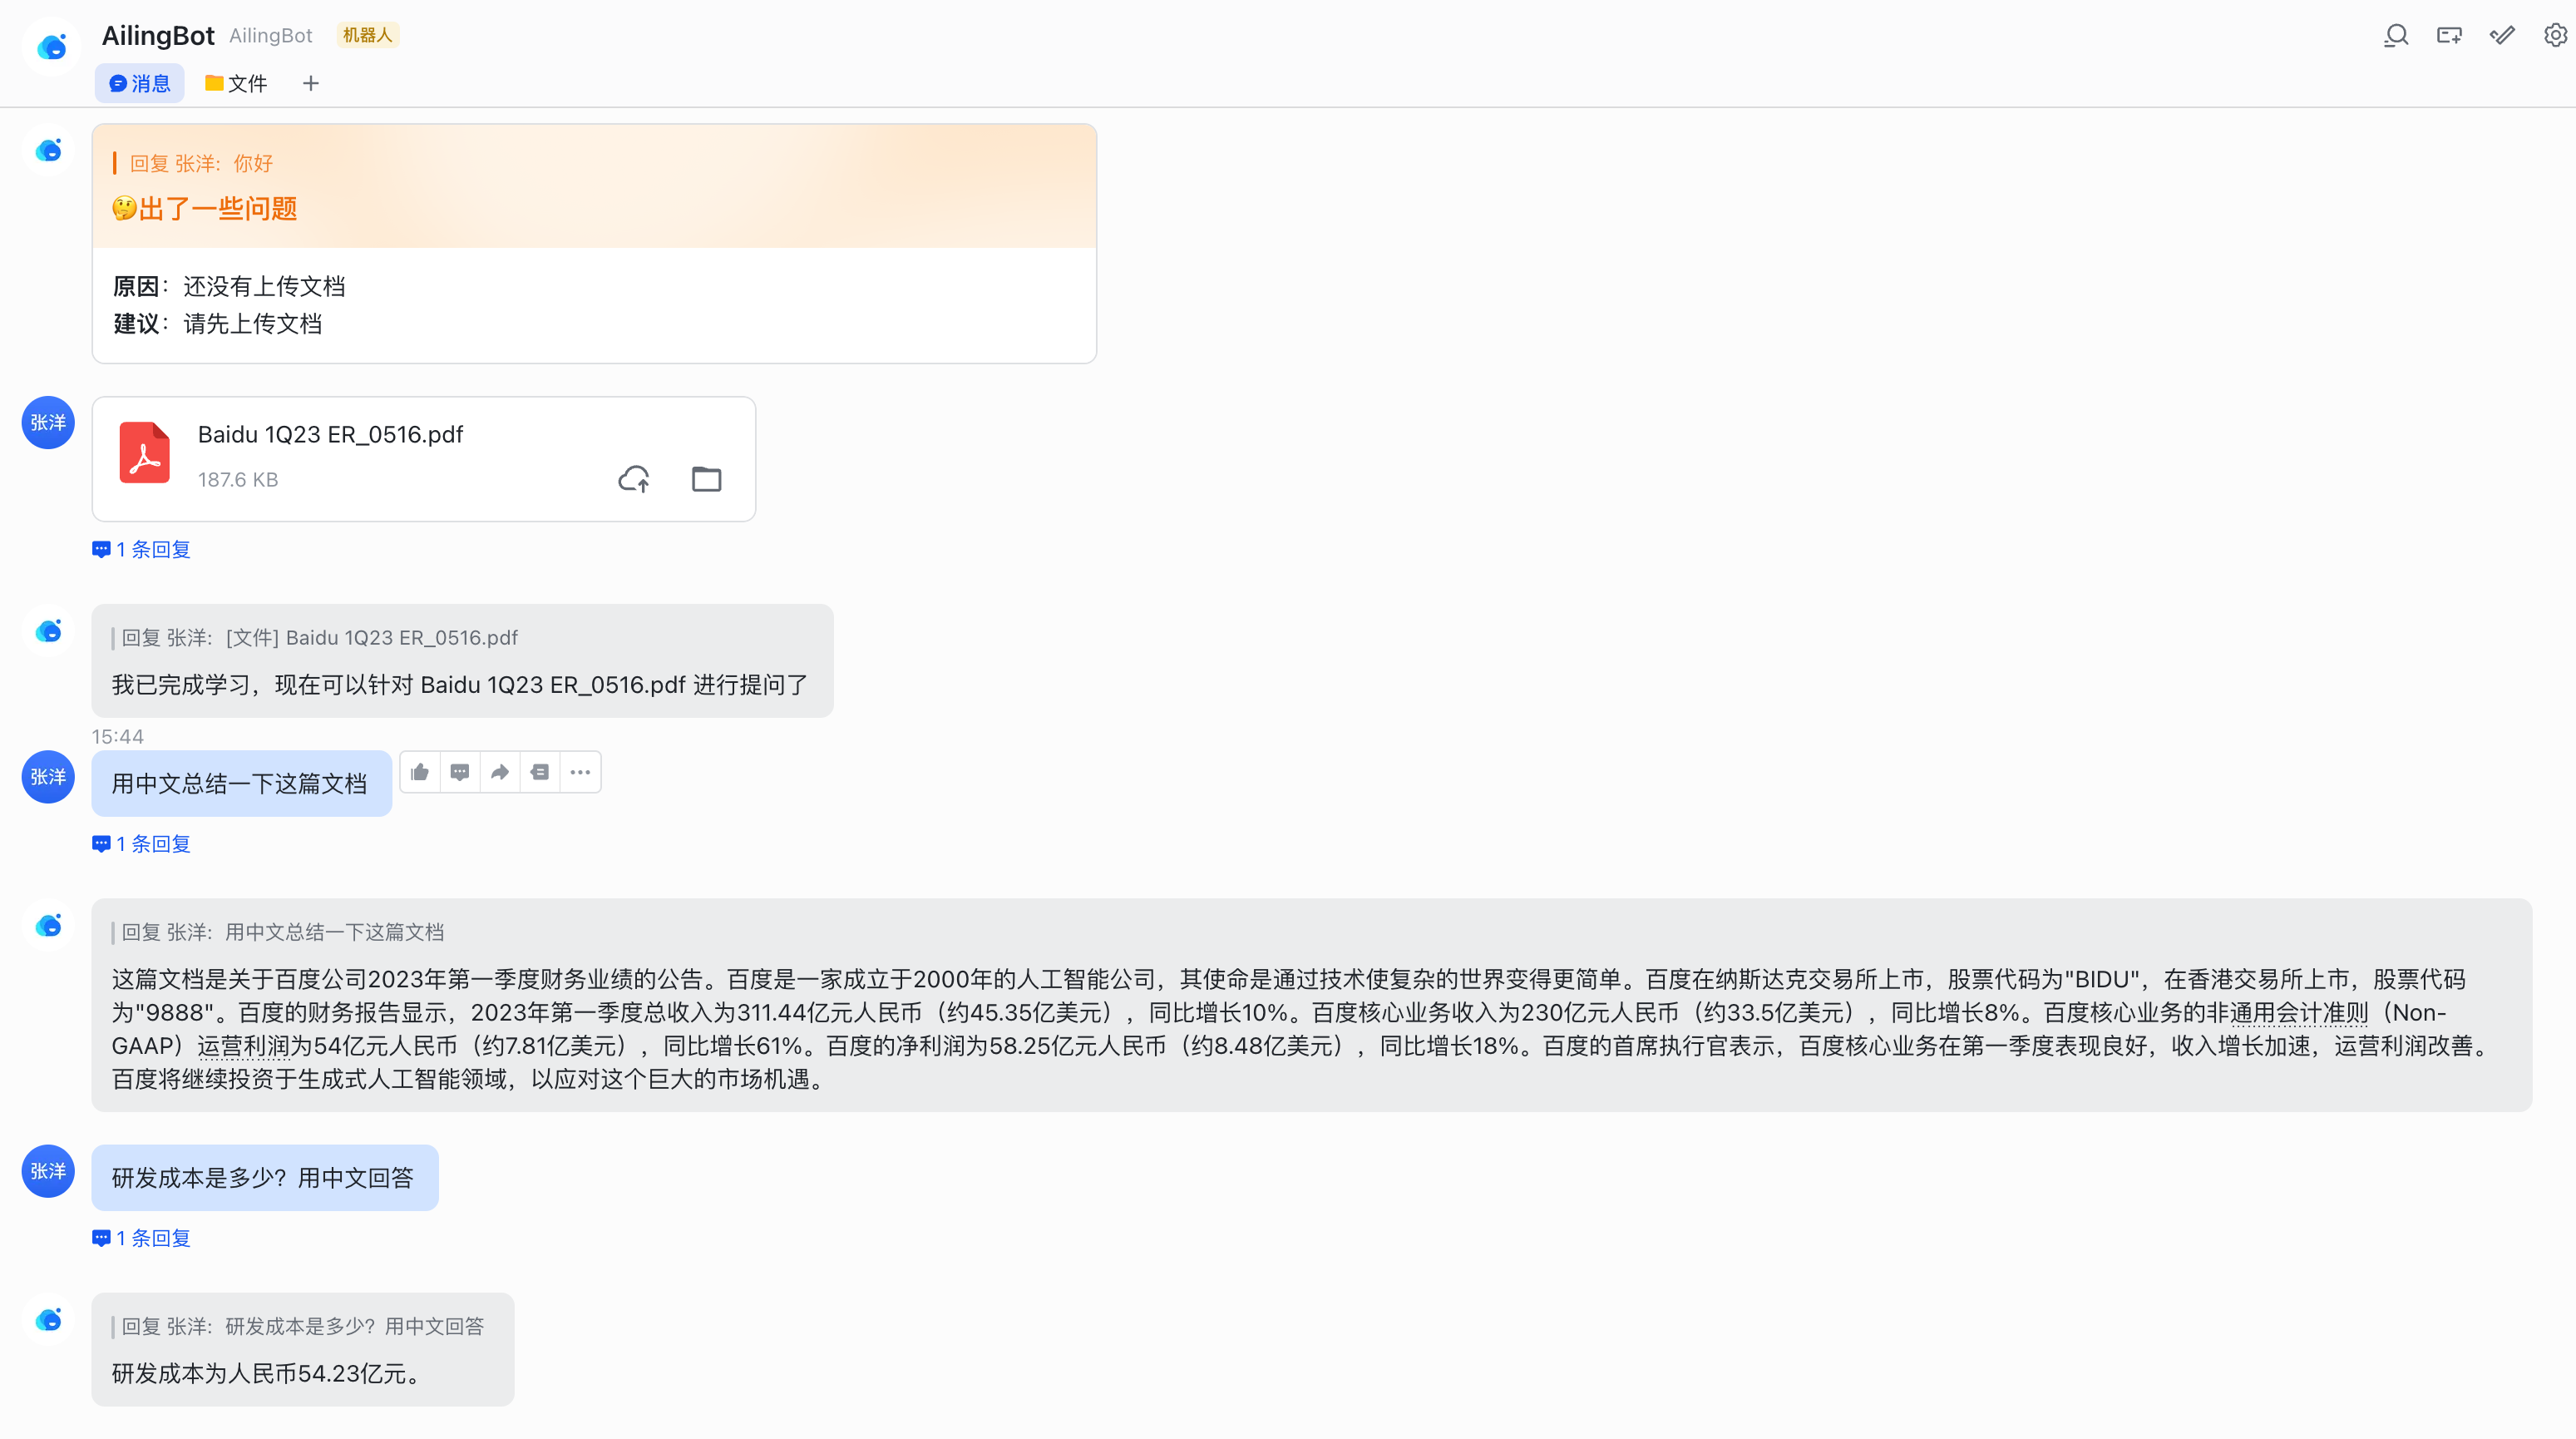
## Integrating with Feishu
Here's a guide on how to quickly integrate the chatbot with Feishu and enable a new conversation policy: uploading
documents and performing knowledge-based question answering on them.
### Using Docker
```shell
git clone https://github.com/ericzhang-cn/ailingbot.git ailingbot
cd ailingbot
docker build -t ailingbot .
docker run -d \
-e AILINGBOT_POLICY__NAME=document_qa \
-e AILINGBOT_POLICY__CHUNK_SIZE=1000 \
-e AILINGBOT_POLICY__CHUNK_OVERLAP=0 \
-e AILINGBOT_POLICY__LLM__OPENAI_API_KEY={your OpenAI API key} \
-e AILINGBOT_POLICY__LLM__MODEL_NAME=gpt-3.5-turbo-16k \
-e AILINGBOT_CHANNEL__NAME=feishu \
-e AILINGBOT_CHANNEL__APP_ID={your Feishu app id} \
-e AILINGBOT_CHANNEL__APP_SECRET={your Feishu app secret} \
-e AILINGBOT_CHANNEL__VERIFICATION_TOKEN={your Feishu webhook verification token} \
-p 8080:8080 \
ailingbot poetry run ailingbot serve
```
### Using PIP
#### Installation
```shell
pip install ailingbot
```
#### Generate Configuration File
```shell
ailingbot init --silence --overwrite
```
#### Modify Configuration File
Open `settings.toml`, and change the `channel` section to the following, filling in your Feishu robot's real
information:
```toml
[channel]
name = "feishu"
app_id = "" # Fill in with real information
app_secret = "" # Fill in with real information
verification_token = "" # Fill in with real information
```
Replace the `policy` section with the following document QA policy:
```toml
[policy]
name = "document_qa"
chunk_size = 1000
chunk_overlap = 5
```
Finally, it is recommended to use the 16k model when using the document QA policy. Therefore,
change `policy.llm.model_name` to the following configuration:
```toml
[policy.llm]
_type = "openai"
model_name = "gpt-3.5-turbo-16k" # Change to gpt-3.5-turbo-16k
openai_api_key = "" # Fill in with real information
temperature = 0
```
#### Start the Service
```shell
ailingbot serve
```
Finally, we need to go to the Feishu admin console to configure the webhook address.
The webhook URL for Feishu is: `http(s)://your_public_IP:8080/webhook/feishu/event/`
After completing the above configuration, you can find the chatbot in Feishu and start chatting:
## Integrating with DingTalk
Here's a guide on how to quickly integrate the chatbot with DingTalk.
### Using Docker
```shell
git clone https://github.com/ericzhang-cn/ailingbot.git ailingbot
cd ailingbot
docker build -t ailingbot .
docker run -d \
-e AILINGBOT_POLICY__NAME=conversation \
-e AILINGBOT_POLICY__HISTORY_SIZE=5 \
-e AILINGBOT_POLICY__LLM__OPENAI_API_KEY={your OpenAI API key} \
-e AILINGBOT_CHANNEL__NAME=dingtalk \
-e AILINGBOT_CHANNEL__APP_KEY={your DingTalk app key} \
-e AILINGBOT_CHANNEL__APP_SECRET={your DingTalk app secret} \
-e AILINGBOT_CHANNEL__ROBOT_CODE={your DingTalk robot code} \
-p 8080:8080 \
ailingbot poetry run ailingbot serve
```
### Using PIP
#### Installation
```shell
pip install ailingbot
```
#### Generate Configuration File
```shell
ailingbot init --silence --overwrite
```
#### Modify Configuration File
Open `settings.toml`, and change the `channel` section to the following, filling in your DingTalk robot's real
information:
```toml
[channel]
name = "dingtalk"
app_key = "" # Fill in with real information
app_secret = "" # Fill in with real information
robot_code = "" # Fill in with real information
```
#### Start the Service
```shell
ailingbot serve
```
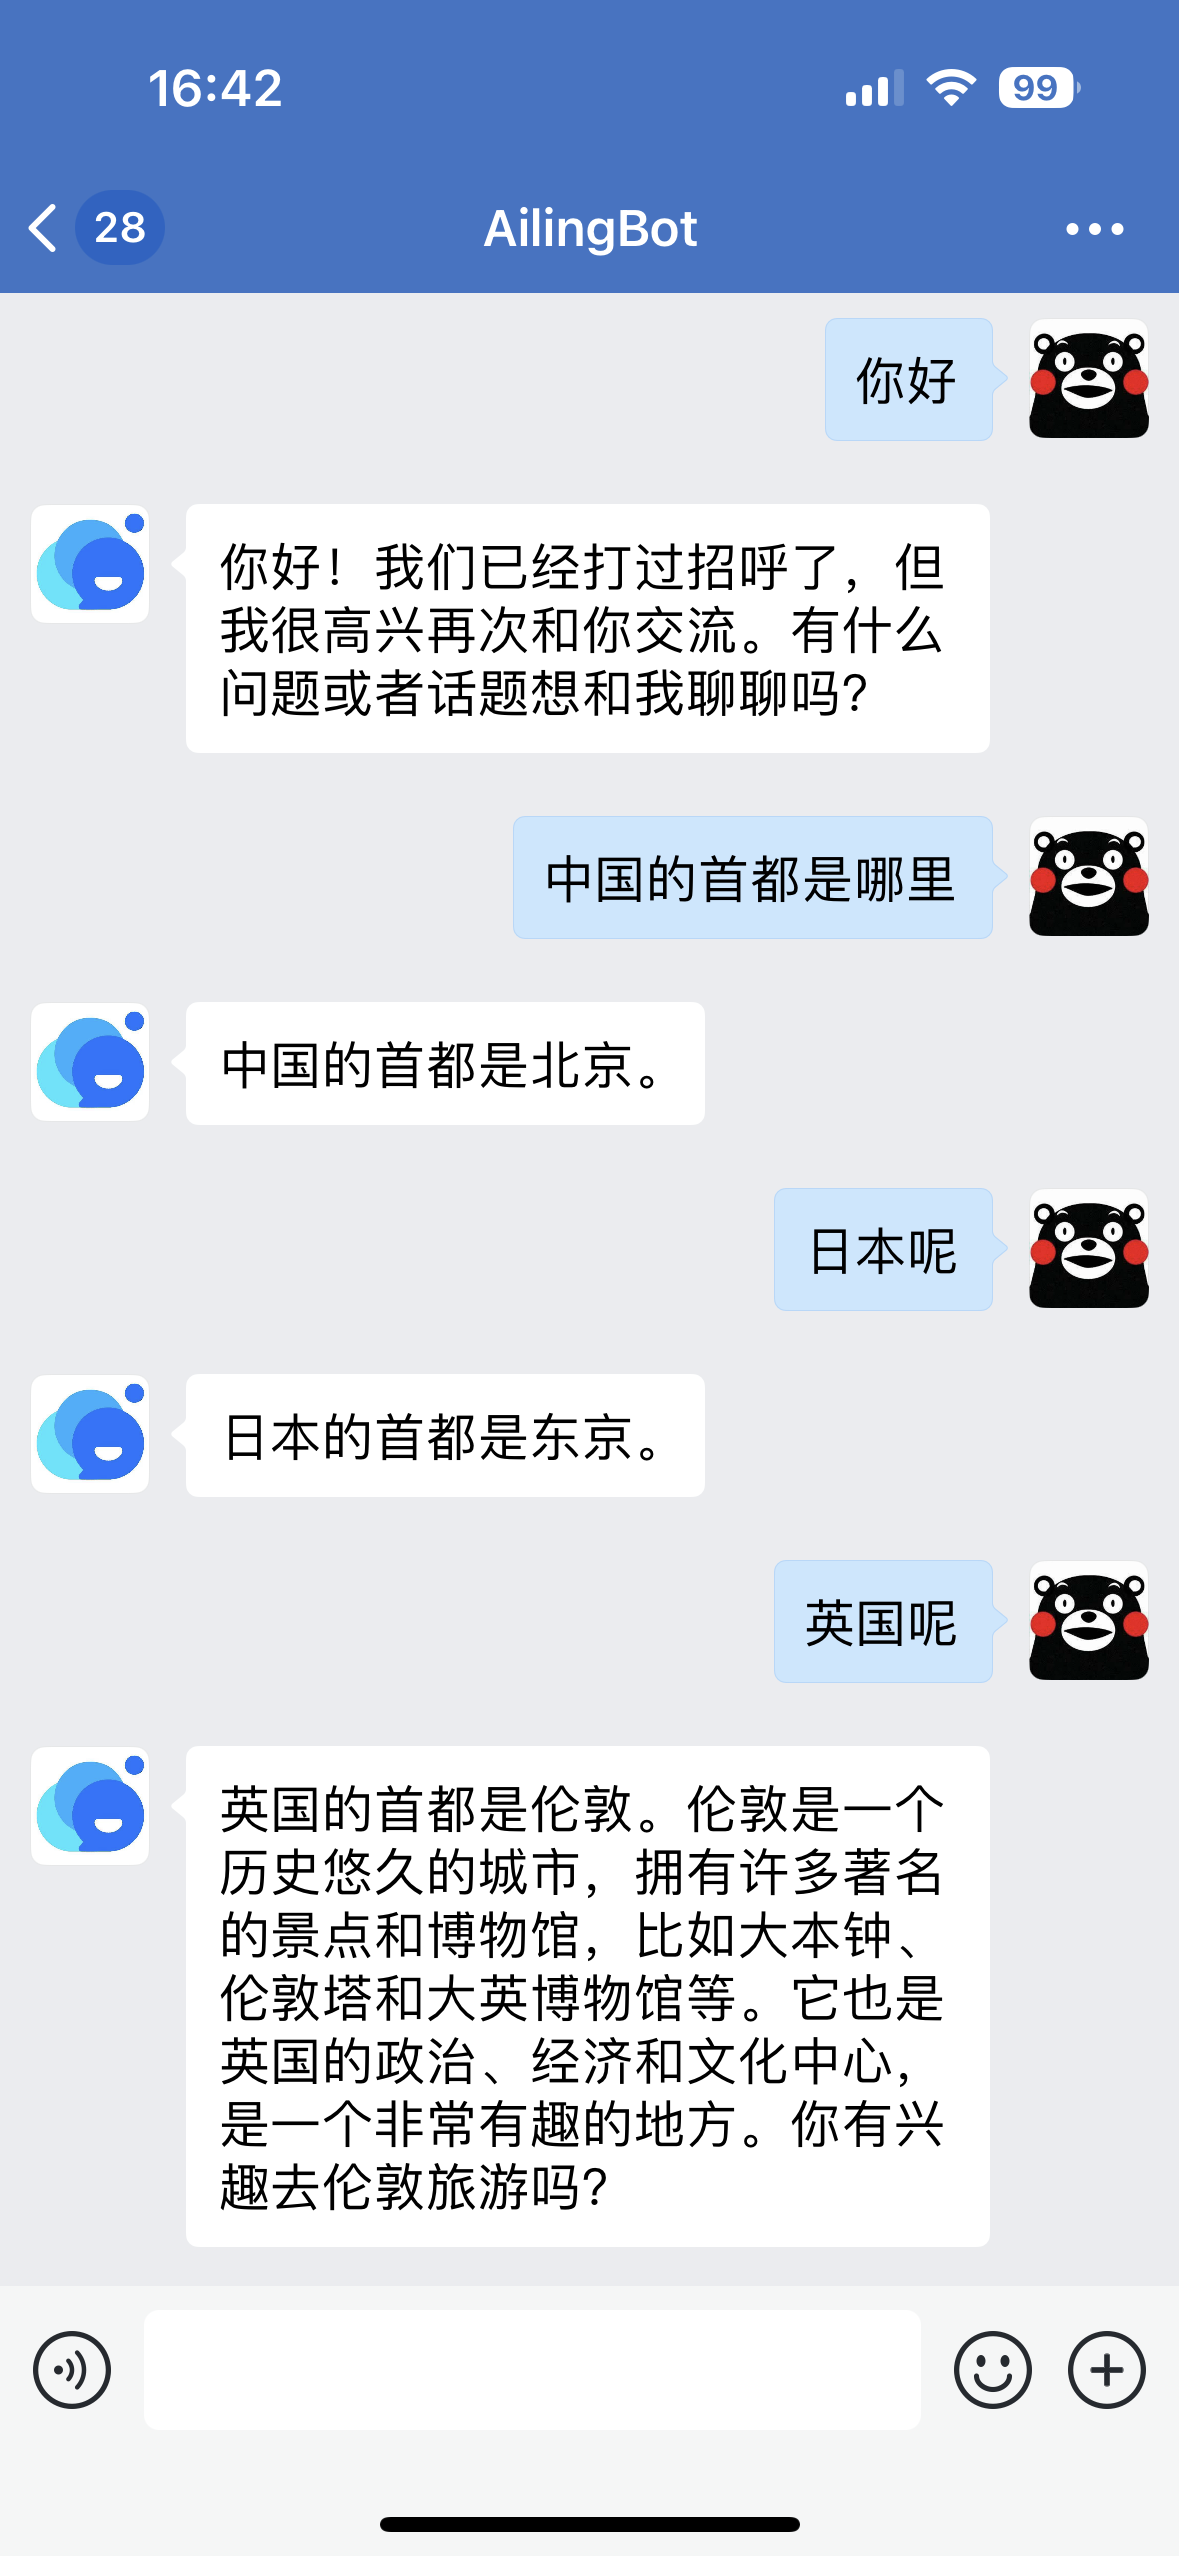
Finally, we need to go to the DingTalk admin console to configure the webhook address.
The webhook URL for DingTalk is: `http(s)://your_public_IP:8080/webhook/dingtalk/event/`
After completing the above configuration, you can find the chatbot in DingTalk and start chatting:
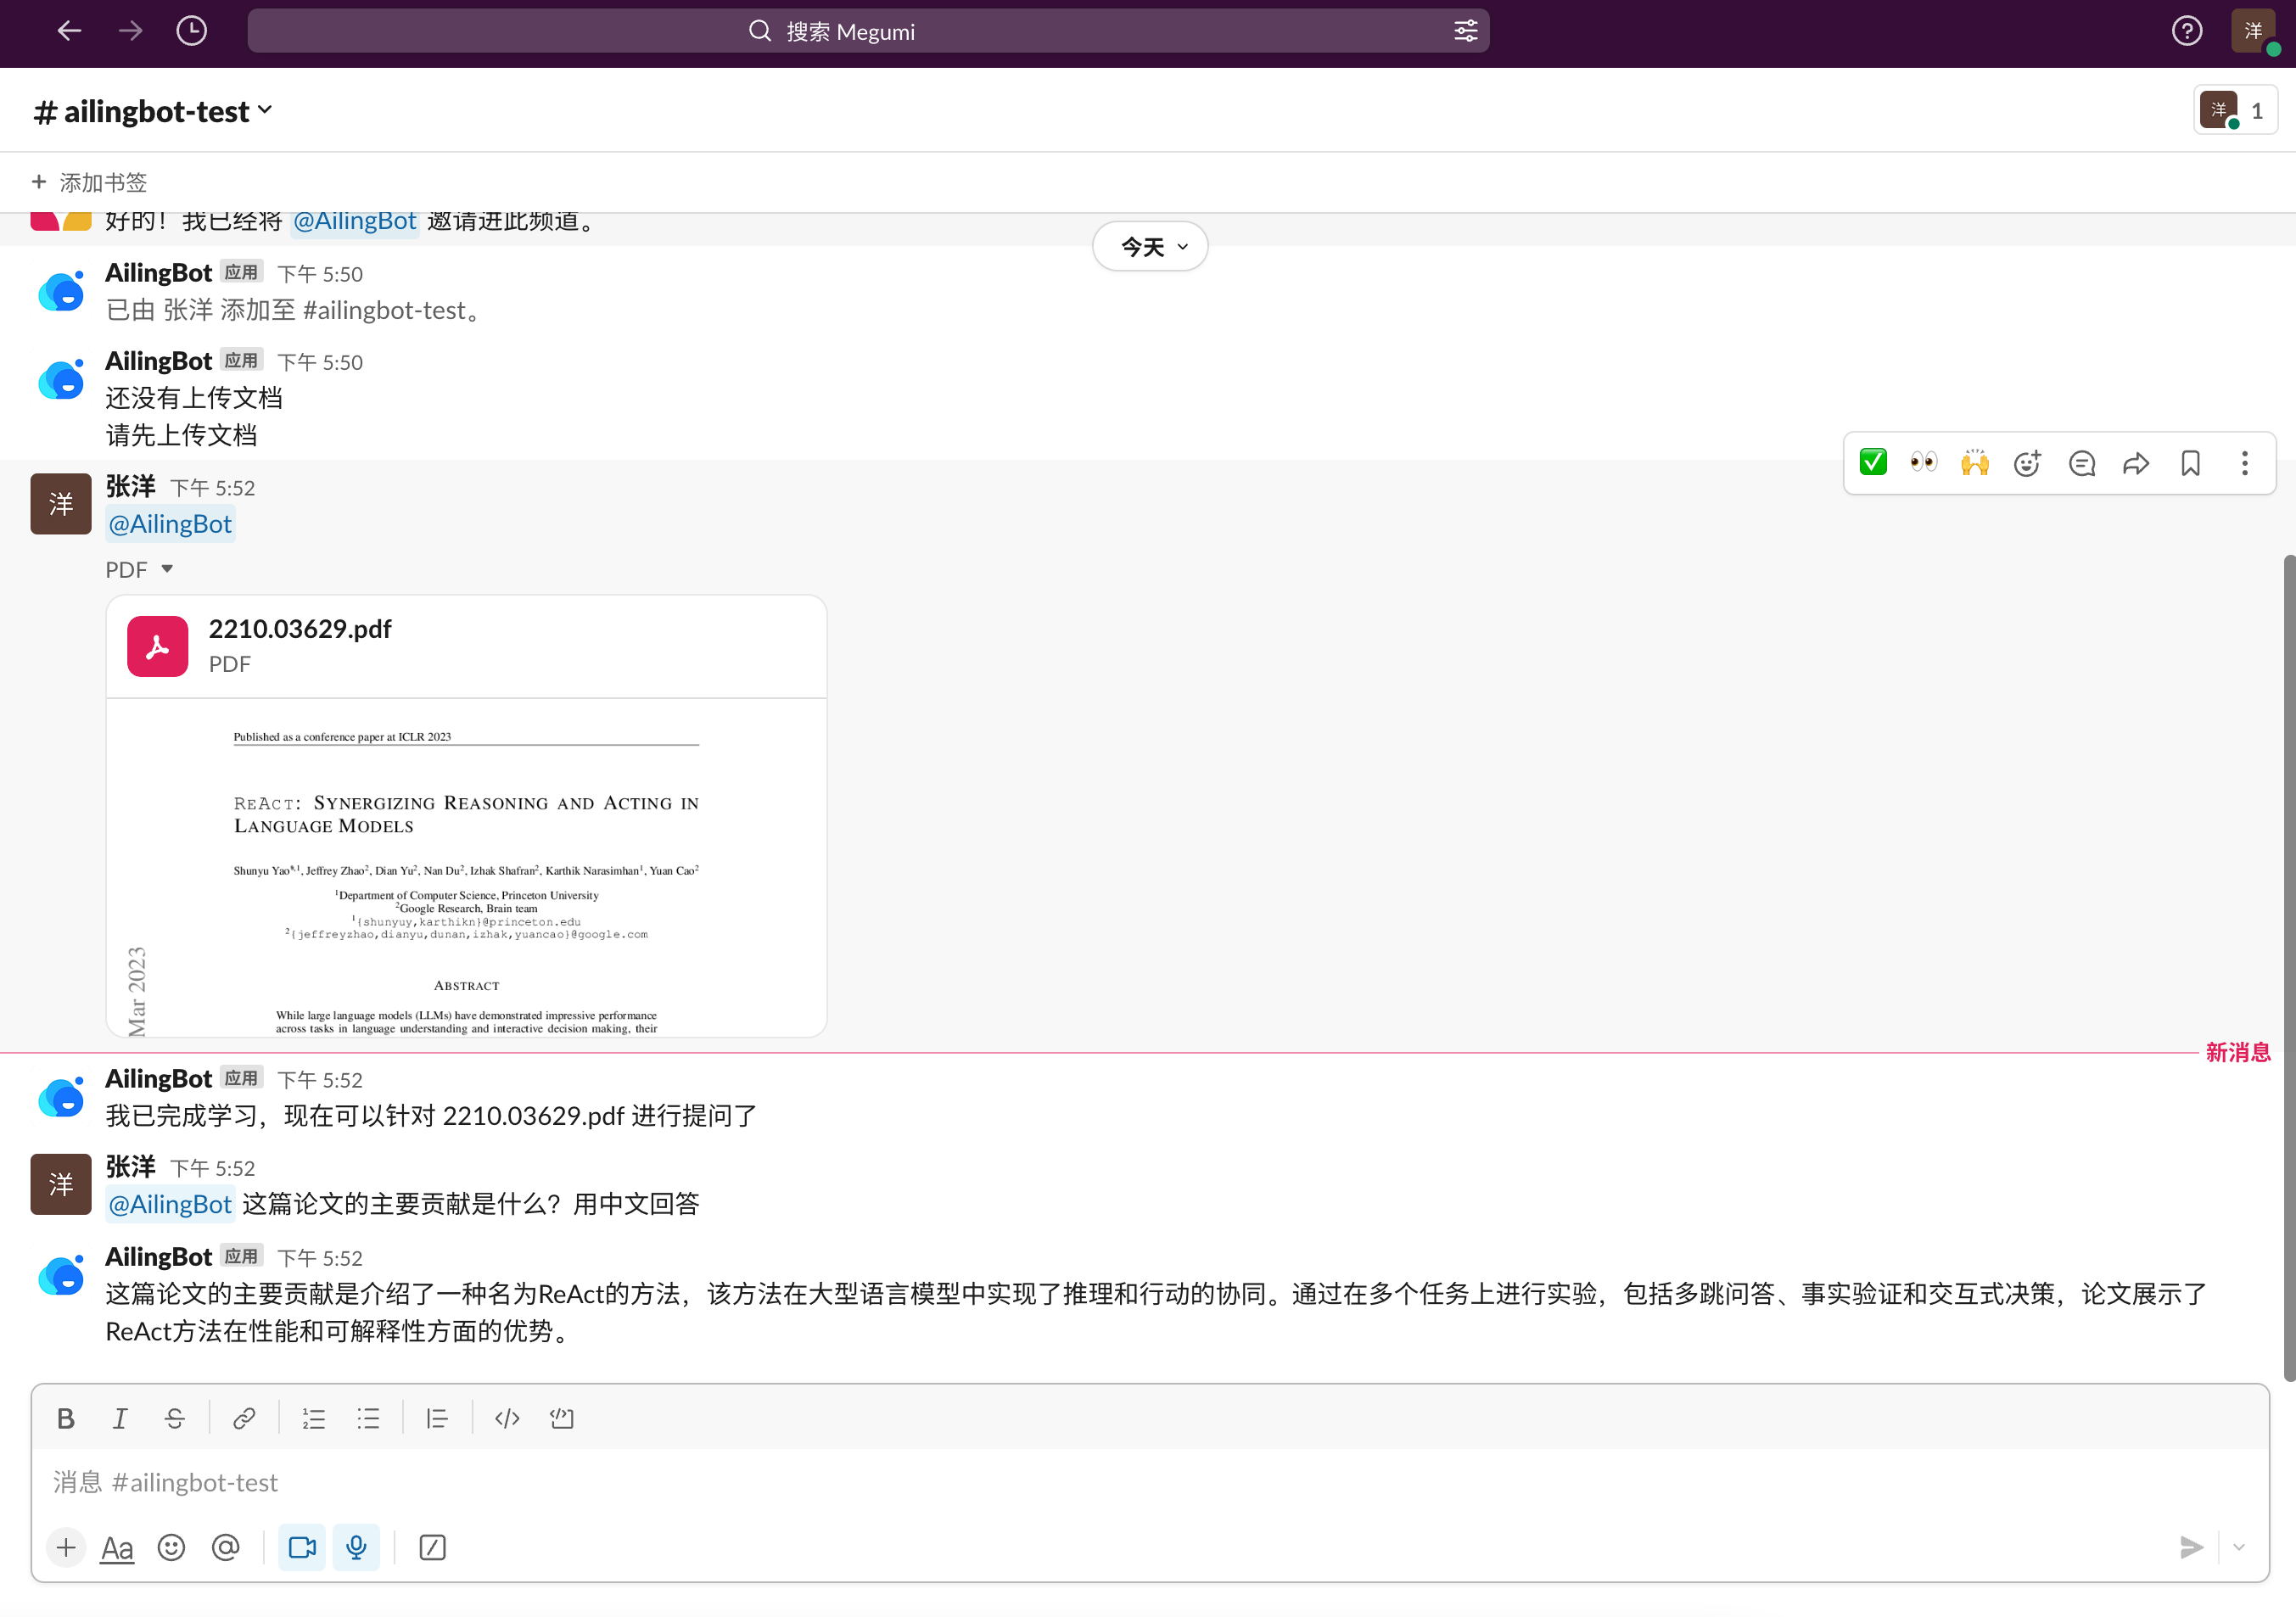
## Integrating with Slack
Here's a guide on how to quickly integrate the chatbot with Slack and enable a new conversation policy: uploading
documents and performing knowledge-based question answering on them.
### Using Docker
```shell
git clone https://github.com/ericzhang-cn/ailingbot.git ailingbot
cd ailingbot
docker build -t ailingbot .
docker run -d \
-e AILINGBOT_POLICY__NAME=document_qa \
-e AILINGBOT_POLICY__CHUNK_SIZE=1000 \
-e AILINGBOT_POLICY__CHUNK_OVERLAP=0 \
-e AILINGBOT_POLICY__LLM__OPENAI_API_KEY={your OpenAI API key} \
-e AILINGBOT_POLICY__LLM__MODEL_NAME=gpt-3.5-turbo-16k \
-e AILINGBOT_CHANNEL__NAME=slack \
-e AILINGBOT_CHANNEL__VERIFICATION_TOKEN={your Slack App webhook verification token} \
-e AILINGBOT_CHANNEL__OAUTH_TOKEN={your Slack App oauth token} \
-p 8080:8080 \
ailingbot poetry run ailingbot serve
```
### Using PIP
#### Installation
```shell
pip install ailingbot
```
#### Generate Configuration File
```shell
ailingbot init --silence --overwrite
```
#### Modify Configuration File
Open `settings.toml`, and change the `channel` section to the following, filling in your Slack robot's real information:
```toml
[channel]
name = "slack"
verification_token = "" # Fill in with real information
oauth_token = "" # Fill in with real information
```
Replace the `policy` section with the following document QA policy:
```toml
[policy]
name = "document_qa"
chunk_size = 1000
chunk_overlap = 5
```
Finally, it is recommended to use the 16k model when using the document QA policy. Therefore,
change `policy.llm.model_name` to the following configuration:
```toml
[policy.llm]
_type = "openai"
model_name = "gpt-3.5-turbo-16k" # Change to gpt-3.5-turbo-16k
openai_api_key = "" # Fill in with real information
temperature = 0
```
#### Start the Service
```shell
ailingbot serve
```
Finally, we need to go to the Slack admin console to configure the webhook address.
The webhook URL for Slack is: `http(s)://your_public_IP:8080/webhook/slack/event/`
After completing the above configuration, you can find the chatbot in Slack and start chatting:
# 📖User Guide
## Main Process
The main processing flow of AilingBot is as follows:
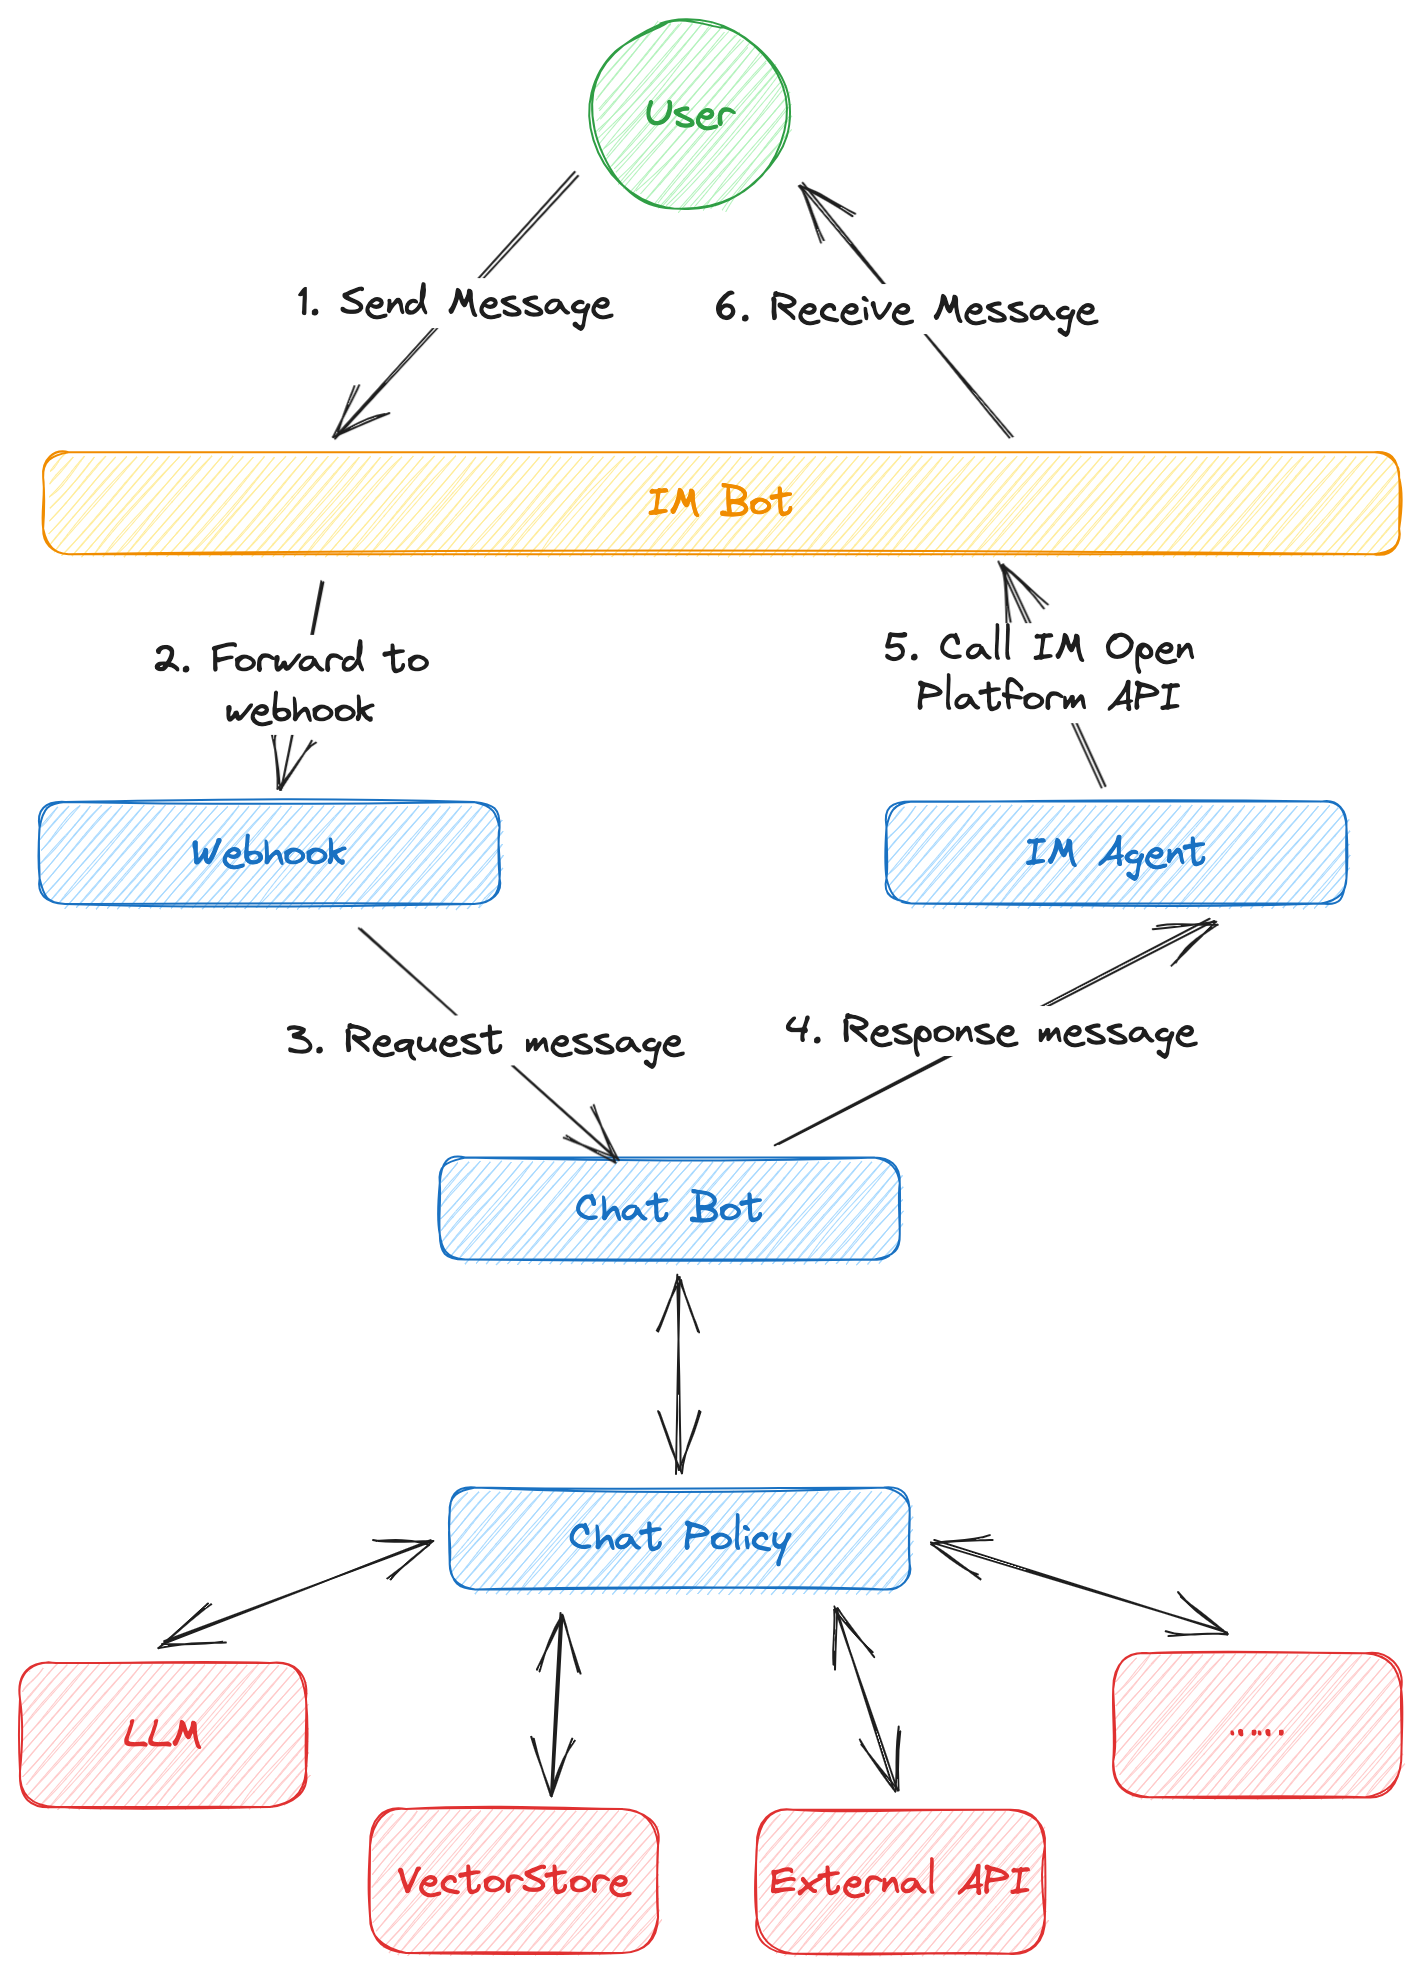
1. First, the user sends a message to the IM bot.
2. If a webhook is configured, the instant messaging tool will forward the request sent to the bot to the webhook
service address.
3. The webhook service processes the original IM message and converts it into AilingBot's internal message format, which
is then sent to ChatBot.
4. ChatBot processes the request and forms a response message based on the configured chat policy. During this process,
ChatBot may perform operations such as requesting a large language model, accessing a vector database, or calling an
external API to complete the request processing.
5. ChatBot sends the response message to the IM Agent. The IM Agent is responsible for converting the AilingBot internal
response message format into a specific IM format and calling the IM open capability API to send the response
message.
6. The IM bot displays the message to the user, completing the entire processing process.
## Main Concepts
- **IM bot**: A capability built into most instant messaging tools that allows administrators to create a bot and
process user messages through a program.
- **Channel**: A channel represents different terminals, which can be an IM or a custom terminal (such as the web).
- **Webhook**: An HTTP(S) service used to receive user messages forwarded by IM bots. Different channels have their own
specifications for webhooks, so each channel requires its own webhook implementation.
- **IM Agent**: Used to call IM open capability APIs. Different IM open capability APIs are different, so each channel
requires a corresponding agent implementation.
- **ChatBot**: The core component used to receive and respond to user messages.
- **Chat Policy**: Defines how to respond to users and is called by ChatBot. A chat policy specifically defines the
robot's abilities, such as chitchat or knowledge Q&A.
- **LLM**: Large language model, such as OpenAI's ChatGPT and open ChatGLM, are all different large language models. The
large language model is a key component for implementing AI capabilities.
## Configuration
### Configuration Methods
AilingBot can be configured in two ways:
- **Using configuration files**: AilingBot reads `settings.toml` in the current directory as the configuration file
in [TOML](https://toml.io/en/) format. Please refer to the following section for specific configuration items.
- **Using environment variables**: AilingBot also reads configuration items in environment variables. Please refer to
the following section for a list of environment variables.
> 💡 Both configuration files and environment variables can be used together. If a configuration item exists in both, the
> environment variable takes precedence.
### Configuration Mapping
All configurations have the following mappings between TOML keys and environment variables:
- All environment variables start with `AILINGBOT_`.
- Double underscores `__` are used as separators between levels.
- Underscores in configuration keys are preserved in environment variables.
- Case-insensitive.
For example:
- The corresponding environment variable of `some_conf` is `AILINGBOT_SOME_CONF`.
- The corresponding environment variable of `some_conf.conf_1` is `AILINGBOT_SOME_CONF__CONF_1`.
- The corresponding environment variable of `some_conf.conf_1.subconf` is `AILINGBOT_SOME_CONF__CONF_1__SUBCONF`.
### Configuration Items
#### General
| Configuration Item | Description | TOML | Environment Variable |
|--------------------|-----------------------------------------------------------------------------------------------------------------------------------------------|----------------------|---------------------------------|
| Language | Language code (Reference: http://www.lingoes.net/en/translator/langcode.htm) | lang | AILINGBOT_LANG |
| Timezone | Timezone code (Reference: https://en.wikipedia.org/wiki/List_of_tz_database_time_zones) | tz | AILINGBOT_TZ |
| Policy Name | Predefined policy name or complete policy class path | policy.name | AILINGBOT_POLICY__NAME |
| Channel Name | Predefined channel name | channel.name | AILINGBOT_CHANNEL__NAME |
| Webhook Path | Complete class path of non-predefined channel webhook | channel.webhook_name | AILINGBOT_CHANNEL__WEBHOOK_NAME |
| Agent Path | Complete class path of non-predefined channel agent | channel.agent_name | AILINGBOT_CHANNEL__AGENT_NAME |
| Uvicorn Config | All uvicorn configurations (Reference: [uvicorn settings](https://www.uvicorn.org/settings/)). These configurations will be passed to uvicorn | uvicorn.* | AILINGBOT_UVICORN__* |
Configuration example:
```toml
lang = "zh_CN"
tz = "Asia/Shanghai"
[policy]
name = "conversation"
# More policy configurations
[channel]
name = "wechatwork"
# More channel configurations
[uvicorn]
host = "0.0.0.0"
port = 8080
```
#### Built-in Policy Configuration
##### conversation
Conversation uses LangChain's Conversation as the policy, which enables direct interaction with LLM and has a
conversation history context, enabling multi-turn conversations.
| Configuration Item | Description | TOML | Environment Variable |
|--------------------|---------------------------------------------------------------|---------------------|--------------------------------|
| History Size | Indicates how many rounds of historical conversations to keep | policy.history_size | AILINGBOT_POLICY__HISTORY_SIZE |
Configuration example:
```toml
# Use the conversation policy and keep 5 rounds of historical conversations
[policy]
name = "conversation"
history_size = 5
```
##### document_qa
Document_qa uses LangChain's [Stuff](https://python.langchain.com/docs/modules/chains/document/stuff) as the policy.
Users can upload a document and then ask questions based on the document content.
| Configuration Item | Description | TOML | Environment Variable |
|--------------------|---------------------------------------------------|----------------------|---------------------------------|
| Chunk Size | Corresponds to LangChain Splitter's chunk_size | policy.chunk_size | AILINGBOT_POLICY__CHUNK_SIZE |
| Chunk Overlap | Corresponds to LangChain Splitter's chunk_overlap | policy.chunk_overlap | AILINGBOT_POLICY__CHUNK_OVERLAP |
Configuration example:
```toml
# Use the document_qa policy, with chunk_size and chunk_overlap set to 1000 and 0, respectively
[policy]
name = "document_qa"
chunk_size = 1000
chunk_overlap = 0
```
#### Model Configuration
The model configuration is consistent with LangChain. The following is an example.
##### OpenAI
```toml
[policy.llm]
_type = "openai" # Corresponding environment variable: AILINGBOT_POLICY__LLM___TYPE
model_name = "gpt-3.5-turbo" # Corresponding environment variable: AILINGBOT_POLICY__LLM__MODEL_NAME
openai_api_key = "sk-pd*****************************aAb" # Corresponding environment variable: AILINGBOT_POLICY__LLM__OPENAI_API_KEY
```
## Command Line Tools
### Initialize Configuration File (init)
#### Usage
The `init` command generates a configuration file `settings.toml` in the current directory. By default, the user will be
prompted interactively. You can use the `--silence` option to generate the configuration file directly using default
settings.
```text
Usage: ailingbot init [OPTIONS]
Initialize the AilingBot environment.
Options:
--silence Without asking the user.
--overwrite Overwrite existing file if a file with the same name already
exists.
--help Show this message and exit.
```
#### Options
| Option | Description | Type | Remarks |
|-------------|----------------------------------------------------------------------|------|---------|
| --silence | Generate the default configuration directly without asking the user. | Flag | |
| --overwrite | Allow overwriting the `settings.toml` file in the current directory. | Flag | |
### View Current Configuration (config)
The `config` command reads the current environment configuration (including the configuration file and environment
variables) and merges them.
#### Usage
```text
Usage: ailingbot config [OPTIONS]
Show current configuration information.
Options:
-k, --config-key TEXT Configuration key.
--help Show this message and exit.
```
#### Options
| Option | Description | Type | Remarks |
|------------------|-------------------|--------|--------------------------------------------------------------------------|
| -k, --config-key | Configuration key | String | If not passed, the complete configuration information will be displayed. |
### Start Command Line Bot (chat)
The `chat` command starts an interactive command-line bot for testing the current chat policy.
#### Usage
```text
Usage: ailingbot chat [OPTIONS]
Start an interactive bot conversation environment.
Options:
--debug Enable debug mode.
--help Show this message and exit.
```
#### Options
| Option | Description | Type | Remarks |
|---------|-------------------|------|------------------------------------------------------------------|
| --debug | Enable debug mode | Flag | The debug mode will output more information, such as the prompt. |
### Start Webhook Service (serve)
The `serve` command starts a Webhook HTTP server for interacting with specific IM.
#### Usage
```text
Usage: ailingbot serve [OPTIONS]
Run webhook server to receive events.
Options:
--log-level [TRACE|DEBUG|INFO|SUCCESS|WARNING|ERROR|CRITICAL]
The minimum severity level from which logged
messages should be sent to(read from
environment variable AILINGBOT_LOG_LEVEL if
is not passed into). [default: TRACE]
--log-file TEXT STDOUT, STDERR, or file path(read from
environment variable AILINGBOT_LOG_FILE if
is not passed into). [default: STDERR]
--help Show this message and exit.
```
#### Options
| Option | Description | Type | Remarks |
|-------------|--------------------------------------------------------------------------|--------|-------------------------------------------------------------|
| --log-level | The minimum severity level from which logged messages should be sent to. | String | By default, all log levels will be displayed (TRACE). |
| --log-file | The location where logs are output. | String | By default, logs will be output to standard error (STDERR). |
### Start API Service (api)
The `api` command starts the API HTTP server.
#### Usage
```text
Usage: ailingbot api [OPTIONS]
Run endpoint server.
Options:
--log-level [TRACE|DEBUG|INFO|SUCCESS|WARNING|ERROR|CRITICAL]
The minimum severity level from which logged
messages should be sent to(read from
environment variable AILINGBOT_LOG_LEVEL if
is not passed into). [default: TRACE]
--log-file TEXT STDOUT, STDERR, or file path(read from
environment variable AILINGBOT_LOG_FILE if
is not passed into). [default: STDERR]
--help Show this message and exit.
```
#### Options
| Option | Description | Type | Remarks |
|-------------|--------------------------------------------------------------------|--------|---------------------------------------------------------|
| --log-level | Display log level, which will display logs at this level and above | String | By default, all levels are displayed (TRACE) |
| --log-file | Log output location | String | By default, logs are printed to standard error (STDERR) |
## 🔌API
TBD
# 💻Development Guide
## Development Guidelines
TBD
## Developing Chat Policy
TBD
## Developing Channel
TBD
# 🤔Frequently Asked Questions
- Due to the fact that WeChat Work does not support uploading file event callbacks, the built-in `document_qa`
policy cannot be used for WeChat Work.
- The webhook of each IM requires a public IP. If you do not have one, you can consider testing locally through the "
intranet penetration" solution. Please refer to online resources for specific methods.
- We expect the chat policy to be stateless, and the state should be stored externally. However, in specific
implementations, the policy may still have local states (such as storing conversation history in local variables).
Therefore, when uvicorn has multiple worker processes, these local states cannot be shared because each process has a
separate chat policy instance, and a request from the same user may be responded to by different workers, leading to
unexpected behavior. To avoid this, please ensure that at least one of the following two conditions is met:
- Chat policy does not use local states.
- Only one uvicorn worker is started.
# 🎯Roadmap
- [ ] Provide complete usage and developer documentation.
- [ ] Support more channels.
- [x] WeChat Work
- [x] Feishu
- [x] DingTalk
- [x] Slack
- [ ] Support more request message types.
- [x] Text request
- [ ] Image request
- [x] File request
- [ ] Support more response message types.
- [x] Text response
- [ ] Image response
- [ ] File response
- [ ] Markdown response
- [ ] Table response
- [ ] Develop more out-of-the-box chat policies.
- [x] Multi-round conversation policy
- [x] Document question and answer policy
- [ ] Database question and answer policy
- [ ] Online search question and answer policy
- [ ] Support calling standalone chat policy services through HTTP.
- [ ] Abstract basic components
- [ ] Large language model
- [ ] Knowledge base
- [ ] Tools
- [ ] Support local model deployment.
- [ ] ChatGLM-6B
- [x] Support API.
- [ ] Web management dashboard.
- [x] Provide deployment capability based on Docker containers.
- [ ] Enhance the observability and controllability of the system.
- [ ] Complete test cases.