Ecosyste.ms: Awesome
An open API service indexing awesome lists of open source software.
https://github.com/digiampietro/gns3-large
GNS3 dockerfile with VPCS, IOU support, QEMU and Wireshark
https://github.com/digiampietro/gns3-large
Last synced: 3 months ago
JSON representation
GNS3 dockerfile with VPCS, IOU support, QEMU and Wireshark
- Host: GitHub
- URL: https://github.com/digiampietro/gns3-large
- Owner: digiampietro
- Created: 2014-10-26T23:49:08.000Z (over 9 years ago)
- Default Branch: master
- Last Pushed: 2015-02-12T21:17:46.000Z (over 9 years ago)
- Last Synced: 2024-01-19T23:04:25.741Z (5 months ago)
- Language: Shell
- Homepage:
- Size: 358 KB
- Stars: 26
- Watchers: 6
- Forks: 20
- Open Issues: 0
-
Metadata Files:
- Readme: README.md
Lists
- awesome-stars - gns3-large - GNS3 dockerfile with VPCS, IOU support, QEMU and Wireshark (Shell)
README
# GNS3 1.2.3 docker image with VPCS, IOU, QEMU and Wireshark
### News
2015-01-20 Updated GNS3 to version 1.2.3
2014-12-06 Updated GNS3 to version 1.2.1, minor fixes
2014-11-20 Updated GNS3 to version 1.2
2014-11-15 Added support to be executed in Windows using [boot2docker](http://boot2docker.io/) and an X-Windows server like [Xming](http://www.straightrunning.com/XmingNotes/), [Cigwin/X](http://x.cygwin.com/) or similar software
2014-11-09 Added Gnome Connection Manager, routing to GNS3 emulated network, minor fixes
2014-10-27 Added QEMU emulator
2014-10-29 Added the tap0 network interface, owned by the current user, to allow connection to the physical world without need to be root
### Description
This image is based on Ubuntu 14.04 and includes GNS3, VPCS, IOU Support, QEMU and Wireshark. For IOU emulation no additional Virtual Machine is required.
VirtualBox is not included, there are some issues that I was not able to solve to run VirtualBox inside a Docker container.
On image startup a new user is created with same username and user id of current user with the purpose of sharing the same home directory that the user has on the Linux machine.
### Usage
A detailed tutorial is available at [digiampietro.com](http://www.digiampietro.com/2014/1109/cisco_network_emulation_gns3_docker_container.html)
To start the image use the `myrun.sh` script, you will get a standard linux prompt, launch gns3 issuing the `gns3` command, you will have access to your home directory. For unknown reason, to me sometimes happen that the gns3 windows has black color covering readible areas, in that case exit and relauch gns3.
The `myrun.sh` is avilable on my GitHub repository for [gns3-large](https://github.com/digiampietro/gns3-large):
```
#!/bin/sh
export GDISPLAY=unix/$DISPLAY # forward X11 display to the host machine
export GUSERNAME=`id -u -n` # current user's username
export GUID=`id -u` # current user's user id
export GGROUP=`id -g -n` # current user's primary group name
export GGID=`id -g` # current user's primary group id
export GHOME=$HOME # current user's home directory
export GSHELL=$SHELL # current user's shell
#
# to connect the emulated network to the external world
# we use a tap0 interface inside the docker container
# connected to the GNS3 emulated network through
# a GNS3 Cloud device attached to the tap0 interface
#
export GTAPIP=10.123.1.1 # the tap0 IP address
export GTAPMASK=255.255.255.0 # the tap0 IP netmask
export GTAPNATENABLE=0 # enable NAT on tap0 outgoing traffic (if 1 GROUTE2GNS3 must be 0)
export GNS3NETWORK=10.123.0.0 # IP network used inside the GNS3 emulated network
export GNS3NETMASK=255.255.0.0 # IP netmask used inside the GNS3 emulated network
export GROUTE2GNS3=1 # enable routing from the container eth0 to the emulated network
sudo docker run -h gns3-large \
-v /tmp/.X11-unix:/tmp/.X11-unix \
-v $HOME:$HOME \
-e DISPLAY=$GDISPLAY \
-e GUSERNAME=$GUSERNAME \
-e GUID=$GUID \
-e GGROUP=$GGROUP \
-e GGID=$GGID \
-e GHOME=$HOME \
-e GSHELL=$SHELL \
-e GTAPIP=$GTAPIP \
-e GTAPMASK=$GTAPMASK \
-e GTAPNATENABLE=$GTAPNATENABLE \
-e GNS3NETWORK=$GNS3NETWORK \
-e GNS3NETMASK=$GNS3NETMASK \
-e GROUTE2GNS3=$GROUTE2GNS3 \
--privileged \
-it digiampietro/gns3-large
```
* `-h gns3-large` gives the hostname to the docker image
* `-v /tmp/.X11-unix:/tmp/.X11-unix` is needed to display the application in the host environment
* `-v $HOME:$HOME` mount your home directory inside the docker image (the `$HOME` evniroment variable must be correctly set)
* `-e DISPLAY=unix/$DISPLAY` is needed to display the application int the host environment
* `-e ... ` these options set environment variables used by the startup script to add the current user to the docker image. The $HOME and $SHELL environment variables must be correctly set and must contain users's home directory and user's shell
* `--privileged` run in privileged mode, needed to use the tap0 network device to connect to the physical network
* `-it digiampietro/gns3-large` starts the image with a controlling terminal
The docker image, each time that starts, has the virtual interface MAC address changed, for this reason the `iourc.txt` file, containing the IOU License, must be regenerated. The startup script take care of this but you have to put the script `keygen.py` in the `gns3-misc/` folder inside your home directory. The generated `iourc.txt` file is put in `/src/misc/iourc.txt` (in the docker image file system).
After image startup you have a standard linux prompt, type `gns3` to start the application or type exit to remain in the docker image with root access; to exit from the image type `exit` once more.
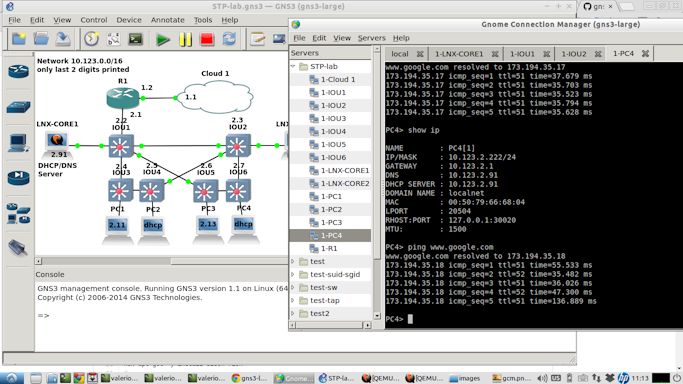
In the docker image two nice tools are included to allow easier access to each device console
* __Gnome Connection Manager__ a multi-tabbed terminal emulator with a list of hosts to connect to on the left panel (see image below), you can launch it with the _gcm_ command
* __gcmconf__ a simple perl script that reads the GNS3 projects from your home directory and create or update the Gnome Connection Manager configuration file to include all devices in your emulated network as showin in the image below
To complete the setup of GNS3, launch the application `gns3` at the linux prompt, go to **Edit -> Preferences ...**:
* in **General -> Console applications** replace the string __gnome-terminal__ with __lxterminal__ and then click on **Apply** and **OK**. This is needed because gnome-terminal can have some issues, related to dbus, inside the docker image;
* in **IOS on UNIX -> General settings** put the string **`/src/misc/iourc.txt`** in **Path to IOURC (pushed to the server)** and then click on **Apply** and **OK**
* in **Dynamips - IOS Routers** click __New__ and add your router images. For legal reasons these images cannot be bundled with the docker image, they have names like `c3725-adventerprisek9-mz.124-15.T14.image` or `c3640-jk9s-mz.124-16.image` or `c7200-adventerprisek9-mz.124-15.T14.image`. Google is your best friend
* in **IOS on UNIX - IOU Devices** click __New__ and add your IOU images. For legal reasons these images cannot be bundled with docker image, they have names like `i86bi-linux-l2-adventerprisek9-15.1a.bin` or `i86bi-linux-l3-adventerprisek9-15.4.1T.bin`.
### Connection to the physical world
To connect to the physical world and to the internet, a tap0 device, owned by the current user, is automatically created by the startup script. Because the `gns3` is not running as root, the only way to connect to external world is using the **cloud symbol** and the **tap0** device.
When using the cloud symbol click on **Configure**, select the **NIO TAP** tab, write **tap0** in the field **TAP interface**, click on **Add** and then on **Apply** and **OK**.
The tap0, virtual ethernet interface, by default (can be change editing the `myrun.sh` file):
* has ip address 10.123.1.1 and netmask 255.255.255.0, can be change editing the `myrun.sh` file;
* the router interface connected to the cloud symbol must have an ip address on the same subnet (for example 10.123.1.2/24)
* assuming that the emulated network will use the network 10.123.0.0/16, routing, by default, has been configured on the docker container (can be changed and enable NAT instead);
* a route to this network must be added on the host (unless NAT is used), can be done using the **hostroute2gns3** script included in this git repository;
## Author
I am happy to be contacted about this project, my contact details are:
|Item |Content |
|-----------------|-------------------------------------------------|
|Author's name |Valerio Di Giampietro |
|Email |[email protected] (yes it's a valid email address!) |
|Personal web site|http://va.ler.io (aka http://digiampietro.com) |
|LinkedIn |http://it.linkedin.com/in/digiampietro |
|Twitter |http://twitter.com/valerio |
|Facebook |http://facebook.com/digiampietro |
## License
(The MIT License)
Copyright (c) 2014 Valerio Di Giampietro [digiampietro.com](http://digiampietro.com)
Permission is hereby granted, free of charge, to any person obtaining a copy of this software and associated documentation files (the 'Software'), to deal in the Software without restriction, including without limitation the rights to use, copy, modify, merge, publish, distribute, sublicense, and/or sell copies of the Software, and to permit persons to whom the Software is furnished to do so, subject to the following conditions:
The above copyright notice and this permission notice shall be included in all copies or substantial portions of the Software.
THE SOFTWARE IS PROVIDED 'AS IS', WITHOUT WARRANTY OF ANY KIND, EXPRESS OR IMPLIED, INCLUDING BUT NOT LIMITED TO THE WARRANTIES OF MERCHANTABILITY, FITNESS FOR A PARTICULAR PURPOSE AND NONINFRINGEMENT. IN NO EVENT SHALL THE AUTHORS OR COPYRIGHT HOLDERS BE LIABLE FOR ANY CLAIM, DAMAGES OR OTHER LIABILITY, WHETHER IN AN ACTION OF CONTRACT, TORT OR OTHERWISE, ARISING FROM, OUT OF OR IN CONNECTION WITH THE SOFTWARE OR THE USE OR OTHER DEALINGS IN THE SOFTWARE.