Ecosyste.ms: Awesome
An open API service indexing awesome lists of open source software.
https://github.com/emiloberg/oppna-program-reklistan-app
iOS and Android App for http://reklistan.vgregion.se
https://github.com/emiloberg/oppna-program-reklistan-app
Last synced: about 1 month ago
JSON representation
iOS and Android App for http://reklistan.vgregion.se
- Host: GitHub
- URL: https://github.com/emiloberg/oppna-program-reklistan-app
- Owner: emiloberg
- Created: 2015-05-06T12:12:06.000Z (about 9 years ago)
- Default Branch: master
- Last Pushed: 2015-11-11T12:41:04.000Z (over 8 years ago)
- Last Synced: 2024-02-15T03:34:08.883Z (5 months ago)
- Language: JavaScript
- Size: 57.3 MB
- Stars: 16
- Watchers: 5
- Forks: 10
- Open Issues: 0
-
Metadata Files:
- Readme: README.md
Lists
- awesome-nativescript - REKlistan - App that helps promote good and safe drug prescribing in Sweden. Downloads and stores data locally for offline use. (Open Source)
- awesome-stars - emiloberg/oppna-program-reklistan-app - iOS and Android App for http://reklistan.vgregion.se (JavaScript)
README
# oppna-program-reklistan-app
iOS and Android app to help medical professionals in Region Västra Götaland, Sweden, to prescribe drugs.
It fetches data via JSON from the companion website [http://reklistan.vgregion.se](http://reklistan.vgregion.se) and stores in the app for offline usage. Built with [NativeScript](https://www.nativescript.org/). The backend site which supplies the data is built with [Liferay](https://www.liferay.com/).
[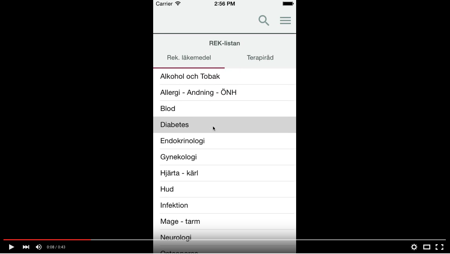](https://www.youtube.com/watch?v=9GeqZmPBxm4)
[Watch video demonstration (43 seconds)](https://www.youtube.com/watch?v=9GeqZmPBxm4)
## Installation
```
# Clone this repo
git clone https://github.com/emiloberg/oppna-program-reklistan-app.git
# Install all dependencies and prepare the project, this will run for a while.
npm install
# Follow the instructions under the heading 'Setting iOS app icons/launch images' below.
```
## Re-preparing the app
If you've already set up the project as described above, but want to rebuild the app (because source code has changed...) do:
```
# cd to/the/project/root
# Checkout the code
npm run prepare
# Build the app as described under 'Building the app'
```
## Building the app
### Android
First, run through _Re-preparing the app_ as described above.
Then, bump the version number. From the root directory run:
```
npm run bump android
```
Then, from root/rekapp, run (after replacing the path and pwd in the command):
```
tns build android --release --key-store-path /path/to/keystore/file.keystore --key-store-password KEYSTORE-PWD --key-store-alias VGR --key-store-alias-password KEYSTORE-PWD
```
Your compiled APK will be placed in.
```
rekapp/platforms/android/build/outputs/apk/rekapp-release.apk
```
Point your web browser to [https://play.google.com/apps/publish/](https://play.google.com/apps/publish/). Log in with license account. Select _REKlistan_, press _APK_ and the _Beta_ tab. Press _Upload APK for beta version_. Select the newley created apk and wait a few hours for Google to process it. Then you can release it to beta/production.
### iOS
First, run through _Re-preparing the app_ as described above.
Then, bump the version number. From the root directory run:
```
npm run bump ios
```
Then, from the app-root/rekapp, open XCode by running
```
open platforms/ios/rekapp.xcodeproj/
```
Select _Product_ > _Archive_. If the _Archive_ option is grayed out do the following: On the top of the XCode window you have a few build buttons (Play, Stop, etc). To the right of the stop icon it says _rekapp > [Some emulator]_. Press the emulator (this is the build destination) and select a non-emulator. There's probably a choice called something like _Generic iOS Device_ - select that. Now Archive should be enabled. Press it.
App will now build. Wait half a minute and a window with all archived versions will now be shown. Press _Upload to App Store_. It'll take a while as Apple will do an automatic validation of the package (and tell you if something's wrong).
Point your web browser to [https://itunesconnect.apple.com](https://itunesconnect.apple.com). Select _My Apps_ and _REKlistan_. To add the build as a new TestFlight (beta) version. Select _TestFlight_ and then _External Testing_. Click _Add build to test_, select the just created build and then fill out the form.
Wait while (could be a couple of hours up to a few days!) while Apple screens the app. You're not getting a mail when they're done so you've to look in from time to time.
## Setting iOS app icons/launch images
First time, after adding the ios platform by running `tns platform add` you need to add all app icons and launch images to the project. Do this by following this guide.
1. From the root of the project start xcode by running `open rekapp/platforms/ios/rekapp.xcodeproj`
2. In xcode, select _rekapp_ on the top left. Scroll down to _App Icons and Launch Images_, it should look like this:
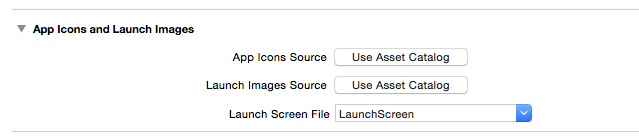
3. Press _Use Asset Catalog_ next to _App Icons Source_. Press _Migrate_ in the dialog. The screens should now look like this:
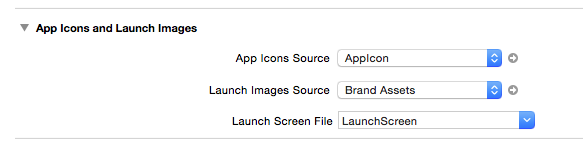
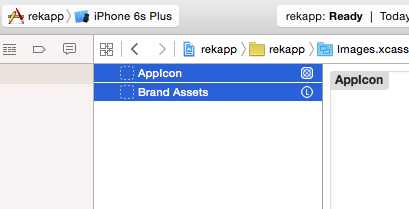
4. Press the little gray arrow next to _App Icons Source [AppIcon]_.
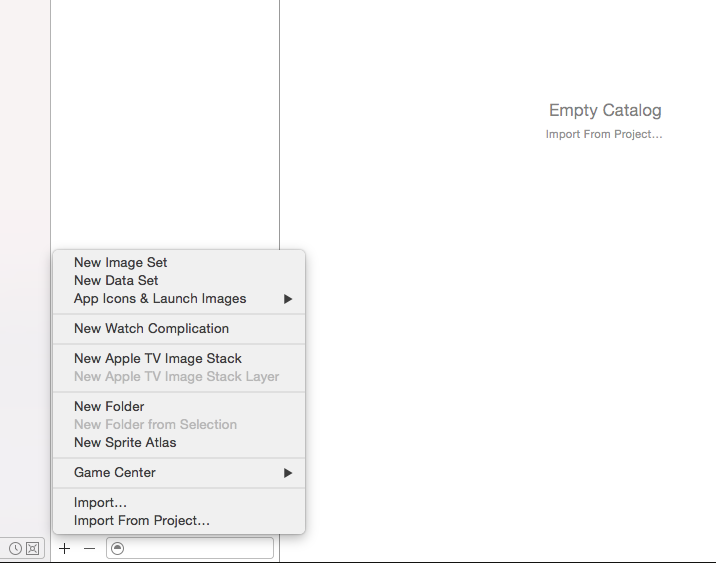
5. On the new screen, select both _AppIcon_ and _Brand Assets_, right click and select _Remove Selected Items_. The list should now be empty.
6. At the bottom of the screen, press the plus sign and select _Import..._
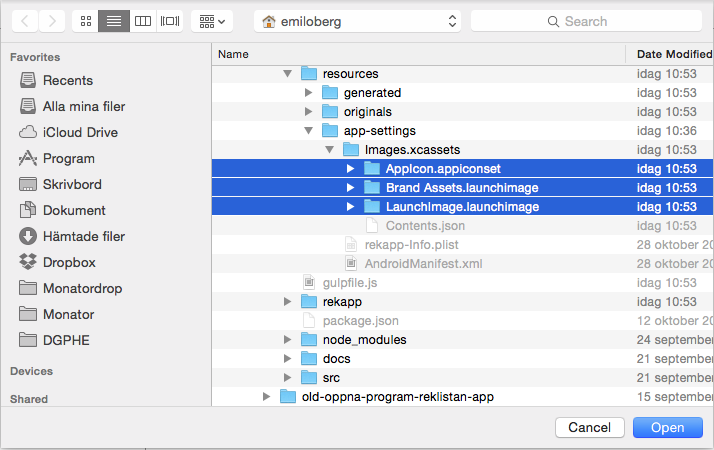
7. Select the three folders inside `resources/app-settings/Images.xcassets` and
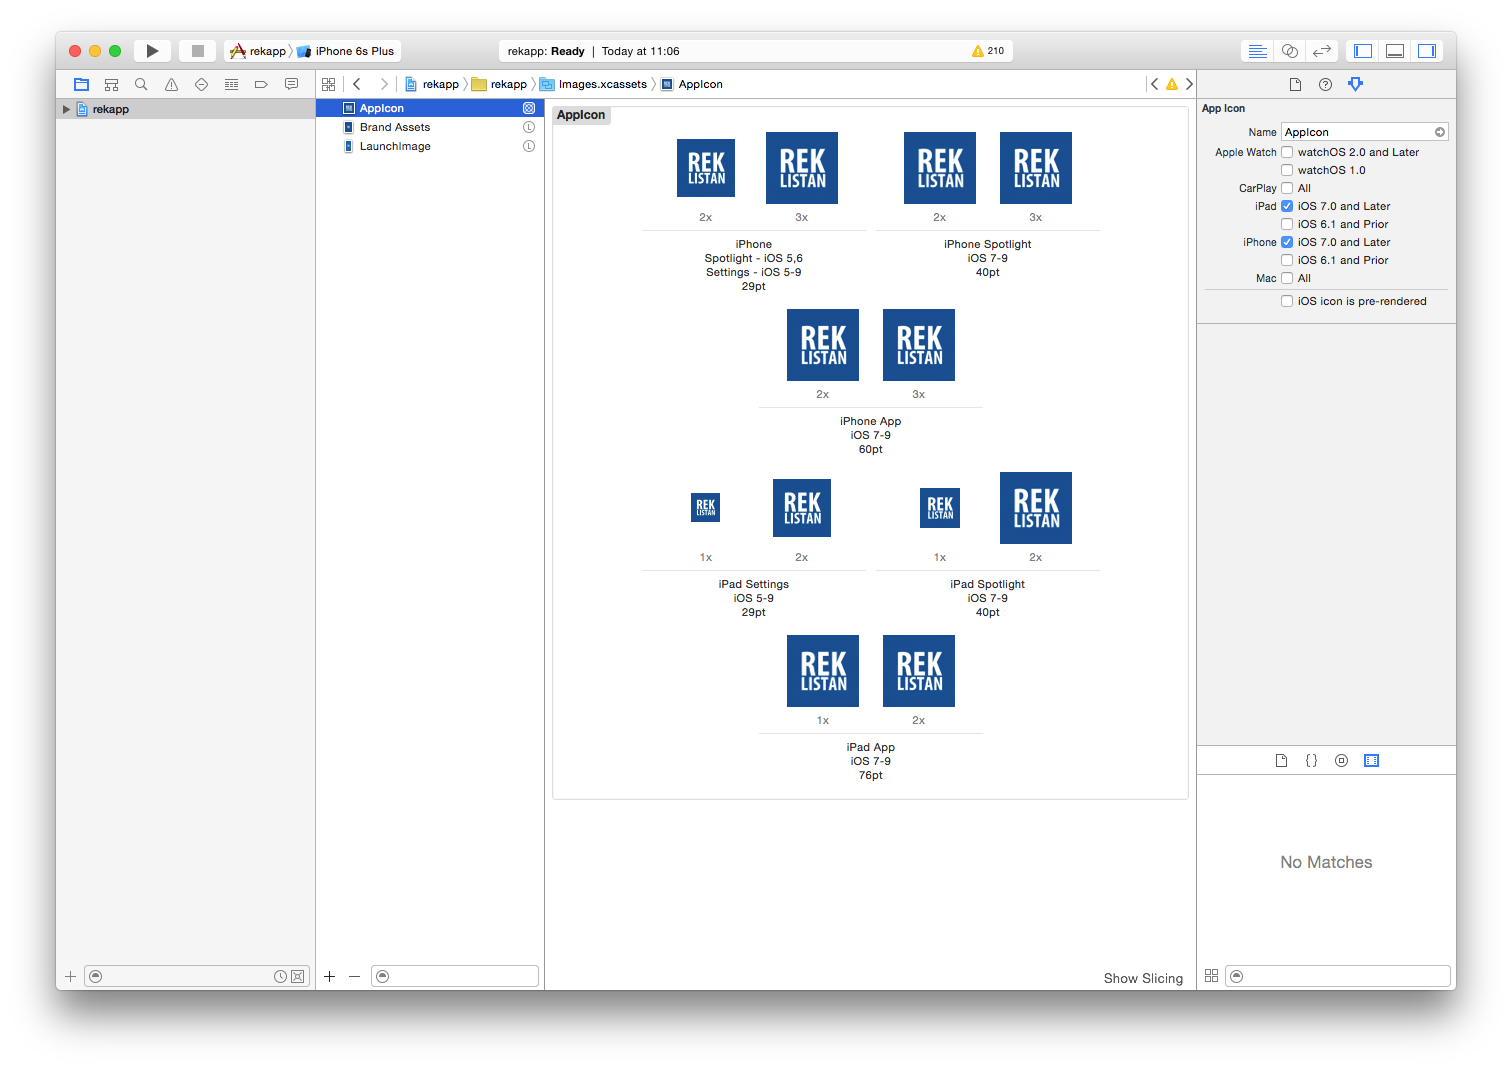
8. The screen should now look like this
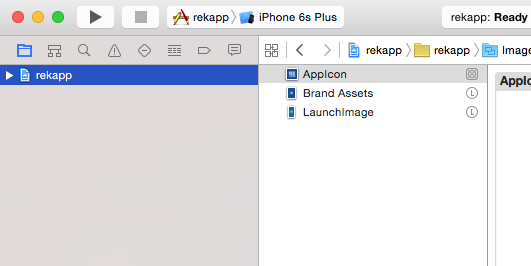
9. Press _rekapp_ in the leftmost column to return to the main screen
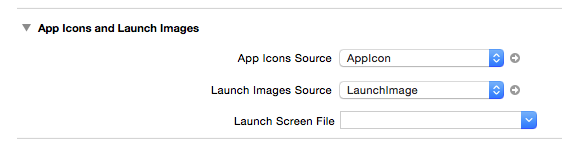
10. Scroll down to _App Icons and Launch Images_ again. And set the 3 fields so that _App Icons Source_ = `AppIcon`, Launch Images Source = `LaunchImage` and clear out _Laynch Screen File_ (it should be empty). When all done, it should look like the screenshot below.
All done!
## Hacks
These hacks are installed automagically when `npm install`-ing the project. The text below if just documentation of the hacks and nothing you need to do manually.
### WebView and rendering
This can be removed once [https://github.com/NativeScript/NativeScript/issues/1038](https://github.com/NativeScript/NativeScript/issues/1038) is released.
Currently, the WebView (used to display advices/drugs) isn't rendering correctly on older Android (probably <= 4.3).
To solve this, the file `rekapp/node_modules/tns-core-modules/ui/web-view/web-view.android.js` is patched at Line 71 and 83.
Where it says something like:
```
this._android.loadDataWithBaseURL(baseUrl, content, "text/html; charset=utf-8", "utf-8", null);
```
`; charset=utf-8` part of the `"text/html; charset=utf-8"` is removed, so that it reads:
```
this._android.loadDataWithBaseURL(baseUrl, content, "text/html", "utf-8", null);
```
Same thing on line 71.
### WebView and images
This can be removed once [https://github.com/NativeScript/NativeScript/issues/963](https://github.com/NativeScript/NativeScript/issues/963) is released.
Currently the WebView isn't can't show pre-downloaded images on Android. There's [an open GitHub issue]([https://github.com/NativeScript/NativeScript/issues/963](https://github.com/NativeScript/NativeScript/issues/963)) which solves this.
The file `rekapp/node_modules/tns-core-modules/ui/web-view/web-view.android.js` is patched at Line 84.
```
this._android.loadData(src, "text/html; charset=utf-8", "utf-8");
```
is replaced with
```
var baseUrl = "file:///" + require("file-system").knownFolders.documents().path + '/';
this._android.loadDataWithBaseURL(baseUrl, src, "text/html", "utf-8", null);
```
## Development
This is a ES2015/EcmaScript 6 app. All source files lives in the `src` directory and gets compiled into ES5 into the `/rekapp` directory.
Images in vector format in `src/app/images` gets converted into png images of different sizes (@2x, @3x, hdpi, etc) and copied to `rekapp/app/images` when `gulp images` is run. Images, already in png format, in `src/app/images-fixed` just gets copied to `rekapp/app/images` when the same gulp task is run.
### Automation
The `npm install` and `npm run prepare` commands will run a whole lot of magic to prepare the app for you. Rather then describing all magic which happens here, take a look at the `root/package.json` file under the `scripts` section.
### Never - ever - touch files in the rekapp/platforms folder
These files are generated and will be overwritten.
If you want to change the `AndroidManifest.xml`/`rekapp-Info.plist` files, edit them in `root/resources/app-settings` and run `tns run prepare` to copy them to the right place.
If you want to change the hacks (as described above), edit them in `root/resources/hacks` and run `tns run prepare` to copy them to the right place. If you want to add/remove a hack; take a look at the `internal:copy-hacks` task in `root/package.json`.
### When developing, run:
```
# To start the emulator the first time
gulp startIOS
# To watch for file changes. When a file is changed
# the source is recomipled (from ES2015 to ES5) and
# changes pushed to the emulator.
gulp livesyncIOS
```
or run:
```
gulp watchFullIOS
```
Currently, NativeScript does unfortunately not display `console.log` or exception statements in the terminal when running with livesync. Therefor we still have to do full rebuilds with the `watchFullIOS` command to get terminal outputs.
### File structure
```
| - gulpfile.js - Development gulp file (for recompiling, etc)
| - node_modules - Development modules
| - package.json - Development package.json
| - rekapp - The actual app.
| - app - The actual app
| - node_modules - App modules
| - package.json - App package json
| - resources - Resources which are not bundled with the app
| - src - Source of the app. Files gets moved from here to 'rekapp'
```
* Javascript source files (ES2015) gets compiled and moved from `src` to `rekapp`. XML and CSS files gets copied without alternation.
* Javascript files in `src/thirdparty` gets moved from `src` to `rekapp` _without_ compilation.
* To install app dependencies, run `npm install [package] --save` from the `rekapp` folder. The NativeScript build process will copy them to the correct places in the app. They may be required in the normal way (`let theModules = require('theModule')`)
### Changes to app settings
These changes are done to the iOS/Android app settings.
#### Set Android Permissions
Edit: `rekapp/platforms/android/src/main/AndroidManifest.xml` and add:
```
```
#### Disable landscape mode and remove Android Title Bar by:
##### Android
Edit: `rekapp/platforms/android/src/main/AndroidManifest.xml` and change
```
```
into
```
```
##### iOS
Edit: `rekapp/platforms/ios/rekapp/rekapp-Info.plist`
To allow SSL Connections on iOS9+. Add as a child to the outermost ``:
```
NSAppTransportSecurity
NSAllowsArbitraryLoads
```
To change app name, change:
```
CFBundleDisplayName
${PRODUCT_NAME}
```
into
```
CFBundleDisplayName
REKlistan
```
and then, to change allowed orientations, change:
```
UISupportedInterfaceOrientations
UIInterfaceOrientationPortrait
UIInterfaceOrientationLandscapeLeft
UIInterfaceOrientationLandscapeRight
UISupportedInterfaceOrientations~ipad
UIInterfaceOrientationPortrait
UIInterfaceOrientationPortraitUpsideDown
UIInterfaceOrientationLandscapeLeft
UIInterfaceOrientationLandscapeRight
```
into
```
UISupportedInterfaceOrientations
UIInterfaceOrientationPortrait
UISupportedInterfaceOrientations~ipad
UIInterfaceOrientationPortrait
UIInterfaceOrientationPortraitUpsideDown
```