Ecosyste.ms: Awesome
An open API service indexing awesome lists of open source software.
https://github.com/quansitech/qs-cusform
零代码自定义表单组件扩展
https://github.com/quansitech/qs-cusform
designable form formily lowcode qscmf
Last synced: 3 months ago
JSON representation
零代码自定义表单组件扩展
- Host: GitHub
- URL: https://github.com/quansitech/qs-cusform
- Owner: quansitech
- License: mit
- Created: 2020-05-19T06:00:31.000Z (about 4 years ago)
- Default Branch: master
- Last Pushed: 2024-01-30T06:07:29.000Z (5 months ago)
- Last Synced: 2024-04-01T20:48:24.119Z (3 months ago)
- Topics: designable, form, formily, lowcode, qscmf
- Language: JavaScript
- Homepage:
- Size: 5.59 MB
- Stars: 6
- Watchers: 4
- Forks: 5
- Open Issues: 11
-
Metadata Files:
- Readme: README.md
- License: LICENSE
Lists
- awesome-lowcode-component - qs-cusform - 零代码自定义表单组件扩展
README
# qs-cusform 自定义表单
提示: v2版与v1无法平滑升级,v2版会废弃v1的数据表(不会删除),请确认数据无需继承的场景下再执行升级操作 [v1版本文档](https://github.com/quansitech/qs-cusform/blob/master/README_v1.md)
v2版本是基于[alibaba/formily](https://github.com/alibaba/formily)和[alibaba/designable](https://github.com/alibaba/designable)开发的零代码自定义表单扩展,大大简化原来designable对于用户不优化的操作界面,仅留下必须的部分组件和控制选项,降低用户的使用和学习门槛,并与qscmf无缝整合。
## 效果图
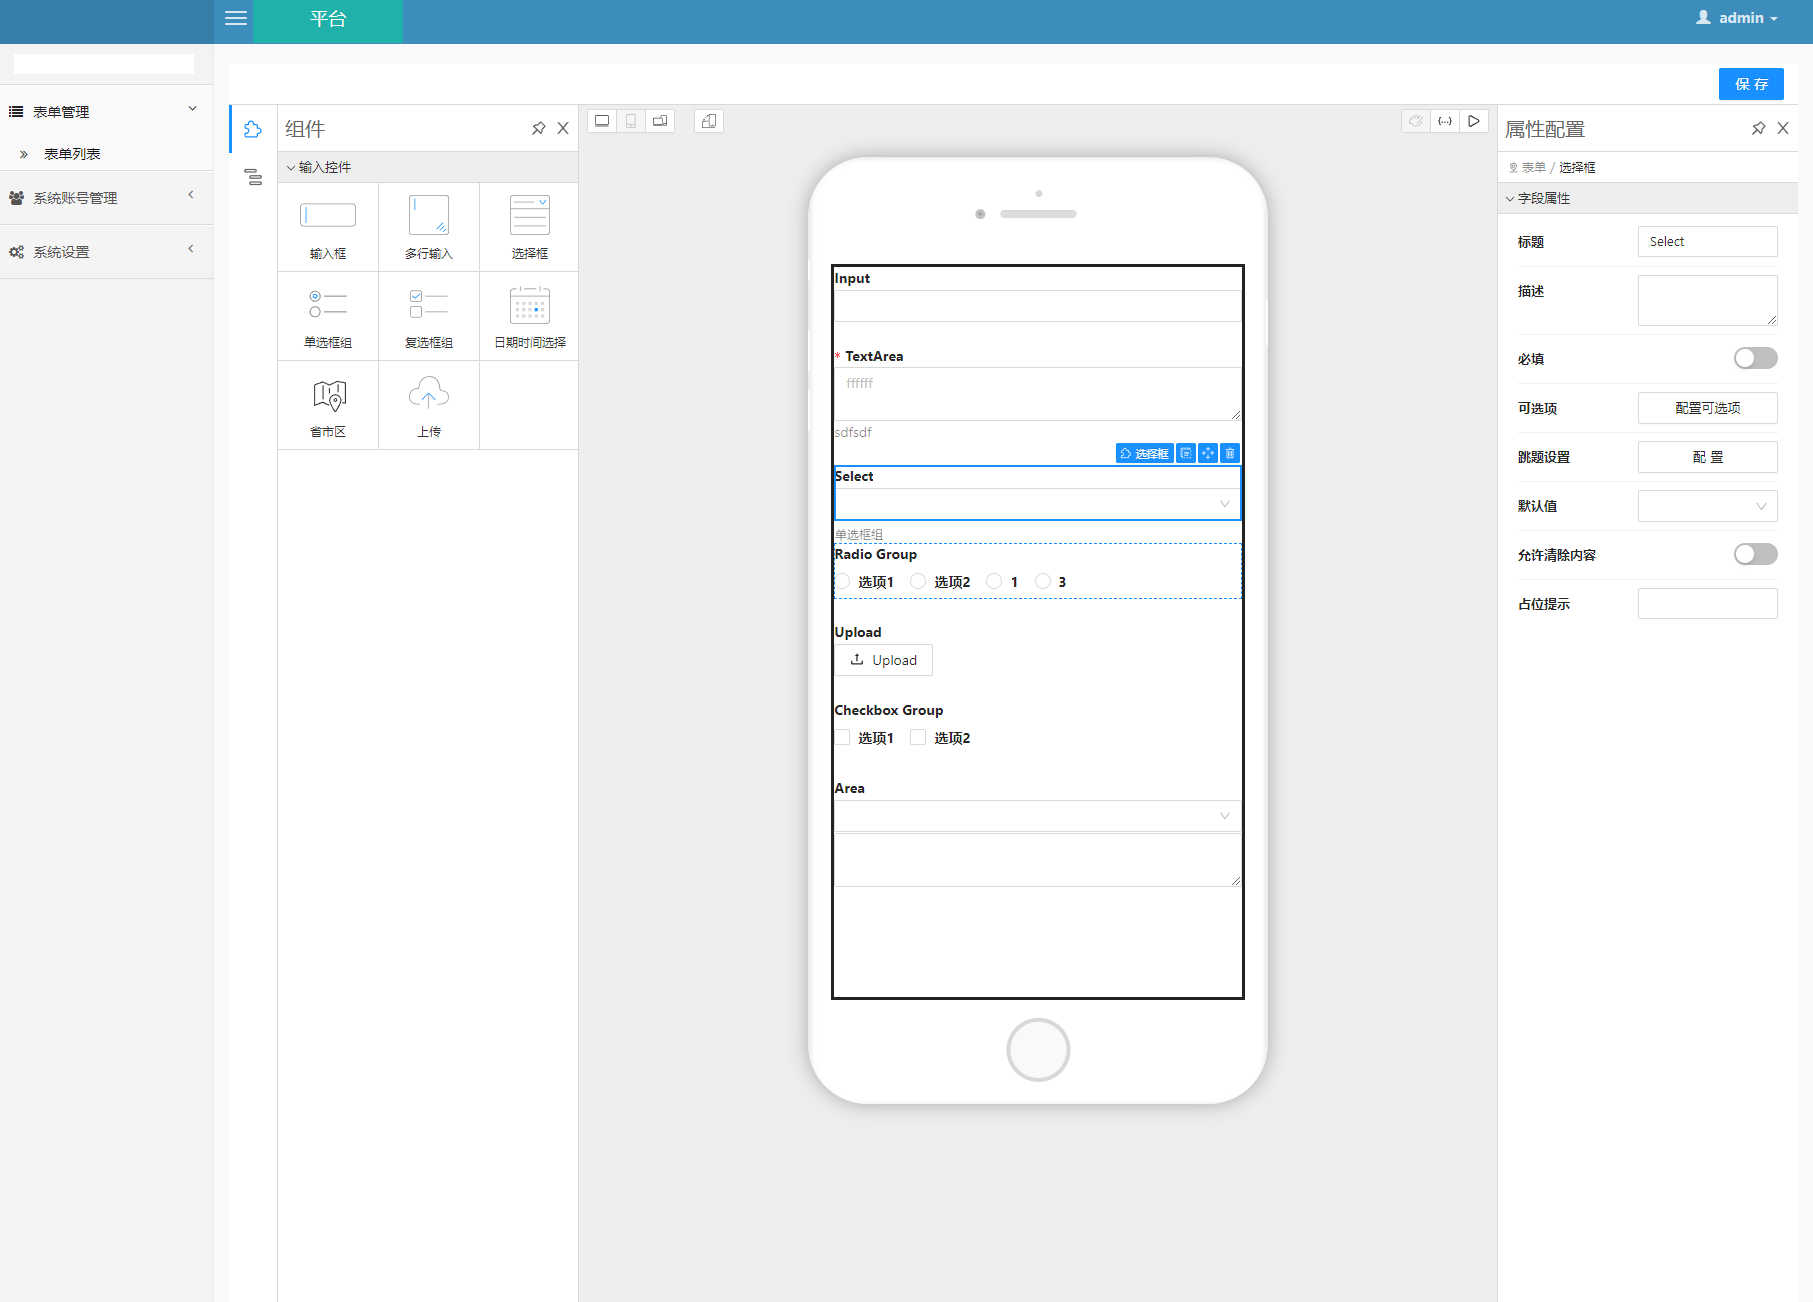
##
## 用法
### 1.安装及执行迁移
```shell
composer require quansitech/cus-form
php artisan migrate
```
### 2. 配置
在根目录的PackageConfig.php文件添加配置项,配置项说明看注释
```php
'cusform' => [
'form_description'=>true, //默认false , true表示开启表单描述字段
'ue_extra_attr'=>'data-url="/Public/libs/ueditor/php/controller.php?oss=1&type=image"' // 自定义ueditor组件的extra_attr参数
'force_delete' => true, //默认为false,表示存在用户提交的表单内容则禁止删除,true表示不做删除检测
'jsOptions' => [
'urlPrefix' => '', //一般不用填写,如采用了非规则的网站前缀(如 https://qscmf.test/project1),需要显式添加
'area' => [
'url' => '', //地区组件获取地区数据的api,一般不用填写,如需要自定义获取api,可通过填写覆盖默认的api
],
'upload' => [
'oss' => true,//是否开启oss上传功能,true开启,false 关闭,默认为false
'action' => '' //上传地址,默认请求组件提供的上传接口,如需自定义可修改
]
]
]
```
### 3.表单管理页
地址 http://[host]:[port]/admin/Form/index
##
## API说明
+ CusForm
| 方法 | 说明 | 参数 | 返回值类型 |
| -------------- | ------------------- | ---------------------------------------------------------------- | ---------------------------------------------------------------------------------- |
| getInstance | 生成CusForm实例对象 | | |
| formSchema | 自定义表单的jsonSchema字符串 | int form_id 表单主键 | string |
| getApplySchema | 获取用户提交的表单数据 | int apply_id 用户数据的主键id
string mode edit(可编辑)\|readonly (只读) | stdClass json对象类型 |
| editApply | 编辑用户提交的表单数据 | int apply_id 用户数据的主键id
stdClass post_object 提交字段的json对象 | [flag, error]
falg为true或者false
false时error保存出错信息 |
| submitApply | 新增用户提交的表单数据 | int form_id 自定义表单主键id
stdClass post_object 提交的字段json对象 | [res, error]
res 如果是false error保存出错信息
否则 res 返回 apply_id |
| getApplyRecord | 获取用户填写记录 | int apply_id 用户数据主键id | array 内容索引数组
`[ 0 => { component_type: 'input', title:'标题', value: '1234'} ]` |
+ Builder
| 方法 | 说明 | 参数 | 返回值类型 |
| ---------- | ---------------------- | ------------------------- | -------- |
| __contruct | 构造函数 | Object json_schema的json对象 | 无 |
| build | 生成新的json_schema的json对象 | | stdClass |
| addBefore | 在自定义表单前插入字段组件 | BaseComponent 组件对象 | this |
| addAfter | 在自定义表单后插入字段组件 | BaseComponent 组件对象 | this |
+ BaseComponent
| 方法 | 说明 | 参数 | 返回值类型 |
| ----------- | --------------- | ---------------------------------------------------------------------------------------- | ------------------------------------------------------------------------ |
| __construct | 构造函数 | string sign 字段标识 | |
| value | 设置组件的值 | string \| stdClass \| array \| number value | this |
| type | 组件值类型 | string type | this |
| title | 标题 | string title | this |
| required | 必填 | bool required 默认值true | this |
| description | 说明 | string description | this |
| default | 默认值 | string \| stdClass \| array \| number default | this |
| validator | 验证器 | string validator
可选项: email、enum、idcard、integer、number
、phone、required、url | this |
| enum | 数据源 | array enum
[[ 'label' => '1分', 'value' => 1],[ 'label' => '2分', 'value' => 2]]this | this |
| validate | 验证 | | array
[true, ''] 验证通过
[false, '错误原因'] 验证失败 |
| readonly | 设置成只读 | | BaseComponent 当前对象 |
| build | 创建组件json_schema | | array
[sign, component]
sign: 组件标识
component: json_schema |
+ Input (BaseComponent实现类)
| 方法 | 说明 | 参数 | 返回值类型 |
| ----------- | ----- | --------------------------------------- | ----- |
| __construct | 构造函数 | string sign 组件标识
string title 组件标题 | |
| placeholder | 占位符 | string placeholder 占位符 | this |
| allowClear | 是否可清空 | bool allowclear
true 启用可清空按钮 | this |
| maxLength | 最大长度 | int maxLength | this |
+ Radio (BaseComponent实现类)
| 方法 | 说明 | 参数 | 返回值类型 |
| ----------- | ---- | --------------------------------------- | ----- |
| __construct | 构造函数 | string sign 组件标识
string title 组件标题 | |
+ Textarea (BaseComponent实现类)
| 方法 | 说明 | 参数 | 返回值类型 |
| ----------- | ----- | --------------------------------------- | ----- |
| __construct | 构造函数 | string sign 组件标识
string title 组件标题 | |
| placeholder | 占位符 | string placeholder 占位符this | this |
| allowClear | 是否可清空 | bool allowclear
true 启用可清空按钮 | this |
| showCount | 展示字数 | bool showCount | this |
+ Text (BaseComponent实现类)
| 方法 | 说明 | 参数 | 返回值类型 |
| ----------- | ---- | ---------------------- | ----- |
| __construct | 构造函数 | string title 组件标题 默认为空 | |
| content | 设置内容 | string content | this |
+ DatePicker (BaseComponent实现类)
| 方法 | 说明 | 参数 | 返回值类型 |
| ----------- | ------- | --------------------------------------------------------- | ----- |
| __construct | 构造函数 | string sign 组件标识
string title 组件标题 | |
| placeholder | 占位符 | string placeholder 占位符this | this |
| allowClear | 是否可清空 | bool allowclear
true 启用可清空按钮 | this |
| picker | 设置展示类型 | string mode
year \| time \| date \| month \| quarter | this |
| showTime | 是否可录入时间 | bool show | this |
+ formilyBuilder
| 方法 | 说明 | 参数 | 返回值类型 |
| ------------ | ---------------------------------------- | ------------------------------------------------ | ----- |
| __construct | 构造函数 | int apply_id 用户数据的主键id
stdClass json_schema | |
| setMode | 只读\|编辑 | string mode
readonly \| edit | this |
| setPostUrl | 设置表单提交地址
默认提交到 admin/formApply/edit | string url | this |
| hideButton | 隐藏按钮 默认为不隐藏 | bool hide | this |
| setReturnUrl | 设置返回按钮跳转地址 | string return_url | this |
##
## 自定义验证器
1. 在Schema\Validator 新增新的验证类
2. 继承BaseValidator基类
3. 实现validate 和 errorMsg方法, validate负责对数据进行验证, errorMsg返回验证失败时的错误提示
##
## 用例
### 1. 后台获取用户提交的表单数据
```php
$apply_id = 5; //qs_form_apply的主键,是用户提交的内容主键
$mode = 'edit'; //表单模式,edit 编辑 readonly 自读
$schema = CusForm::getInstance()->getApplySchema($apply_id, $mode);
$builder = new FormilyBuilder($apply_id, $schema);
$builder->setMode($mode);
echo (string)$builder;
```
### 2. 生成自定义表单的jsonSchema
```php
use CusForm\Schema\Builder;
use CusForm\CusForm;
$json = CusForm::getInstance()->formSchema(1);
$builder = new Builder(json_decode($json));
$this->ajaxReturn($builder->build());
```
### 3. 保存表单内容
```php
use CusForm\Helper;
use CusForm\CusForm;
$data = Helper::iJson();
$form_id = (int)$data.form_id;
list($r, $errMsg) = CusForm::getInstance()->submitApply($form_id, $data);
if($r === false){
$this->ajaxReturn(['status' => 0, 'info' => $errMsg]);
}
else {
$this->ajaxReturn(['status' => 1, 'info' => '成功']);
}
```
### 4. 生成用户提交的内容 jsonSchema
```php
use CusForm\CusForm;
use CusForm\Schema\Builder;
$apply_id = 5;
$mode = 'readonly';
$json = CusForm::getInstance()->getApplySchema(5, 'readonly');
$builder = new Builder($json);
$this->ajaxReturn($builder->build());
```
### 5. 固定字段与自定义字段结合
```
use CusForm\CusForm;
use CusForm\Schema\Builder;
use CusForm\Schema\Components\Radio;
use CusForm\Schema\Components\Input;
use CusForm\Schema\Components\Textarea;
$json = CusForm::getInstance()->getApplySchema(5, 'readonly');
$builder = new Builder($json);
$bq1 = new Textarea('bq1', '问题1');
$bq1->maxLength(150)->showCount(true)->required()->default('非常棒了')->readonly();
$builder->addBefore($bq1); //将bq1固定字段添加到表单前
$bq2 = new Input('bq2', '问题2');
$bq2->placeholder('占位符')->allowClear(true)->required()->readonly();
$builder->addBefore($bq2);
$aq1 = new Radio('aq1', '问题3');
$aq1->enum([
[
'label' => '1分',
'value' => 1
],
[
'label' => '2分',
'value' => 2
],
[
'label' => '3分',
'value' => 3
],
[
'label' => '4分',
'value' => 4
],
[
'label' => '5分',
'value' => 5
]
])->required()->default(5)->readonly();
$builder->addAfter($aq1); //将aq1固定字段添加到表单后
$this->ajaxReturn($builder->build());
```
### 6.前台获取自定义表单
```php
import React from 'react'
import { createForm } from '@formily/core'
import { createSchemaField } from '@formily/react'
import {
FormItem,
DatePicker,
Checkbox,
Cascader,
Editable,
Input,
NumberPicker,
Switch,
Password,
PreviewText,
Radio,
Reset,
Select,
Space,
Submit,
TimePicker,
Transfer,
TreeSelect,
FormGrid,
FormLayout,
FormTab,
FormCollapse,
ArrayTable,
ArrayCards,
} from '@formily/antd'
import {Card, Slider, Rate, message} from 'antd'
import {Form, Area, Upload} from "@quansitech/qs-formily"
import 'antd/dist/antd.less'
const form = createForm()
const SchemaField = createSchemaField({
components: {
Space,
FormGrid,
FormLayout,
FormTab,
FormCollapse,
ArrayTable,
ArrayCards,
FormItem,
DatePicker,
Checkbox,
Cascader,
Editable,
Input,
NumberPicker,
Switch,
Password,
PreviewText,
Radio,
Reset,
Select,
Submit,
TimePicker,
Transfer,
TreeSelect,
Upload,
Card,
Slider,
Rate,
Area
},
})
export const SchedulePage = () => {
const [ formProps, setFormProps ] = React.useState();
const [ schema, setSchema ] = React.useState();
React.useEffect(() => {
//获取jsonSchema
fetch('schema').then(res => {
setFormProps(res.form);
setSchema(res.schema);
})
}, []);
const handleSubmit = async (data) => {
//to do submit
}
return
提交}
}
```
## 开发步骤
node 16.20.2
1. clone 本仓库到本地
2. clone [quansitech/qs-formily (github.com)](https://github.com/quansitech/qs-formily)到js/packages
3. clone [alibaba/formily: Alibaba Group Unified Form Solution -- Support React/ReactNative/Vue2/Vue3 (github.com)](https://github.com/alibaba/formily)将packages改名formilySrc,并移到js文件夹下(仅调试formily的源码时才需要)
4. 在js目录下执行yarn install
5. cd js/formily/antd yarn start 进入开发调试模式;yarn build:playground 编译打包js
## 编译步骤
node 16.20.2
1. clone 本仓库到本地
2. 在js目录下执行yarn install
3. cd js/formily/antd yarn build:playground 编译打包js
## 如何自定义组件
1. 自定义组件分两种情况
+ 组件需要与formitem进行属性映射
*需要通过 @formily/react 的connect和mapRrops接口进行属性映射,可参考@formily相关文档及@formily/antd 的源码*
+ 无需与formitem属性映射
定义普通的react组件即可
2. 在js/formily/antd/src/components下新增组件文件夹,增加behavior和resource接口,用于定义组件在designable的展示及预置行为。 如果需要给组件添加固定属性,可以在createResource方法中传入固定属性参数;
如组件中需要用到Config配置,可定义init方法,并将组件通过addInitComponent注册进初始化列表。
3. 在js/formily/antd/src/schemas添加组件的配置选项
4. 在js/formily/antd/src/locales中添加中英对照
5. 如需要添加自定义属性组件,可在js/formily/setters/src/components下新增组件