Ecosyste.ms: Awesome
An open API service indexing awesome lists of open source software.
https://github.com/HongwenZhang/PyMAF
[ICCV 2021, Oral] PyMAF: 3D Human Pose and Shape Regression with Pyramidal Mesh Alignment Feedback Loop
https://github.com/HongwenZhang/PyMAF
3d-human-pose 3d-human-shape-and-pose-estimation human-mesh-recovery human-model-reconstruction smpl
Last synced: 3 months ago
JSON representation
[ICCV 2021, Oral] PyMAF: 3D Human Pose and Shape Regression with Pyramidal Mesh Alignment Feedback Loop
- Host: GitHub
- URL: https://github.com/HongwenZhang/PyMAF
- Owner: HongwenZhang
- License: other
- Created: 2021-03-27T03:42:36.000Z (over 3 years ago)
- Default Branch: smpl
- Last Pushed: 2024-01-21T15:20:57.000Z (6 months ago)
- Last Synced: 2024-01-22T02:08:05.477Z (6 months ago)
- Topics: 3d-human-pose, 3d-human-shape-and-pose-estimation, human-mesh-recovery, human-model-reconstruction, smpl
- Language: Python
- Homepage: https://hongwenzhang.github.io/pymaf
- Size: 7.07 MB
- Stars: 567
- Watchers: 12
- Forks: 66
- Open Issues: 13
-
Metadata Files:
- Readme: README.md
- License: LICENSE
Lists
- awesome-human-pose-estimation - [code - Arxiv, PyMAF-X (3D Whole-Body Mesh Recovery / 2022)
- awesome-3D-human - PyMAF\
README
🚩 **[Update]** The compatible EFT label files are now available [here](https://cloud.tsinghua.edu.cn/d/635c717375664cd6b3f5), which helps to train a much stronger HMR baseline. See [issue #58](https://github.com/HongwenZhang/PyMAF/issues/58).
# PyMAF [ICCV'21 Oral] & PyMAF-X [TPAMI'23]
This repository contains the code for the following papers:
**PyMAF-X: Towards Well-aligned Full-body Model Regression from Monocular Images**
Hongwen Zhang, Yating Tian, Yuxiang Zhang, Mengcheng Li, Liang An, Zhenan Sun, Yebin Liu
TPAMI, 2023
[[Project Page]](https://www.liuyebin.com/pymaf-x) [[Paper]](https://arxiv.org/pdf/2207.06400.pdf) [[Code: smplx branch]](https://github.com/HongwenZhang/PyMAF/tree/smplx)
**PyMAF: 3D Human Pose and Shape Regression with Pyramidal Mesh Alignment Feedback Loop**
Hongwen Zhang*, Yating Tian*, Xinchi Zhou, Wanli Ouyang, Yebin Liu, Limin Wang, Zhenan Sun
\* Equal contribution
ICCV, 2021 (Oral Paper)
[[Project Page]](https://hongwenzhang.github.io/pymaf) [[Paper]](https://arxiv.org/pdf/2103.16507.pdf) [Code: smpl branch]
# Instruction for PyMAF
Preview of demo results:
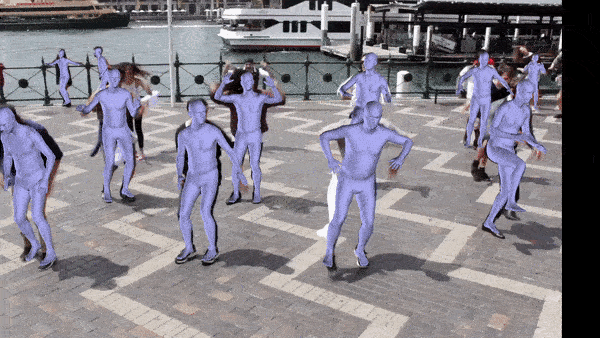
Frame by frame reconstruction. Video clipped from here.

Frame by frame reconstruction. Video from here.
More results: [Click Here](https://hongwenzhang.github.io/pymaf)
## Requirements
- Python 3.8
```
conda create --no-default-packages -n pymafx python=3.8
conda activate pymafx
```
### packages
- [PyTorch](https://www.pytorch.org) tested on version 1.9.0
```
conda install pytorch==1.9.0 torchvision==0.10.0 cudatoolkit=11.1 -c pytorch -c conda-forge
```
- [pytorch3d](https://github.com/facebookresearch/pytorch3d/blob/main/INSTALL.md)
```
pip install "git+https://github.com/facebookresearch/pytorch3d.git@stable"
```
- other packages listed in `requirements.txt`
```
pip install -r requirements.txt
```
### necessary files
> mesh_downsampling.npz & DensePose UV data
- Run the following script to fetch mesh_downsampling.npz & DensePose UV data from other repositories.
```
bash fetch_data.sh
```
> SMPL model files
- Collect SMPL model files from [https://smpl.is.tue.mpg.de](https://smpl.is.tue.mpg.de) and [UP](https://github.com/classner/up/blob/master/models/3D/basicModel_neutral_lbs_10_207_0_v1.0.0.pkl). Rename model files and put them into the `./data/smpl` directory.
> Fetch preprocessed data from [SPIN](https://github.com/nkolot/SPIN#fetch-data).
> Fetch final_fits data from [SPIN](https://github.com/nkolot/SPIN#final-fits). [important note: using [EFT](https://github.com/facebookresearch/eft) fits for training is much better. Compatible npz files are available [here](https://cloud.tsinghua.edu.cn/d/635c717375664cd6b3f5)]
> Download the [pre-trained model](https://drive.google.com/drive/folders/1R4_Vi4TpCQ26-6_b2PhjTBg-nBxZKjz6?usp=sharing) and put it into the `./data/pretrained_model` directory.
After collecting the above necessary files, the directory structure of `./data` is expected as follows.
```
./data
├── dataset_extras
│ └── .npz files
├── J_regressor_extra.npy
├── J_regressor_h36m.npy
├── mesh_downsampling.npz
├── pretrained_model
│ └── PyMAF_model_checkpoint.pt
├── smpl
│ ├── SMPL_FEMALE.pkl
│ ├── SMPL_MALE.pkl
│ └── SMPL_NEUTRAL.pkl
├── smpl_mean_params.npz
├── final_fits
│ └── .npy files
└── UV_data
├── UV_Processed.mat
└── UV_symmetry_transforms.mat
```
## Demo
You can first give it a try on Google Colab using the notebook we have prepared, which is no need to prepare the environment yourself: [](https://colab.research.google.com/drive/11RXLsH9BdoSCwY6G-IX7KgqDxVoImu6K?usp=sharing)
Run the demo code.
#### For image input:
```
python3 demo.py --checkpoint=data/pretrained_model/PyMAF_model_checkpoint.pt --img_file examples/COCO_val2014_000000019667.jpg
```
#### For video input:
```
# video with single person
python3 demo.py --checkpoint=data/pretrained_model/PyMAF_model_checkpoint.pt --vid_file examples/dancer.mp4
# video with multiple persons
python3 demo.py --checkpoint=data/pretrained_model/PyMAF_model_checkpoint.pt --vid_file examples/flashmob.mp4
```
## Evaluation
### COCO Keypoint Localization
1. Download the preprocessed data [coco_2014_val.npz](https://drive.google.com/drive/folders/1R4_Vi4TpCQ26-6_b2PhjTBg-nBxZKjz6?usp=sharing). Put it into the `./data/dataset_extras` directory.
2. Run the COCO evaluation code.
```
python3 eval_coco.py --checkpoint=data/pretrained_model/PyMAF_model_checkpoint.pt
```
### 3DPW
Run the evaluation code. Using `--dataset` to specify the evaluation dataset.
```
# Example usage:
# 3DPW
python3 eval.py --checkpoint=data/pretrained_model/PyMAF_model_checkpoint.pt --dataset=3dpw --log_freq=20
```
## Training
🚀 **[Important update]: Using [EFT](https://github.com/facebookresearch/eft) fits is recommended, as it can significantly improve the baseline. Compatible data is available [here](https://cloud.tsinghua.edu.cn/d/635c717375664cd6b3f5). See [issue #58](https://github.com/HongwenZhang/PyMAF/issues/58) for more training details using the EFT labels.**
Below messages are the training details of the conference version of PyMAF.
To perform training, we need to collect preprocessed files of training datasets at first.
The preprocessed labels have the same format as SPIN and can be retrieved from [here](https://github.com/nkolot/SPIN#fetch-data). Please refer to [SPIN](https://github.com/nkolot/SPIN) for more details about data preprocessing.
PyMAF is trained on Human3.6M at the first stage and then trained on the mixture of both 2D and 3D datasets at the second stage. Example usage:
```
# training on COCO
CUDA_VISIBLE_DEVICES=0 python3 train.py --regressor pymaf_net --single_dataset --misc TRAIN.BATCH_SIZE 64
# training on mixed datasets
CUDA_VISIBLE_DEVICES=0 python3 train.py --regressor pymaf_net --pretrained_checkpoint path/to/checkpoint_file.pt --misc TRAIN.BATCH_SIZE 64
```
Running the above commands will use Human3.6M or mixed datasets for training, respectively. We can monitor the training process by setting up a TensorBoard at the directory `./logs`.
## Citation
If this work is helpful in your research, please cite the following paper.
```
@inproceedings{pymaf2021,
title={PyMAF: 3D Human Pose and Shape Regression with Pyramidal Mesh Alignment Feedback Loop},
author={Zhang, Hongwen and Tian, Yating and Zhou, Xinchi and Ouyang, Wanli and Liu, Yebin and Wang, Limin and Sun, Zhenan},
booktitle={Proceedings of the IEEE International Conference on Computer Vision},
year={2021}
}
@article{pymafx2023,
title={PyMAF-X: Towards Well-aligned Full-body Model Regression from Monocular Images},
author={Zhang, Hongwen and Tian, Yating and Zhang, Yuxiang and Li, Mengcheng and An, Liang and Sun, Zhenan and Liu, Yebin},
journal={IEEE Transactions on Pattern Analysis and Machine Intelligence},
year={2023}
}
```
## Acknowledgments
The code is developed upon the following projects. Many thanks to their contributions.
- [SPIN](https://github.com/nkolot/SPIN)
- [DaNet](https://github.com/HongwenZhang/DaNet-3DHumanReconstruction)
- [VIBE](https://github.com/mkocabas/VIBE)
- [PIFu](https://github.com/shunsukesaito/PIFu)
- [DensePose](https://github.com/facebookresearch/DensePose)
- [HMR](https://github.com/akanazawa/hmr)
- [pose_resnet](https://github.com/Microsoft/human-pose-estimation.pytorch)