Ecosyste.ms: Awesome
An open API service indexing awesome lists of open source software.
https://github.com/Textualize/rich-cli
Rich-cli is a command line toolbox for fancy output in the terminal
https://github.com/Textualize/rich-cli
markdown rich syntax-highlighting terminal terminal-colors
Last synced: about 2 months ago
JSON representation
Rich-cli is a command line toolbox for fancy output in the terminal
- Host: GitHub
- URL: https://github.com/Textualize/rich-cli
- Owner: Textualize
- License: mit
- Created: 2022-01-22T12:31:52.000Z (over 2 years ago)
- Default Branch: main
- Last Pushed: 2024-03-31T12:37:00.000Z (3 months ago)
- Last Synced: 2024-04-19T02:53:14.732Z (about 2 months ago)
- Topics: markdown, rich, syntax-highlighting, terminal, terminal-colors
- Language: Python
- Homepage: https://www.textualize.io
- Size: 8.59 MB
- Stars: 2,936
- Watchers: 29
- Forks: 75
- Open Issues: 32
-
Metadata Files:
- Readme: README.md
- Changelog: CHANGELOG.md
- License: LICENSE
Lists
- awesome-textualize-projects - Rich CLI
- bookmarks - Textualize/rich-cli - Rich-cli is a command line toolbox for fancy output in the terminal (Cryptocurrency)
- cli-apps - rich - Rich-CLI is a command line toolbox for fancy output in the terminal, built with [Rich](https://github.com/Textualize/rich). (<a name="text-processing"></a>Text processing)
- awesome-stars - Textualize/rich-cli - Rich-cli is a command line toolbox for fancy output in the terminal (Python)
- awesome-stars - Textualize/rich-cli - Rich-cli is a command line toolbox for fancy output in the terminal (Python)
- awesome-stars - Textualize/rich-cli - Rich-cli is a command line toolbox for fancy output in the terminal (Python)
- awesome-stars - Textualize/rich-cli - Rich-cli is a command line toolbox for fancy output in the terminal (Python)
- awesome-stars - Textualize/rich-cli - Rich-cli is a command line toolbox for fancy output in the terminal (Python)
- my-awesome-github-stars - Textualize/rich-cli - Rich-cli is a command line toolbox for fancy output in the terminal (Python)
- awesome - Textualize/rich-cli - Rich-cli is a command line toolbox for fancy output in the terminal (Python)
- awesome-stars - Textualize/rich-cli - Rich-cli is a command line toolbox for fancy output in the terminal (Python)
- awesome-stars - rich-cli - cli is a command line toolbox for fancy output in the terminal | Textualize | 2964 | (Python)
- awesome-stars - Textualize/rich-cli - `★2974` Rich-cli is a command line toolbox for fancy output in the terminal (Python)
- awesome-stars - Textualize/rich-cli - Rich-cli is a command line toolbox for fancy output in the terminal (Python)
- awesome-stars - Textualize/rich-cli - `★2918` Rich-cli is a command line toolbox for fancy output in the terminal (Python)
- awesome-cli-apps - rich - Rich-CLI is a command line toolbox for fancy output in the terminal, built with [Rich](https://github.com/Textualize/rich). (<a name="text-processing"></a>Text processing)
- awesome-stars - Textualize/rich-cli - Rich-cli is a command line toolbox for fancy output in the terminal (Python)
- awesome-stars - Textualize/rich-cli - Rich-cli is a command line toolbox for fancy output in the terminal (terminal)
README
# Rich-CLI
Rich-CLI is a command line toolbox for fancy output in the terminal, built with [Rich](https://github.com/Textualize/rich).
Use the `rich` command to highlight a variety of file types in the terminal, with specialized rendering for Markdown and JSON files. Additionally you can markup and format text from the command line.
## Installation
There are a few options for installing Rich-CLI.
### Windows / Linux
You can install Rich-CLI with [pipx](https://pypa.github.io/pipx/).
```
pipx install rich-cli
```
### MacOS
You can install Rich-CLI with [Homebrew](https://brew.sh/).
```
brew install rich
```
### Universal
Rich-CLI may be installed as a Python package, either using `pip`:
```
python -m pip install rich-cli
```
Or using `conda` or `mamba`:
```
mamba install -c conda-forge rich-cli
```
## Rich command
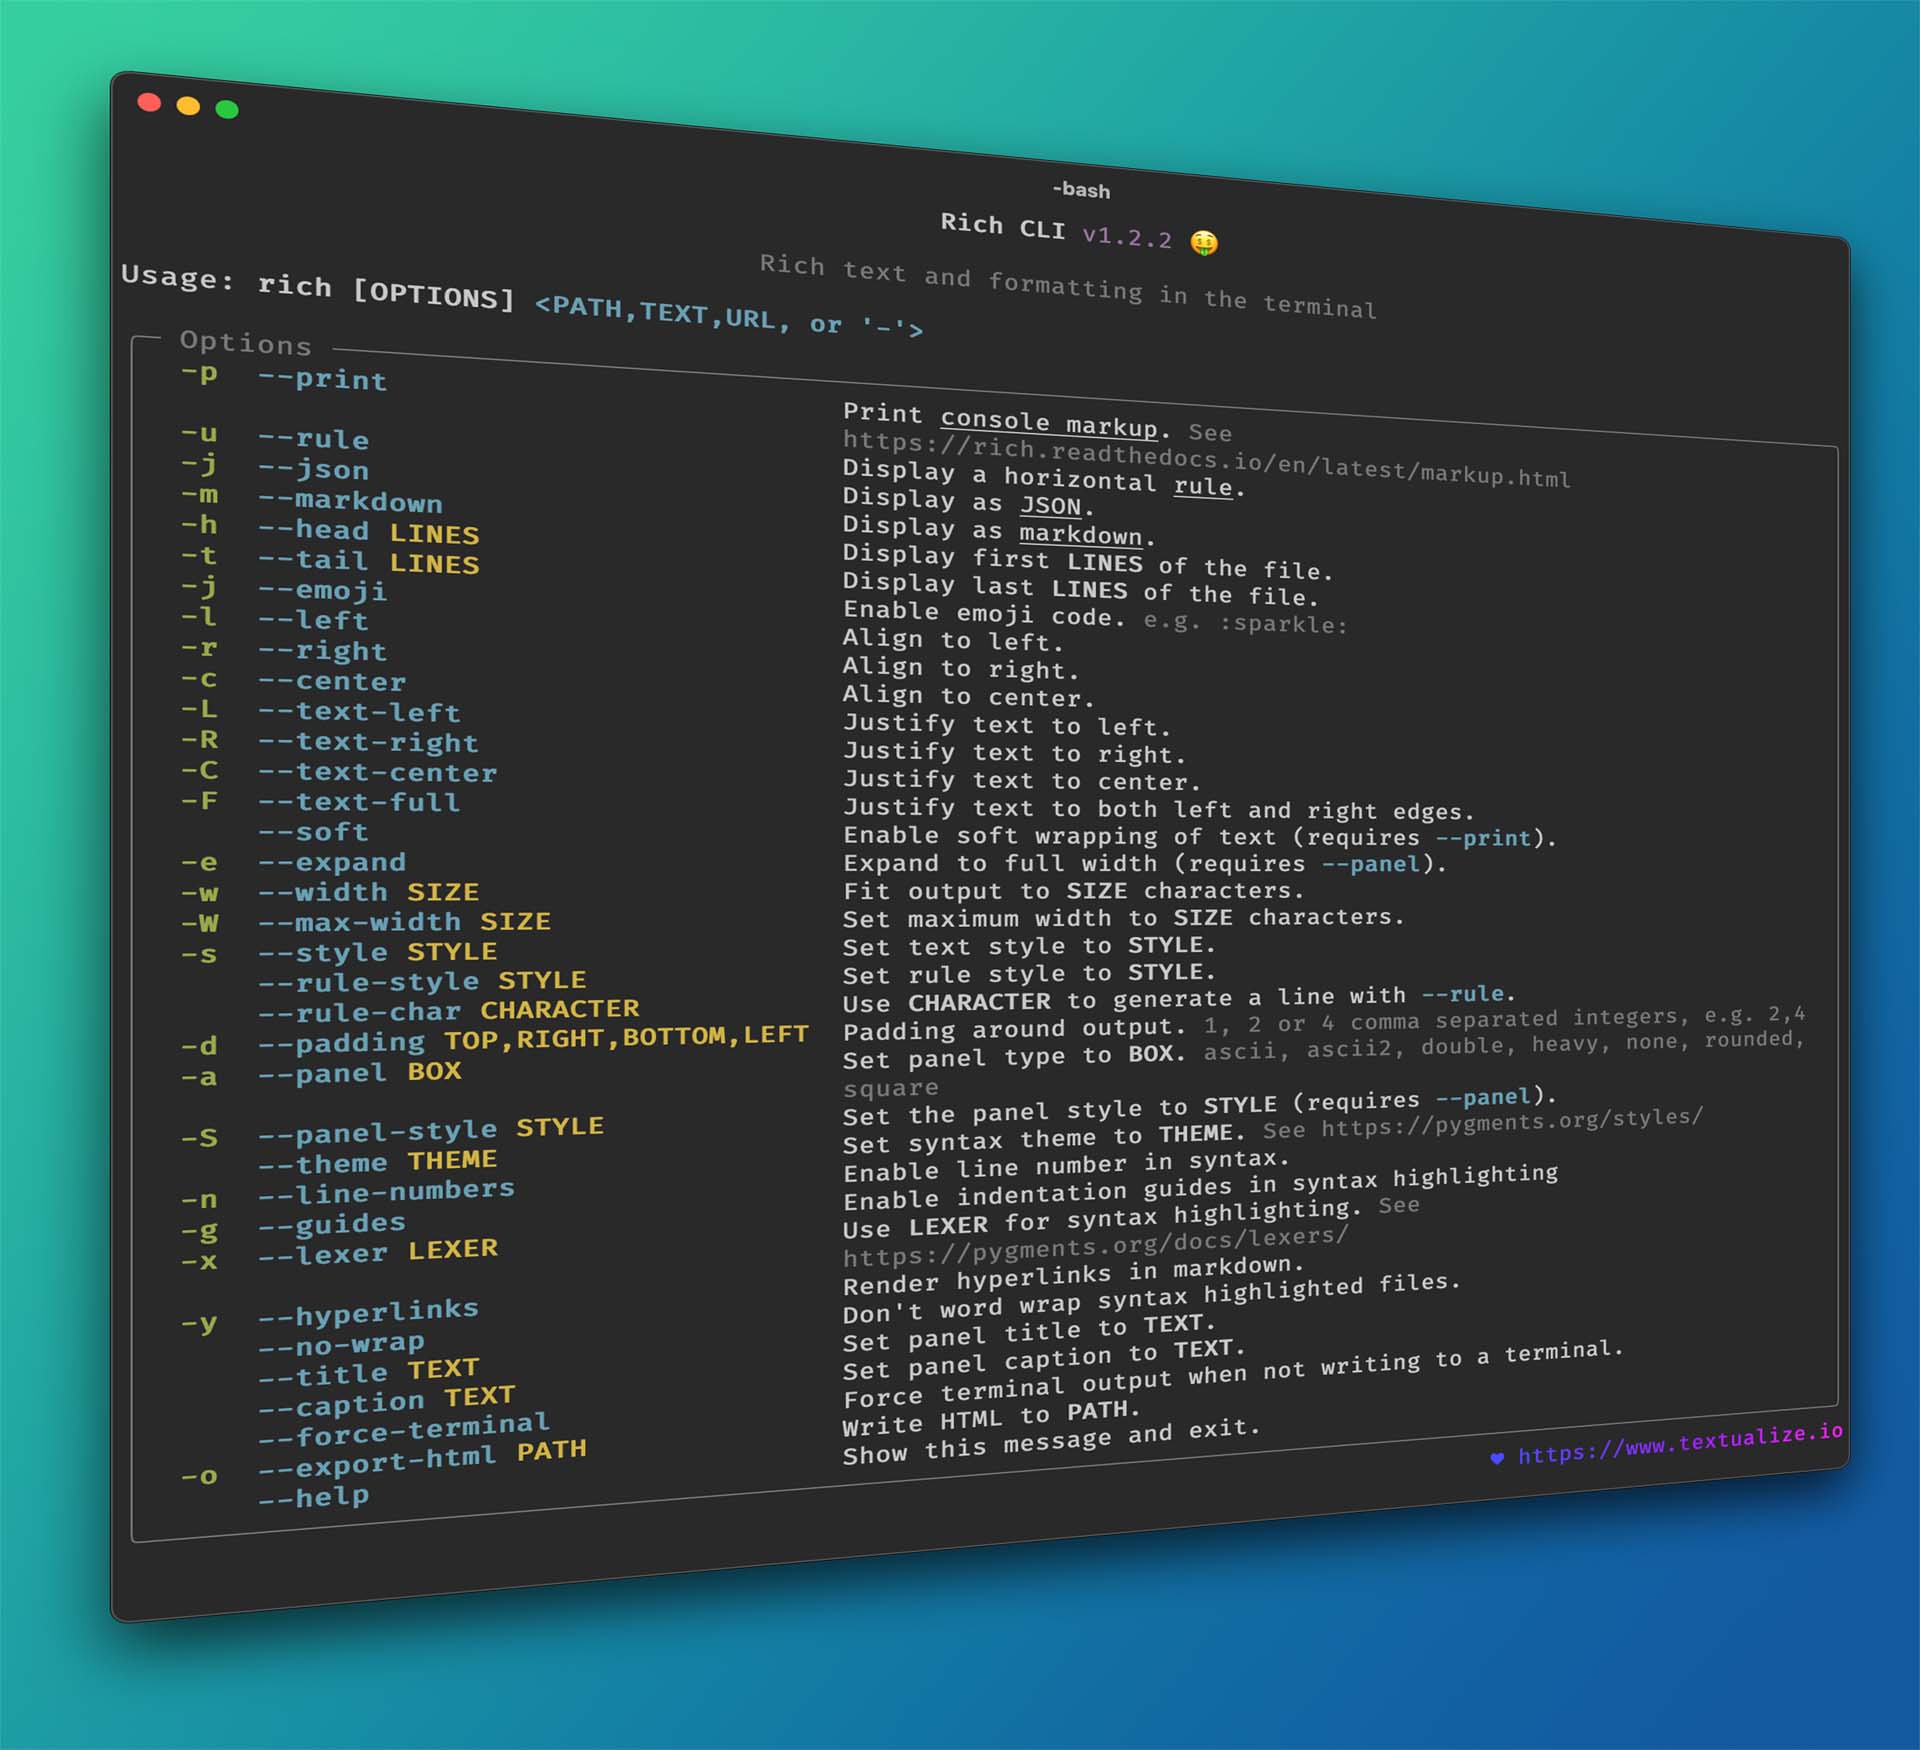
Once installed you should have the `rich` command in your path. Run the following to see usage / help:
```
rich --help
```
## Syntax highlighting
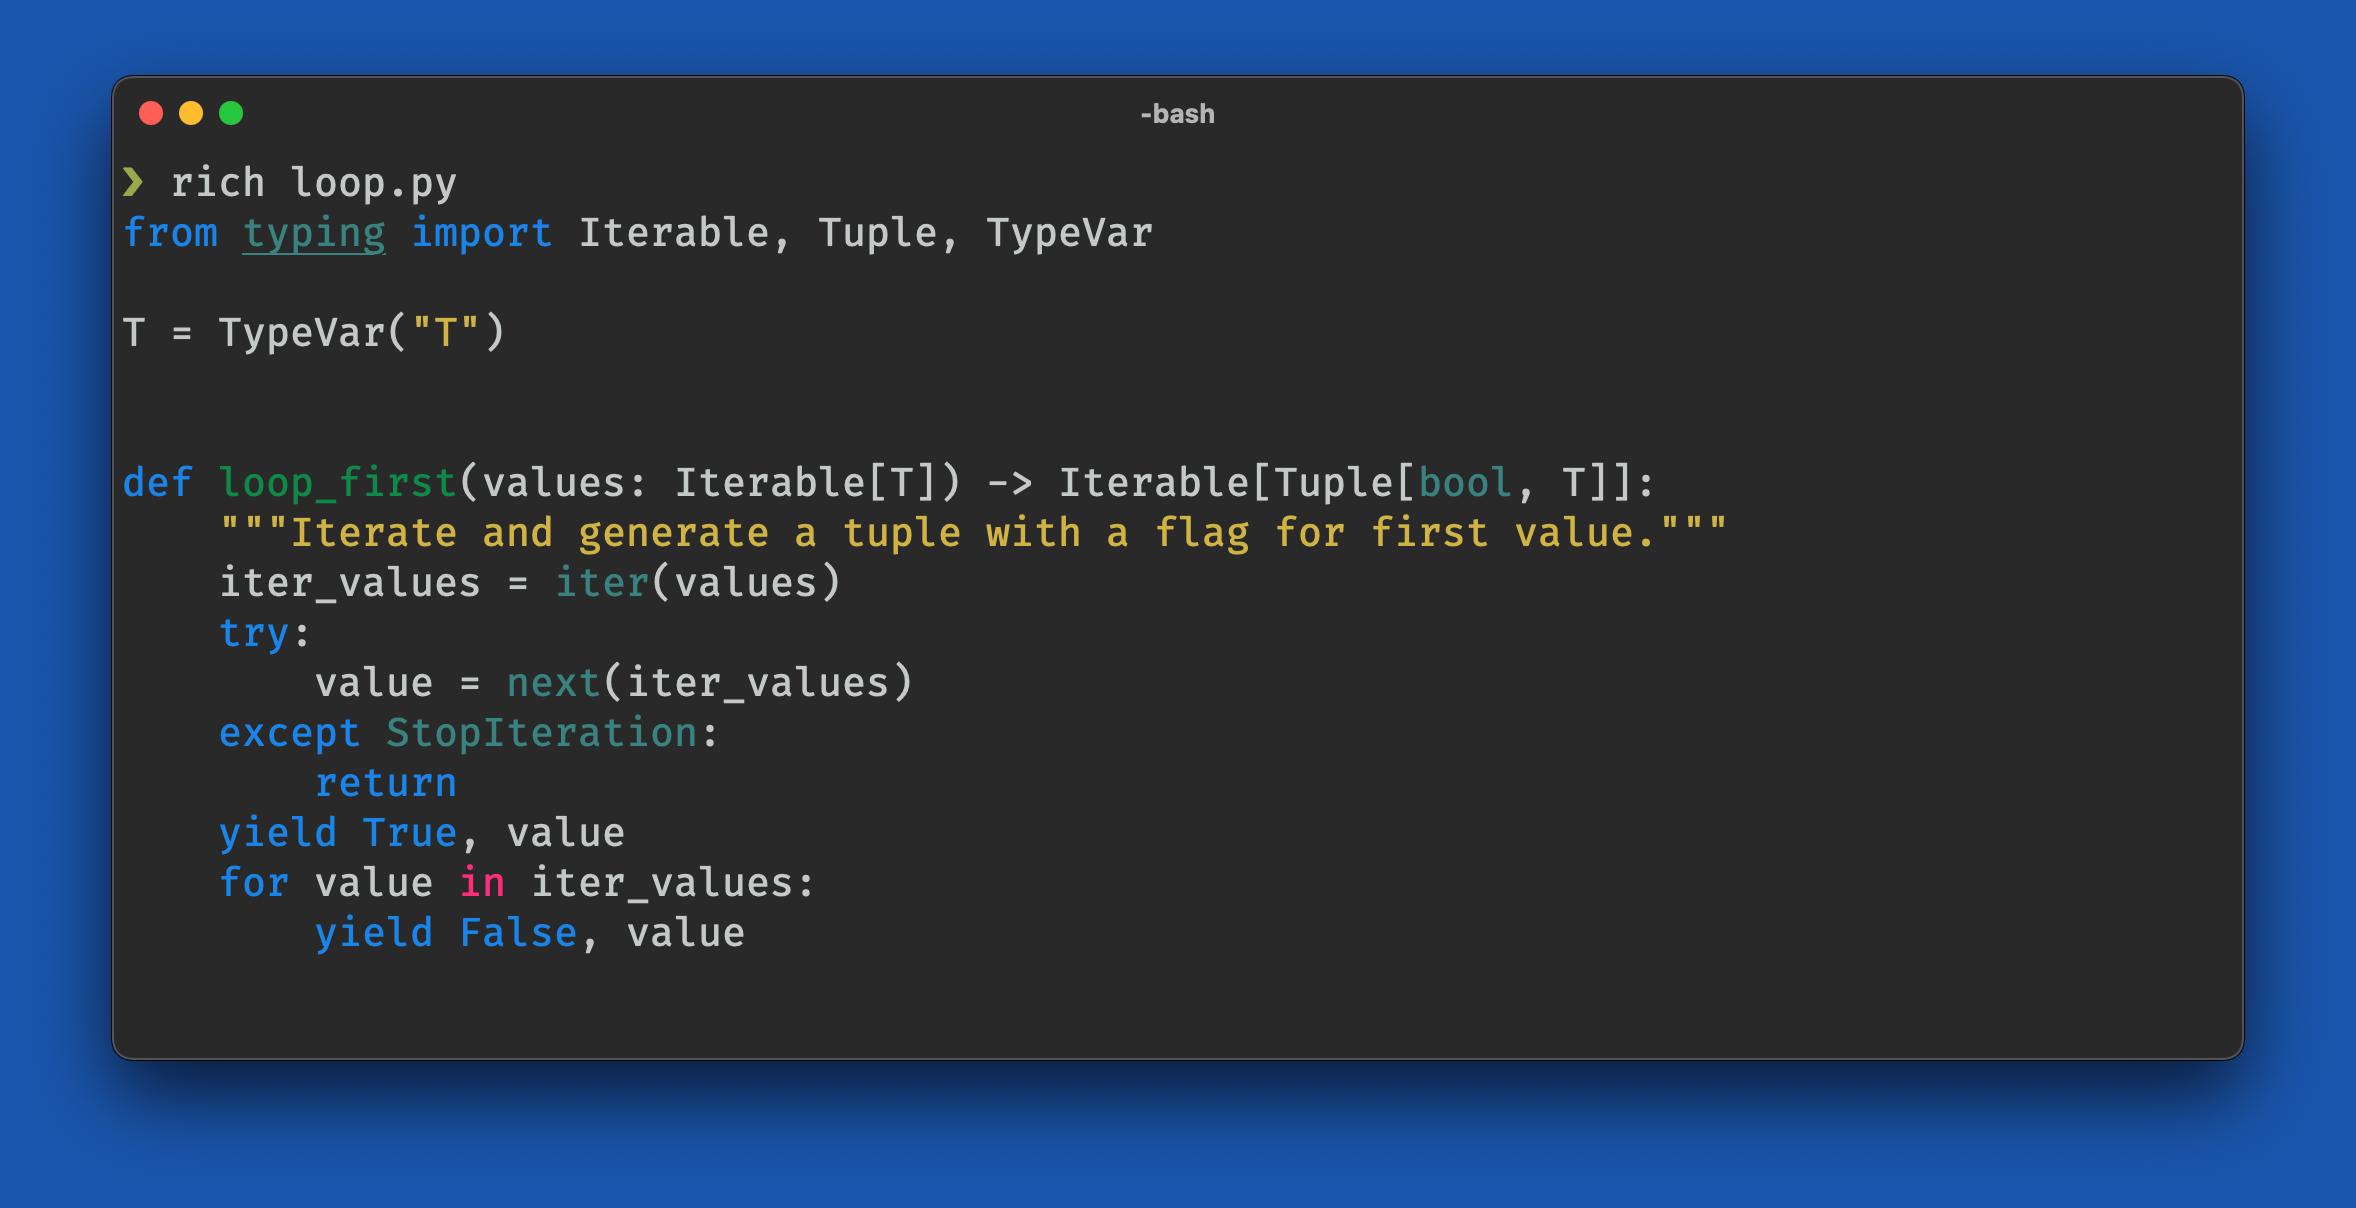
To syntax highlight a file enter `rich` followed by a path. Many file formats are supported.
```
rich loop.py
```
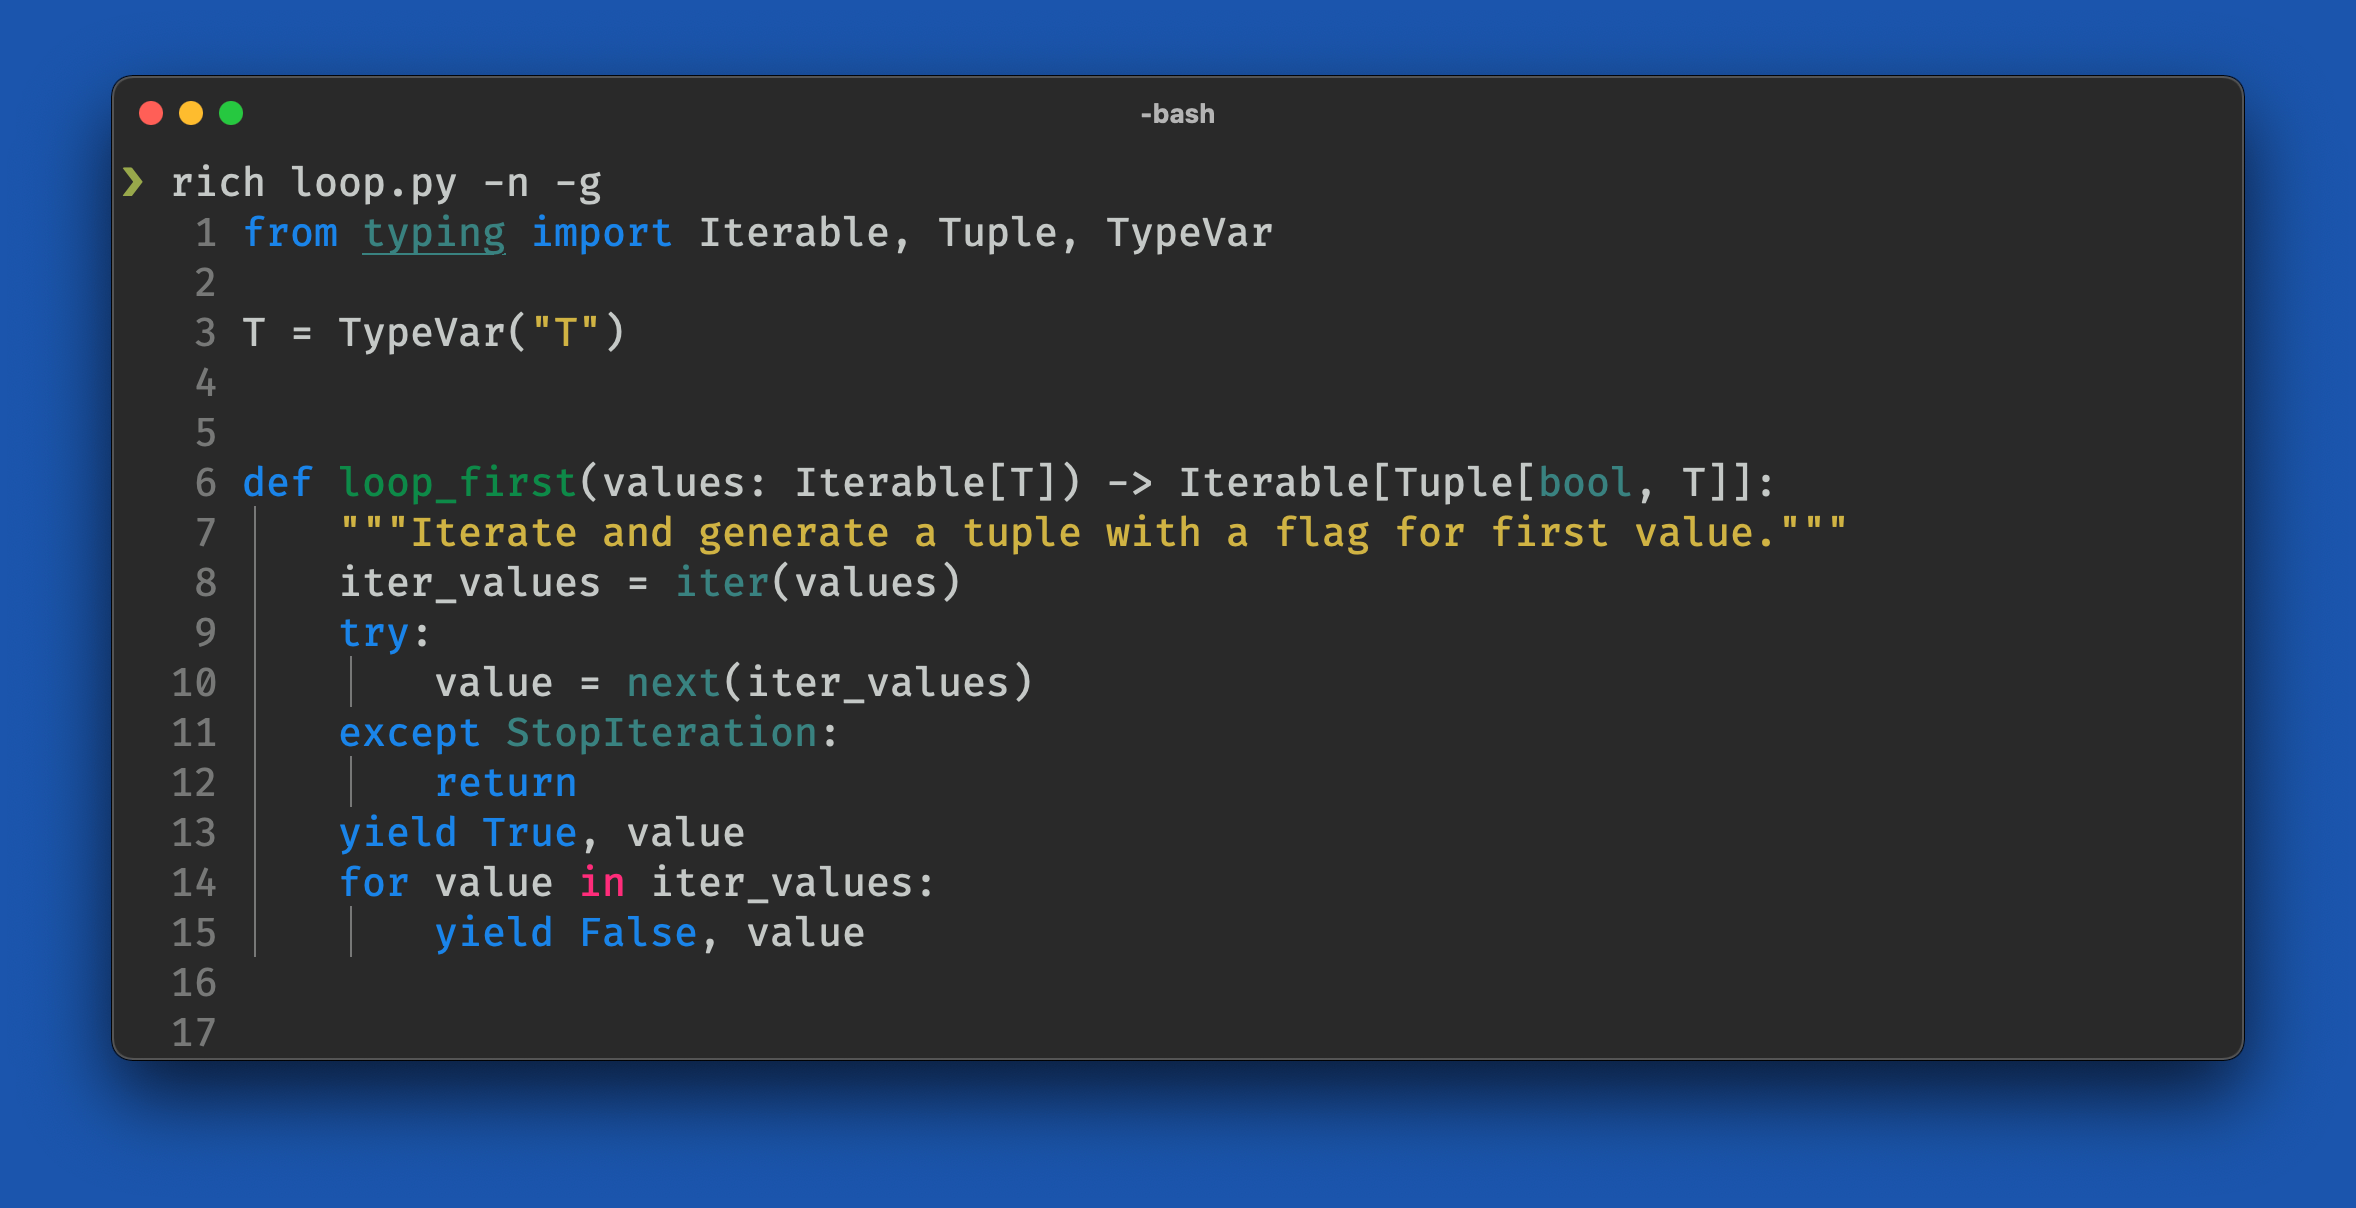
Add the `--line-number` or `-n` switch to enable line numbers. Add `--guides` or `-g` to enable indentation guides.
```
rich loop.py -n -g
```
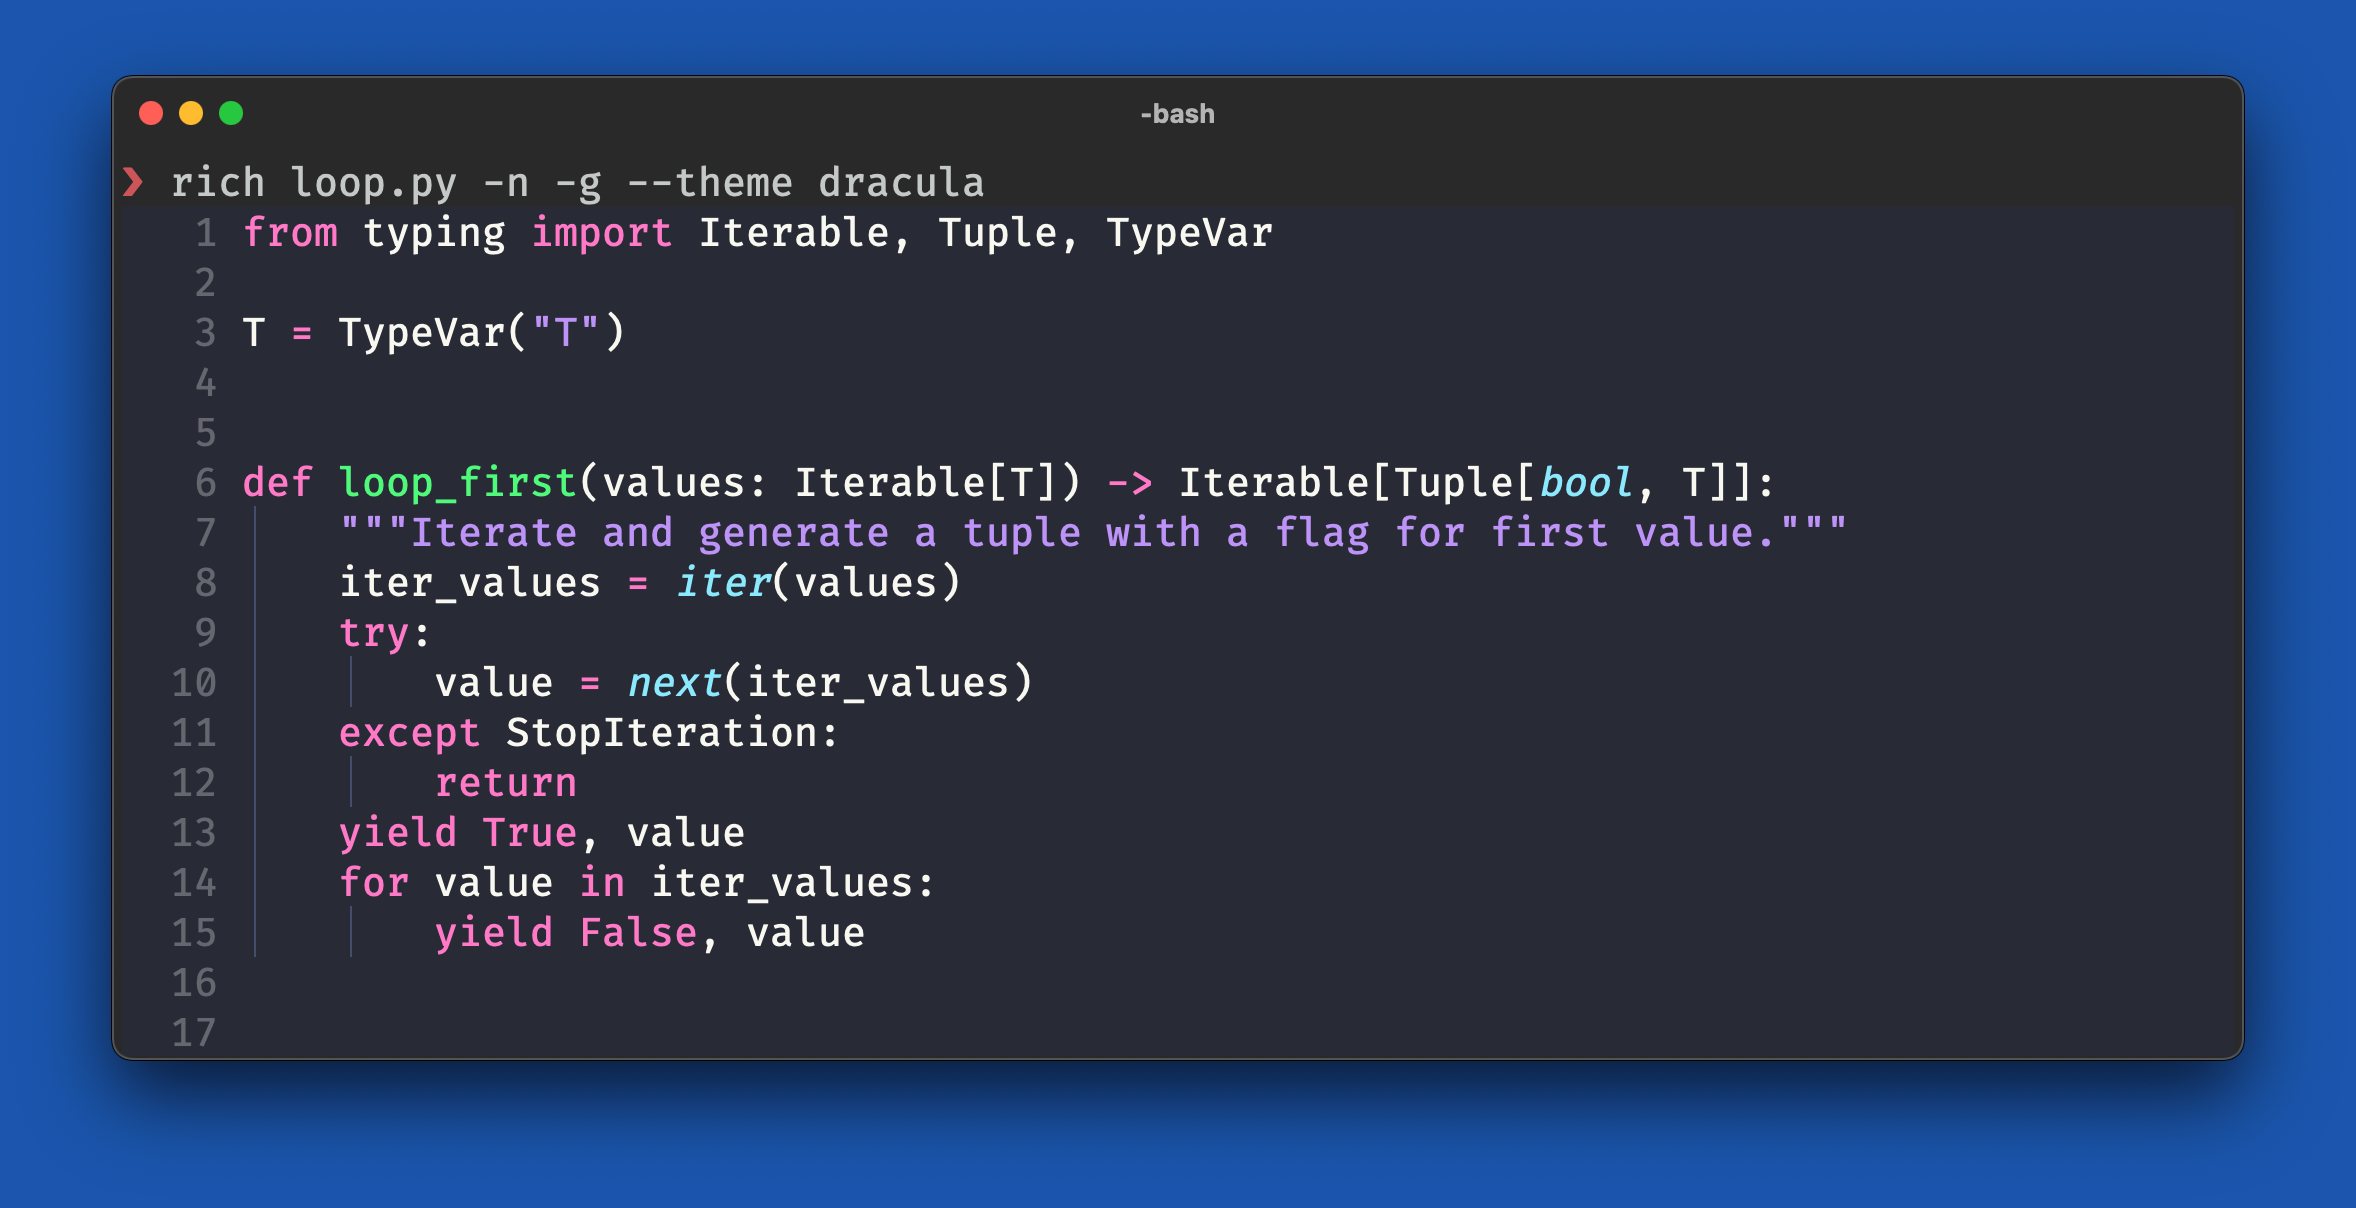
You can specify a [theme](https://pygments.org/styles/) with `--theme`.
```
rich loop.py --theme dracula
```
You can set the default theme via the `RICH_THEME` environment variable. So the following is equivalent to the above command:
```
RICH_THEME=dracula rich loop.py
```
By default, `rich` will wrap lines if they don't fit within the available width. You can disable this behavior with `--no-wrap`.
`Rich` will try to deduce the format of the via from the filename. If you want to override the auto-detected _lexer_ you can explicitly set it with the `--lexer` or `-x` switch.
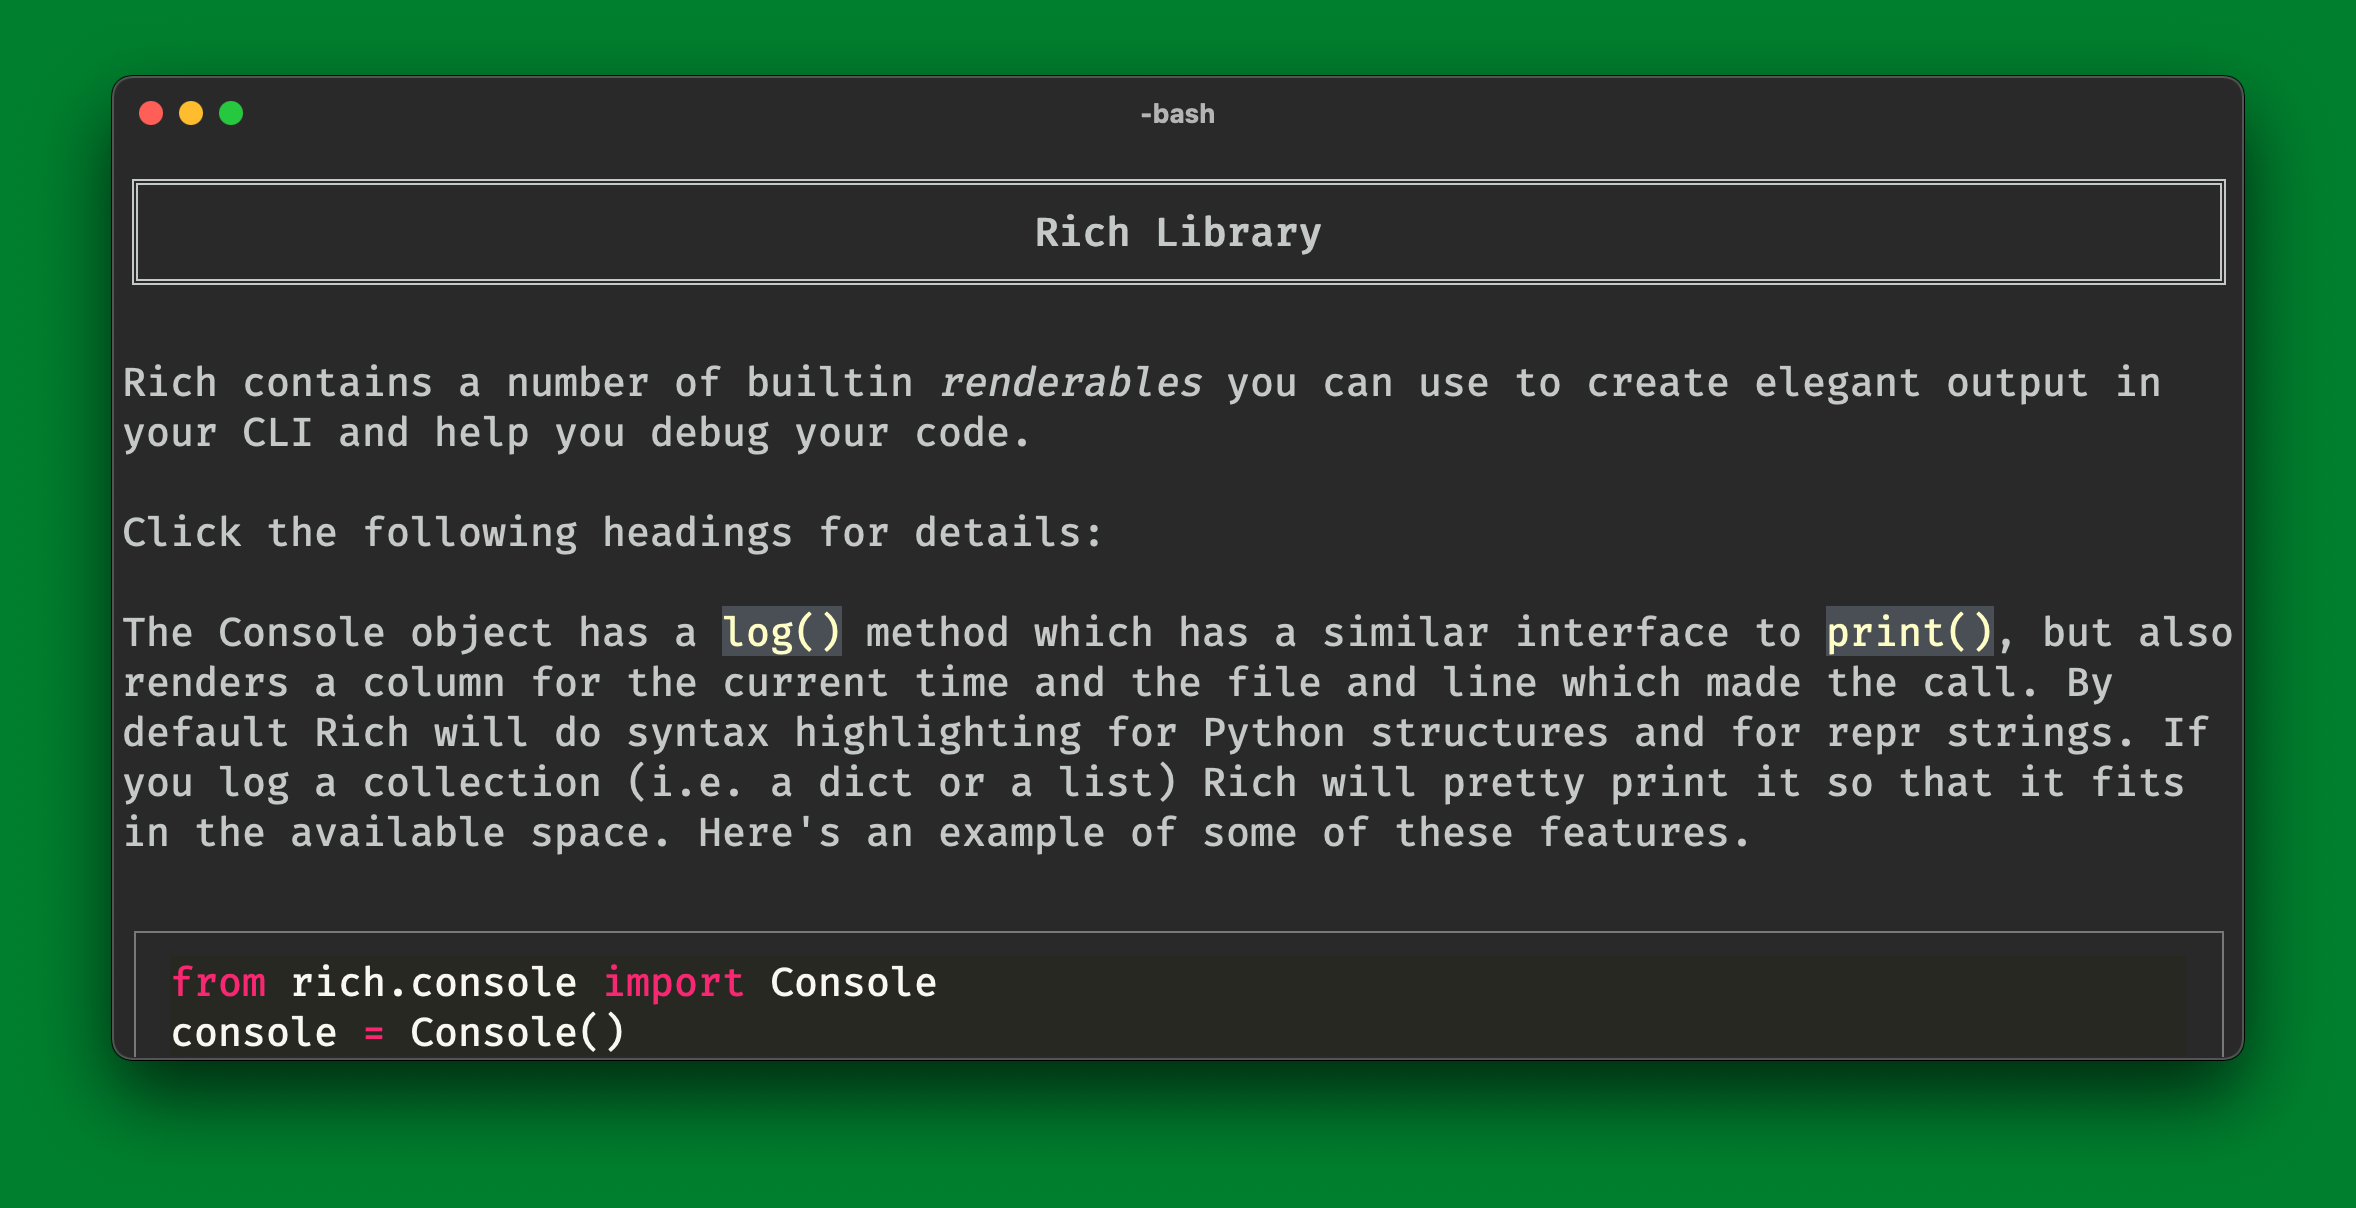
## Markdown
You can request markdown rendering by adding the `--markdown` switch or `-m`. If the file ends with `.md` markdown will be auto-detected.
```
rich README.md
```
If your terminal supports hyperlinks, you can add `--hyperlinks` or `-y` which will output hyperlinks rather than full URLs.
```
rich README.md --hyperlinks
```
## Jupyter notebook
You can request Jupyter notebook rendering by adding the `--ipynb` switch. If the file ends with `.ipynb` Jupyter notebook will be auto-detected.
```
rich notebook.ipynb
```
All options that apply to syntax highlighting can be applied to code cells, and all options that apply to Markdown can be
applied to Markdown cells.
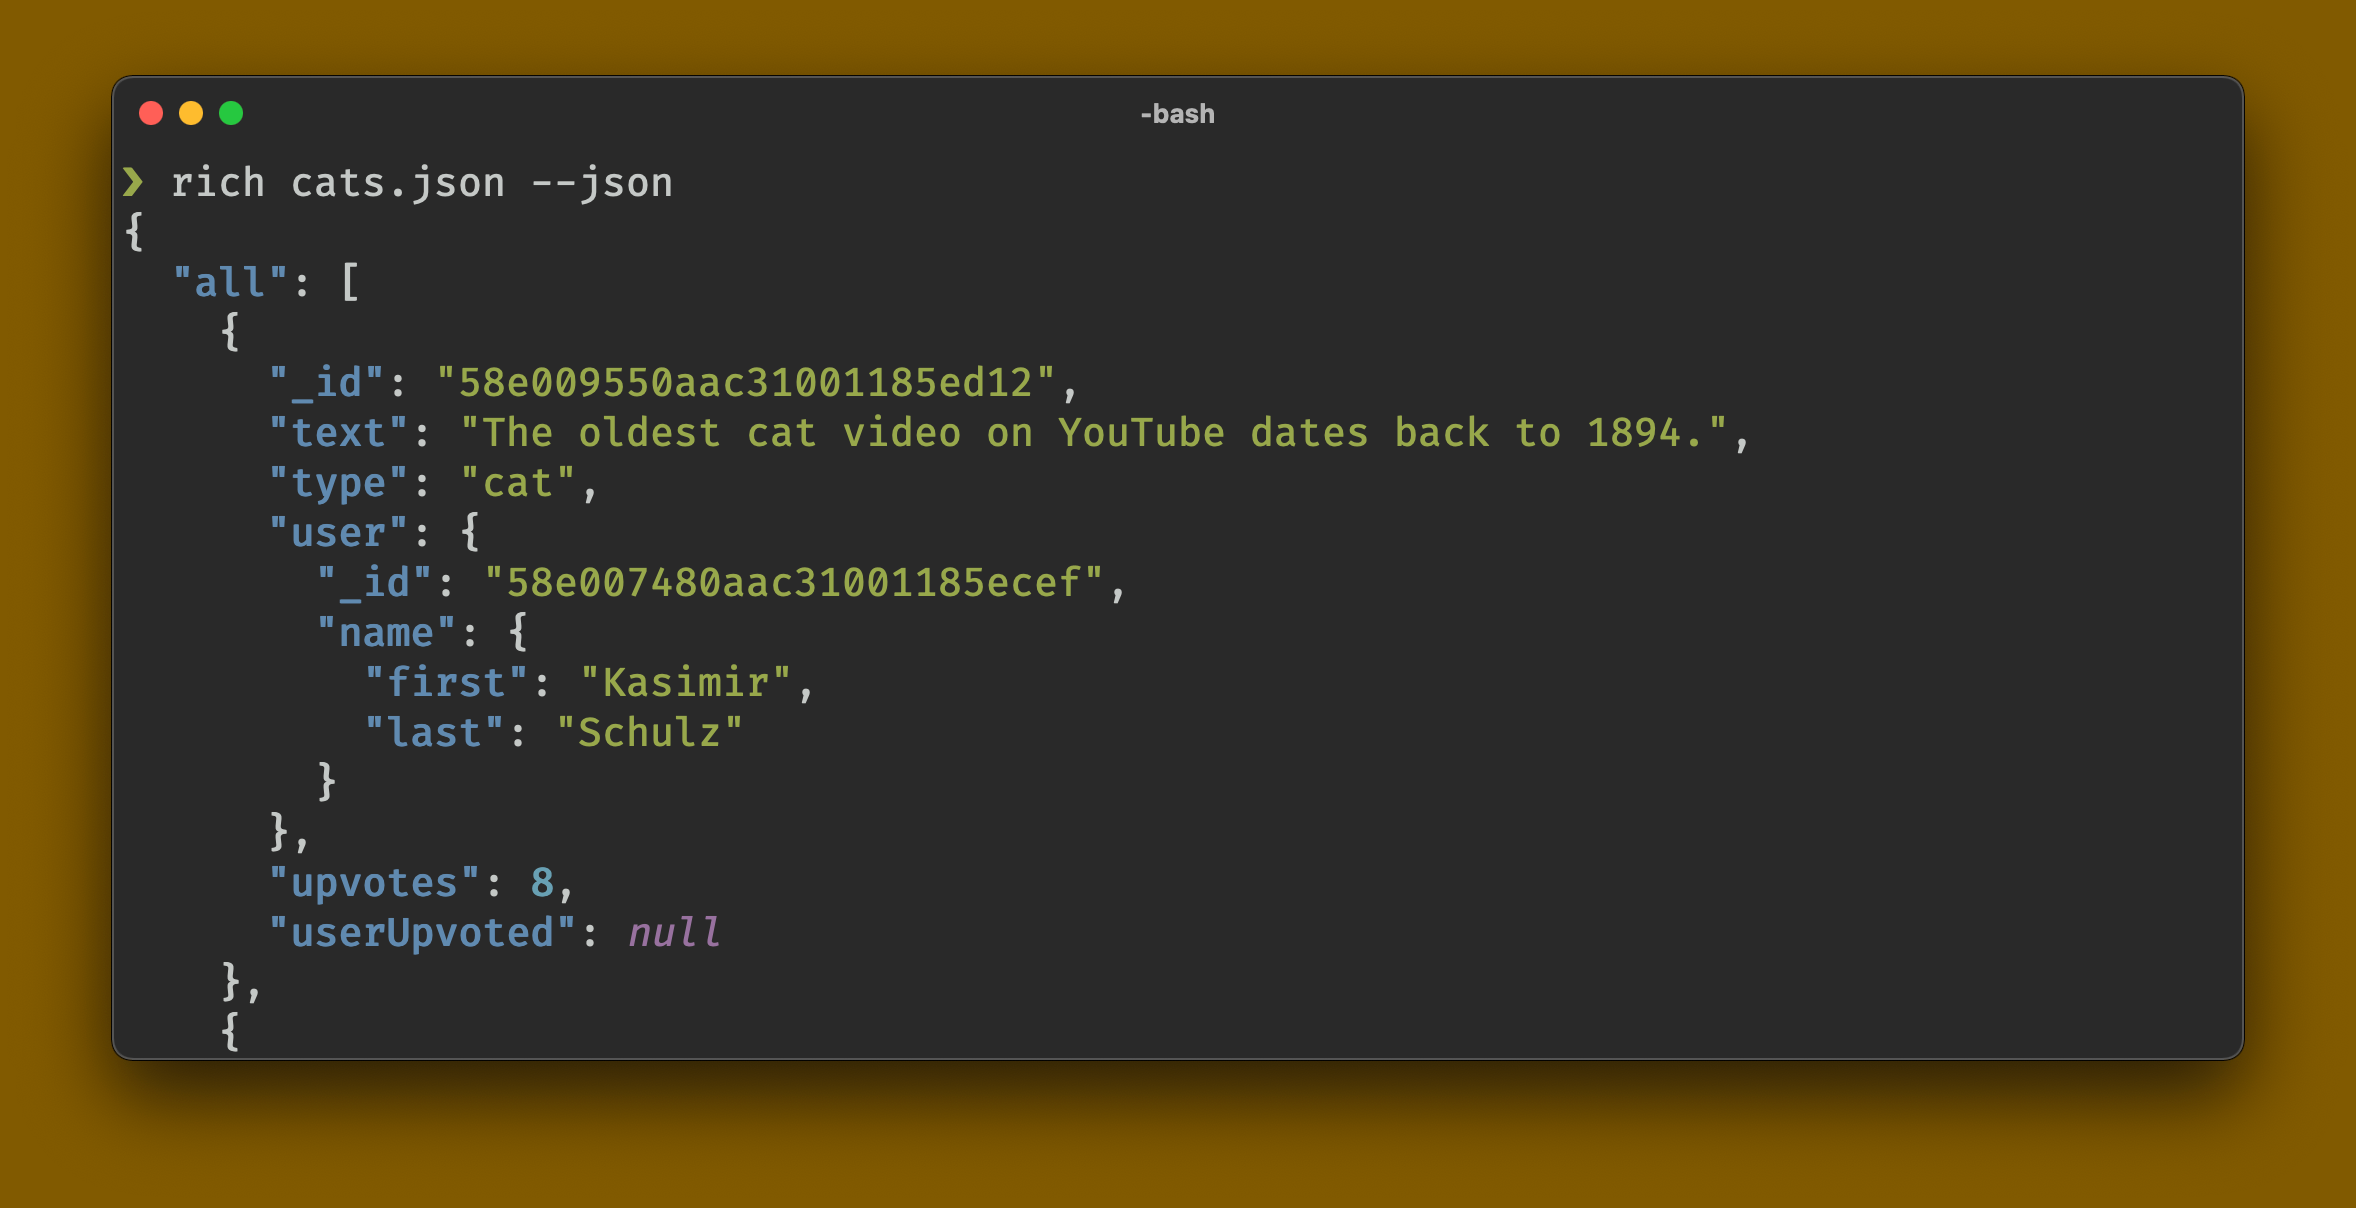
## JSON
You can request JSON pretty formatting and highlighting with the `--json` or `-j` switches. If the file ends with `.json` then JSON will be auto-detected.
```
rich cats.json
```
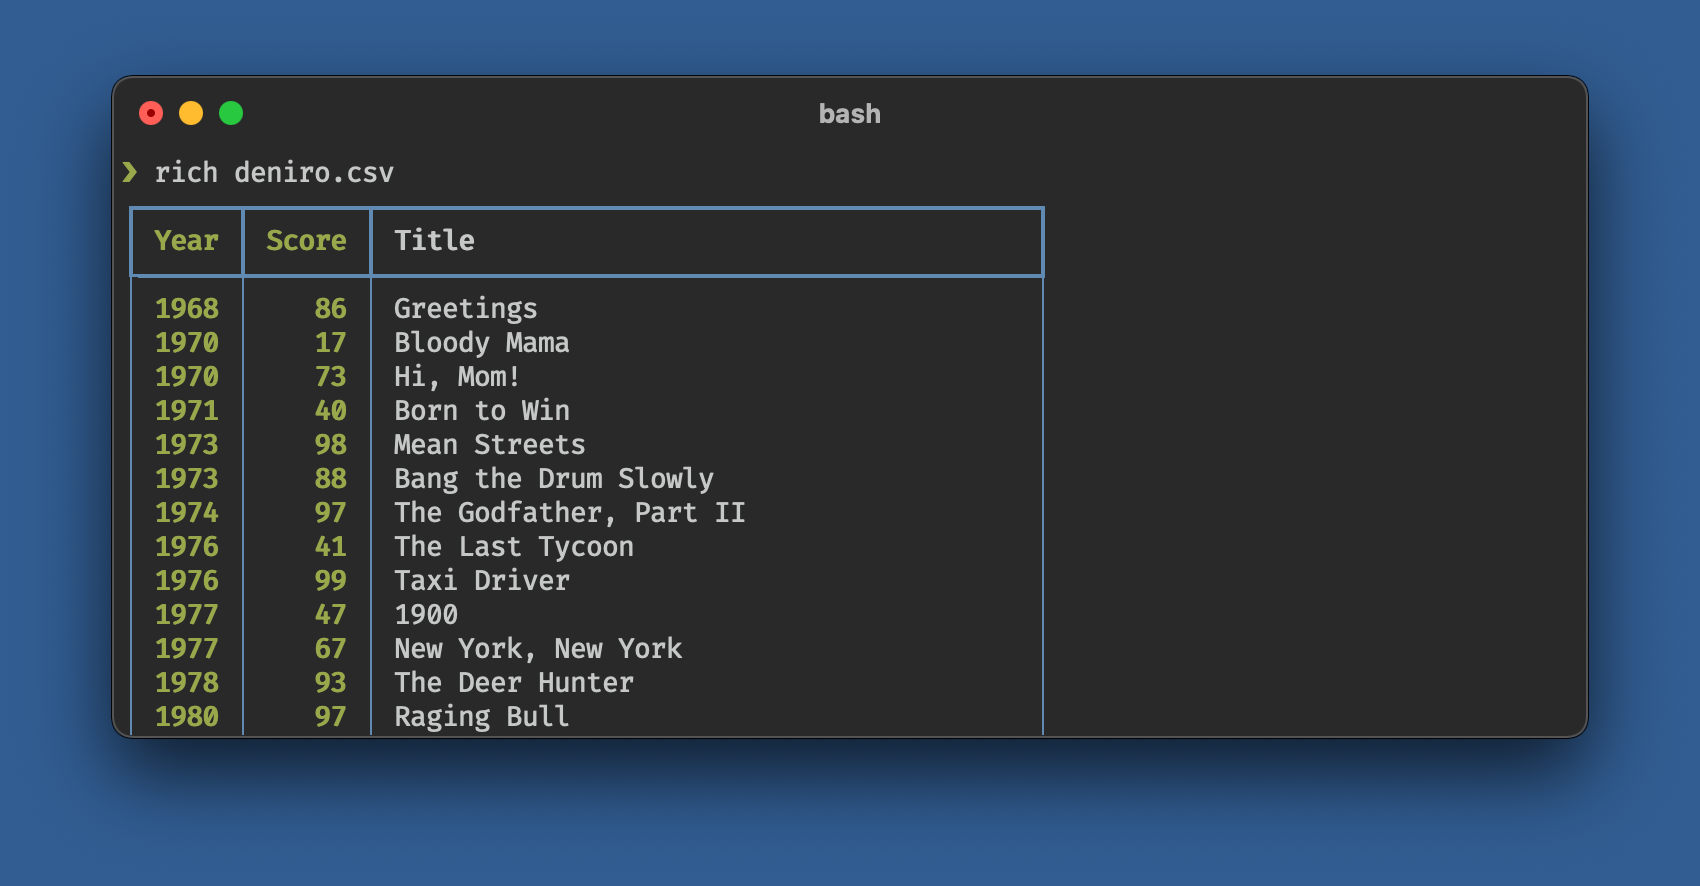
## CSV
Rich can display the contents of a CSV (or TSV) as a table. If the file ends with `.csv` or `.tsv` then CSV will be auto-detected.
```
rich deniro.csv
```
### Rules
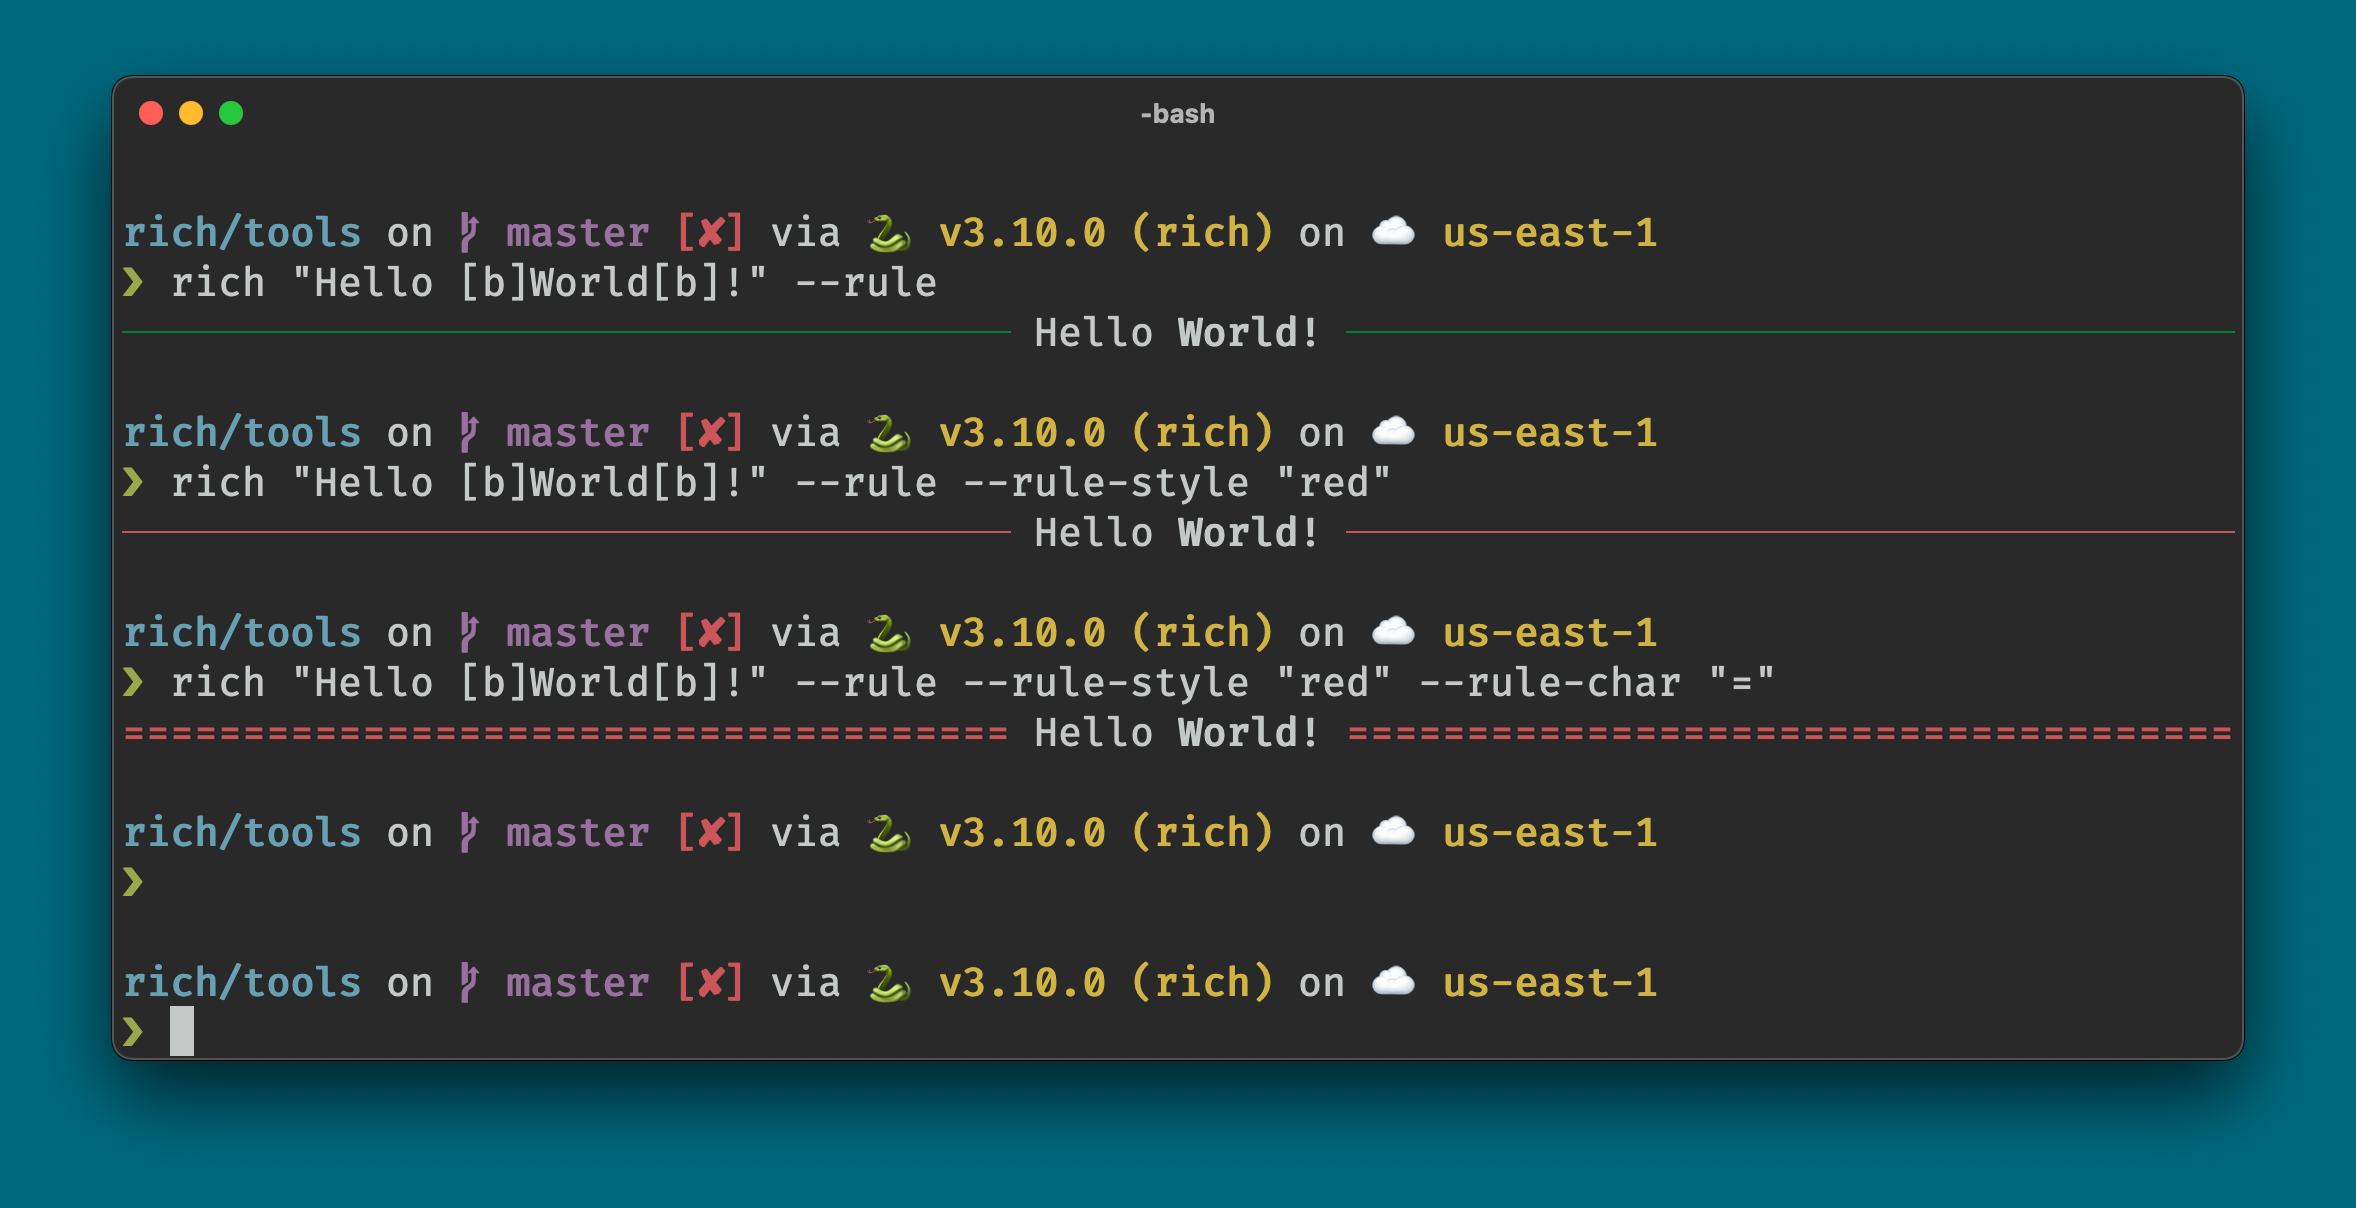
You can render a horizontal rule with `--rule` or `-u`. Specify a rule style with `--rule-style`. Set the character(s) to render the line with `--rule-char`.
```
rich "Hello [b]World[/b]!" --rule
rich "Hello [b]World[/b]!" --rule --rule-style "red"
rich "Hello [b]World[/b]!" --rule --rule-style "red" --rule-char "="
```
## Pager
Add `--pager` to display the content with a built in pager application.
Scroll the pager with cursor keys, page up/down, home, end. Alternatively use the scrollbar which will be visible to the right of the terminal. Or use the vi navigation (j, k, ctrl_d, ctrl-u).
```
rich __main__.py -n -g --theme monokai --pager
```
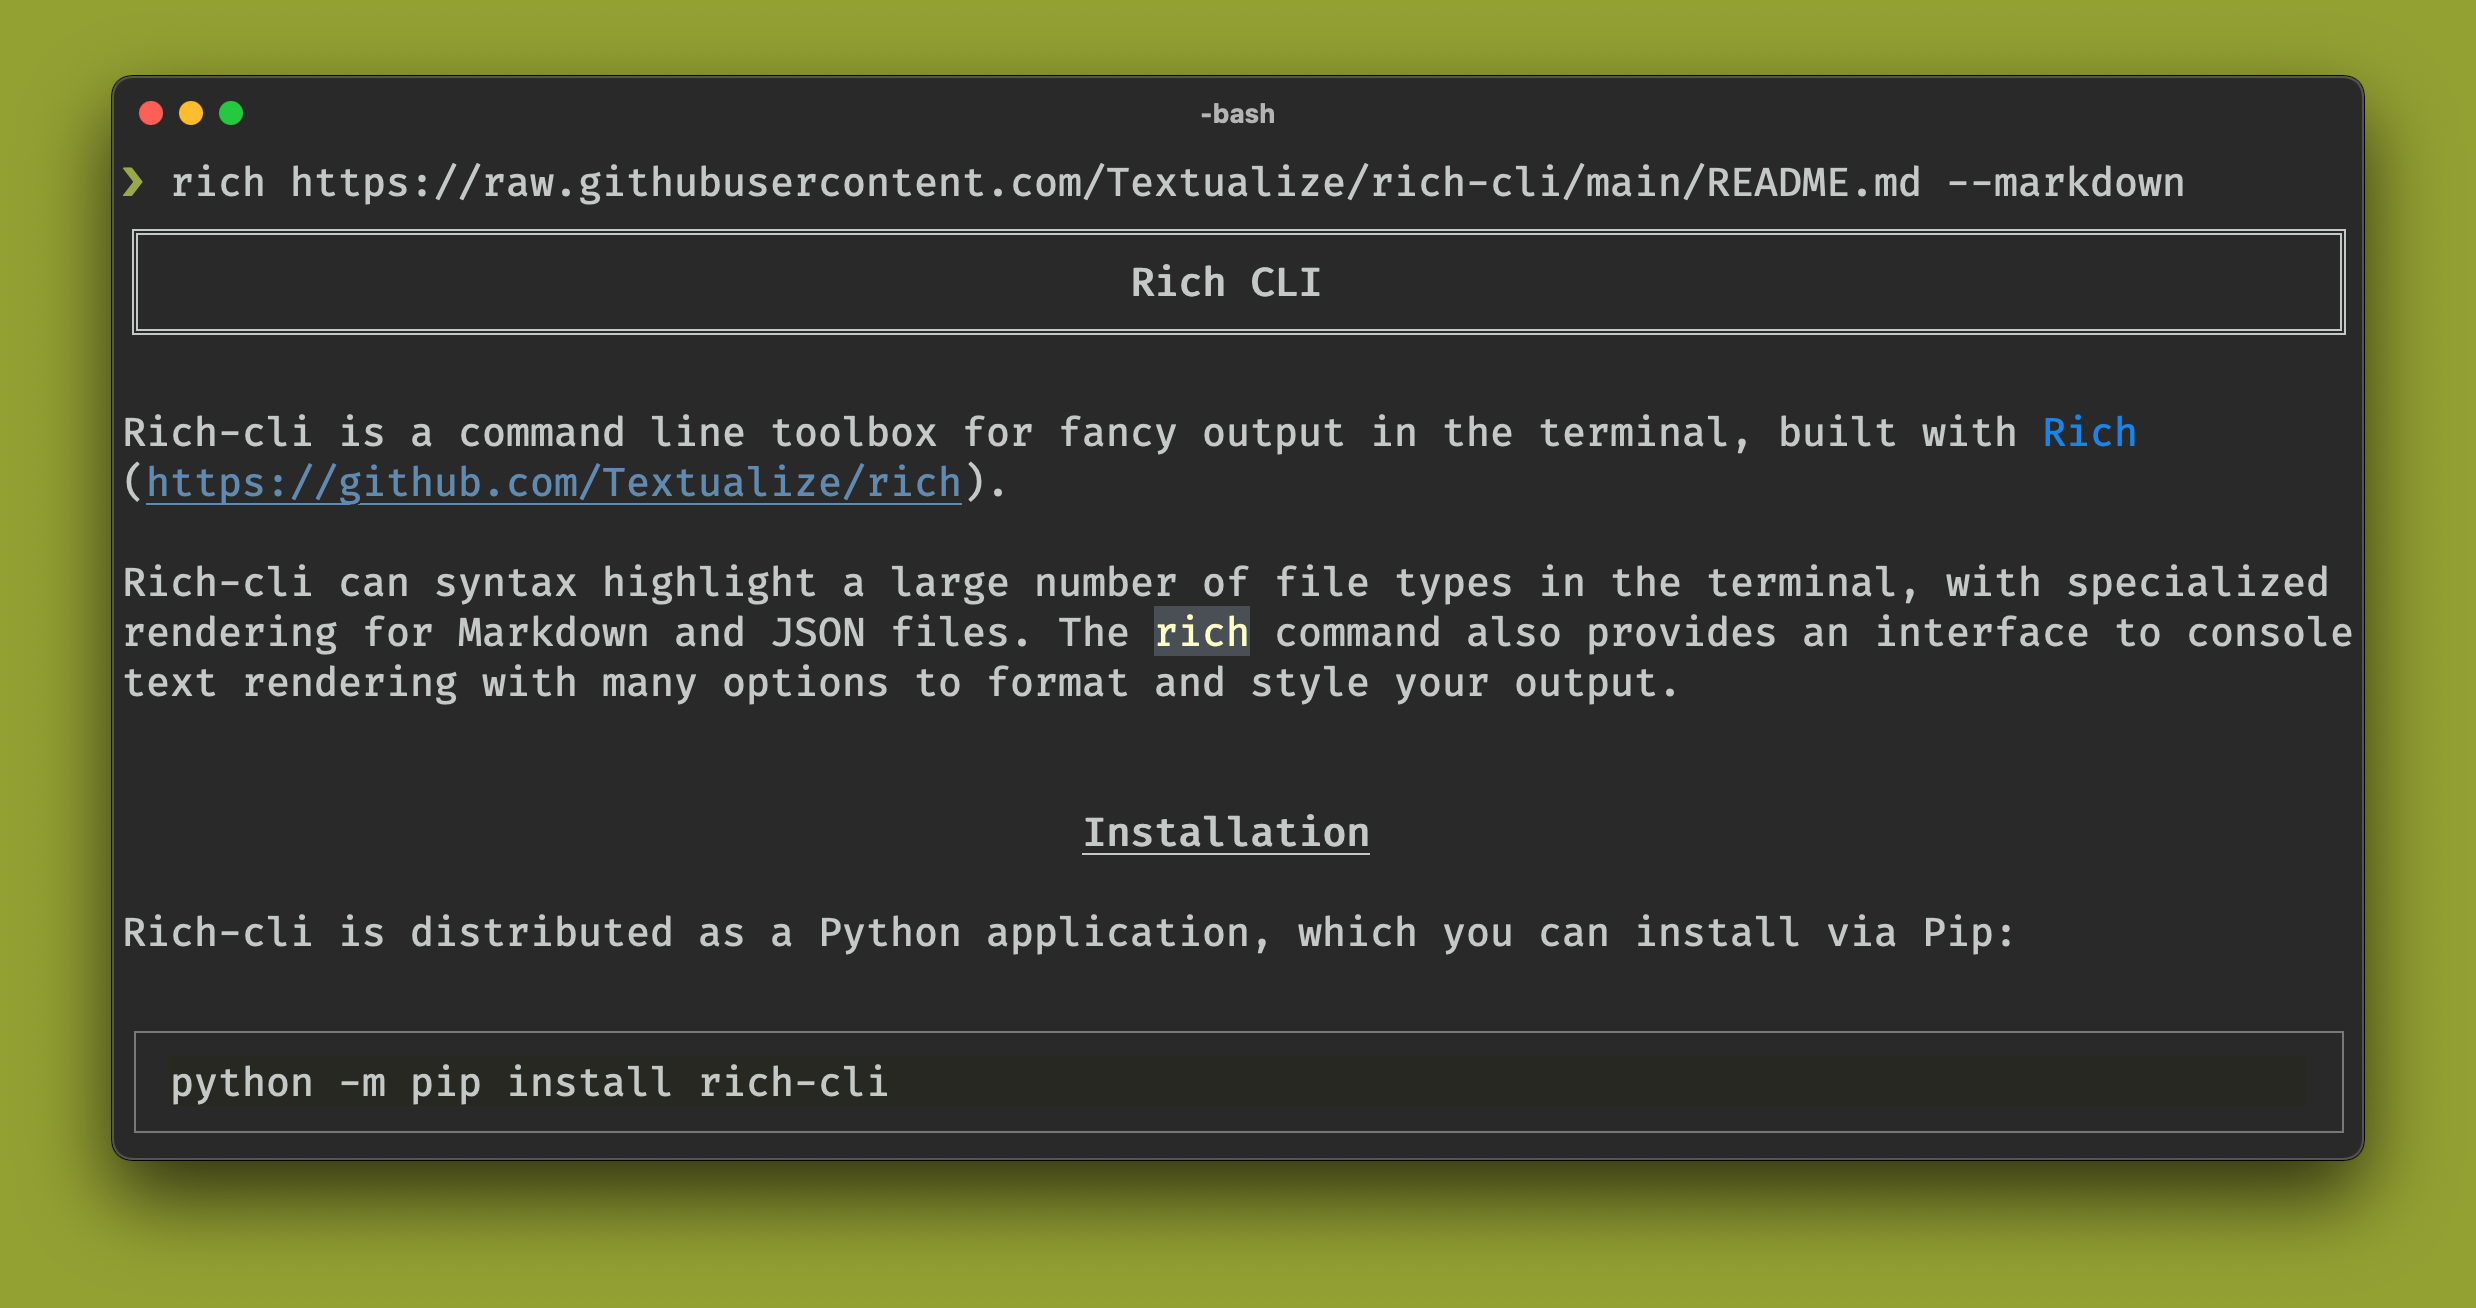
## Network
The `rich` command can read files from the internet you give it a URL starting with `http://` or `https://`.
```
rich https://raw.githubusercontent.com/Textualize/rich-cli/main/README.md --markdown
```
## Exporting
In addition to rendering to the console, `rich` can write an HTML file. This works with any command. Add `--export-html` or `-o` followed by the output path.
```
rich README.md -o readme.html
```
After running this command you should find a "readme.html" in your current working directory.
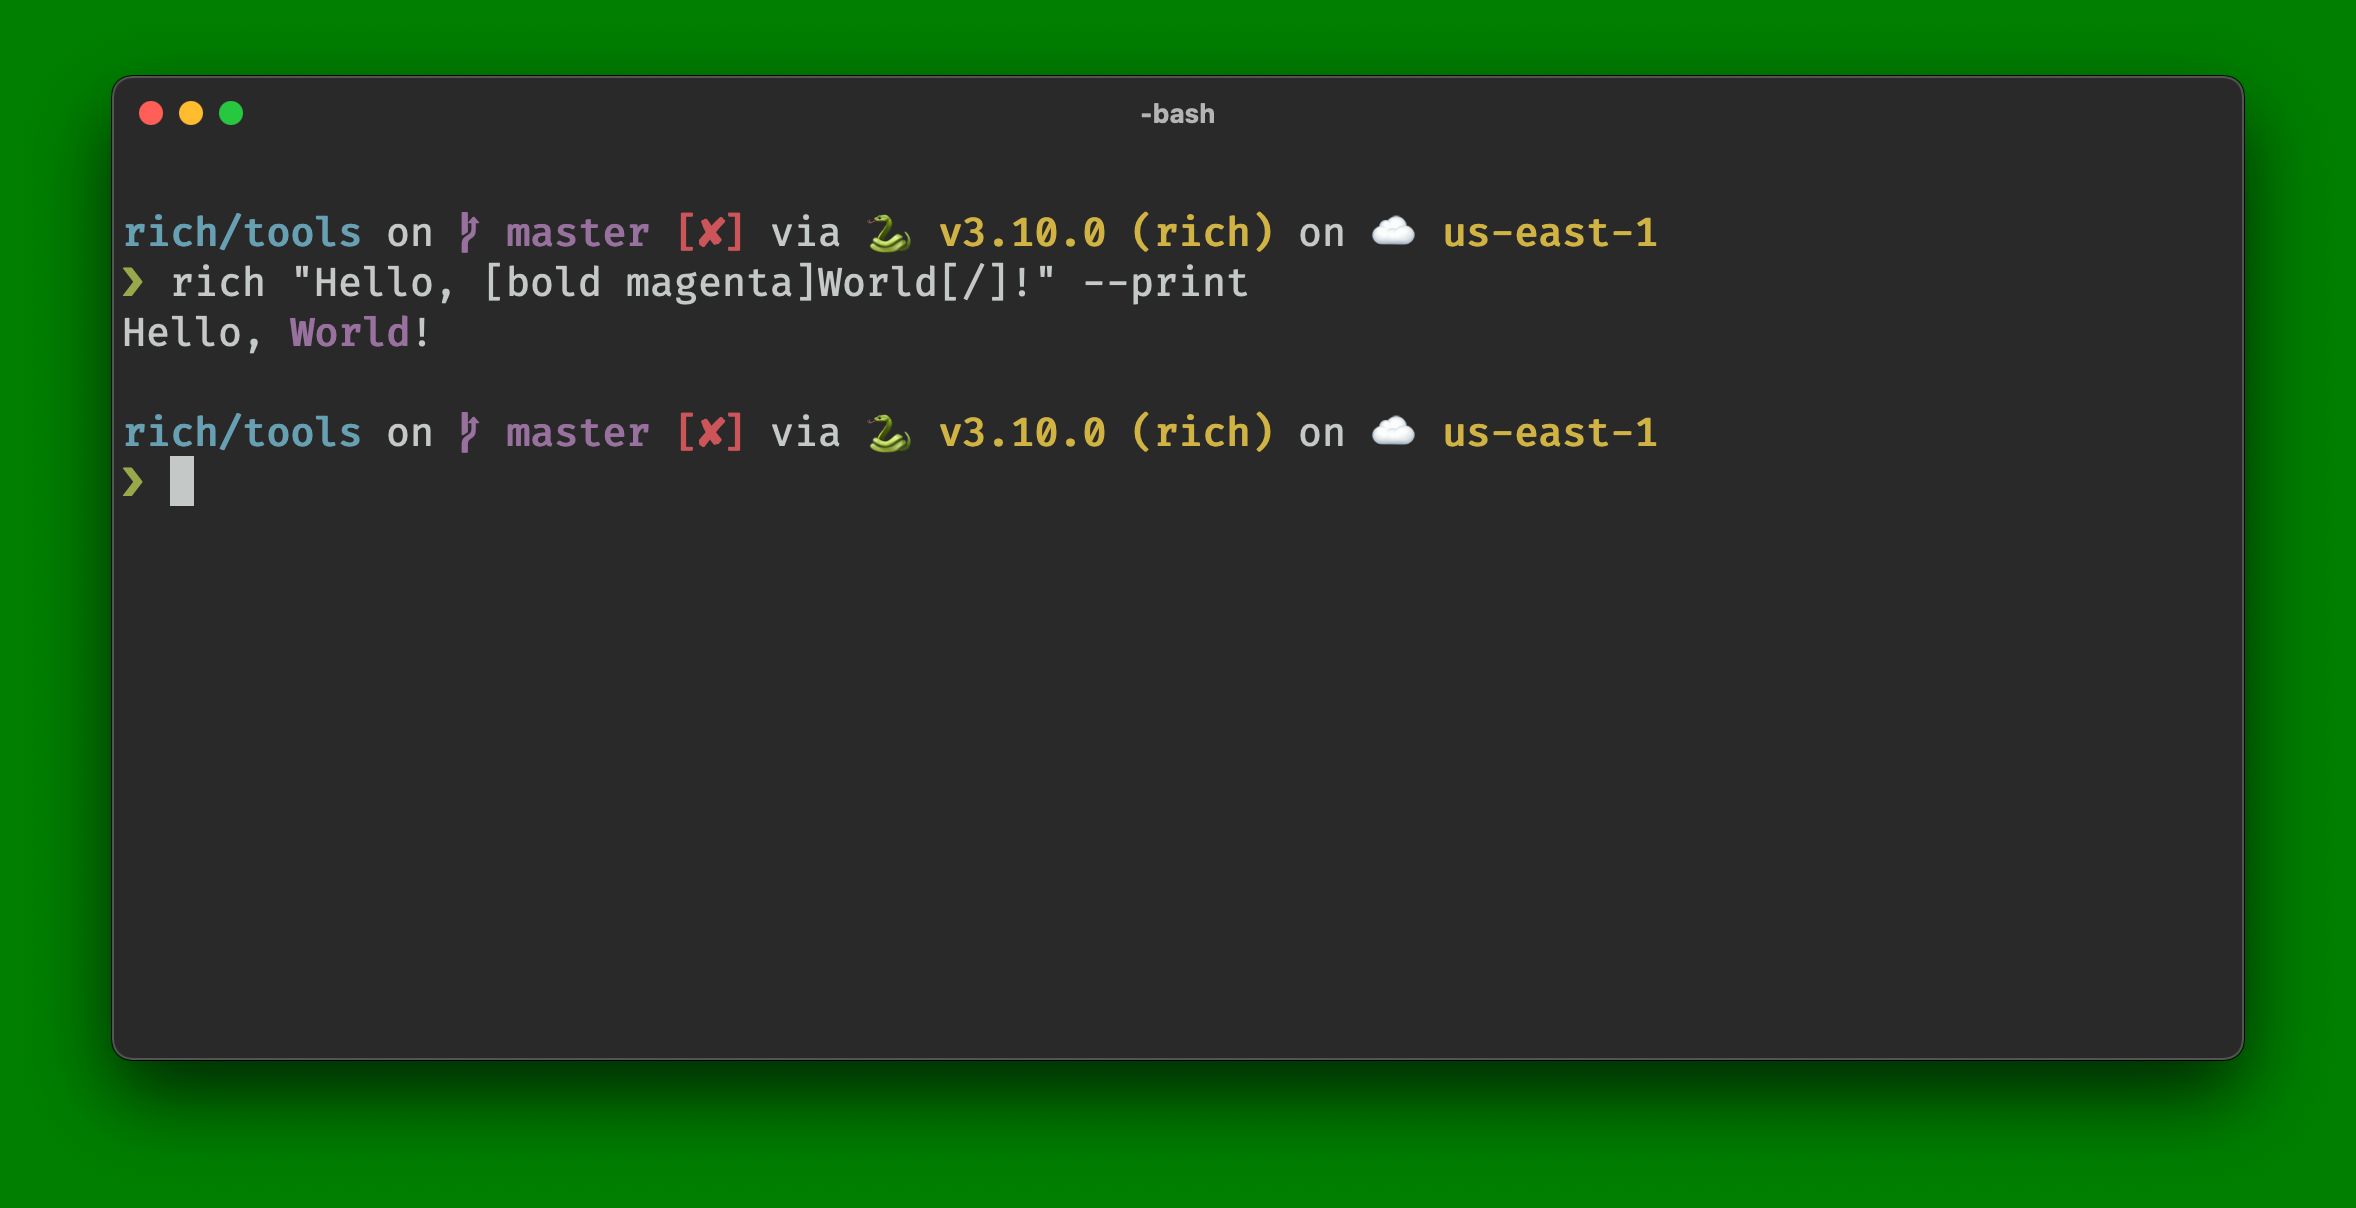
## Rich Printing
If you add the `--print` or `--p` option then Rich will treat the first argument as [console markup](https://rich.readthedocs.io/en/latest/markup.html) which allows you to insert styles with a markup similar in design to bbcode.
```
rich "Hello, [bold magenta]World[/]!" --print
```
### Soft wrapping
Rich will word wrap your text by default by inserting newlines where appropriate. If you don't want this behavior you can enable _soft_ wrapping with `--soft`.
## Reading from Stdin
Where `rich` accepts a path, you can enter `-` which reads the content from stdin. You may want this if you are piping output from another process.
Note that when rich isn't writing directly to the terminal it will disable ansi color codes, so you may want to add `--force-terminal` or `-F` to tell `rich` you want to keep ansi codes in the output.
```
cat README.md | rich - --markdown --force-terminal
```
## General Options
There are a number of additional switches you may add to modify the content rendered to the terminal. These options are universal and apply to all of the above features.
### Style
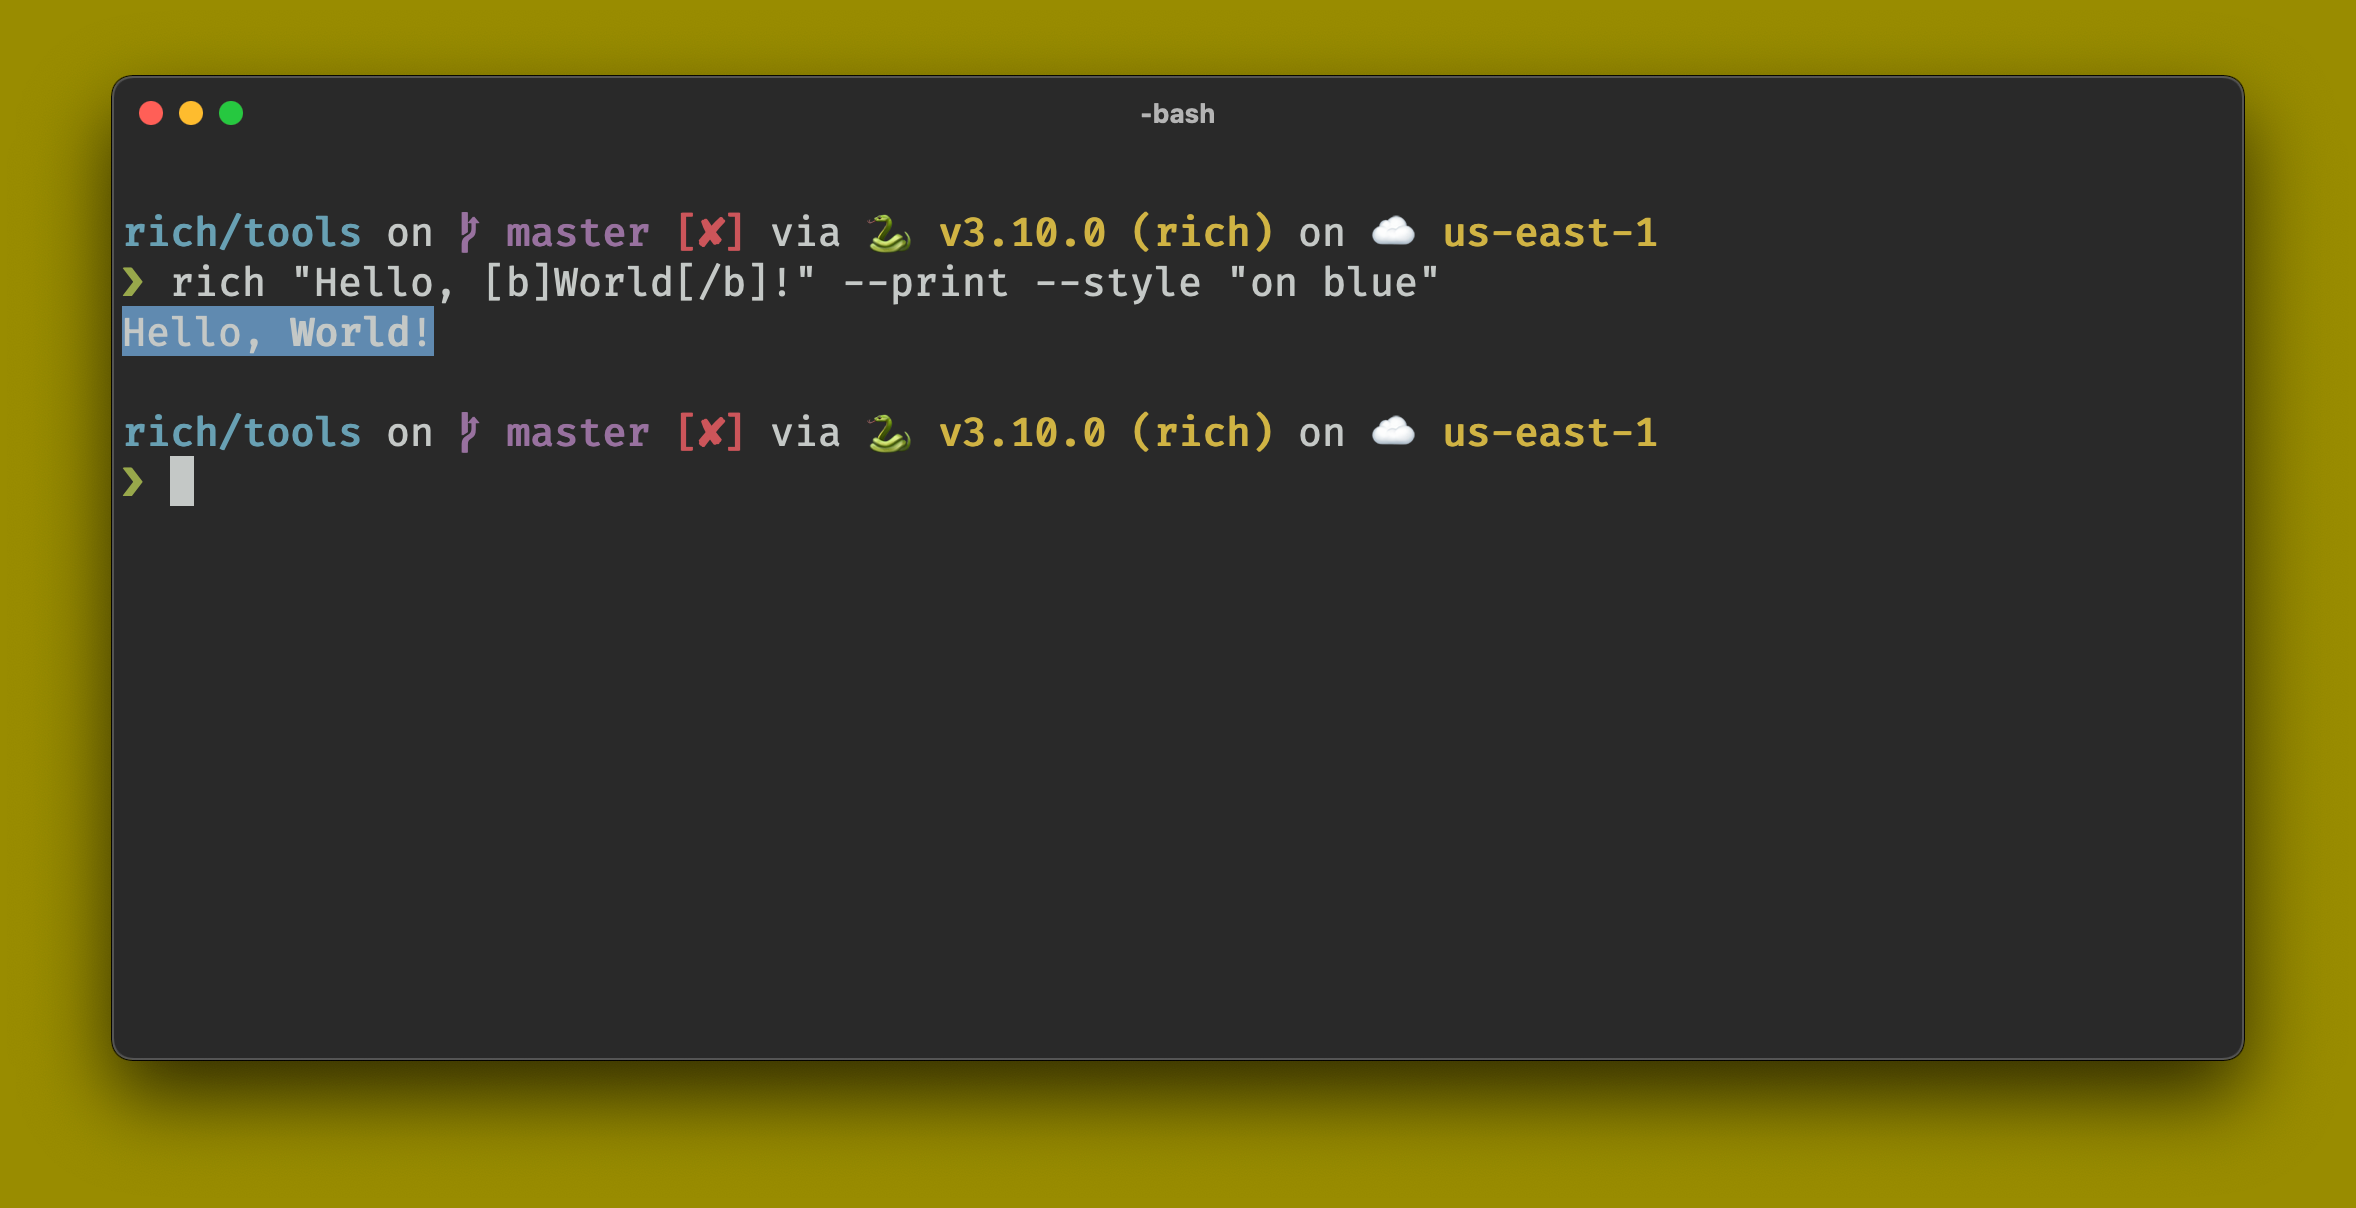
You can set a style to apply to the output with `--style` or `-s`. The styles are specified with [this syntax](https://rich.readthedocs.io/en/latest/style.html).
```
rich "Hello, [b]World[/b]!" --print --style "on blue"
```
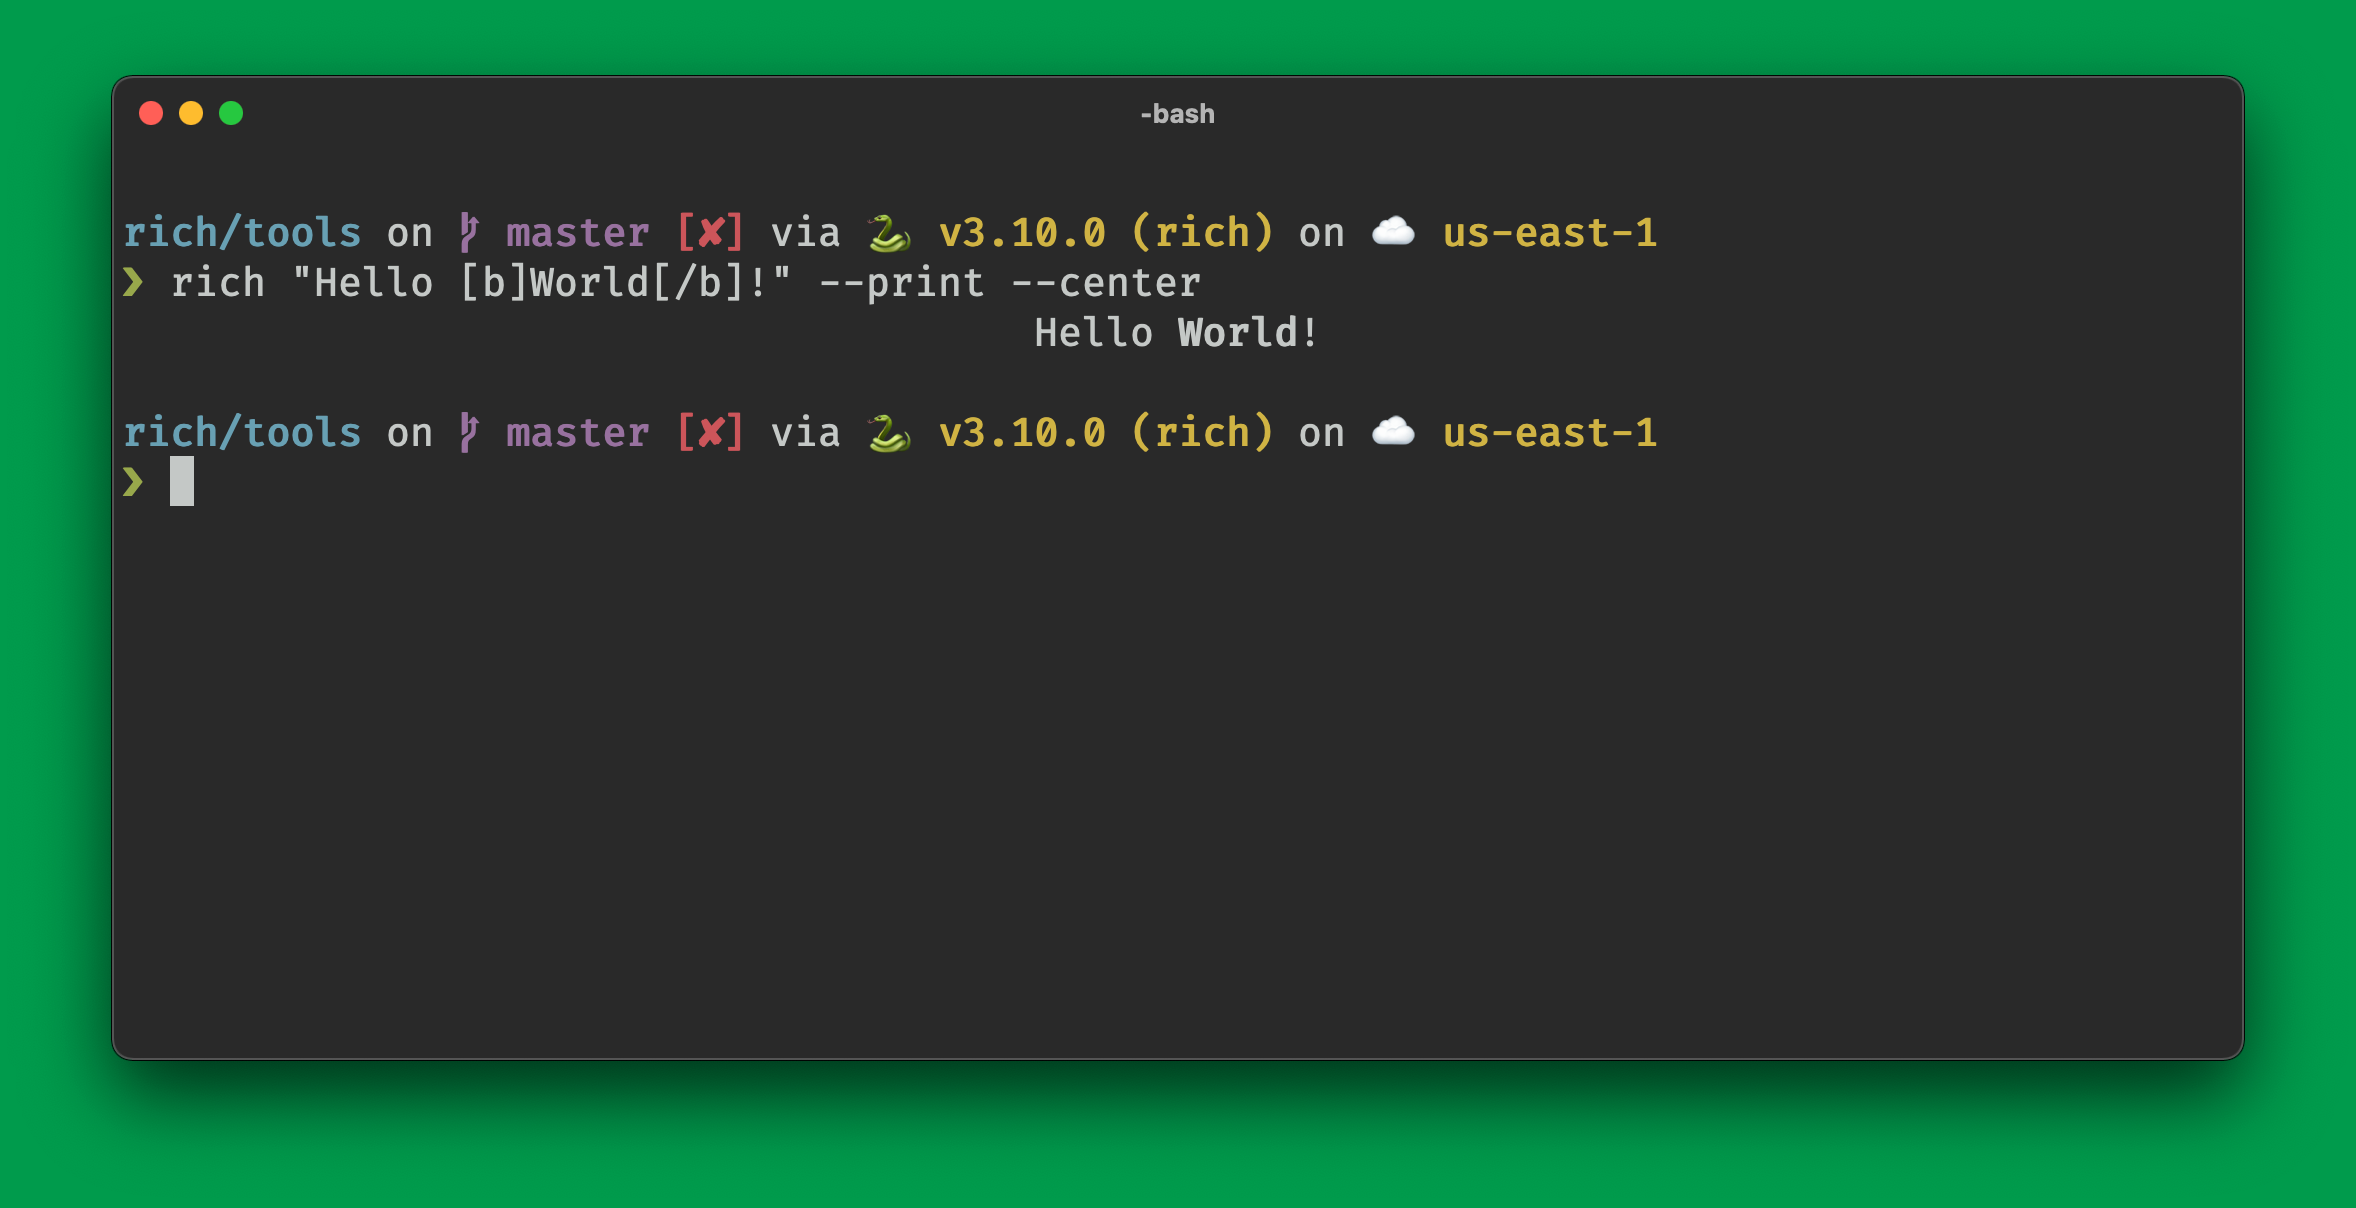
### Alignment
You can align output to the left, center, or right with the `--left`, `--center`, or `--right` options, or their single letter counterparts: `-l`, `-c`, or `-r`.
```
rich "Hello [b]World[/b]!" --print --center
```
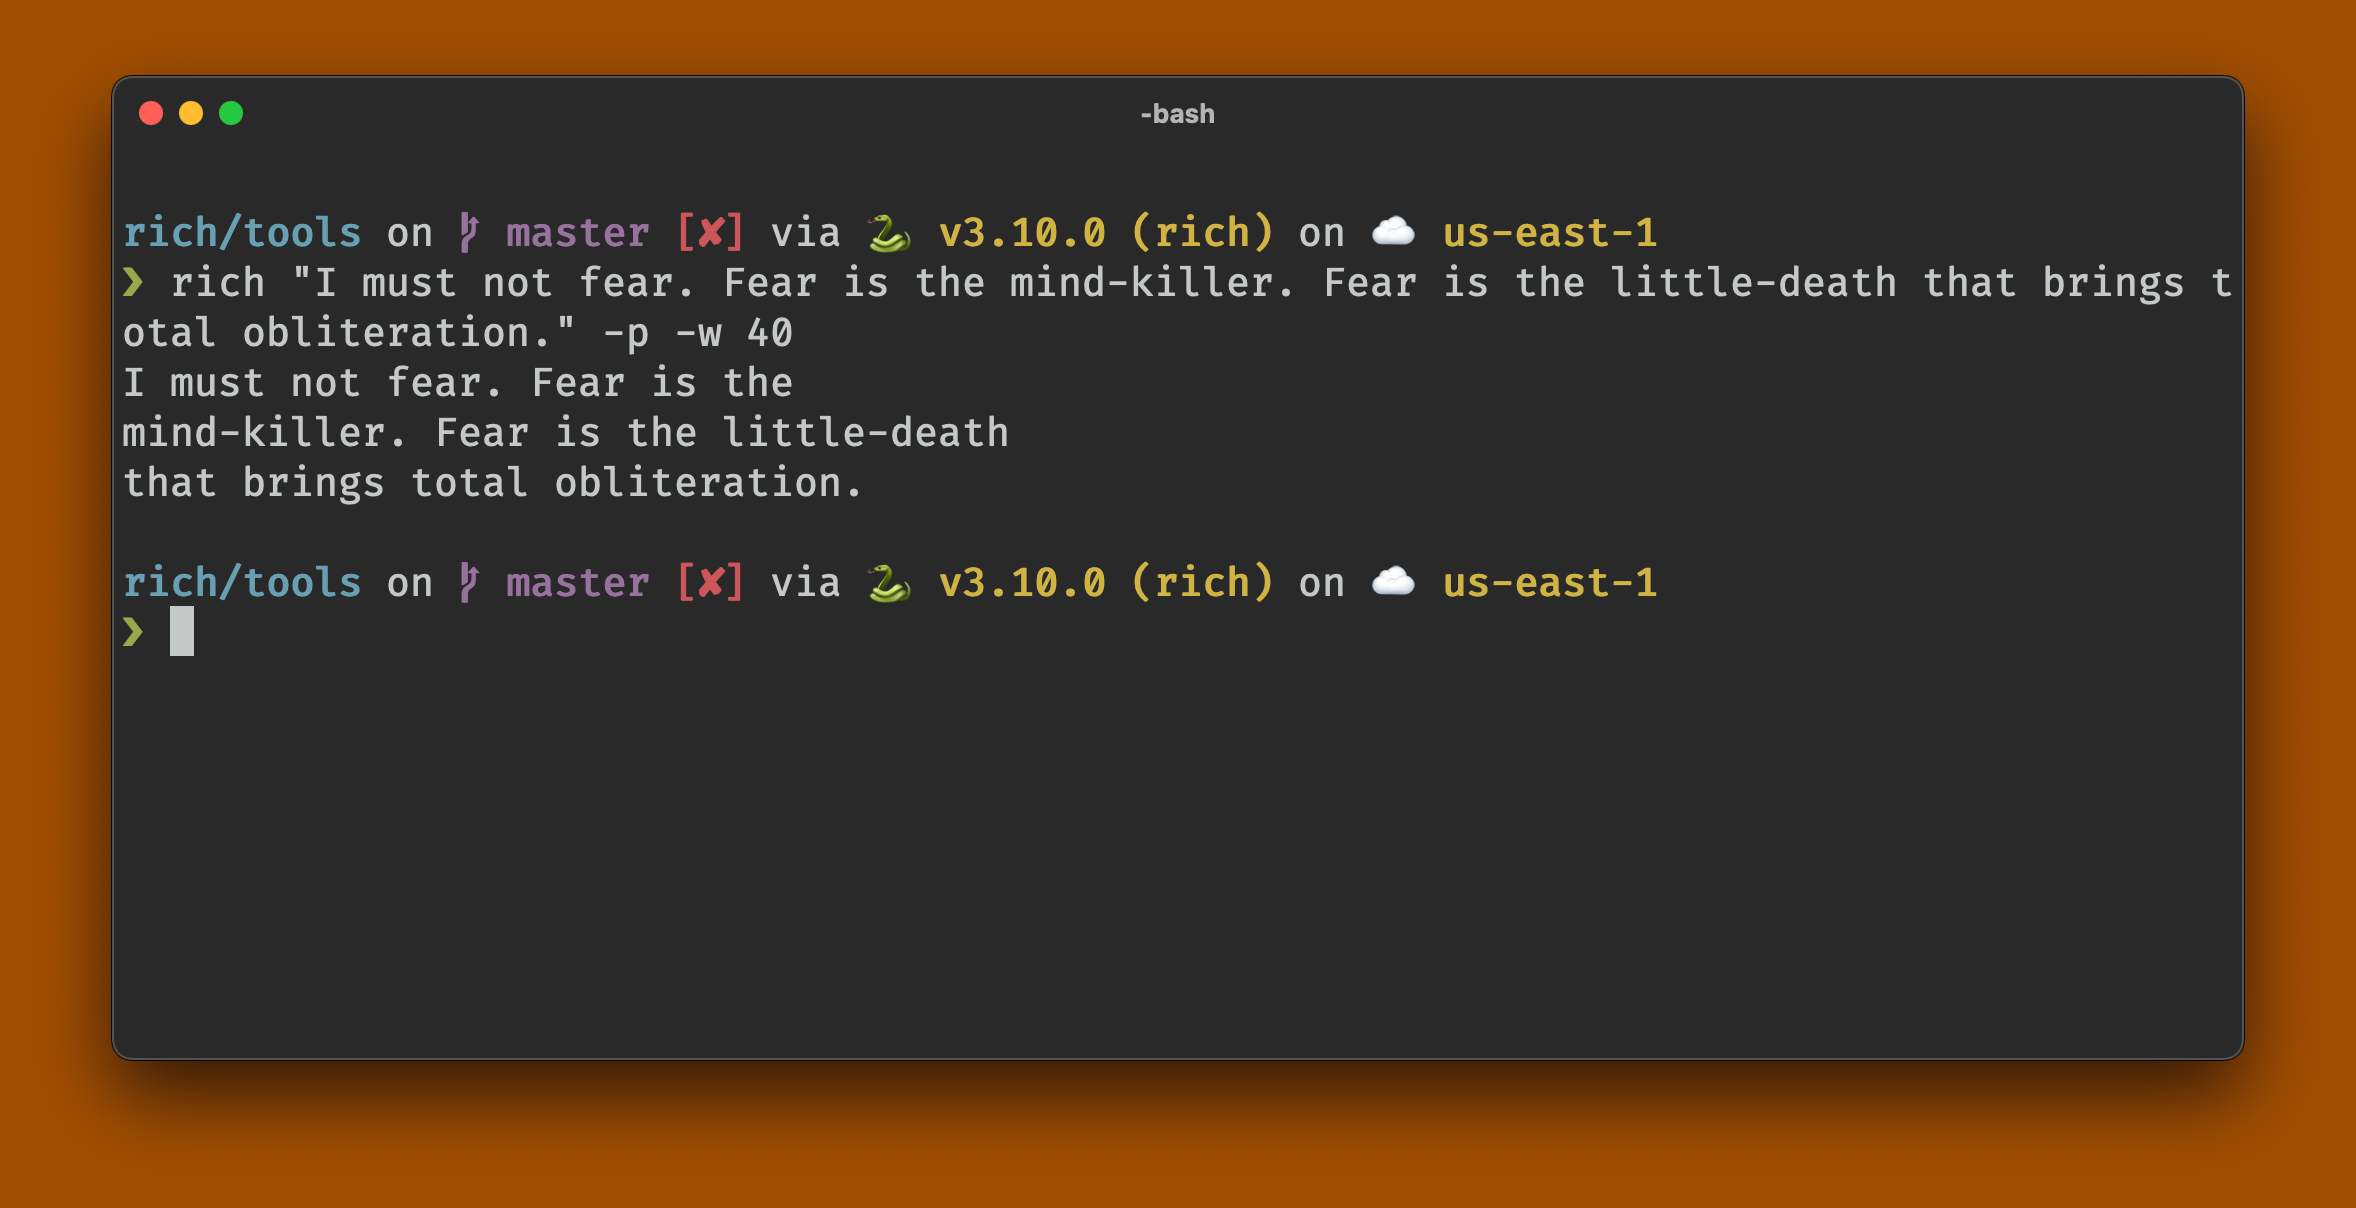
### Width
You can set the width of the output with `--width` or `-w` and the desired width. Note that the default behavior is to wrap text.
```
rich "I must not fear. Fear is the mind-killer. Fear is the little-death that brings total obliteration." -p -w 40
```
### Text Justify
You can set how `rich` will justify text with `--text-left`, `--text-right`, `--text-center`, and `--text-full`; or the single letter equivalents: `-L`, `-R`, `-C`, and `-F`.
The difference between `--left` and `--text-left` may not be obvious unless you specify the width of the output. The `--left`, `--center`, and `--right` options will center the block of text within the terminal dimensions. Whereas, the `--text-left`, `--text-center`, and `--text-right` options define how text is rendered _within_ that block.
In the following examples, we specify a width of 40 (`-w 40`) which is center aligned with the `-c` switch. Note how the `-R`, `-C` and `-F` apply the text justification within the 40 character block:
```
rich "I must not fear. Fear is the mind-killer. Fear is the little-death that brings total obliteration." -p -w 40 -c -L
rich "I must not fear. Fear is the mind-killer. Fear is the little-death that brings total obliteration." -p -w 40 -c -R
rich "I must not fear. Fear is the mind-killer. Fear is the little-death that brings total obliteration." -p -w 40 -c -C
rich "I must not fear. Fear is the mind-killer. Fear is the little-death that brings total obliteration." -p -w 40 -c -F
```
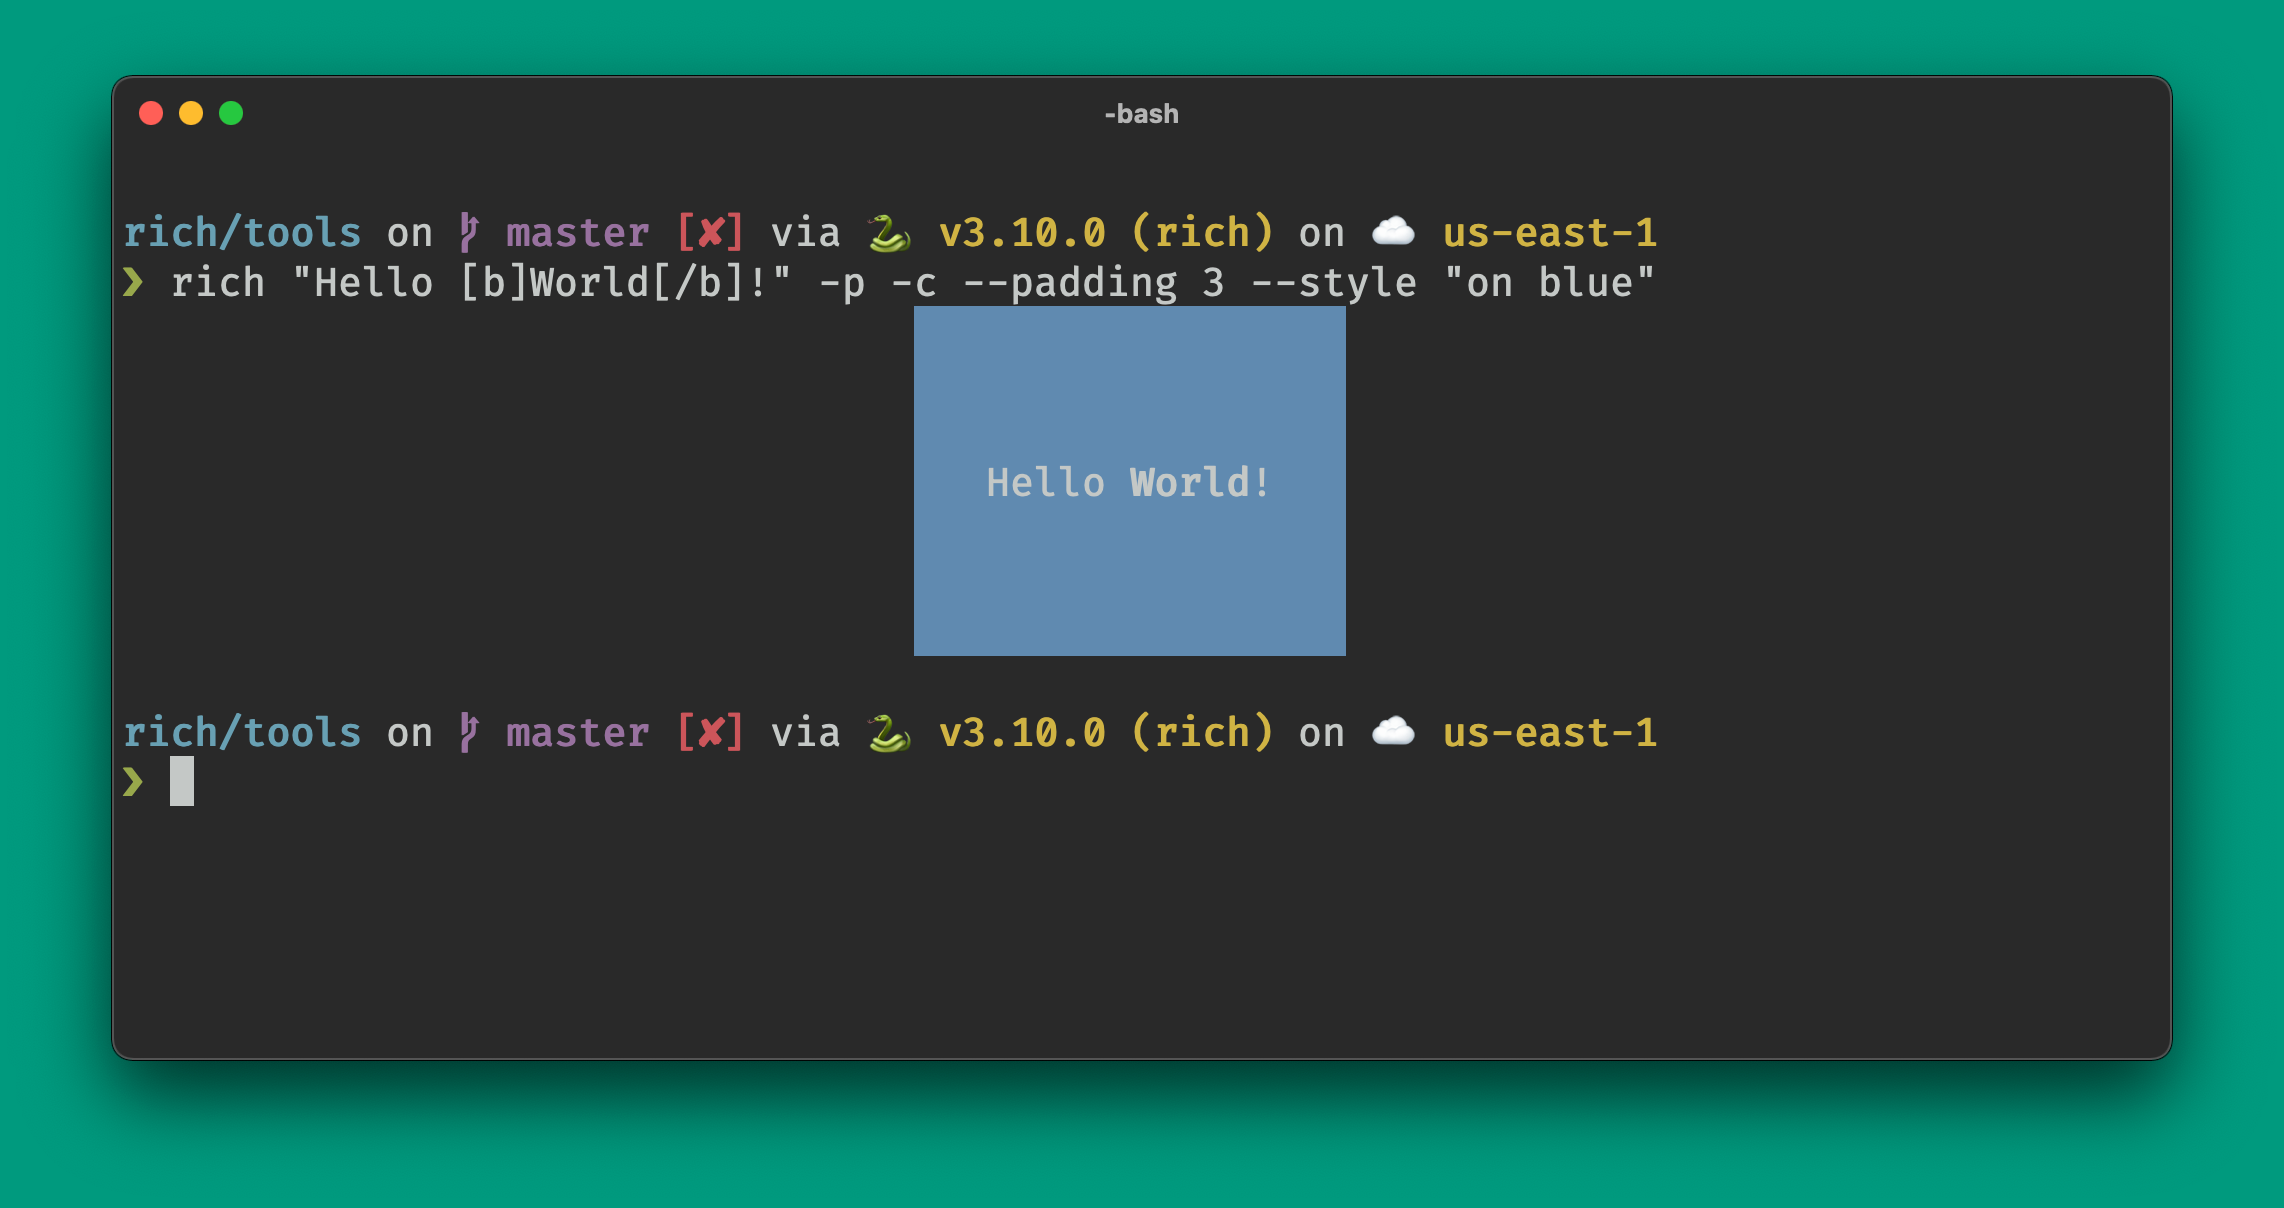
### Padding
You can apply _padding_ around the output with `--padding` or `-d`.
```
rich "Hello [b]World[/b]!" -p -c --padding 3 --style "on blue"
```
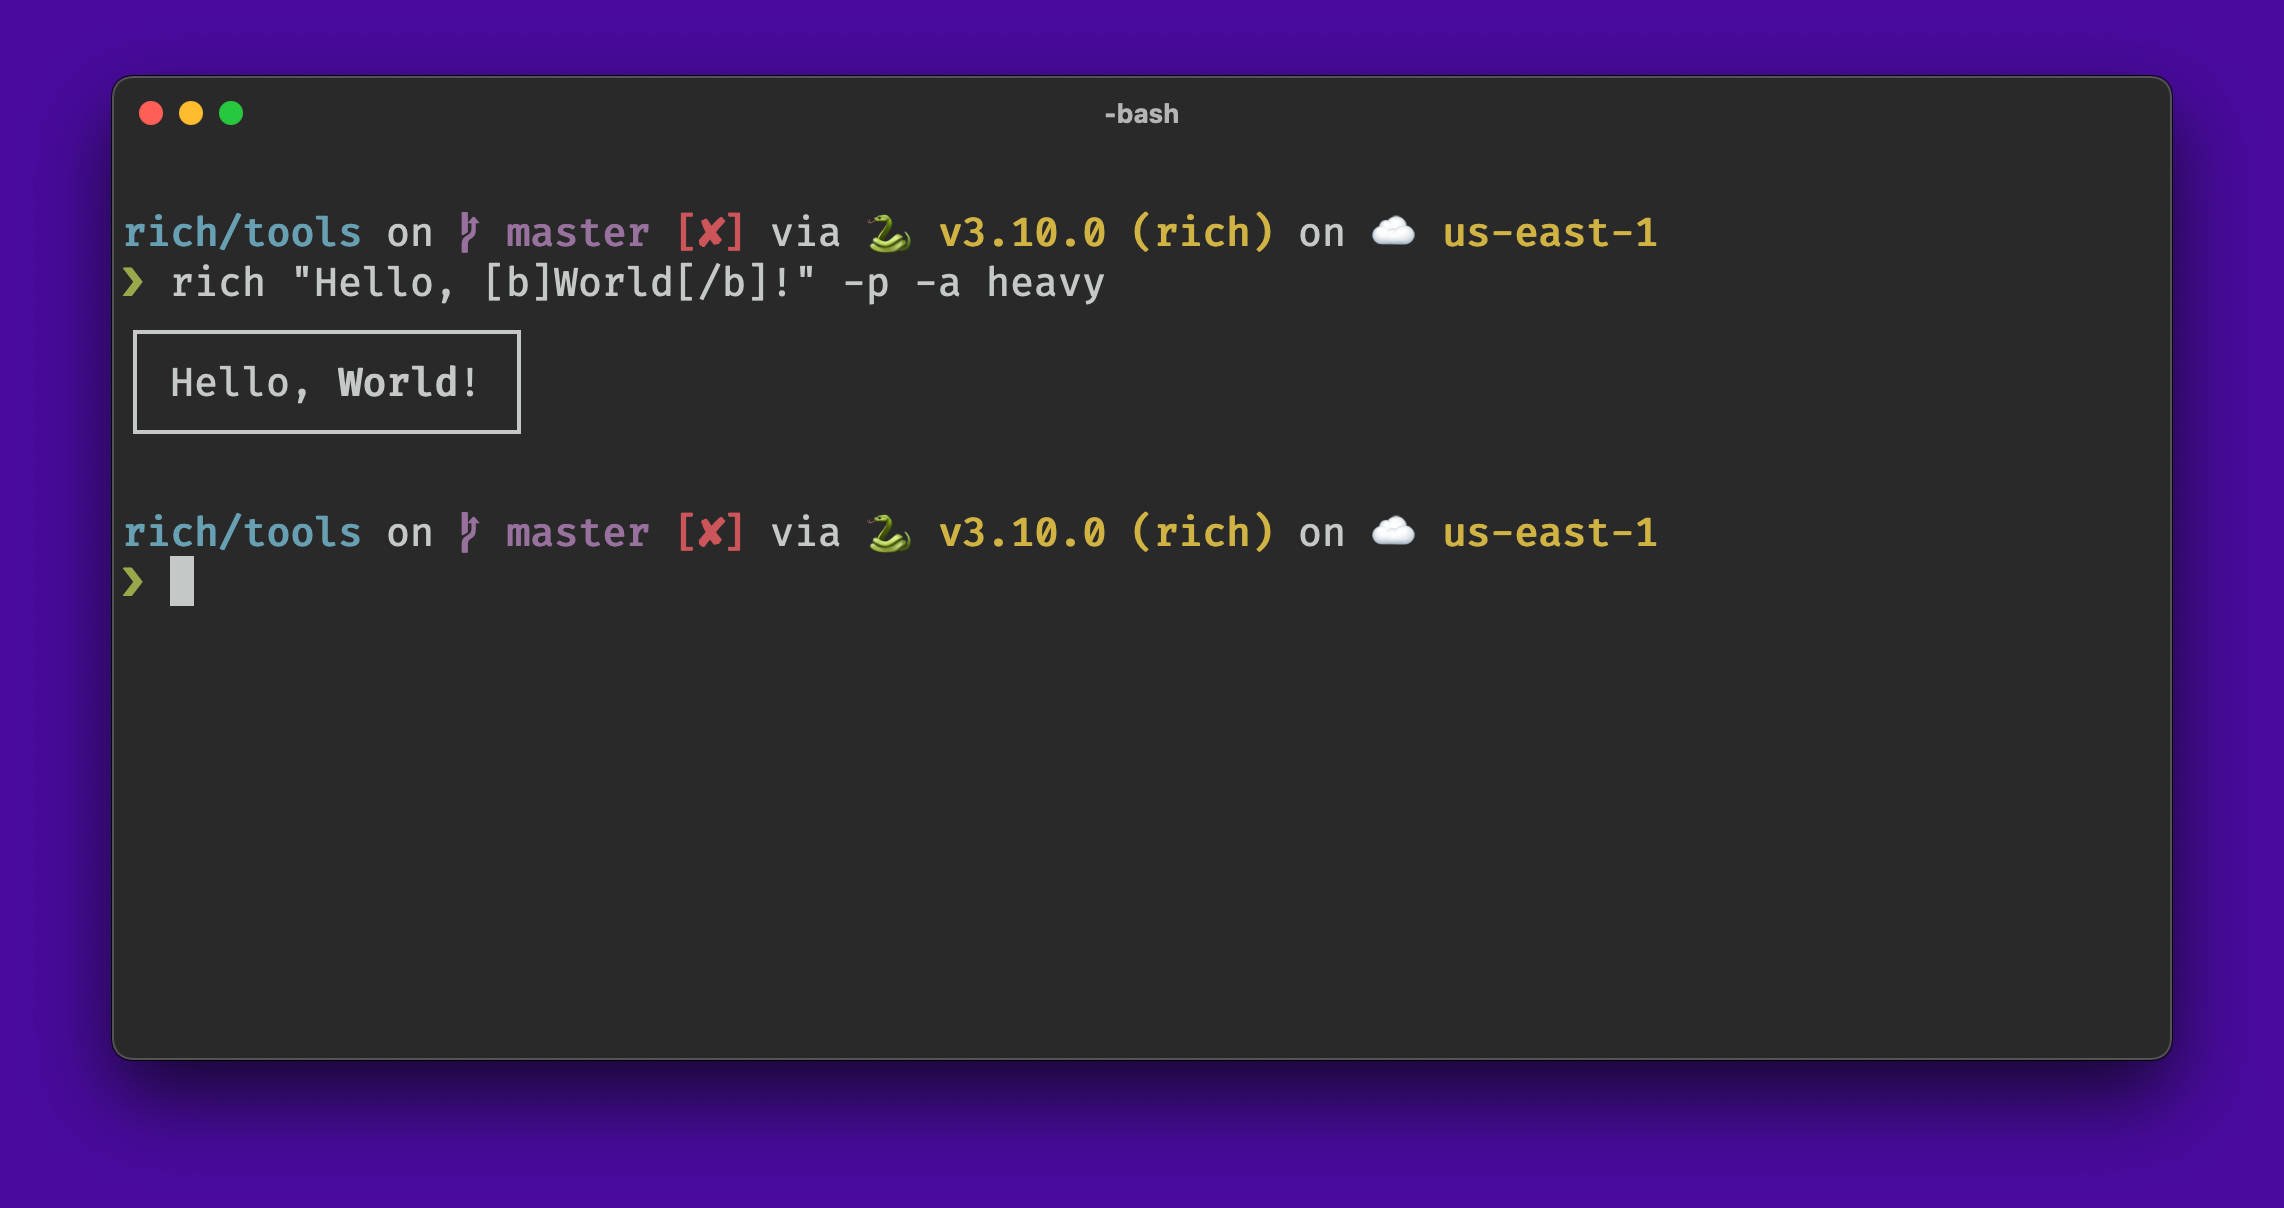
### Panel
You can draw a _panel_ around content with `--panel` or `-a`, which takes one of a number of [styles](https://rich.readthedocs.io/en/latest/appendix/box.html).
```
rich "Hello, [b]World[/b]!" -p -a heavy
```