Ecosyste.ms: Awesome
An open API service indexing awesome lists of open source software.
https://github.com/auth0/react-native-lock
[DEPRECATED] A wrapper of Lock to use with React Native (iOS & Android)
https://github.com/auth0/react-native-lock
Last synced: 2 months ago
JSON representation
[DEPRECATED] A wrapper of Lock to use with React Native (iOS & Android)
- Host: GitHub
- URL: https://github.com/auth0/react-native-lock
- Owner: auth0
- License: mit
- Archived: true
- Created: 2015-11-06T18:51:41.000Z (over 8 years ago)
- Default Branch: master
- Last Pushed: 2018-12-27T12:55:24.000Z (over 5 years ago)
- Last Synced: 2024-04-14T01:51:05.634Z (3 months ago)
- Language: Java
- Homepage:
- Size: 407 KB
- Stars: 277
- Watchers: 11
- Forks: 81
- Open Issues: 44
-
Metadata Files:
- Readme: README.md
- Changelog: CHANGELOG.md
- License: LICENSE
Lists
- awesome-react-native - react-native-lock-ios ★291 - Auth0 Lock for React Native (iOS) (Components / System)
- awesome-stars - auth0/react-native-lock - [DEPRECATED] A wrapper of Lock to use with React Native (iOS & Android) (Java)
README
# This library is DEPRECATED
We recommend following our [react-native quickstart](https://auth0.com/docs/quickstart/native/react-native) and using https://github.com/auth0/react-native-auth0.
# react-native-lock
[![NPM version][npm-image]][npm-url]
[![CI Status][travis-image]][travis-url]
[Auth0](https://auth0.com) is an authentication broker that supports social identity providers as well as enterprise identity providers such as Active Directory, LDAP, Google Apps and Salesforce.
**react-native-lock** is a wrapper around Lock's implementations for [iOS](https://github.com/auth0/Lock.iOS-OSX) and [Android](https://github.com/auth0/Lock.Android) ready to use for React Native
## Before you start
Starting 8th June 2017 Auth0 restricted some Auth flows for new Auth0 clients (Grant types), even if your account was created before that date, so this library won't work out of the box since it relies on legacy grants. If you were already using this libary before 8th June, you can go to your client's settings and enable the grants you neeed.
* `Legacy: RO` (`http://auth0.com/oauth/legacy/grant-type/ro`): for database connections
* `Legacy: RO jwt bearer` (`http://auth0.com/oauth/legacy/grant-type/ro/jwt-bearer`): for TouchID
* `Legcy: Access Token` (`http://auth0.com/oauth/legacy/grant-type/access_token`): for native social integrations
In our documentation you will find more information about [Grant types](https://auth0.com/docs/clients/client-grant-types).
We will continue fixing bugs for react-native-lock for the time being.
## Requirements
### iOS
* iOS 7+
* [CocoaPods](https://cocoapods.org)
### Android
* Minimum SDK 16
## Installation
Run `npm install --save react-native-lock` to add the package to your app's dependencies.
### iOS
#### react-native cli
Run `react-native link react-native-lock` so your project is linked against your Xcode project & install Lock for iOS using CocoaPods and run `react-native run-ios`
#### Manually
1. In XCode, in the project navigator, right click `Libraries` ➜ `Add Files to [your project's name]`
2. Go to `node_modules` ➜ `react-native-lock` and add `A0RNLock.xcodeproj`
3. In XCode, in the project navigator, select your project. Add `libA0RNLock.a` to your project's `Build Phases` ➜ `Link Binary With Libraries`
4. Click `A0RNLock.xcodeproj` in the project navigator and go the `Build Settings` tab. Make sure 'All' is toggled on (instead of 'Basic'). Look for `Header Search Paths` and make sure it contains `$(SRCROOT)/../react-native/React`, `$(SRCROOT)/../../React`, `${SRCROOT}/../../ios/Pods/Headers/Public` and `${SRCROOT}/../../ios/Pods/Headers/Public/Lock` - all marked as `recursive`.
5. Inside your `ios` directory add a file named `Podfile` with the following [content](https://github.com/auth0/react-native-lock/blob/master/Podfile.template)
6. Run `pod install --project-directory=ios`
7. Run `react-native run-ios`
#### CocoaPods Warning
If you get the following warning.
```
[!] The ` [Debug]` target overrides the `OTHER_LDFLAGS` build setting defined in `Pods/Target Support Files/Pods/Pods.debug.xcconfig'. This can lead to problems with the CocoaPods installation
- Use the `$(inherited)` flag, or
- Remove the build settings from the target.
[!] The ` [Release]` target overrides the `OTHER_LDFLAGS` build setting defined in `Pods/Target Support Files/Pods/Pods.release.xcconfig'. This can lead to problems with the CocoaPods installation
- Use the `$(inherited)` flag, or
- Remove the build settings from the target.
```
Click `.xcodeproj` in the project navigator and go the `Build Settings` tab. Make sure 'All' is toggled on (instead of 'Basic'). Look for `Other Linker Flags` and replace the value `-ObjC` with the value `$(inherited)` for your Application's Target.
#### Compile error react-native >=0.26.0
If you are using a `react-native` version `>=0.26.0`, you might encounter the following error while trying to run the project
```
"std::terminate()", referenced from:
___clang_call_terminate in libReact.a(RCTJSCExecutor.o)
```
*React Native* introduced some C++ code so we need to tell **Xcode** to include use those symbols for compile. First click `.xcodeproj` in the Project Navigator to show your project's target (at least one for your app).
Then for each of the targets do the following:
- Go the `Build Settings` tab, and make sure `All` is toggled on (instead of `Basic`)
- Look for `Other Linker Flags` and add the flag `-lc++` for **all** configurations
> If your project was created using `react-native init` command, you will have two targets (app & tests) so make sure **BOTH** of them has the correct flags
#### CocoaPods with uses_framework! flag
> This more of a hack than an actual solution. We recommend to avoid including Lock as a dynamic framework unless you have a very good reason to do that.
After setting up `react-native-lock` either [Manually](#manually) or using [react-native cli](#react-native-cli) you need to open your iOS project with Xcode and follow these steps:
1. Click `A0RNLock.xcodeproj` in the project navigator and go the `Build Settings` tab. Make sure 'All' is toggled on (instead of 'Basic'). Look for `Framework Search Paths` and make sure it contains `$BUILD_DIR/$CONFIGURATION$EFFECTIVE_PLATFORM_NAME/Lock`
2. Change to the `A0RNLock.xcodeproj` target tab `Build Phases`, and in the section `Link Binary with Libraries` click the `+` and add `Lock.framework` and make sure it's `Status` is set to **optional**
3. In the project navigator, select your project (should be the top one) and go the `Build Settings` tab. Make sure 'All' is toggled on (instead of 'Basic') and look for `Other Linker Flags` and make sure the value `-ObjC` is listed there
### Android
#### react-native cli
Run `react-native link react-native-lock` so your project is linked against your Android project
In your file `android/app/build.gradle`, inside the `android` section add the following
```gradle
packagingOptions {
exclude 'META-INF/LICENSE'
exclude 'META-INF/NOTICE'
}
```
Then in your `android/app/src/main/AndroidManifest.xml` add the following inside `` tag
```xml
```
And finally run `react-native run-android`
#### Manually
In your file `android/settings.gradle` add the following
```gradle
include ':react-native-lock'
project(':react-native-lock').projectDir = new File(rootProject.projectDir, '../node_modules/react-native-lock/android')
```
In the file `android/app/build.gradle` add a new dependency
```gradle
dependencies {
//Other gradle dependencies...
compile project(':react-native-lock')
}
```
And in the same file inside the `android` section
```gradle
packagingOptions {
exclude 'META-INF/LICENSE'
exclude 'META-INF/NOTICE'
}
```
> This fixes the error `Error: duplicate files during packaging of APK
Then in the file `MainApplication.java` add the following Java import
```java
import com.auth0.lock.react.LockReactPackage;
```
> In react-native versions older than 0.29 you should add do this in `MainActivity.java` instead
and add Lock's React Native module
```java
/**
* A list of packages used by the app. If the app uses additional views
* or modules besides the default ones, add more packages here.
*/
@Override
protected List getPackages() {
return Arrays.asList(
new MainReactPackage(),
//Other RN modules
new LockReactPackage()
);
}
```
Then in your `android/app/src/main/AndroidManifest.xml` add the following inside `` tag
```xml
```
> For more information and configuration options you should see the Lock.Android [docs](https://github.com/auth0/Lock.Android)
And finally run `react-native run-android`
## Usage
Let's require `react-native-lock` module:
```js
var Auth0Lock = require('react-native-lock');
```
And initialize it with your Auth0 credentials that you can get from [our dashboard](https://app.auth0.com/#/applications)
```js
var lock = new Auth0Lock({clientId: "YOUR_CLIENT_ID", domain: "YOUR_DOMAIN"});
```
### Email/Password, Enterprise & Social authentication
```js
lock.show({}, (err, profile, token) => {
console.log('Logged in!');
});
```
And you'll see our native login screen
[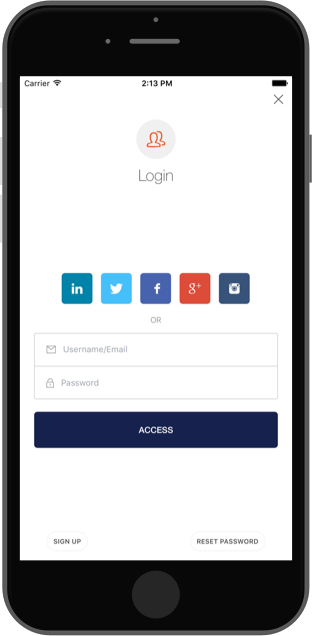](https://auth0.com)
### Avoid WebView for Social Auth
In order to make Lock use the OS browser to perform Web Auth you will need to pass the attribute `useBrowser` when you build Lock like
```js
var lock = new Auth0Lock({clientId: "YOUR_CLIENT_ID", domain: "YOUR_DOMAIN", useBrowser: true});
```
Then you need to configure both your iOS and Android project following the instructions detailed below.
> **IMPORTANT**: This feature only works with iOS 9 or later.
### iOS
In the file `AppDelegate.m` add the following import on the top (next to the other imports of the file)
```objc
#import "A0LockReact.h"
```
and then inside the `AppDelegate` implementation add the following method
```objc
- (BOOL)application:(UIApplication *)app openURL:(NSURL *)url options:(NSDictionary *)options {
return [[A0LockReact sharedInstance] handleURL:url sourceApplication:nil];
}
```
And finally in the file `Info.plist` add the following entry
```xml
CFBundleURLTypes
CFBundleTypeRole
Editor
CFBundleURLName
auth0
CFBundleURLSchemes
{Bundle Identifier}
```
Where the Bundle identifier can be found in the same file under the key `CFBundleIdentifier` like
```xml
CFBundleIdentifier
org.reactjs.native.example.$(PRODUCT_NAME:rfc1034identifier)
```
### Android
In the file `AndroidManifest` find where the `LockActivity` is declared and insde the `activity` tags add the following
```xml
```
And make sure Lock's activity launch mode is `singleTask`
### TouchID (iOS Only)
```js
lock.show({
connections: ["touchid"]
}, (err, profile, token) => {
console.log('Logged in!');
});
```
And you'll see TouchID login screen
[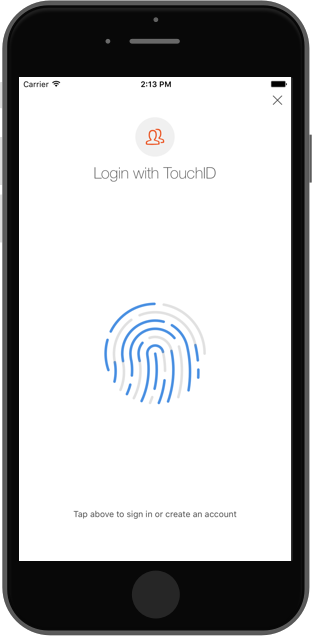](https://auth0.com)
> Because it uses a Database connection, the user can change it's password and authenticate using email/password whenever needed. For example when you change your device.
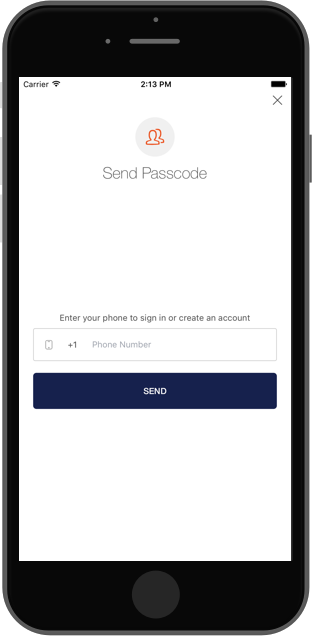
### SMS Passwordless
```js
lock.show({
connections: ["sms"]
}, (err, profile, token) => {
console.log('Logged in!');
});
```
And you'll see SMS Passwordless login screen
[](https://auth0.com)
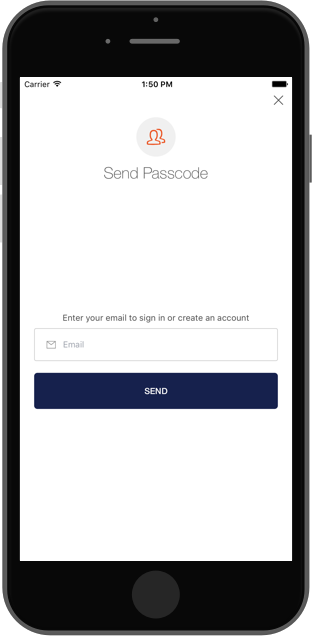
### Email Passwordless
```js
lock.show({
connections: ["email"]
}, (err, profile, token) => {
console.log('Logged in!');
});
```
And you'll see Email Passwordless login screen
[](https://auth0.com)
## Upgrading
If you are upgrading your `react-native` version just run `react-native upgrade` and overwrite all conflicts (option `a` or `overwrite this and all others`).
> If you have custom code in any of the conflict files, like `AppDelegate.m`, it's probably best to backup a copy to apply those changes later.
Then run `react-native link react-native-lock` and follow the same steps like you did the first time you installed the library.
## API
### Lock
####.show(options, callback)
Show Lock's authentication screen as a modal screen using the connections configured for your applications or the ones specified in the `options` parameter. This is the list of valid options:
* **closable** (`boolean`): If Lock screen can be dismissed
* **disableSignUp** (`boolean`): default to false, if true will hide the signup button
* **disableResetPassword** (`boolean`): default to false, if true will hide the reset password button
* **connections** (`[string]`): List of enabled connections to use for authentication. Must be enabled in your app's dashboard first.
* **authParams** (`object`): Object with the parameters to be sent to the Authentication API, e.g. `scope`.
The callback will have the error if anything went wrong or after a successful authentication, it will yield the user's profile info and tokens.
####.authenticationAPI()
Returns Auth0 Authentication API client that can be used to refresh user's token, obtain user information or call Auth0 delegation.
> For more info check [react-native-auth0](https://github.com/auth0/react-native-auth0)
####.usersAPI(token)
Returns Auth0 Users API client using a valid user's token for [Management API](https://auth0.com/docs/api/management/v2#!/Users/get_users). With this client you can update user's metadata or link two user accounts.
> For more info check [react-native-auth0](https://github.com/auth0/react-native-auth0)
## Issue Reporting
If you have found a bug or if you have a feature request, please report them at this repository issues section. Please do not report security vulnerabilities on the public GitHub issue tracker. The [Responsible Disclosure Program](https://auth0.com/whitehat) details the procedure for disclosing security issues.
## What is Auth0?
Auth0 helps you to:
* Add authentication with [multiple authentication sources](https://docs.auth0.com/identityproviders), either social like **Google, Facebook, Microsoft Account, LinkedIn, GitHub, Twitter, Box, Salesforce, among others**, or enterprise identity systems like **Windows Azure AD, Google Apps, Active Directory, ADFS or any SAML Identity Provider**.
* Add authentication through more traditional **[username/password databases](https://docs.auth0.com/mysql-connection-tutorial)**.
* Add support for **[linking different user accounts](https://docs.auth0.com/link-accounts)** with the same user.
* Support for generating signed [Json Web Tokens](https://docs.auth0.com/jwt) to call your APIs and **flow the user identity** securely.
* Analytics of how, when and where users are logging in.
* Pull data from other sources and add it to the user profile, through [JavaScript rules](https://docs.auth0.com/rules).
## Create a free account in Auth0
1. Go to [Auth0](https://auth0.com) and click Sign Up.
2. Use Google, GitHub or Microsoft Account to login.
## Author
[Auth0](https://auth0.com/)
## License
react-native-lock-ios is available under the MIT license. See the [LICENSE](LICENSE) file for more info.
[npm-image]: https://img.shields.io/npm/v/react-native-lock.svg?style=flat
[npm-url]: https://npmjs.org/package/react-native-lock
[travis-image]: http://img.shields.io/travis/auth0/react-native-lock.svg?style=flat
[travis-url]: https://travis-ci.org/auth0/react-native-lock