Ecosyste.ms: Awesome
An open API service indexing awesome lists of open source software.
https://github.com/bezhanSalleh/filament-shield
The easiest and most intuitive way to add access management to your Filament Admin Resources, Pages & Widgets through `spatie/laravel-permission`
https://github.com/bezhanSalleh/filament-shield
acl easy-access-management filament filamentplugin laravel livewire permissions php roles secure
Last synced: about 1 month ago
JSON representation
The easiest and most intuitive way to add access management to your Filament Admin Resources, Pages & Widgets through `spatie/laravel-permission`
- Host: GitHub
- URL: https://github.com/bezhanSalleh/filament-shield
- Owner: bezhanSalleh
- License: mit
- Created: 2022-01-02T13:40:00.000Z (over 2 years ago)
- Default Branch: 3.x
- Last Pushed: 2024-03-29T03:03:16.000Z (3 months ago)
- Last Synced: 2024-04-04T11:03:21.718Z (2 months ago)
- Topics: acl, easy-access-management, filament, filamentplugin, laravel, livewire, permissions, php, roles, secure
- Language: PHP
- Homepage:
- Size: 710 KB
- Stars: 1,033
- Watchers: 19
- Forks: 144
- Open Issues: 5
-
Metadata Files:
- Readme: README.md
- Changelog: CHANGELOG.md
- Contributing: .github/CONTRIBUTING.md
- Funding: .github/FUNDING.yml
- License: LICENSE.md
- Code of conduct: CODE_OF_CONDUCT.md
- Security: .github/SECURITY.md
Lists
- awesome-filament - bezhanSalleh/filament-shield - The easiest and most intuitive way to add access management to your Filament Admin Resources, Pages & Widgets through `spatie/laravel-permission`. (Integrations)
README


# Shield
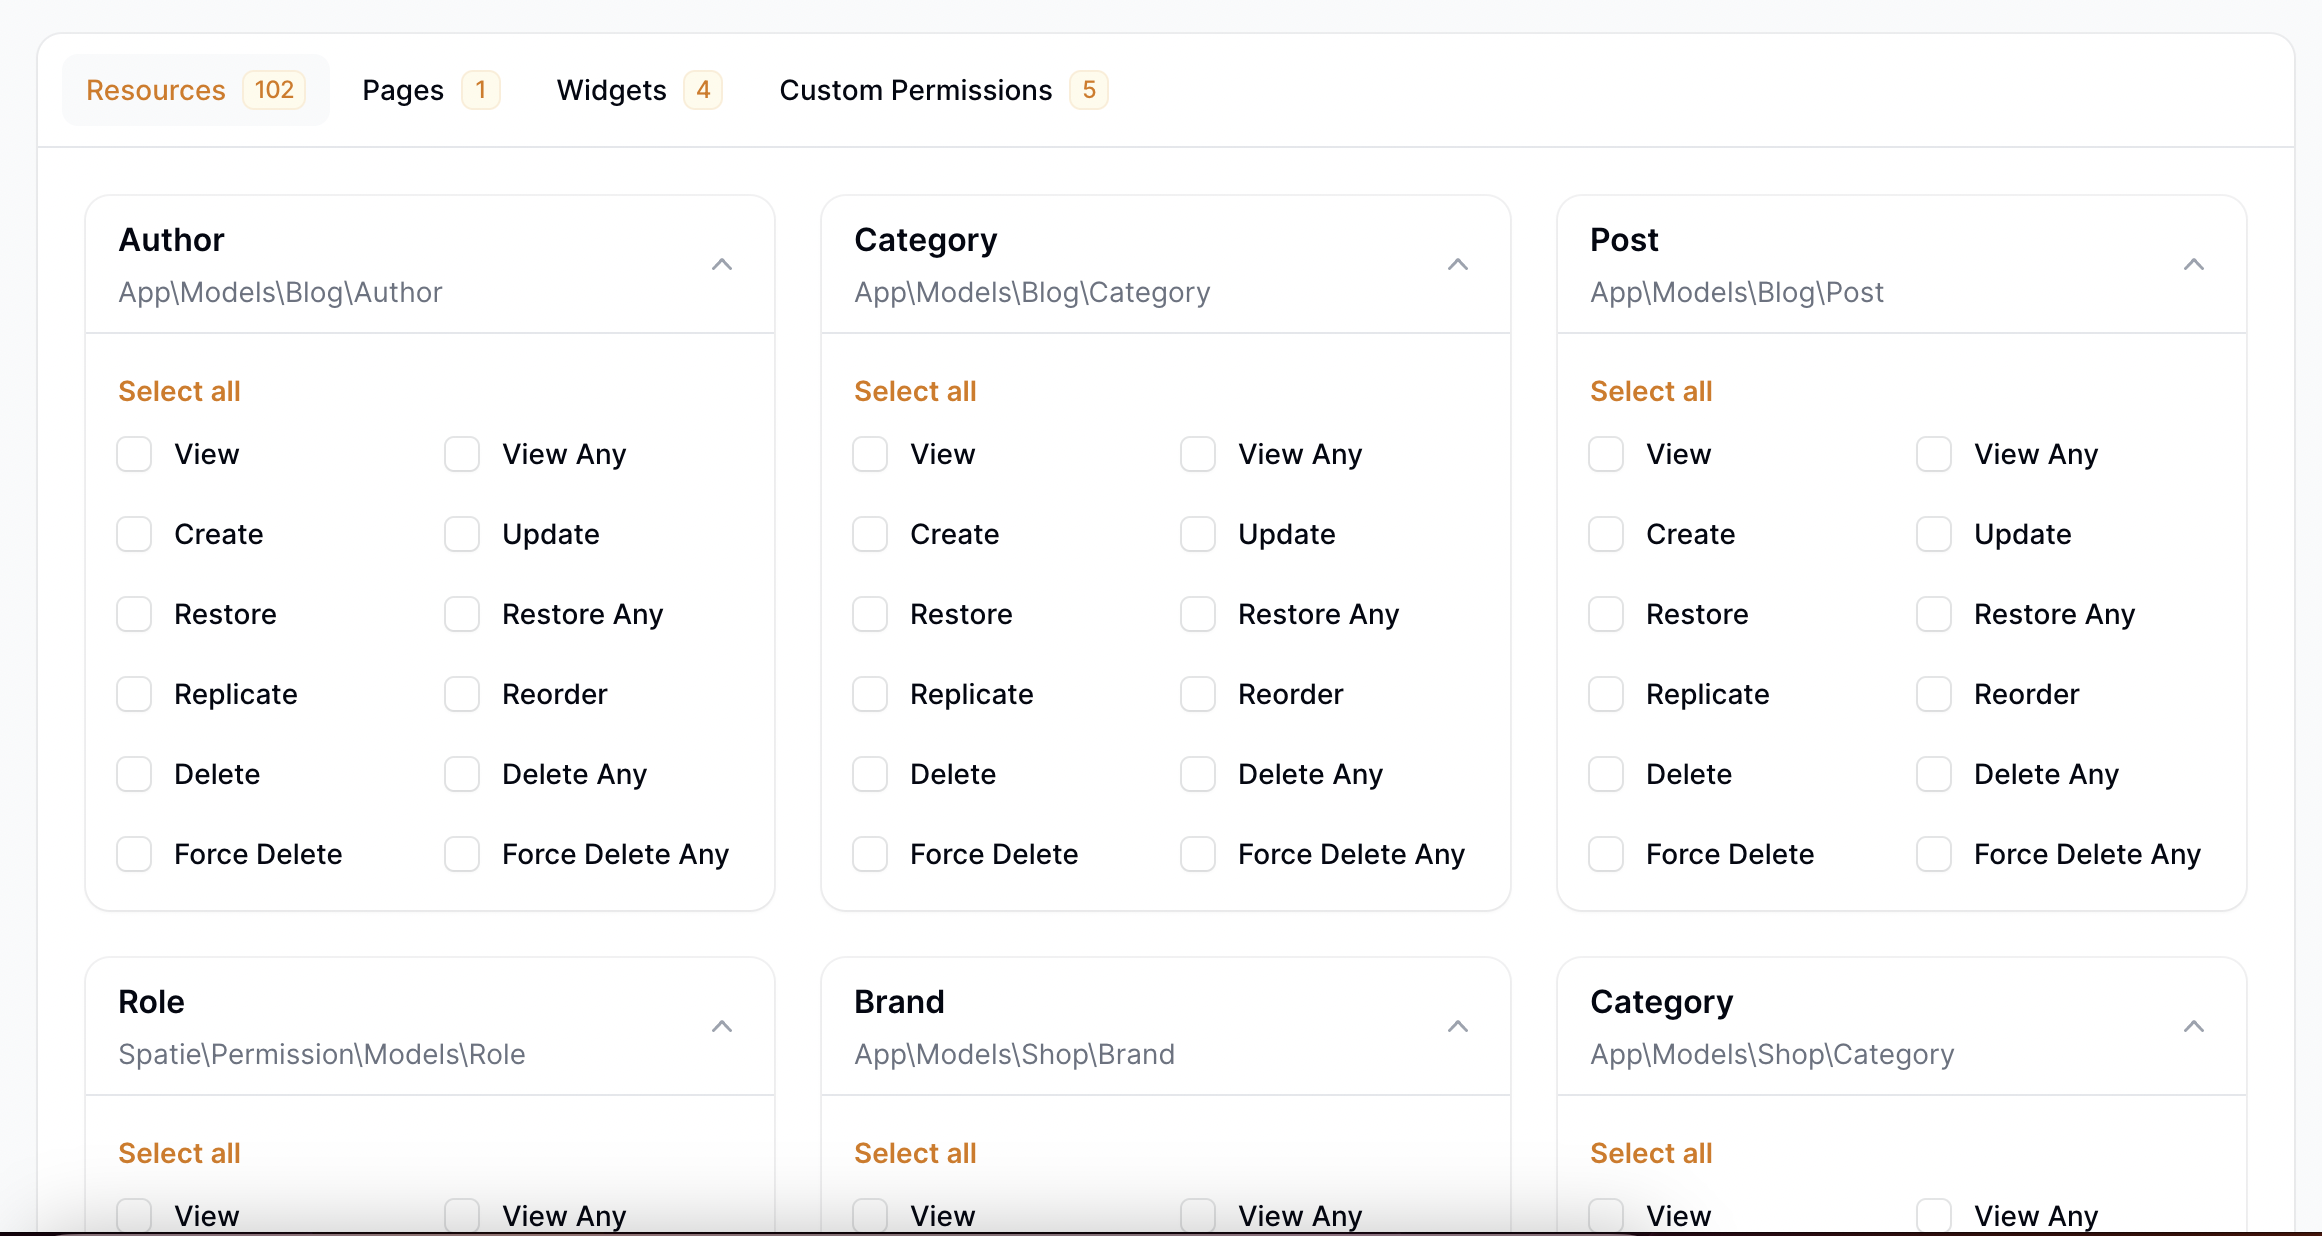
The easiest and most intuitive way to add access management to your Filament Admin:
- :fire: **Resources**
- :fire: **Pages**
- :fire: **Widgets**
- :fire: **Custom Permissions**
> [!NOTE]
> For **Filament 2.x** use **[2.x](https://github.com/bezhanSalleh/filament-shield/tree/2.x)** branch
> [!IMPORTANT]
> Prior to `v3.1.0` Shield supported [spatie/laravel-permission](https://packagist.org/packages/spatie/laravel-permission):`^5.0` and now it supports version `^6.0`. Which has some breaking changes around migrations. If you are upgrading from a version prior to `v3.1.0` please make sure to remove the old migration file and republish the new one.
## Installation
1. Install the package via composer:
```bash
composer require bezhansalleh/filament-shield
```
2. Add the `Spatie\Permission\Traits\HasRoles` trait to your User model(s):
```php
use Illuminate\Foundation\Auth\User as Authenticatable;
use Spatie\Permission\Traits\HasRoles;
class User extends Authenticatable
{
use HasRoles;
// ...
}
```
3. Publish the `config` file then setup your configuration:
```bash
php artisan vendor:publish --tag=filament-shield-config
```
4. Register the plugin for the Filament Panels you want
```php
public function panel(Panel $panel): Panel
{
return $panel
->plugins([
\BezhanSalleh\FilamentShield\FilamentShieldPlugin::make()
]);
}
```
5. Now run the following command to install shield:
```bash
php artisan shield:install
```
Follow the prompts and enjoy!
## Filament Panels
If you want to enable `Shield` for more than one panel then you need to register the plugin for each panel as mentioned above.
### Panel Access
Shield comes with the `HasPanelShield` trait which provides an easy way to integrate Shield's conventions with the Filament's panel access system.
The `HasPanelShield` trait provides an implementation for the `canAccessPanel` method, determining access based on whether the user possesses the `super_admin` role or the `panel_user` role. It also assigns the `panel_user` role to the user upon creation and removes it upon deletion. Ofcourse the role names can be changed from the plugin's configuration file.
```php
use BezhanSalleh\FilamentShield\Traits\HasPanelShield;
use Filament\Models\Contracts\FilamentUser;
use Illuminate\Foundation\Auth\User as Authenticatable;
use Spatie\Permission\Traits\HasRoles;
class User extends Authenticatable implements FilamentUser
{
use HasRoles;
use HasPanelShield;
// ...
}
```
#### Resources
Generally there are two scenarios that shield handles permissions for your `Filament` resources.
##### Default
Out of the box `Shield` handles the predefined permissions for `Filament` resources. So if that's all that you need you are all set.
If you need to add a single permission (for instance `lock`) and have it available for all your resources just append it to the following `config` key:
```php
permission_prefixes' => [
'resource' => [
'view',
'view_any',
'create',
'update',
'restore',
'restore_any',
'replicate',
'reorder',
'delete',
'delete_any',
'force_delete',
'force_delete_any',
'lock'
],
...
],
```
:bulb: Now you are thinking **`what if I need a permission to be only available for just one resource?`**
No worries, that's where [Custom Permissions](#custom-permissions) come to play.
##### Custom Permissions
To define custom permissions per `Resource` your `Resource` must implement the `HasShieldPermissions` contract.
This contract has a `getPermissionPrefixes()` method which returns an array of permission prefixes for your `Resource`.
Consider you have a `PostResource` and you want a couple of the predefined permissions plus a new permission called `publish_posts` to be only available for `PostResource` only.
```php
can('publish_post');
}
```
🅰️/🈯️ To make the prefix translatable, publish `Shield`'s translations and append the prefix inside `resource_permission_prefixes_labels` as key and it's translation as value for the languages you need.
```php
//lang/en/filament-shield.php
'resource_permission_prefixes_labels' => [
'publish' => 'Publish'
],
//lang/es/filament-shield.php
'resource_permission_prefixes_labels' => [
'publish' => 'Publicar'
],
```
##### Configure Permission Identifier
By default the permission identifier is generated as follow:
```php
Str::of($resource)
->afterLast('Resources\\')
->before('Resource')
->replace('\\', '')
->snake()
->replace('_', '::');
```
So for instance if you have a resource like `App\Filament\Resources\Shop\CategoryResource` then the permission identifier would be `shop::category` and then it would be prefixed with your defined prefixes or what comes default with shield.
If you wish to change the default behaviour, then you can call the static `configurePermissionIdentifierUsing()` method inside a service provider's `boot()` method, to which you pass a Closure to modify the logic. The Closure receives the fully qualified class name of the resource as `$resource` which gives you the ability to access any property or method defined within the resource.
For example, if you wish to use the model name as the permission identifier, you can do it like so:
```php
use BezhanSalleh\FilamentShield\Facades\FilamentShield;
FilamentShield::configurePermissionIdentifierUsing(
fn($resource) => str($resource::getModel())
->afterLast('\\')
->lower()
->toString()
);
```
> **Warning**
> Keep in mind that ensuring the uniqueness of the permission identifier is now up to you.
##### Custom Navigation Group
By default the english translation renders Roles and Permissions under 'Filament Shield' if you wish to change this, first publish the [translations files](#translations) and change the relative locale to the group of your choosing for example:
```php
'nav.group' => 'Filament Shield',
```
to
```php
'nav.group' => 'User Management',
```
apply this to each language you have groups in.
#### Pages
If you have generated permissions for `Pages` you can toggle the page's navigation from sidebar and restricted access to the page. You can set this up manually but this package comes with a `HasPageShield` trait to speed up this process. All you have to do is use the trait in you pages:
```php
`HasPageShield` uses the `booted` method to check the user's permissions and makes sure to execute the `booted` page method in the parent page if exists.
###### Pages Hooks
However if you need to perform some methods before and after the booted method you can declare the next hooks methods in your filament page.
```php
'App\Policies\RolePolicy',
];
...
```
**You can skip it if you have enabled it from the `config`:**
```php
// config/filament-shield.php
...
'register_role_policy' => [
'enabled' => true,
],
...
```
#### Policy Path
If your policies are not in the default `Policies` directory in the `app_path()` you can change the directory name in the config file:
```php
...
'generator' => [
'option' => 'policies_and_permissions',
'policy_directory' => 'Policies',
],
...
```
#### Custom folder structure for Models or Third-Party Plugins
Shield also generates policies and permissions for third-party plugins and `Models` with custom folder structure and to enforce the generated policies you will need to register them in your application's `AuthServiceProvider`:
```
...
class AuthServiceProvider extends ServiceProvider
{
...
protected $policies = [
...,
'App\Models\Blog\Author' => 'App\Policies\Blog\AuthorPolicy',
'Ramnzys\FilamentEmailLog\Models\Email' => 'App\Policies\EmailPolicy'
];
```
#### Users (Assigning Roles to Users)
Shield does not come with a way to assign roles to your users out of the box, however you can easily assign roles to your users using Filament `Forms`'s `Select` or `CheckboxList` component. Inside your users `Resource`'s form add one of these components and configure them as you need:
```php
// Using Select Component
Forms\Components\Select::make('roles')
->relationship('roles', 'name')
->multiple()
->preload()
->searchable()
// Using CheckboxList Component
Forms\Components\CheckboxList::make('roles')
->relationship('roles', 'name')
->searchable()
```
You can find out more about these components in the [Filament Docs](https://filamentphp.com/docs/3.x/forms/installation)
- [Select](https://filamentphp.com/docs/3.x/forms/fields/select)
- [CheckboxList](https://filamentphp.com/docs/3.x/forms/fields/checkbox-list)
#### Layout Customization
You can easily customize the `Grid`, `Section` and `CheckboxList`'s `columns()` and `columnSpan()` without publishing the resource.
```php
use BezhanSalleh\FilamentShield\FilamentShieldPlugin;
public function panel(Panel $panel): Panel
{
return $panel
...
...
->plugins([
FilamentShieldPlugin::make()
->gridColumns([
'default' => 1,
'sm' => 2,
'lg' => 3
])
->sectionColumnSpan(1)
->checkboxListColumns([
'default' => 1,
'sm' => 2,
'lg' => 4,
])
->resourceCheckboxListColumns([
'default' => 1,
'sm' => 2,
]),
]);
}
```
#### Translations
Publish the translations using:
```bash
php artisan vendor:publish --tag="filament-shield-translations"
```
## Available Filament Shield Commands
#### `shield:doctor`
- Show useful info about Filament Shield.
#### `shield:install`
Setup Core Package requirements and Install Shield. Accepts the following flags:
- `--fresh` re-run the migrations
- `--only` Only setups shield without generating permissions and creating super-admin
#### `shield:generate`
Generate Permissions and/or Policies for Filament entities. Accepts the following flags:
- `--all` Generate permissions/policies for all entities
- `--option[=OPTION]` Override the config generator option(`policies_and_permissions`,`policies`,`permissions`)
- `--resource[=RESOURCE]` One or many resources separated by comma (,)
- `--page[=PAGE]` One or many pages separated by comma (,)
- `--widget[=WIDGET]` One or many widgets separated by comma (,)
- `--exclude` Exclude the given entities during generation
- `--ignore-config-exclude` Ignore config `exclude` option during generation
- `--ignore-existing-policies` Do not overwrite the existing policies.
#### `shield:super-admin`
Create a user with super_admin role.
- Accepts an `--user=` argument that will use the provided ID to find the user to be made super admin.
### `shield:publish`
- Publish the Shield `RoleResource` and customize it however you like
### `shield:seeder`
- Deploy easily by setting up your roles and permissions or add your custom seeds
## Testing
```bash
composer test
```
## Changelog
Please see [CHANGELOG](CHANGELOG.md) for more information on what has changed recently.
## Contributing
Please see [CONTRIBUTING](.github/CONTRIBUTING.md) for details.
## Security Vulnerabilities
Please review [our security policy](../../security/policy) on how to report security vulnerabilities.
## Credits
- [Bezhan Salleh](https://github.com/bezhanSalleh)
- [All Contributors](../../contributors)
## License
The MIT License (MIT). Please see [License File](LICENSE.md) for more information.