Ecosyste.ms: Awesome
An open API service indexing awesome lists of open source software.
https://github.com/AnupAmmanavar/SwiftUI-Server-Driver-UI
Server Driven UI using the Swifts declarative SwiftUI UI toolkit
https://github.com/AnupAmmanavar/SwiftUI-Server-Driver-UI
architecture declarative-ui ios-app server-driven-ui servercomponent standalone-uicomponents swiftui uicomponent
Last synced: 3 days ago
JSON representation
Server Driven UI using the Swifts declarative SwiftUI UI toolkit
- Host: GitHub
- URL: https://github.com/AnupAmmanavar/SwiftUI-Server-Driver-UI
- Owner: AnupAmmanavar
- Created: 2020-05-07T18:42:28.000Z (about 4 years ago)
- Default Branch: master
- Last Pushed: 2021-01-30T07:28:44.000Z (over 3 years ago)
- Last Synced: 2024-03-26T17:59:28.518Z (3 months ago)
- Topics: architecture, declarative-ui, ios-app, server-driven-ui, servercomponent, standalone-uicomponents, swiftui, uicomponent
- Language: Swift
- Homepage:
- Size: 84 KB
- Stars: 73
- Watchers: 4
- Forks: 9
- Open Issues: 0
-
Metadata Files:
- Readme: README.md
Lists
- awesome-stars - AnupAmmanavar/SwiftUI-Server-Driver-UI - Server Driven UI using the Swifts declarative SwiftUI UI toolkit (Swift)
README
# SwiftUI-Server-Driven-UI
Please go to this __[Server-Driven-UI Architecture using UIComponents](https://medium.com/better-programming/build-a-server-driven-ui-using-ui-components-in-swiftui-466ecca97290)__ if you would like to read it on [Medium](https://medium.com/better-programming/build-a-server-driven-ui-using-ui-components-in-swiftui-466ecca97290) platform
This article will talk about
* Server-Driven UI,
* Its implementation using re-usable components called `UIComponents`, and
* Creating a generic vertical list view for rendering UI components.
* tIt will conclude with a brief discussion of how UI components can serve different purposes.
## What Is Server-Driven UI? ##
* It is an architecture where the server decides the UI views that need to be rendered on the application screen.
* There exists a contract between the application and the server. The basis of this __contract__ gives the server control over the UI of the application.
#### Contract 🤔
* The server defines the list of components.
* For each of the components defined at the server, we have a corresponding UI implementation in the app (UIComponent).
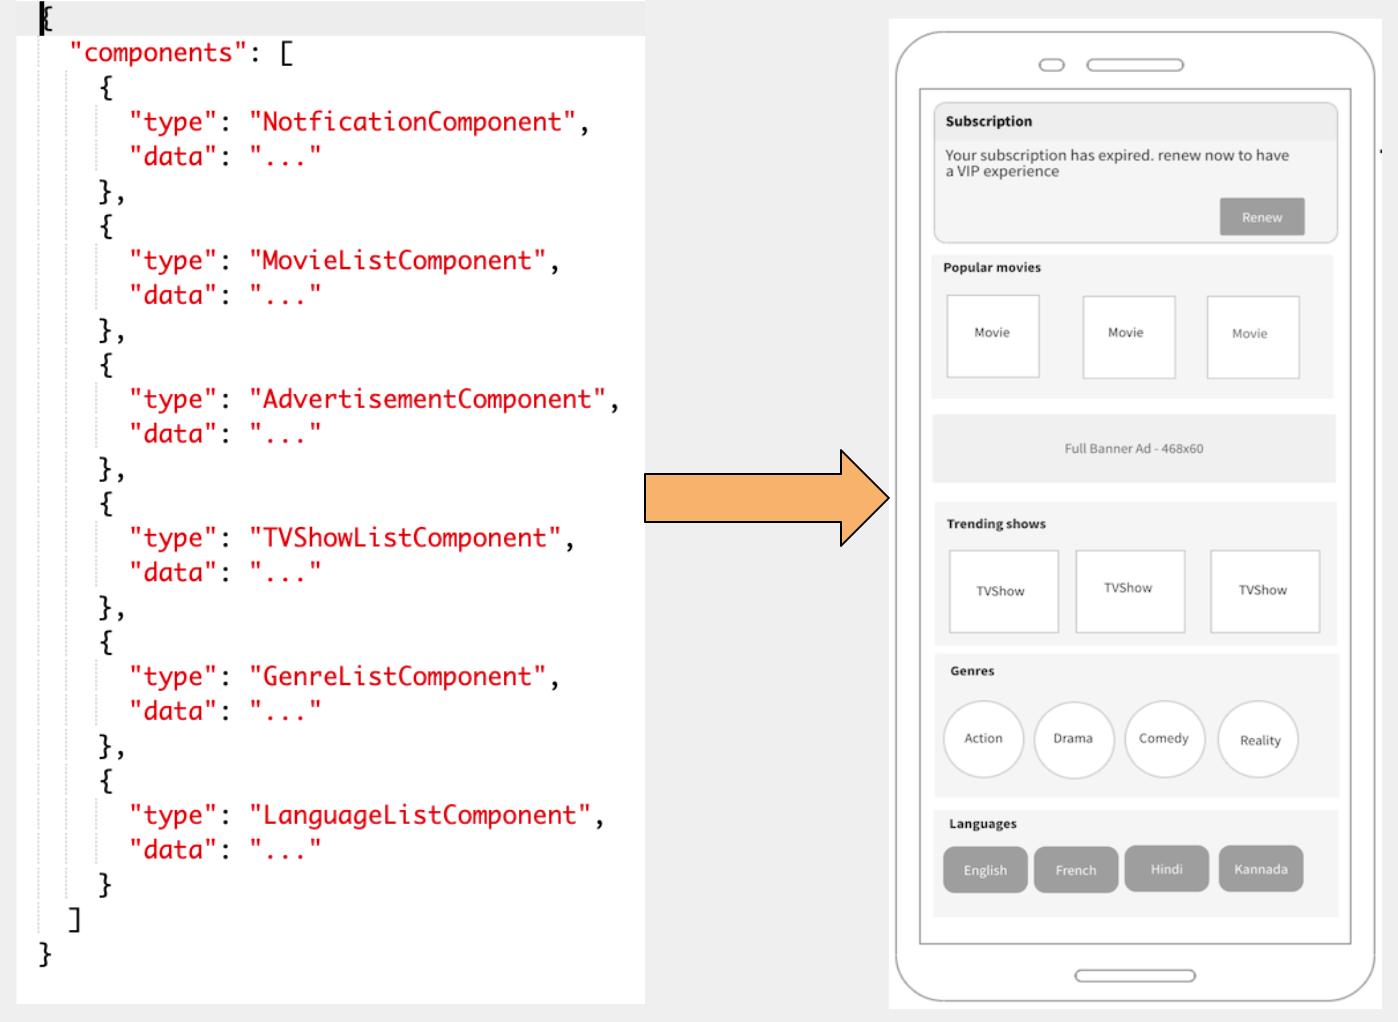
Consider an entertainment app like Hotstar, whose contract is defined as shown below. On the left are the components from the server(__ServerComponent__), and on the right are the corresponding __UI Components__.
#### Working ####
* The screen does not have a predefined layout like a storyboard. Rather, it consists of a generic list view rendering multiple different views vertically, as per the server response.
* To make it possible, we have to create views that are standalone and can be reused throughout the application. We call these re-usable views the UIComponent.
#### Contract ####
> For every ServerComponent, we have a corresponding UIComponent.
### SwiftUI ###
Swift is a UI toolkit that lets you design application screens in a programmatic, declarative way.
```swift
struct NotificationView: View {
let notificationMessage: String
var body: some View {
Text(notificationMessage)
}
}
```
## Server-Driven UI Implementation in SwiftUI ##
This is a three-step process.
1. Define the standalone UIComponents.
2. Construct the UIComponents based on the API response.
3. Render the UIComponents on the screen.
### Step 1 - Define standalone UIComponents ###
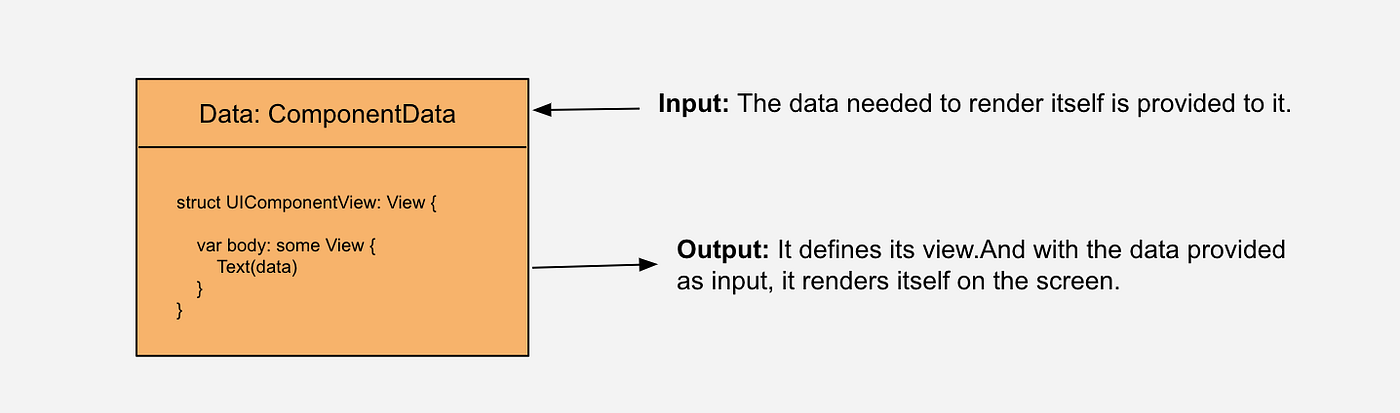
__Input:__ Firstly, for the UIComponent to render itself, it should be provided with data.
__Output:__ UIComponent defines its UI. When used for rendering inside a screen, it renders itself based on the data (input) provided to it.
#### UIComponent implementation ####
```swift
protocol UIComponent {
var uniqueId: String { get }
func render() -> AnyView
}
```
* All the UI views have to conform to this UI-component protocol.
* As the components are rendered inside a generic vertical list, each UIComponent has to be independently identified. The `uniqueId` property is used to serve that purpose.
* The `render()` is where the UI of the component is defined. Calling this function on a screen will render the component.
Let's look at NotificationComponent.
```swift
struct NotificationComponent: UIComponent {
var uniqueId: String
// The data required for rendering is passed as a dependency
let uiModel: NotificationUIModel
// Defines the View for the Component
func render() -> AnyView {
NotificationView(uiModel: uiModel).toAny()
}
}
// Contains the properties required for rendering the Notification View
struct NotificationUIModel {
let header: String
let message: String
let actionText: String
}
// Notification view takes the NotificationUIModel as a dependency
struct NotificationView: View {
let uiModel: NotificationUIModel
var body: some View {
VStack {
Text(uiModel.header)
Text(uiModel.message)
Button(action: {}) {
Text(uiModel.actionText)
}
}
}
}
```
* `NotificationUIModel` is the data required by the component to render. This is the input to the UIComponent.
* `NotificationView` is a SwiftUI view that defines the UI of the component. It takes in `NotificationUIModel` as a dependency. This view is the output of the UIComponent when used for rendering on the screen.
### Step 2 - Construct the UIComponents based on the API response ###
```swift
class HomePageController: ObservableObject {
let repository: Repository
@Published var uiComponents: [UIComponent] = []
..
..
func loadPage() {
val response = repository.getHomePageResult()
response.forEach { serverComponent in
let uiComponent = parseToUIComponent(serverComponent)
uiComponents.append(uiComponent)
}
}
}
func parseToUIComponent(serverComponent: ServerComponent) -> UIComponent {
var uiComponent: UIComponent
if serverComponent.type == "NotificationComponent" {
uiComponent = NotificationComponent(serverComponent.data, serverComponent.id)
}
else if serverComponent.type == "GenreListComponent" {
uiComponent = GenreListComponent(serverComponent.data, serverComponent.id)
}
...
...
return uiComponent
}
```
* `HomePageController` loads the server components from the repository and converts them into the UIComponents.
* The `uiComponent`'s property is responsible for holding the list of UIComponents. Wrapping it with the `@Published` property makes it an observable. Any change in its value will be published to the `Observer(View)`. *__This makes it possible to keep the View in sync with the state of the application.__*
### Step 3 - Render UIComponents on the screen using Generic List ###
This the last part. The screen’s only responsibility is to render the `UIComponents`.
* It subscribes to the `uiComponents` observable.
* Whenever the value of the `uiComponents` changes, the `HomePage` is notified, which then updates its UI.
* A generic ListView is used for rendering the UIComponents
```swift
struct HomePageView: View {
@ObservedObject var controller: HomePageViewModel
var body: some View {
ScrollView(.vertical) {
VStack {
ForEach(controller.uiComponents, id: \.uniqueId) { uiComponent in
uiComponent.render()
}
}
}
.onAppear(perform: {
self.controller.loadPage()
})
}
}
```
#### Rendering using Generic Vstack ####
All the UIComponents are rendered vertically using a VStack inside. As the UIComponents are uniquely identifiable, we can use the `ForEach` construct for rendering.
Since all the components conforming to UIComponent protocol must return a common type, *__the render() function returns AnyView__*. Below is an extension on the View for converting it toAnyView.
```swift
extension View {
func toAny() -> AnyView {
return AnyView(self)
}
}
```
## Conclusion ##
We saw how `UIComponent` can be used to give the server control over the UI of the application. But with UIComponents you can achieve something more.
Let’s consider a case without server-driven UI. It's often the case that the pieces of UI are used many times across the application. This leads to duplication of the view and view logic. So, it’s better to divide the UI into meaningful, reusable UI-components.
Having them this way will let the domain-layer/business layer define and construct the UI components. Additionally, the business-layer can take the responsibility of controlling the UI.
Have a look at the article __[Android Jetpack Compose — Create a Component-Based Architecture](https://medium.com/better-programming/create-a-component-based-architecture-in-android-jetpack-compose-96980c191351)__, which explains UI-Components in detail. As it uses Jetpack compose-Android’s declarative UI kit, it wouldn’t be hard to understand.