Ecosyste.ms: Awesome
An open API service indexing awesome lists of open source software.
https://github.com/pmndrs/drei
🥉 useful helpers for react-three-fiber
https://github.com/pmndrs/drei
helpers hooks react react-three-fiber threejs
Last synced: about 1 month ago
JSON representation
🥉 useful helpers for react-three-fiber
- Host: GitHub
- URL: https://github.com/pmndrs/drei
- Owner: pmndrs
- License: mit
- Created: 2020-04-26T19:38:41.000Z (about 4 years ago)
- Default Branch: master
- Last Pushed: 2024-05-01T09:11:14.000Z (about 2 months ago)
- Last Synced: 2024-05-01T11:29:09.219Z (about 2 months ago)
- Topics: helpers, hooks, react, react-three-fiber, threejs
- Language: JavaScript
- Homepage: https://drei.pmnd.rs/
- Size: 26.8 MB
- Stars: 7,420
- Watchers: 52
- Forks: 617
- Open Issues: 391
-
Metadata Files:
- Readme: README.md
- Contributing: CONTRIBUTING.md
- License: LICENSE
- Code of conduct: CODE_OF_CONDUCT.md
Lists
- awesome-list - drei - three-fiber | pmndrs | 1718 | (JavaScript)
- awesome-game-engine-dev - drei - Useful helpers for react-three-fiber. (Libraries / JavaScript)
- awesome-stars - pmndrs/drei - 🥉 useful helpers for react-three-fiber (JavaScript)
- awesome-stars - pmndrs/drei - 🥉 useful helpers for react-three-fiber (JavaScript)
- awesome-threejs - drei - three-fiber by [@pmndrs](https://github.com/pmndrs) (Related Frameworks / React)
- awesome-stars - pmndrs/drei - 🥉 useful helpers for react-three-fiber (JavaScript)
- awesome - drei - 🌭 useful helpers for react-three-fiber. https://drei.pmnd.rs/ (React / React Components)
- awesome-stars - drei - three-fiber | pmndrs | 7661 | (JavaScript)
- awesome-web -
- my-awesome-stars - pmndrs/drei - 🥉 useful helpers for react-three-fiber (JavaScript)
- awesome-stars - pmndrs/drei - 🥉 useful helpers for react-three-fiber (JavaScript)
- awesome-stars - pmndrs/drei - 🥉 useful helpers for react-three-fiber (JavaScript)
- awesome - pmndrs/drei - 🥉 useful helpers for react-three-fiber (JavaScript)
- awesome-stars - drei - three-fiber | pmndrs | 7629 | (JavaScript)
- my-awesome-stars - drei - three-fiber | pmndrs | 7629 | (JavaScript)
- awesome-webxr-development - Drei - [PerformanceMonitor](https://github.com/pmndrs/drei#performancemonitor) ![][r3f-badge] - Collect the average fps over time (Debug / Avatar)
README
[](https://codesandbox.io/s/bfplr)
[](https://www.npmjs.com/package/@react-three/drei)
[](https://www.npmjs.com/package/@react-three/drei)
[](https://discord.com/channels/740090768164651008/741751532592038022)
[](https://github.com/codespaces/new?template_repository=pmndrs%2Fdrei)
A growing collection of useful helpers and fully functional, ready-made abstractions for [@react-three/fiber](https://github.com/pmndrs/react-three-fiber). If you make a component that is generic enough to be useful to others, think about [CONTRIBUTING](CONTRIBUTING.md)!
```bash
npm install @react-three/drei
```
:point_right: this package is using the stand-alone [`three-stdlib`](https://github.com/pmndrs/three-stdlib) instead of [`three/examples/jsm`](https://github.com/mrdoob/three.js/tree/master/examples/jsm). :point_left:
### Basic usage:
```jsx
import { PerspectiveCamera, PositionalAudio, ... } from '@react-three/drei'
```
### React-native:
```jsx
import { PerspectiveCamera, PositionalAudio, ... } from '@react-three/drei/native'
```
The `native` route of the library **does not** export `Html` or `Loader`. The default export of the library is `web` which **does** export `Html` and `Loader`.
### Index
- Cameras
- Controls
- CameraControls
- FlyControls
- MapControls
- DeviceOrientationControls
- TrackballControls
- ArcballControls
- PointerLockControls
- FirstPersonControls
- ScrollControls
- PresentationControls
- KeyboardControls
- FaceControls
- MotionPathControls
- Gizmos
- Abstractions
- Image
- Text
- Text3D
- PositionalAudio
- Billboard
- ScreenSpace
- ScreenSizer
- Effects
- GradientTexture
- Edges
- Outlines
- Trail
- Sampler
- ComputedAttribute
- Clone
- useAnimations
- MarchingCubes
- Decal
- Svg
- Gltf
- AsciiRenderer
- Splat
- Shaders
- MeshReflectorMaterial
- MeshWobbleMaterial
- MeshDistortMaterial
- MeshRefractionMaterial
- MeshTransmissionMaterial
- MeshDiscardMaterial
- PointMaterial
- SoftShadows
- shaderMaterial
- Misc
- Example
- Html
- CycleRaycast
- Select
- Sprite Animator
- Stats
- StatsGl
- Wireframe
- useDepthBuffer
- useContextBridge
- useFBO
- useCamera
- useCubeCamera
- useDetectGPU
- useAspect
- useCursor
- useIntersect
- useBoxProjectedEnv
- useTrail
- useSurfaceSampler
- FaceLandmarker
- Loaders
- Loader
- useProgress
- useGLTF
- useFBX
- useTexture
- useKTX2
- useCubeTexture
- useVideoTexture
- useTrailTexture
- useFont
- useSpriteLoader
- Performance
- Instances
- Merged
- Points
- Segments
- Detailed
- Preload
- BakeShadows
- meshBounds
- AdaptiveDpr
- AdaptiveEvents
- Bvh
- PerformanceMonitor
- Portals
- Modifiers
- Shapes
- Plane
- Box
- Sphere
- Circle
- Cone
- Cylinder
- Tube
- Torus
- TorusKnot
- Ring
- Tetrahedron
- Polyhedron
- Icosahedron
- Octahedron
- Dodecahedron
- Extrude
- Lathe
- Shape
- RoundedBox
- Screenquad
- Line
- QuadraticBezierLine
- CubicBezierLine
- CatmullRomLine
- Facemesh
- Staging
- Center
- Resize
- BBAnchor
- Bounds
- CameraShake
- Float
- Stage
- Backdrop
- Environment
- Lightformer
- SpotLight
- SpotLightShadow
- Shadow
- Caustics
- ContactShadows
- RandomizedLight
- AccumulativeShadows
- Sky
- Stars
- Sparkles
- Cloud
- useEnvironment
- useMatcapTexture
- useNormalTexture
- ShadowAlpha
# Cameras
#### PerspectiveCamera
[](https://drei.vercel.app/?path=/story/camera-perspectivecamera--perspective-camera-scene-st)
```tsx
type Props = Omit & {
/** Registers the camera as the system default, fiber will start rendering with it */
makeDefault?: boolean
/** Making it manual will stop responsiveness and you have to calculate aspect ratio yourself. */
manual?: boolean
/** The contents will either follow the camera, or be hidden when filming if you pass a function */
children?: React.ReactNode | ((texture: THREE.Texture) => React.ReactNode)
/** Number of frames to render, 0 */
frames?: number
/** Resolution of the FBO, 256 */
resolution?: number
/** Optional environment map for functional use */
envMap?: THREE.Texture
}
```
A responsive [THREE.PerspectiveCamera](https://threejs.org/docs/#api/en/cameras/PerspectiveCamera) that can set itself as the default.
```jsx
```
You can also give it children, which will now occupy the same position as the camera and follow along as it moves.
```jsx
```
You can also drive it manually, it won't be responsive and you have to calculate aspect ratio yourself.
```jsx
c.updateProjectionMatrix()}>
```
You can use the PerspectiveCamera to film contents into a RenderTarget, similar to CubeCamera. As a child you must provide a render-function which receives the texture as its first argument. The result of that function will _not follow the camera_, instead it will be set invisible while the the FBO renders so as to avoid issues where the meshes that receive the texture are interrering.
```jsx
{(texture) => (
)}
```
#### OrthographicCamera
[](https://drei.vercel.app/?path=/story/camera-orthographiccamera--orthographic-camera-scene-st)
A responsive [THREE.OrthographicCamera](https://threejs.org/docs/#api/en/cameras/OrthographicCamera) that can set itself as the default.
```jsx
```
You can use the OrthographicCamera to film contents into a RenderTarget, it has the same API as PerspectiveCamera.
```jsx
{(texture) => (
)}
```
#### CubeCamera
[](https://drei.pmnd.rs/?path=/story/camera-cubecamera--default-story)
A [THREE.CubeCamera](https://threejs.org/docs/#api/en/cameras/CubeCamera) that returns its texture as a render-prop. It makes children invisible while rendering to the internal buffer so that they are not included in the reflection.
```tsx
type Props = JSX.IntrinsicElements['group'] & {
/** Number of frames to render, Infinity */
frames?: number
/** Resolution of the FBO, 256 */
resolution?: number
/** Camera near, 0.1 */
near?: number
/** Camera far, 1000 */
far?: number
/** Custom environment map that is temporarily set as the scenes background */
envMap?: THREE.Texture
/** Custom fog that is temporarily set as the scenes fog */
fog?: Fog | FogExp2
/** The contents of CubeCamera will be hidden when filming the cube */
children: (tex: Texture) => React.ReactNode
}
```
Using the `frames` prop you can control if this camera renders indefinitely or statically (a given number of times).
If you have two static objects in the scene, make it `frames={2}` for instance, so that both objects get to "see" one another in the reflections, which takes multiple renders.
If you have moving objects, unset the prop and use a smaller `resolution` instead.
```jsx
{(texture) => (
)}
```
# Controls
If available controls have damping enabled by default, they manage their own updates, remove themselves on unmount, are compatible with the `frameloop="demand"` canvas-flag. They inherit all props from their underlying [THREE controls](https://github.com/mrdoob/three.js/tree/master/examples/jsm/controls). They are the first effects to run before all other useFrames, to ensure that other components may mutate the camera on top of them.
[Some controls](https://github.com/search?q=repo%3Apmndrs%2Fdrei+language%3ATSX+path%3A%2F%5Esrc%5C%2Fcore%5C%2F.*Controls%5C.tsx%2F+makeDefault&type=code) allow you to set `makeDefault`, similar to, for instance, `PerspectiveCamera`. This will set [@react-three/fiber](https://docs.pmnd.rs/react-three-fiber/api/hooks#usethree)'s `controls` field in the root store. This can make it easier in situations where you want controls to be known and other parts of the app could respond to it. Some drei controls already take it into account, like `CameraShake`, `Gizmo` and `TransformControls`.
```tsx
```
```tsx
const controls = useThree((state) => state.controls)
```
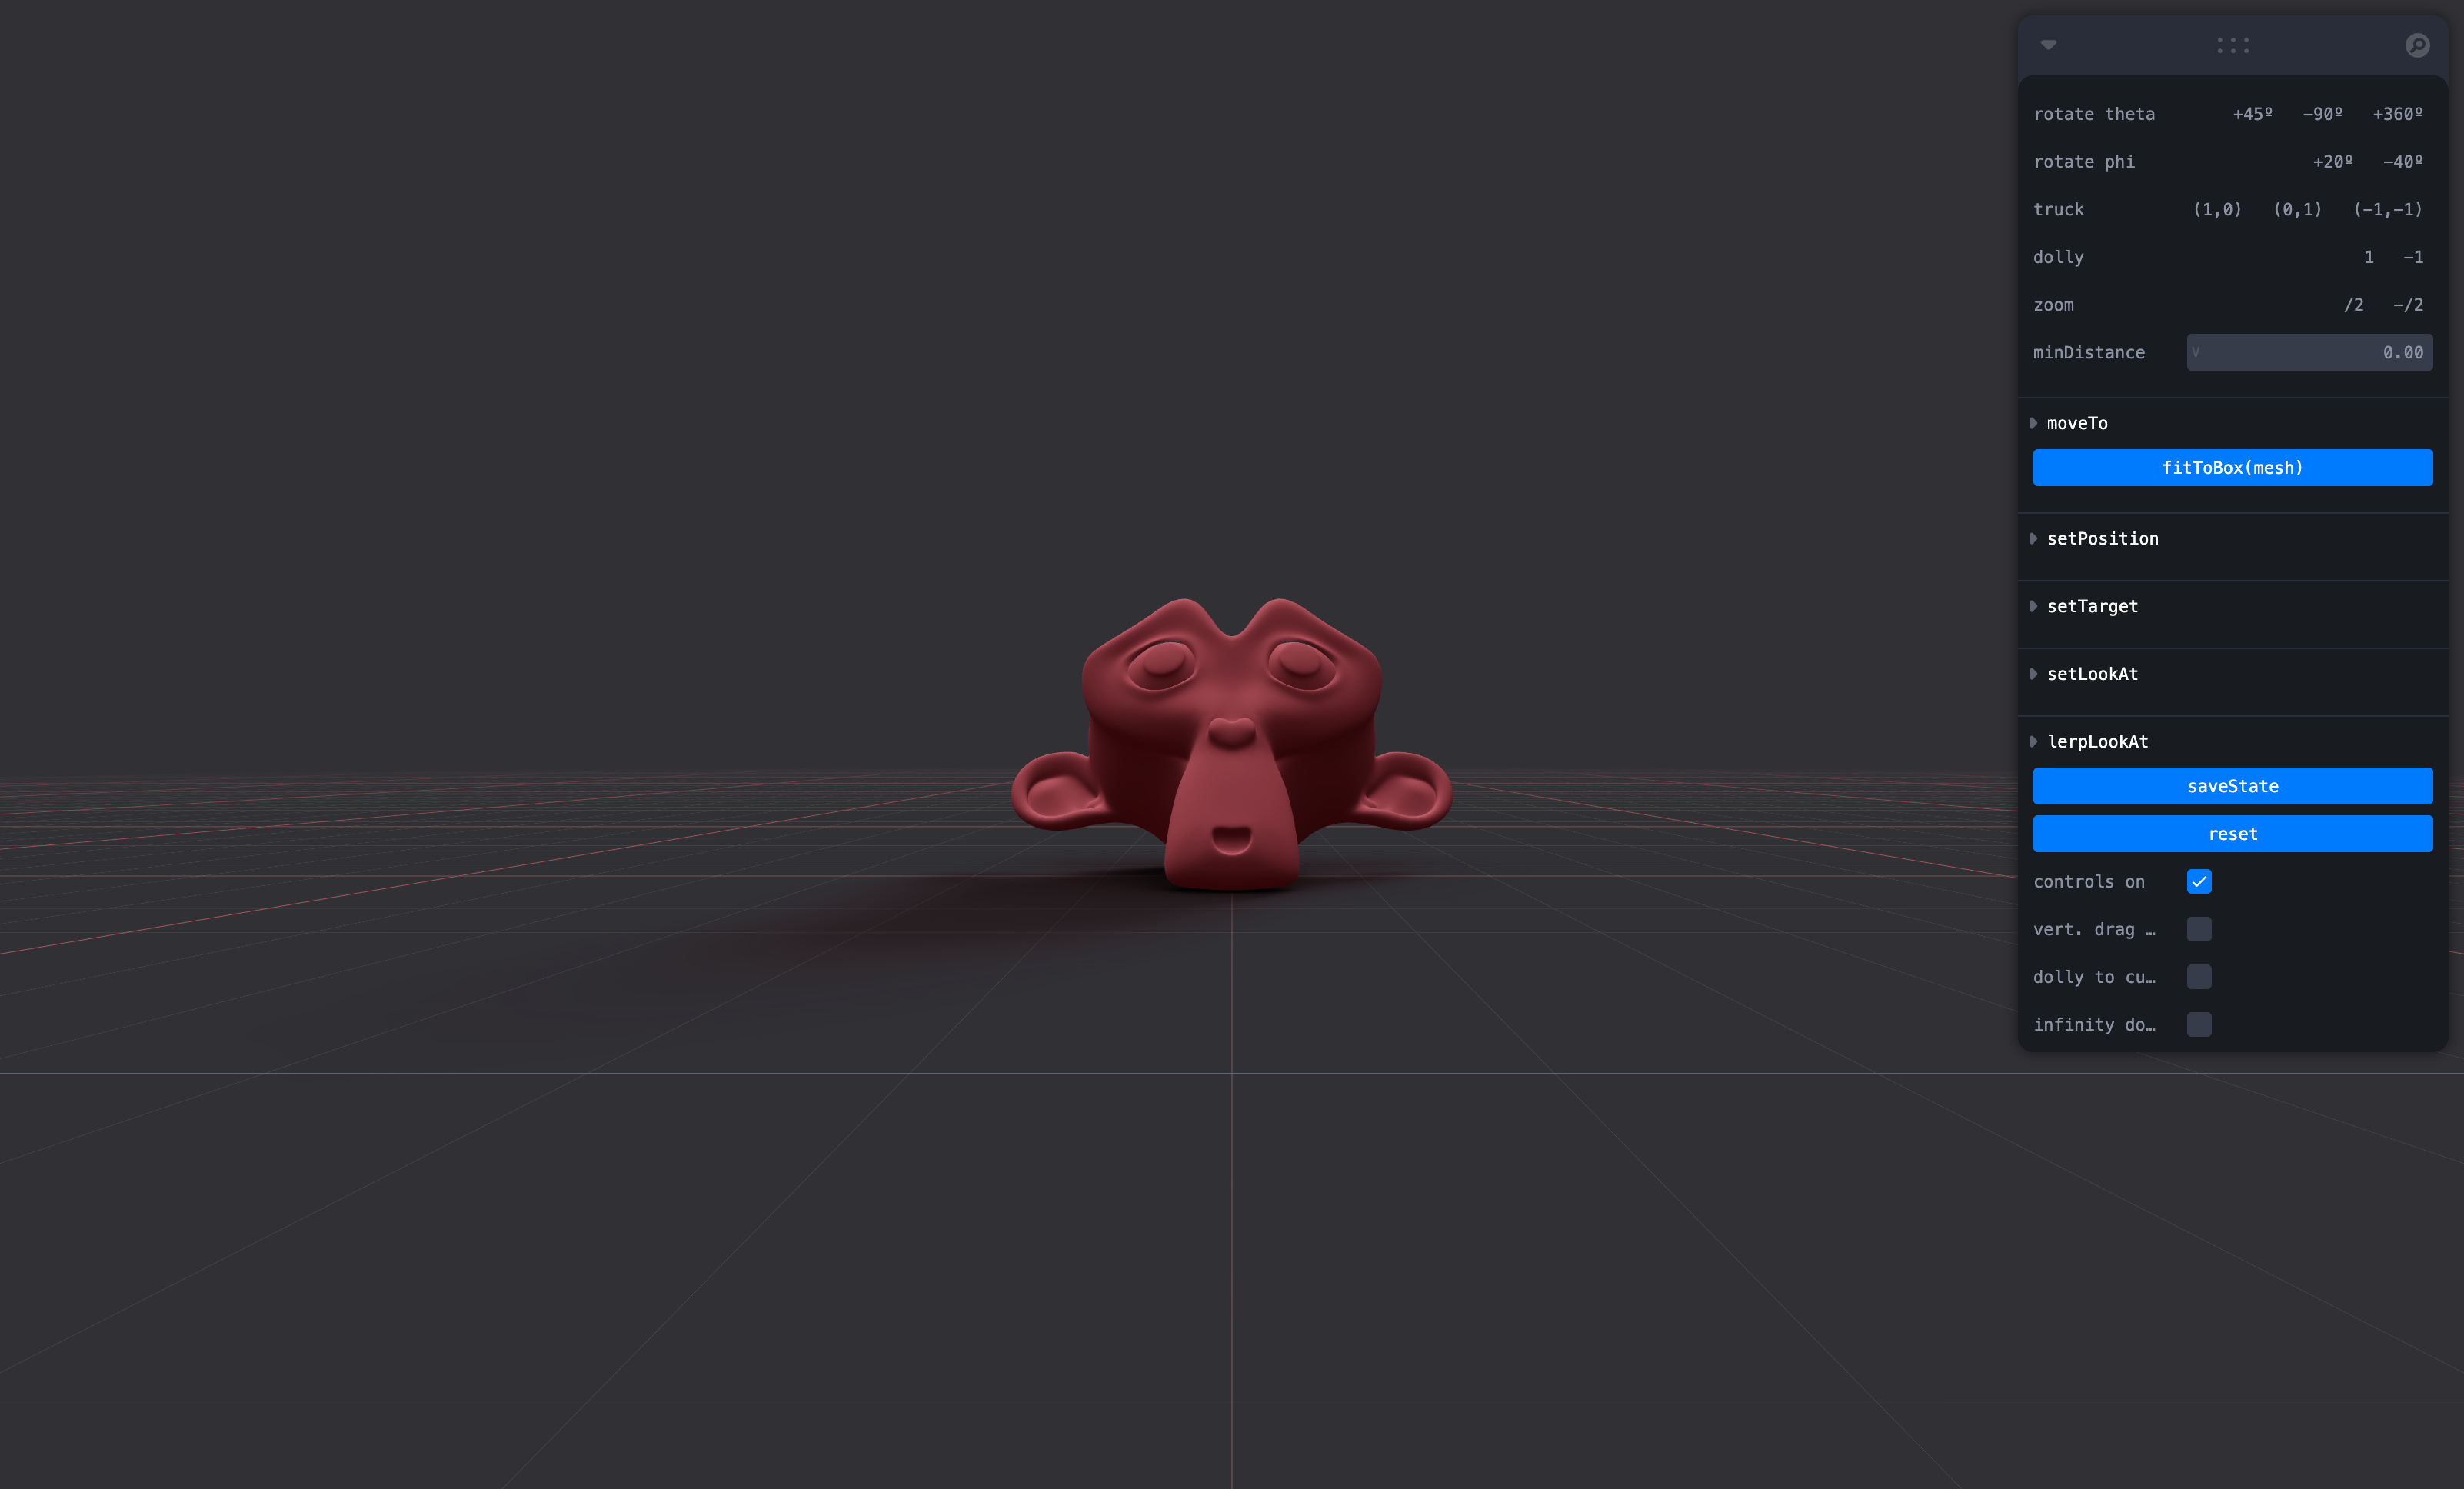
Drei currently exports OrbitControls [](https://drei.vercel.app/?path=/story/controls-orbitcontrols--orbit-controls-story), MapControls [](https://drei.vercel.app/?path=/story/controls-mapcontrols--map-controls-scene-st), TrackballControls, ArcballControls, FlyControls, DeviceOrientationControls, PointerLockControls [](https://drei.vercel.app/?path=/story/controls-pointerlockcontrols--pointer-lock-controls-scene-st), FirstPersonControls [](https://drei.vercel.app/?path=/story/controls-firstpersoncontrols--first-person-controls-story) CameraControls [](https://drei.vercel.app/?path=/story/controls-cameracontrols--camera-controls-story) and FaceControls [](https://drei.vercel.app/?path=/story/controls-facecontrols)
All controls react to the default camera. If you have a `` in your scene, they will control it. If you need to inject an imperative camera or one that isn't the default, use the `camera` prop: ``.
PointerLockControls additionally supports a `selector` prop, which enables the binding of `click` event handlers for control activation to other elements than `document` (e.g. a 'Click here to play' button). All elements matching the `selector` prop will activate the controls. It will also center raycast events by default, so regular onPointerOver/etc events on meshes will continue to work.
#### CameraControls
This is an implementation of the [camera-controls](https://github.com/yomotsu/camera-controls) library.
```tsx
```
```tsx
type CameraControlsProps = {
/** The camera to control, default to the state's `camera` */
camera?: PerspectiveCamera | OrthographicCamera
/** DOM element to connect to, default to the state's `gl` renderer */
domElement?: HTMLElement
/** Reference this CameraControls instance as state's `controls` */
makeDefault?: boolean
/** Events callbacks, see: https://github.com/yomotsu/camera-controls#events */
onStart?: (e?: { type: 'controlstart' }) => void
onEnd?: (e?: { type: 'controlend' }) => void
onChange?: (e?: { type: 'update' }) => void
}
```
#### ScrollControls


```tsx
type ScrollControlsProps = {
/** Precision, default 0.00001 */
eps?: number
/** Horizontal scroll, default false (vertical) */
horizontal?: boolean
/** Infinite scroll, default false (experimental!) */
infinite?: boolean
/** Defines the length of the scroll area, each page is height:100%, default 1 */
pages?: number
/** A factor that increases scroll bar travel, default 1 */
distance?: number
/** Friction in seconds, default: 0.2 (1/5 second) */
damping?: number
/** maxSpeed optionally allows you to clamp the maximum speed. If damping is 0.2s and looks OK
* going between, say, page 1 and 2, but not for pages far apart as it'll move very rapid,
* then a maxSpeed of e.g. 0.1 which will clamp the speed to 0.1 units per second, it may now
* take much longer than damping to reach the target if it is far away. Default: Infinity */
maxSpeed?: number
enabled?: boolean
style?: React.CSSProperties
children: React.ReactNode
}
```
Scroll controls create a HTML scroll container in front of the canvas. Everything you drop into the `` component will be affected.
You can listen and react to scroll with the `useScroll` hook which gives you useful data like the current scroll `offset`, `delta` and functions for range finding: `range`, `curve` and `visible`. The latter functions are especially useful if you want to react to the scroll offset, for instance if you wanted to fade things in and out if they are in or out of view.
```jsx
;
{/* Canvas contents in here will *not* scroll, but receive useScroll! */}
{/* Canvas contents in here will scroll along */}
{/* DOM contents in here will scroll along */}
html in here (optional)
second page
third page
function Foo(props) {
const ref = useRef()
const data = useScroll()
useFrame(() => {
// data.offset = current scroll position, between 0 and 1, dampened
// data.delta = current delta, between 0 and 1, dampened
// Will be 0 when the scrollbar is at the starting position,
// then increase to 1 until 1 / 3 of the scroll distance is reached
const a = data.range(0, 1 / 3)
// Will start increasing when 1 / 3 of the scroll distance is reached,
// and reach 1 when it reaches 2 / 3rds.
const b = data.range(1 / 3, 1 / 3)
// Same as above but with a margin of 0.1 on both ends
const c = data.range(1 / 3, 1 / 3, 0.1)
// Will move between 0-1-0 for the selected range
const d = data.curve(1 / 3, 1 / 3)
// Same as above, but with a margin of 0.1 on both ends
const e = data.curve(1 / 3, 1 / 3, 0.1)
// Returns true if the offset is in range and false if it isn't
const f = data.visible(2 / 3, 1 / 3)
// The visible function can also receive a margin
const g = data.visible(2 / 3, 1 / 3, 0.1)
})
return
}
```
#### PresentationControls


Semi-OrbitControls with spring-physics, polar zoom and snap-back, for presentational purposes. These controls do not turn the camera but will spin their contents. They will not suddenly come to rest when they reach limits like OrbitControls do, but rather smoothly anticipate stopping position.
```jsx
```
#### KeyboardControls


A rudimentary keyboard controller which distributes your defined data-model to the `useKeyboard` hook. It's a rather simple way to get started with keyboard input.
```tsx
type KeyboardControlsState = { [K in T]: boolean }
type KeyboardControlsEntry = {
/** Name of the action */
name: T
/** The keys that define it, you can use either event.key, or event.code */
keys: string[]
/** If the event receives the keyup event, true by default */
up?: boolean
}
type KeyboardControlsProps = {
/** A map of named keys */
map: KeyboardControlsEntry[]
/** All children will be able to useKeyboardControls */
children: React.ReactNode
/** Optional onchange event */
onChange: (name: string, pressed: boolean, state: KeyboardControlsState) => void
/** Optional event source */
domElement?: HTMLElement
}
```
You start by wrapping your app, or scene, into ``.
```tsx
enum Controls {
forward = 'forward',
back = 'back',
left = 'left',
right = 'right',
jump = 'jump',
}
function App() {
const map = useMemo[]>(()=>[
{ name: Controls.forward, keys: ['ArrowUp', 'KeyW'] },
{ name: Controls.back, keys: ['ArrowDown', 'KeyS'] },
{ name: Controls.left, keys: ['ArrowLeft', 'KeyA'] },
{ name: Controls.right, keys: ['ArrowRight', 'KeyD'] },
{ name: Controls.jump, keys: ['Space'] },
], [])
return (
```
You can either respond to input reactively, it uses zustand (with the `subscribeWithSelector` middleware) so all the rules apply:
```tsx
function Foo() {
const forwardPressed = useKeyboardControls(state => state.forward)
```
Or transiently, either by `subscribe`, which is a function which returns a function to unsubscribe, so you can pair it with useEffect for cleanup, or `get`, which fetches fresh state non-reactively.
```tsx
function Foo() {
const [sub, get] = useKeyboardControls()
useEffect(() => {
return sub(
(state) => state.forward,
(pressed) => {
console.log('forward', pressed)
}
)
}, [])
useFrame(() => {
// Fetch fresh data from store
const pressed = get().back
})
}
```
#### FaceControls
[](https://drei.vercel.app/?path=/story/controls-facecontrols)
The camera follows your face.


Pre-requisite: wrap into a [`FaceLandmarker`](#facelandmarker) provider
```tsx
...
```
```tsx
```
```tsx
type FaceControlsProps = {
/** The camera to be controlled, default: global state camera */
camera?: THREE.Camera
/** Whether to autostart the webcam, default: true */
autostart?: boolean
/** Enable/disable the webcam, default: true */
webcam?: boolean
/** A custom video URL or mediaStream, default: undefined */
webcamVideoTextureSrc?: VideoTextureSrc
/** Disable the rAF camera position/rotation update, default: false */
manualUpdate?: boolean
/** Disable the rVFC face-detection, default: false */
manualDetect?: boolean
/** Callback function to call on "videoFrame" event, default: undefined */
onVideoFrame?: (e: THREE.Event) => void
/** Reference this FaceControls instance as state's `controls` */
makeDefault?: boolean
/** Approximate time to reach the target. A smaller value will reach the target faster. */
smoothTime?: number
/** Apply position offset extracted from `facialTransformationMatrix` */
offset?: boolean
/** Offset sensitivity factor, less is more sensible, default: 80 */
offsetScalar?: number
/** Enable eye-tracking */
eyes?: boolean
/** Force Facemesh's `origin` to be the middle of the 2 eyes, default: true */
eyesAsOrigin?: boolean
/** Constant depth of the Facemesh, default: .15 */
depth?: number
/** Enable debug mode, default: false */
debug?: boolean
/** Facemesh options, default: undefined */
facemesh?: FacemeshProps
}
```
```tsx
type FaceControlsApi = THREE.EventDispatcher & {
/** Detect faces from the video */
detect: (video: HTMLVideoElement, time: number) => void
/** Compute the target for the camera */
computeTarget: () => THREE.Object3D
/** Update camera's position/rotation to the `target` */
update: (delta: number, target?: THREE.Object3D) => void
/** ref api */
facemeshApiRef: RefObject
/** ref api */
webcamApiRef: RefObject
/** Play the video */
play: () => void
/** Pause the video */
pause: () => void
}
```
##### FaceControls events
Two `THREE.Event`s are dispatched on FaceControls ref object:
- `{ type: "stream", stream: MediaStream }` -- when webcam's [`.getUserMedia()`](https://developer.mozilla.org/en-US/docs/Web/API/MediaDevices/getUserMedia) promise is resolved
- `{ type: "videoFrame", texture: THREE.VideoTexture, time: number }` -- each time a new video frame is sent to the compositor (thanks to rVFC)
> **Note**
rVFC
>
> Internally, `FaceControls` uses [`requestVideoFrameCallback`](https://caniuse.com/mdn-api_htmlvideoelement_requestvideoframecallback), you may need [a polyfill](https://github.com/ThaUnknown/rvfc-polyfill) (for Firefox).
##### FaceControls[manualDetect]
By default, `detect` is called on each `"videoFrame"`. You can disable this by `manualDetect` and call `detect` yourself.
For example:
```jsx
const controls = useThree((state) => state.controls)
const onVideoFrame = useCallback((event) => {
controls.detect(event.texture.source.data, event.time)
}, [controls])
```
##### FaceControls[manualUpdate]
By default, `update` method is called each rAF `useFrame`. You can disable this by `manualUpdate` and call it yourself:
```jsx
const controls = useThree((state) => state.controls)
useFrame((_, delta) => {
controls.update(delta) // 60 or 120 FPS with default damping
})
```
Or, if you want your own custom damping, use `computeTarget` method and update the camera pos/rot yourself with:
```jsx
const [current] = useState(() => new THREE.Object3D())
useFrame((_, delta) => {
const target = controls?.computeTarget()
if (target) {
//
// A. Define your own damping
//
const eps = 1e-9
easing.damp3(current.position, target.position, 0.25, delta, undefined, undefined, eps)
easing.dampE(current.rotation, target.rotation, 0.25, delta, undefined, undefined, eps)
camera.position.copy(current.position)
camera.rotation.copy(current.rotation)
//
// B. Or maybe with no damping at all?
//
// camera.position.copy(target.position)
// camera.rotation.copy(target.rotation)
}
})
```
#### MotionPathControls

Motion path controls, it takes a path of bezier curves or catmull-rom curves as input and animates the passed `object` along that path. It can be configured to look upon an external object for staging or presentation purposes by adding a `focusObject` property (ref).
```tsx
type MotionPathProps = JSX.IntrinsicElements['group'] & {
/** An optional array of THREE curves */
curves?: THREE.Curve[]
/** Show debug helpers */
debug?: boolean
/** The target object that is moved, default: null (the default camera) */
object?: React.MutableRefObject
/** An object where the target looks towards, can also be a vector, default: null */
focus?: [x: number, y: number, z: number] | React.MutableRefObject
/** Position between 0 (start) and end (1), if this is not set useMotion().current must be used, default: null */
offset?: number
/** Optionally smooth the curve, default: false */
smooth?: boolean | number
/** Damping tolerance, default: 0.00001 */
eps?: number
/** Damping factor for movement along the curve, default: 0.1 */
damping?: number
/** Damping factor for lookAt, default: 0.1 */
focusDamping?: number
/** Damping maximum speed, default: Infinity */
maxSpeed?: number
}
```
You can use MotionPathControls with declarative curves.
```jsx
function App() {
const poi = useRef()
return (
```
Or with imperative curves.
```jsx
```
You can exert full control with the `useMotion` hook, it allows you to define the current position along the path for instance, or define your own lookAt. Keep in mind that MotionPathControls will still these values unless you set damping and focusDamping to 0. Then you can also employ your own easing.
```tsx
type MotionState = {
/** The user-defined, mutable, current goal position along the curve, it may be >1 or <0 */
current: number
/** The combined curve */
path: THREE.CurvePath
/** The focus object */
focus: React.MutableRefObject> | [x: number, y: number, z: number] | undefined
/** The target object that is moved along the curve */
object: React.MutableRefObject>
/** The automated, 0-1 normalised and damped current goal position along curve */
offset: number
/** The current point on the curve */
point: THREE.Vector3
/** The current tangent on the curve */
tangent: THREE.Vector3
/** The next point on the curve */
next: THREE.Vector3
}
const state: MotionState = useMotion()
```
```jsx
function Loop() {
const motion = useMotion()
useFrame((state, delta) => {
// Set the current position along the curve, you can increment indiscriminately for a loop
motion.current += delta
// Look ahead on the curve
motion.object.current.lookAt(motion.next)
})
}
```
# Gizmos
#### GizmoHelper
[](https://drei.pmnd.rs/?path=/story/gizmos-gizmohelper--gizmo-helper-story)
Used by widgets that visualize and control camera position.
Two example gizmos are included: GizmoViewport and GizmoViewcube, and `useGizmoContext` makes it easy to create your own.
Make sure to set the `makeDefault` prop on your controls, in that case you do not have to define the onTarget and onUpdate props.
```jsx
{/* alternative: */}
```
#### PivotControls

Controls for rotating and translating objects. These controls will stick to the object the transform and by offsetting or anchoring it forms a pivot. This control has HTML annotations for some transforms and supports `[tab]` for rounded values while dragging.
```tsx
type PivotControlsProps = {
/** Scale of the gizmo, 1 */
scale?: number
/** Width of the gizmo lines, this is a THREE.Line2 prop, 2.5 */
lineWidth?: number
/** If fixed is true is remains constant in size, scale is now in pixels, false */
fixed?: boolean
/** Pivot does not act as a group, it won't shift contents but can offset in position */
offset?: [number, number, number]
/** Starting rotation */
rotation?: [number, number, number]
/** Starting matrix */
matrix?: THREE.Matrix4
/** Anchor point, like BBAnchor, each axis can be between -1/0/+1 */
anchor?: [number, number, number]
/** If autoTransform is true, automatically apply the local transform on drag, true */
autoTransform?: boolean
/** Allows you to switch individual axes off */
activeAxes?: [boolean, boolean, boolean]
/** Allows you to disable translation via axes arrows */
disableAxes?: boolean
/** Allows you to disable translation via axes planes */
disableSliders?: boolean
/** Allows you to disable rotation */
disableRotations?: boolean
/** Allows you to disable scaling */
disableScaling?: boolean
/** RGB colors */
axisColors?: [string | number, string | number, string | number]
/** Color of the hovered item */
hoveredColor?: string | number
/** HTML value annotations, default: false */
annotations?: boolean
/** CSS Classname applied to the HTML annotations */
annotationsClass?: string
/** Drag start event */
onDragStart?: () => void
/** Drag event */
onDrag?: (l: THREE.Matrix4, deltaL: THREE.Matrix4, w: THREE.Matrix4, deltaW: THREE.Matrix4) => void
/** Drag end event */
onDragEnd?: () => void
/** Set this to false if you want the gizmo to be visible through faces */
depthTest?: boolean
opacity?: number
visible?: boolean
userData?: { [key: string]: any }
children?: React.ReactNode
}
```
```jsx
```
You can use Pivot as a controlled component, switch `autoTransform` off in that case and now you are responsible for applying the matrix transform yourself. You can also leave `autoTransform` on and apply the matrix to foreign objects, in that case Pivot will be able to control objects that are not parented within.
```jsx
const matrix = new THREE.Matrix4()
return (
matrix.copy(matrix_)}
```
#### DragControls
[](https://drei.vercel.app/?path=/story/gizmos-dragcontrols--drag-controls-story) 
You can use DragControls to make objects draggable in your scene. It supports locking the drag to specific axes, setting drag limits, and custom drag start, drag, and drag end events.
```tsx
type DragControlsProps = {
/** If autoTransform is true, automatically apply the local transform on drag, true */
autoTransform?: boolean
/** The matrix to control */
matrix?: THREE.Matrix4
/** Lock the drag to a specific axis */
axisLock?: 'x' | 'y' | 'z'
/** Limits */
dragLimits?: [[number, number] | undefined, [number, number] | undefined, [number, number] | undefined]
/** Hover event */
onHover?: (hovering: boolean) => void
/** Drag start event */
onDragStart?: (origin: THREE.Vector3) => void
/** Drag event */
onDrag?: (
localMatrix: THREE.Matrix4,
deltaLocalMatrix: THREE.Matrix4,
worldMatrix: THREE.Matrix4,
deltaWorldMatrix: THREE.Matrix4
) => void
/** Drag end event */
onDragEnd?: () => void
children: React.ReactNode
}
```
```jsx
```
You can utilize DragControls as a controlled component by toggling `autoTransform` off, which then requires you to manage the matrix transformation manually. Alternatively, keeping `autoTransform` enabled allows you to apply the matrix to external objects, enabling DragControls to manage objects that are not directly parented within it.
```jsx
const matrix = new THREE.Matrix4()
return (
matrix.copy(localMatrix)}
```
#### TransformControls
[](https://drei.vercel.app/?path=/story/gizmos-transformcontrols--transform-controls-story)
An abstraction around [THREE.TransformControls](https://threejs.org/docs/#examples/en/controls/TransformControls).
You can wrap objects which then receive a transform gizmo.
```jsx
```
You could also reference the object which might make it easier to exchange the target. Now the object does not have to be part of the same sub-graph. References can be plain objects or React.MutableRefObjects.
```jsx
```
If you are using other controls (Orbit, Trackball, etc), you will notice how they interfere, dragging one will affect the other. Default-controls will temporarily be disabled automatically when the user is pulling on the transform gizmo.
```jsx
```
#### Grid
[](https://drei.vercel.app/?path=/story/gizmos-grid--use-grid-scene-st)
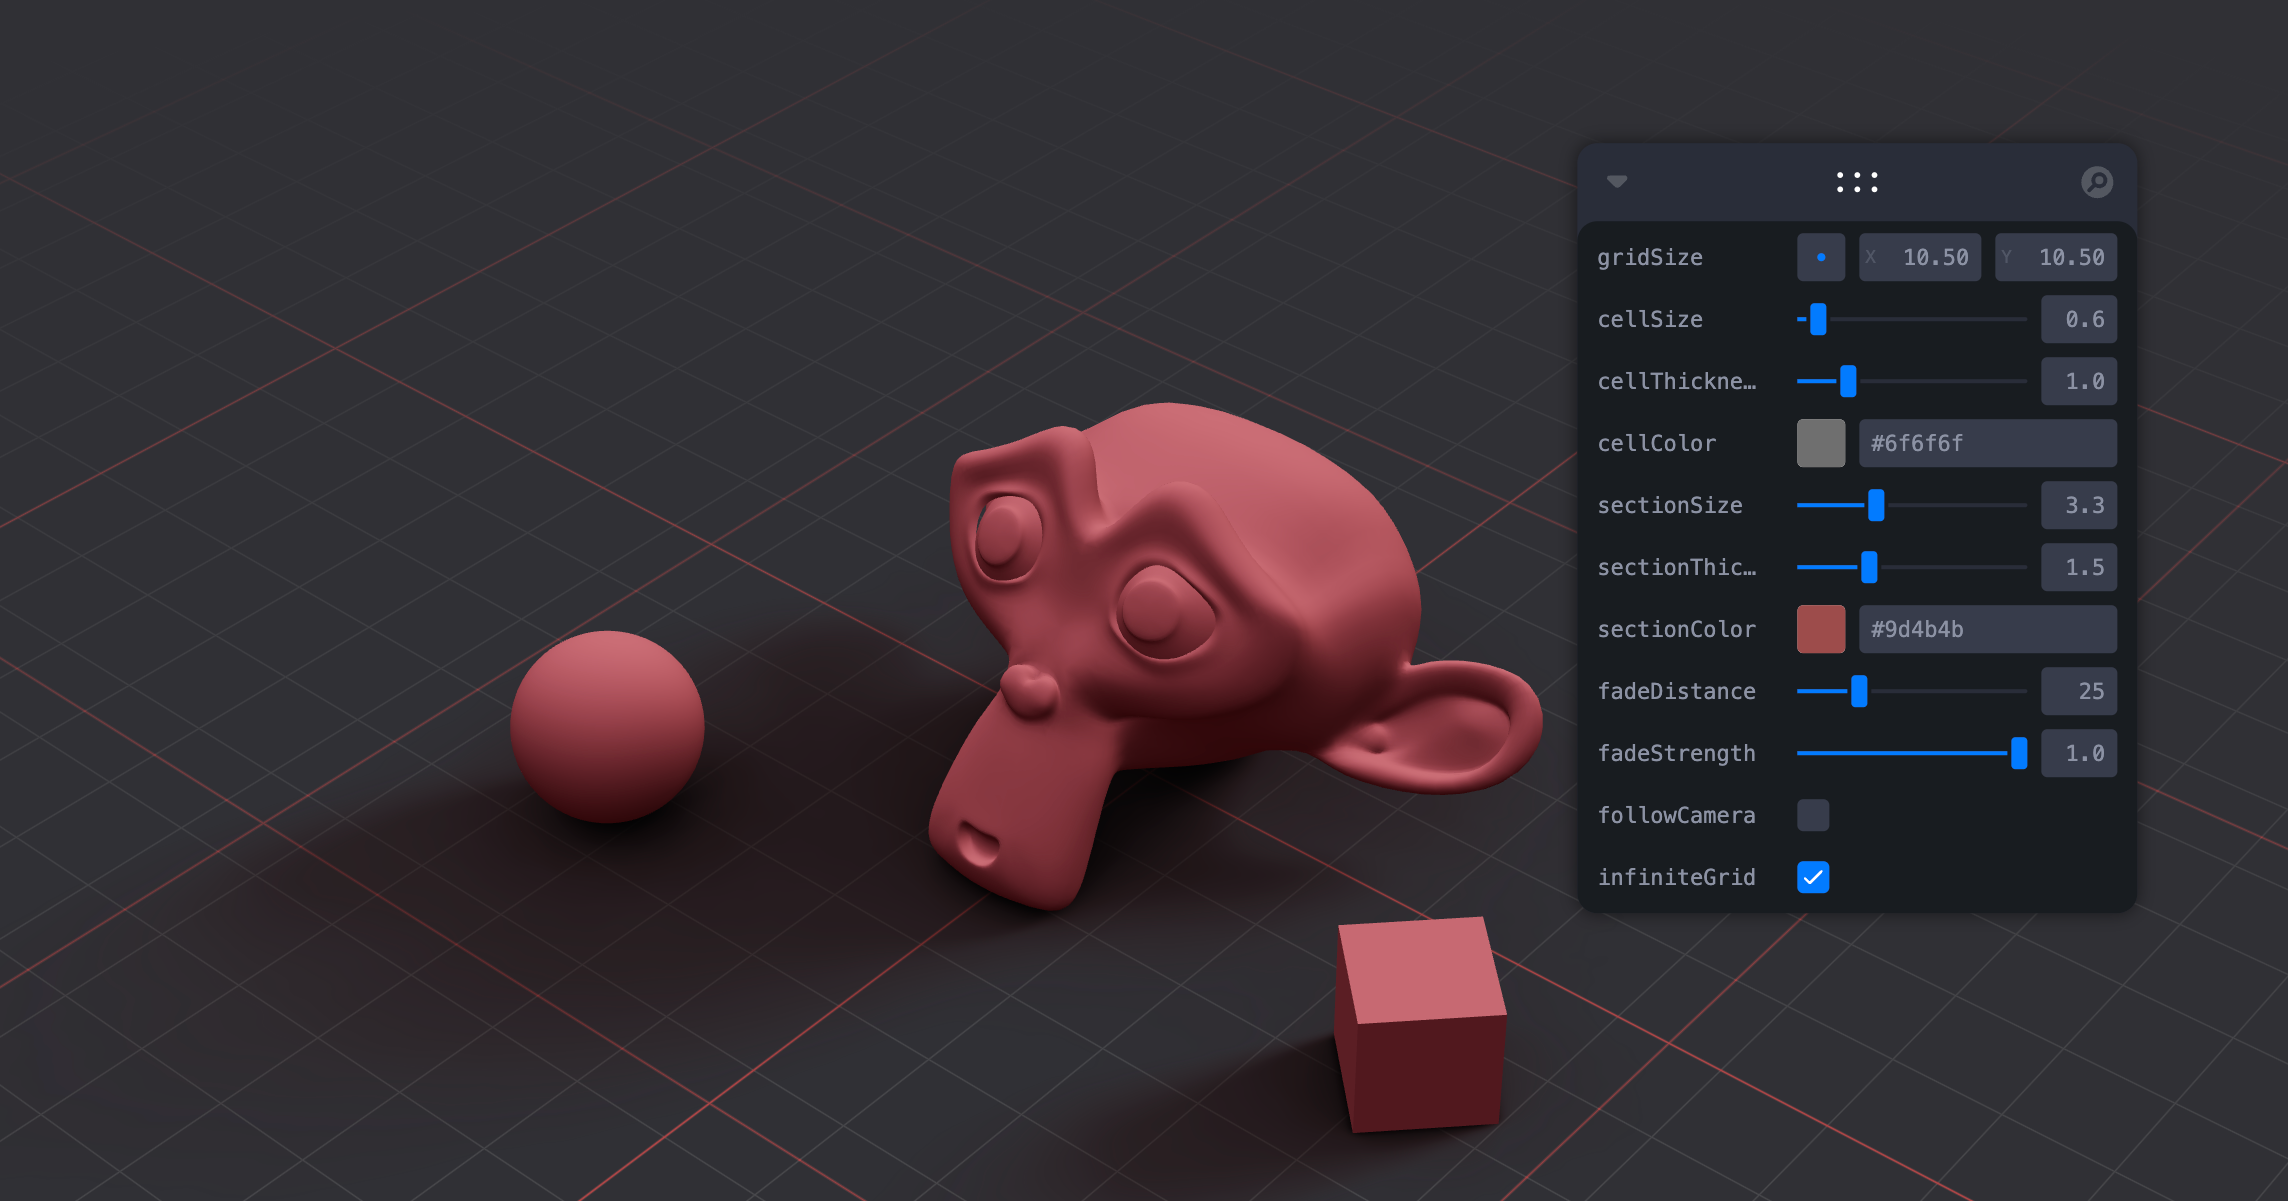
A y-up oriented, shader-based grid implementation.
```tsx
export type GridMaterialType = {
/** Cell size, default: 0.5 */
cellSize?: number
/** Cell thickness, default: 0.5 */
cellThickness?: number
/** Cell color, default: black */
cellColor?: THREE.ColorRepresentation
/** Section size, default: 1 */
sectionSize?: number
/** Section thickness, default: 1 */
sectionThickness?: number
/** Section color, default: #2080ff */
sectionColor?: THREE.ColorRepresentation
/** Follow camera, default: false */
followCamera?: boolean
/** Display the grid infinitely, default: false */
infiniteGrid?: boolean
/** Fade distance, default: 100 */
fadeDistance?: number
/** Fade strength, default: 1 */
fadeStrength?: number
/** Fade from camera (1) or origin (0), or somewhere in between, default: camera */
fadeFrom?: number
}
export type GridProps = GridMaterialType & {
/** Default plane-geometry arguments */
args?: ConstructorParameters
}
```
```jsx
```
#### useHelper
[](https://drei.vercel.app/?path=/story/misc-usehelper--default-story)
A hook for a quick way to add helpers to existing nodes in the scene. It handles removal of the helper on unmount and auto-updates it by default.
```jsx
const mesh = useRef()
useHelper(mesh, BoxHelper, 'cyan')
useHelper(condition && mesh, BoxHelper, 'red') // you can pass false instead of the object ref to hide the helper
```
#### Helper
[](https://drei.vercel.app/?path=/story/gizmos-helper--default-story)
A component for declaratively adding helpers to existing nodes in the scene. It handles removal of the helper on unmount and auto-updates it by default.
```jsx
```
# Shapes
#### Plane, Box, Sphere, Circle, Cone, Cylinder, Tube, Torus, TorusKnot, Ring, Tetrahedron, Polyhedron, Icosahedron, Octahedron, Dodecahedron, Extrude, Lathe, Shape
Short-cuts for a [mesh](https://threejs.org/docs/#api/en/objects/Mesh) with a [buffer geometry](https://threejs.org/docs/#api/en/core/BufferGeometry).
```jsx
// Plane with buffer geometry args
// Box with color set on the default MeshBasicMaterial
// Sphere with a MeshStandardMaterial
```
#### RoundedBox
A box buffer geometry with rounded corners, done with extrusion.
```jsx
```
#### ScreenQuad
```jsx
```
A triangle that fills the screen, ideal for full-screen fragment shader work (raymarching, postprocessing).
👉 [Why a triangle?](https://www.cginternals.com/en/blog/2018-01-10-screen-aligned-quads-and-triangles.html)
👉 [Use as a post processing mesh](https://medium.com/@luruke/simple-postprocessing-in-three-js-91936ecadfb7)
#### Line
[](https://drei.vercel.app/?path=/story/abstractions-line--basic-line)
Renders a THREE.Line2 or THREE.LineSegments2 (depending on the value of `segments`).
```jsx
color="black" // Default
lineWidth={1} // In pixels (default)
segments // If true, renders a THREE.LineSegments2. Otherwise, renders a THREE.Line2
dashed={false} // Default
vertexColors={[[0, 0, 0], ...]} // Optional array of RGB values for each point
{...lineProps} // All THREE.Line2 props are valid
{...materialProps} // All THREE.LineMaterial props are valid
/>
```
#### QuadraticBezierLine
[](https://drei.vercel.app/?path=/story/abstractions-line--quadratic-bezier)
Renders a THREE.Line2 using THREE.QuadraticBezierCurve3 for interpolation.
```jsx
```
You can also update the line runtime.
```jsx
const ref = useRef()
useFrame((state) => {
ref.current.setPoints(
[0, 0, 0],
[10, 0, 0],
// [5, 0, 0] // Optional: mid-point
)
}, [])
return
}
```
#### CubicBezierLine
[](https://drei.vercel.app/?path=/story/abstractions-line--cubic-bezier)
Renders a THREE.Line2 using THREE.CubicBezierCurve3 for interpolation.
```jsx
```
#### CatmullRomLine
[](https://drei.vercel.app/?path=/story/abstractions-line--catmull-rom)
Renders a THREE.Line2 using THREE.CatmullRomCurve3 for interpolation.
```jsx
```
#### Facemesh
[](https://drei.vercel.app/?path=/story/shapes-facemesh--facemesh-st)
Renders an oriented [MediaPipe face mesh](https://developers.google.com/mediapipe/solutions/vision/face_landmarker/web_js#handle_and_display_results):
```jsx
const faceLandmarkerResult = {
"faceLandmarks": [
[
{ "x": 0.5760777592658997, "y": 0.8639070391654968, "z": -0.030997956171631813 },
{ "x": 0.572094738483429, "y": 0.7886289358139038, "z": -0.07189624011516571 },
// ...
],
// ...
],
"faceBlendshapes": [
// ...
],
"facialTransformationMatrixes": [
// ...
]
},
}
const points = faceLandmarkerResult.faceLandmarks[0]
```
```tsx
export type FacemeshProps = {
/** an array of 468+ keypoints as returned by google/mediapipe tasks-vision, default: a sample face */
points?: MediaPipePoints
/** @deprecated an face object as returned by tensorflow/tfjs-models face-landmarks-detection */
face?: MediaPipeFaceMesh
/** constant width of the mesh, default: undefined */
width?: number
/** or constant height of the mesh, default: undefined */
height?: number
/** or constant depth of the mesh, default: 1 */
depth?: number
/** a landmarks tri supposed to be vertical, default: [159, 386, 200] (see: https://github.com/tensorflow/tfjs-models/tree/master/face-landmarks-detection#mediapipe-facemesh-keypoints) */
verticalTri?: [number, number, number]
/** a landmark index (to get the position from) or a vec3 to be the origin of the mesh. default: undefined (ie. the bbox center) */
origin?: number | THREE.Vector3
/** A facial transformation matrix, as returned by FaceLandmarkerResult.facialTransformationMatrixes (see: https://developers.google.com/mediapipe/solutions/vision/face_landmarker/web_js#handle_and_display_results) */
facialTransformationMatrix?: (typeof FacemeshDatas.SAMPLE_FACELANDMARKER_RESULT.facialTransformationMatrixes)[0]
/** Apply position offset extracted from `facialTransformationMatrix` */
offset?: boolean
/** Offset sensitivity factor, less is more sensible */
offsetScalar?: number
/** Fface blendshapes, as returned by FaceLandmarkerResult.faceBlendshapes (see: https://developers.google.com/mediapipe/solutions/vision/face_landmarker/web_js#handle_and_display_results) */
faceBlendshapes?: (typeof FacemeshDatas.SAMPLE_FACELANDMARKER_RESULT.faceBlendshapes)[0]
/** whether to enable eyes (nb. `faceBlendshapes` is required for), default: true */
eyes?: boolean
/** Force `origin` to be the middle of the 2 eyes (nb. `eyes` is required for), default: false */
eyesAsOrigin?: boolean
/** debug mode, default: false */
debug?: boolean
}
```
Ref-api:
```tsx
const api = useRef()
```
```tsx
type FacemeshApi = {
meshRef: React.RefObject
outerRef: React.RefObject
eyeRightRef: React.RefObject
eyeLeftRef: React.RefObject
}
```
You can for example get face mesh world direction:
```tsx
api.meshRef.current.localToWorld(new THREE.Vector3(0, 0, -1))
```
or get L/R iris direction:
```tsx
api.eyeRightRef.current.irisDirRef.current.localToWorld(new THREE.Vector3(0, 0, -1))
```
# Abstractions
#### Image
A shader-based image component with auto-cover (similar to css/background: cover).
```tsx
export type ImageProps = Omit & {
segments?: number
scale?: number | [number, number]
color?: Color
zoom?: number
radius?: number
grayscale?: number
toneMapped?: boolean
transparent?: boolean
opacity?: number
side?: THREE.Side
}
```
```jsx
function Foo() {
const ref = useRef()
useFrame(() => {
ref.current.material.radius = ... // between 0 and 1
ref.current.material.zoom = ... // 1 and higher
ref.current.material.grayscale = ... // between 0 and 1
ref.current.material.color.set(...) // mix-in color
})
return
}
```
To make the material transparent:
```jsx
```
You can have custom planes, for instance a rounded-corner plane.
```jsx
import { extend } from '@react-three/fiber'
import { Image } from '@react-three/drei'
import { easing, geometry } from 'maath'
extend({ RoundedPlaneGeometry: geometry.RoundedPlaneGeometry })
```
#### Text
[](https://drei.vercel.app/?path=/story/abstractions-text--text-st) 
Hi-quality text rendering w/ signed distance fields (SDF) and antialiasing, using [troika-3d-text](https://github.com/protectwise/troika/tree/master/packages/troika-3d-text). All of troikas props are valid! Text is suspense-based!
```jsx
hello world!
```
Text will suspend while loading the font data, but in order to completely avoid FOUC you can pass the characters it needs to render.
```jsx
hello world!
```
#### Text3D
[](https://drei.vercel.app/?path=/story/abstractions-text3d--text-3-d-st) 

Render 3D text using ThreeJS's `TextGeometry`.
Text3D will suspend while loading the font data. Text3D requires fonts in JSON format generated through [typeface.json](http://gero3.github.io/facetype.js), either as a path to a JSON file or a JSON object. If you face display issues try checking "Reverse font direction" in the typeface tool.
```jsx
Hello world!
```
You can use any material. `textOptions` are options you'd pass to the `TextGeometry` constructor. Find more information about available options [here](https://threejs.org/docs/index.html?q=textg#examples/en/geometries/TextGeometry).
You can align the text using the `` component.
```jsx
hello
```
It adds three properties that do not exist in the original `TextGeometry`, `lineHeight`, `letterSpacing` and smooth. LetterSpacing is a factor that is `1` by default. LineHeight is in threejs units and `0` by default. Smooth merges vertices with a tolerance and calls computeVertexNormals.
```jsx
{`hello\nworld`}
```
#### Effects
Abstraction around threes own [EffectComposer](https://threejs.org/docs/#examples/en/postprocessing/EffectComposer). By default it will prepend a render-pass and a gammacorrection-pass. Children are cloned, `attach` is given to them automatically. You can only use passes or effects in there.
By default it creates a render target with HalfFloatType, RGBAFormat. You can change all of this to your liking, inspect the types.
```jsx
import { SSAOPass } from "three-stdlib"
extend({ SSAOPass })
```
#### PositionalAudio

[](https://drei.vercel.app/?path=/story/abstractions-positionalaudio--positional-audio-scene-st) 
A wrapper around [THREE.PositionalAudio](https://threejs.org/docs/#api/en/audio/PositionalAudio). Add this to groups or meshes to tie them to a sound that plays when the camera comes near.
```jsx
```
#### Billboard
[](https://drei.pmnd.rs/?path=/story/abstractions-billboard--billboard-st)
Adds a `` that always faces the camera.
```jsx
I'm a billboard
```
#### ScreenSpace
[](https://drei.pmnd.rs/?path=/story/abstractions-screenspace--screen-space-story)
Adds a `` that aligns objects to screen space.
```jsx
I'm in screen space
```
#### ScreenSizer
[](https://drei.pmnd.rs/?path=/story/abstractions-screensizer--screen-sizer-story)
Adds a `` that scales objects to screen space.
```jsx
```
#### GradientTexture
A declarative THREE.Texture which attaches to "map" by default. You can use this to create gradient backgrounds.
```jsx
```
Radial gradient.
```jsx
import { GradientTexture, GradientType } from './GradientTexture'
;
```
#### Edges
Abstracts [THREE.EdgesGeometry](https://threejs.org/docs/#api/en/geometries/EdgesGeometry). It pulls the geometry automatically from its parent, optionally you can ungroup it and give it a `geometry` prop. You can give it children, for instance a custom material. Edges is based on `` and supports all of its props.
```jsx
```
#### Outlines

An ornamental component that extracts the geometry from its parent and displays an [inverted-hull outline](https://bnpr.gitbook.io/bnpr/outline/inverse-hull-method). Supported parents are ``, `` and ``.
```tsx
type OutlinesProps = JSX.IntrinsicElements['group'] & {
/** Outline color, default: black */
color: ReactThreeFiber.Color
/** Line thickness is independent of zoom, default: false */
screenspace: boolean
/** Outline opacity, default: 1 */
opacity: number
/** Outline transparency, default: false */
transparent: boolean
/** Outline thickness, default 0.05 */
thickness: number
/** Geometry crease angle (0 === no crease), default: Math.PI */
angle: number
}
```
```jsx
```
#### Trail
[](https://drei.vercel.app/?path=/story/misc-trail--use-trail-st)
A declarative, `three.MeshLine` based Trails implementation. You can attach it to any mesh and it will give it a beautiful trail.
Props defined below with their default values.
```jsx
width} // A function to define the width in each point along it.
>
{/* If `target` is not defined, Trail will use the first `Object3D` child as the target. */}
{/* You can optionally define a custom meshLineMaterial to use. */}
{/* */}
```
👉 Inspired by [TheSpite's Codevember 2021 #9](https://spite.github.io/codevember-2021/9/)
#### Sampler
[](https://drei.vercel.app/?path=/story/misc-sampler--sampler-st)
– Complex Demo by @CantBeFaraz
– Simple Demo by @ggsimm
Declarative abstraction around MeshSurfaceSampler & InstancedMesh.
It samples points from the passed mesh and transforms an InstancedMesh's matrix to distribute instances on the points.
Check the demos & code for more.
You can either pass a Mesh and InstancedMesh as children:
```tsx
// This simple example scatters 1000 spheres on the surface of the sphere mesh.
```
or use refs when you can't compose declaratively:
```tsx
const { nodes } = useGLTF('my/mesh/url')
const mesh = useRef(nodes)
const instances = useRef()
return <>
>
```
#### ComputedAttribute
[](https://drei.vercel.app/?path=/story/misc-sampler--sampler-weight-st)
Create and attach an attribute declaratively.
```tsx
{
// ...someLogic;
return new THREE.BufferAttribute([1, 2, 3], 1)
}}
// you can pass any BufferAttribute prop to this component, eg.
usage={THREE.StaticReadUsage}
/>
```
#### Clone
Declarative abstraction around THREE.Object3D.clone. This is useful when you want to create a shallow copy of an existing fragment (and Object3D, Groups, etc) into your scene, for instance a group from a loaded GLTF. This clone is now re-usable, but it will still refer to the original geometries and materials.
```ts
React.ReactNode)
/** Short access castShadow, applied to every mesh within */
castShadow?: boolean
/** Short access receiveShadow, applied to every mesh within */
receiveShadow?: boolean
/>
```
You create a shallow clone by passing a pre-existing object to the `object` prop.
```jsx
const { nodes } = useGLTF(url)
return (
```
Or, multiple objects:
```jsx
```
You can dynamically insert objects, these will apply to anything that isn't a group or a plain object3d (meshes, lines, etc):
```jsx
} />
```
Or make inserts conditional:
```jsx
(object.name === 'table' ? : null)}
} />
```
#### useAnimations
[](https://drei.pmnd.rs/?path=/story/abstractions-useanimations--use-animations-st)

A hook that abstracts [AnimationMixer](https://threejs.org/docs/#api/en/animation/AnimationMixer).
```jsx
const { nodes, materials, animations } = useGLTF(url)
const { ref, mixer, names, actions, clips } = useAnimations(animations)
useEffect(() => {
actions?.jump.play()
})
return (
```
The hook can also take a pre-existing root (which can be a plain object3d or a reference to one):
```jsx
const { scene, animations } = useGLTF(url)
const { actions } = useAnimations(animations, scene)
return
```
#### MarchingCubes
[](https://drei.pmnd.rs/?path=/story/abstractions-marchingcubes--marching-cubes-story)
An abstraction for threes [MarchingCubes](https://threejs.org/examples/#webgl_marchingcubes)
```jsx
```
#### Decal
[](https://drei.pmnd.rs/?path=/story/misc-decal--decal-st)
Abstraction around Three's `DecalGeometry`. It will use the its parent `mesh` as the decal surface by default.
The decal box has to intersect the surface, otherwise it will not be visible. if you do not specifiy a rotation it will look at the parents center point. You can also pass a single number as the rotation which allows you to spin it.
```js
```
If you do not specify a material it will create a transparent meshBasicMaterial with a polygonOffsetFactor of -10.
```jsx
```
If declarative composition is not possible, use the `mesh` prop to define the surface the decal must attach to.
```js
```
#### Svg
[](https://drei.pmnd.rs/?path=/story/abstractions-svg--svg-st)
Wrapper around the `three` [svg loader](https://threejs.org/examples/?q=sv#webgl_loader_svg) demo.
Accepts an SVG url or svg raw data.
```js
```
#### Gltf
This is a convenience component that will load a gltf file and clone the scene using [drei/Clone](#clone). That means you can re-use and mount the same gltf file multiple times. It accepts all props that Clone does, including shortcuts (castShadow, receiveShadow) and material overrides.
```js
```
#### AsciiRenderer

Abstraction of three's [AsciiEffect](https://threejs.org/examples/?q=as#webgl_effects_ascii). It creates a DOM layer on top of the canvas and renders the scene as ascii characters.
```tsx
type AsciiRendererProps = {
/** Render index, default: 1 */
renderIndex?: number
/** CSS background color (can be "transparent"), default: black */
bgColor?: string
/** CSS character color, default: white */
fgColor?: string
/** Characters, default: ' .:-+*=%@#' */
characters?: string
/** Invert character, default: true */
invert?: boolean
/** Colorize output (very expensive!), default: false */
color?: boolean
/** Level of detail, default: 0.15 */
resolution?: number
}
```
```jsx
```
#### Splat
A declarative abstraction around [antimatter15/splat](https://github.com/antimatter15/splat). It supports re-use, multiple splats with correct depth sorting, splats can move and behave as a regular object3d's, supports alphahash & alphatest, and stream-loading.
```tsx
type SplatProps = {
/** Url towards a *.splat file, no support for *.ply */
src: string
/** Whether to use tone mapping, default: false */
toneMapped?: boolean
/** Alpha test value, , default: 0 */
alphaTest?: number
/** Whether to use alpha hashing, default: false */
alphaHash?: boolean
/** Chunk size for lazy loading, prevents chokings the worker, default: 25000 (25kb) */
chunkSize?: number
} & JSX.IntrinsicElements['mesh']
```
```jsx
```
In order to depth sort multiple splats correectly you can either use alphaTest, for instance with a low value. But keep in mind that this can show a slight outline under some viewing conditions.
```jsx
```
You can also use alphaHash, but this can be slower and create some noise, you would typically get rid of the noise in postprocessing with a TAA pass. You don't have to use alphaHash on all splats.
```jsx
```
# Shaders
#### MeshReflectorMaterial
[](https://drei.vercel.app/?path=/story/shaders-meshreflectormaterial--reflector-st)
Easily add reflections and/or blur to any mesh. It takes surface roughness into account for a more realistic effect. This material extends from [THREE.MeshStandardMaterial](https://threejs.org/docs/#api/en/materials/MeshStandardMaterial) and accepts all its props.
```jsx
0 of bias makes sure that the blurTexture is not too sharp because of the multiplication with the depthTexture
distortion={1} // Amount of distortion based on the distortionMap texture
distortionMap={distortionTexture} // The red channel of this texture is used as the distortion map. Default is null
debug={0} /* Depending on the assigned value, one of the following channels is shown:
0 = no debug
1 = depth channel
2 = base channel
3 = distortion channel
4 = lod channel (based on the roughness)
*/
reflectorOffset={0.2} // Offsets the virtual camera that projects the reflection. Useful when the reflective surface is some distance from the object's origin (default = 0)
/>
```
#### MeshWobbleMaterial
[](https://drei.vercel.app/?path=/story/shaders-meshwobblematerial--mesh-wobble-material-st)
This material makes your geometry wobble and wave around. It was taken from the [threejs-examples](https://threejs.org/examples/#webgl_materials_modified) and adapted into a self-contained material.
```jsx
```
#### MeshDistortMaterial
[](https://drei.vercel.app/?path=/story/shaders-meshdistortmaterial--mesh-distort-material-st)
This material makes your geometry distort following simplex noise.
```jsx
```
#### MeshRefractionMaterial

A convincing Glass/Diamond refraction material.
```tsx
type MeshRefractionMaterialProps = JSX.IntrinsicElements['shaderMaterial'] & {
/** Environment map */
envMap: THREE.CubeTexture | THREE.Texture
/** Number of ray-cast bounces, it can be expensive to have too many, 2 */
bounces?: number
/** Refraction index, 2.4 */
ior?: number
/** Fresnel (strip light), 0 */
fresnel?: number
/** RGB shift intensity, can be expensive, 0 */
aberrationStrength?: number
/** Color, white */
color?: ReactThreeFiber.Color
/** If this is on it uses fewer ray casts for the RGB shift sacrificing physical accuracy, true */
fastChroma?: boolean
}
```
If you want it to reflect other objects in the scene you best pair it with a cube-camera.
```jsx
{(texture) => (
)}
```
Otherwise just pass it an environment map.
```jsx
const texture = useLoader(RGBELoader, "/textures/royal_esplanade_1k.hdr")
return (
```
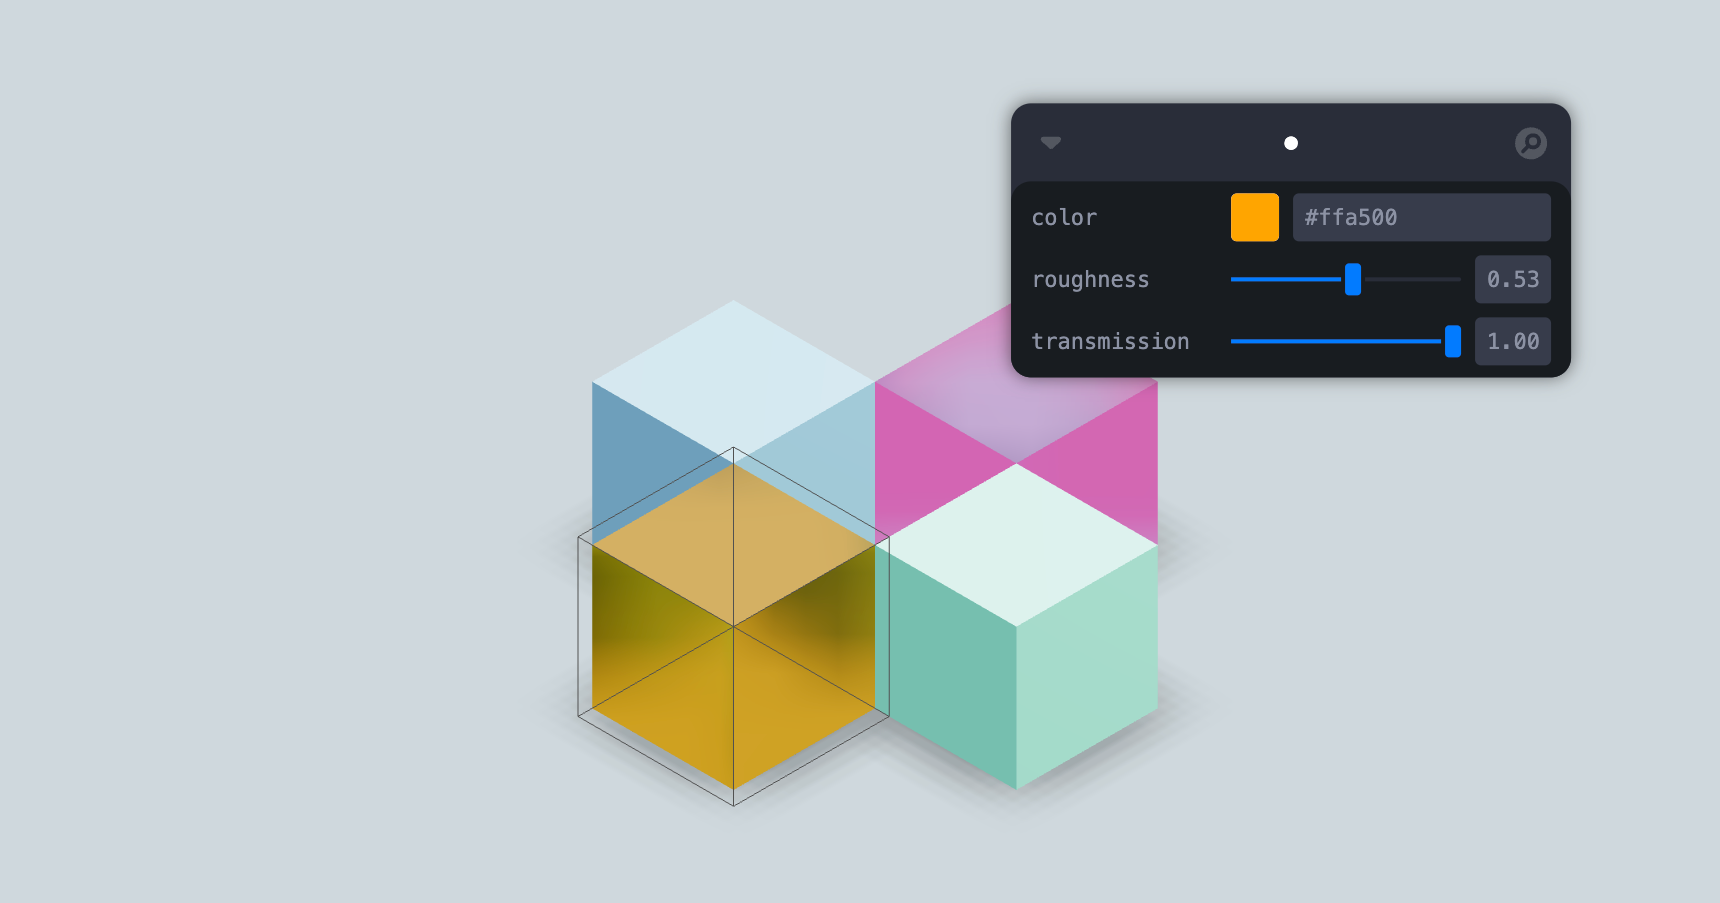
#### MeshTransmissionMaterial
An improved THREE.MeshPhysicalMaterial. It acts like a normal PhysicalMaterial in terms of transmission support, thickness, ior, roughness, etc., but has chromatic aberration, noise-based roughness blur, (primitive) anisotropic blur support, and unlike the original it can "see" other transmissive or transparent objects which leads to improved visuals.
Although it should be faster than MPM keep in mind that it can still be expensive as it causes an additional render pass of the scene. Low samples and low resolution will make it faster. If you use roughness consider using a tiny resolution, for instance 32x32 pixels, it will still look good but perform much faster.
For performance and visual reasons the host mesh gets removed from the render-stack temporarily. If you have other objects that you don't want to see reflected in the material just add them to the parent mesh as children.
```tsx
type MeshTransmissionMaterialProps = JSX.IntrinsicElements['meshPhysicalMaterial'] & {
/* Transmission, default: 1 */
transmission?: number
/* Thickness (refraction), default: 0 */
thickness?: number
/** Backside thickness (when backside is true), default: 0 */
backsideThickness?: number
/* Roughness (blur), default: 0 */
roughness?: number
/* Chromatic aberration, default: 0.03 */
chromaticAberration?: number
/* Anisotropy, default: 0.1 */
anisotropicBlur?: number
/* Distortion, default: 0 */
distortion?: number
/* Distortion scale, default: 0.5 */
distortionScale?: number
/* Temporal distortion (speed of movement), default: 0.0 */
temporalDistortion?: number
/** The scene rendered into a texture (use it to share a texture between materials), default: null */
buffer?: THREE.Texture
/** transmissionSampler, you can use the threejs transmission sampler texture that is
* generated once for all transmissive materials. The upside is that it can be faster if you
* use multiple MeshPhysical and Transmission materials, the downside is that transmissive materials
* using this can't see other transparent or transmissive objects nor do you have control over the
* buffer and its resolution, default: false */
transmissionSampler?: boolean
/** Render the backside of the material (more cost, better results), default: false */
backside?: boolean
/** Resolution of the local buffer, default: undefined (fullscreen) */
resolution?: number
/** Resolution of the local buffer for backfaces, default: undefined (fullscreen) */
backsideResolution?: number
/** Refraction samples, default: 6 */
samples?: number
/** Buffer scene background (can be a texture, a cubetexture or a color), default: null */
background?: THREE.Texture
}
```
```jsx
return (
```
If each material rendering the scene on its own is too expensive you can share a buffer texture. Either by enabling `transmissionSampler` which would use the threejs-internal buffer that MeshPhysicalMaterials use. This might be faster, the downside is that no transmissive material can "see" other transparent or transmissive objects.
```jsx
```
Or, by passing a texture to `buffer` manually, for instance using useFBO.
```jsx
const buffer = useFBO()
useFrame((state) => {
state.gl.setRenderTarget(buffer)
state.gl.render(state.scene, state.camera)
state.gl.setRenderTarget(null)
})
return (
<>
```
Or a PerspectiveCamera.
```jsx
{(texture) => (
<>
>
)}
```
This would mimic the default MeshPhysicalMaterial behaviour, these materials won't "see" one another, but at least they would pick up on everything else, including transmissive or transparent objects.
#### MeshDiscardMaterial
A material that renders nothing. In comparison to `
{/* Shadows and edges will show, but the model itself won't */}
```
#### PointMaterial
Antialiased round dots. It takes the same props as regular [THREE.PointsMaterial](https://threejs.org/docs/index.html?q=PointsMaterial#api/en/materials/PointsMaterial) on which it is based.
```jsx
```
#### SoftShadows
```tsx
type SoftShadowsProps = {
/** Size of the light source (the larger the softer the light), default: 25 */
size?: number
/** Number of samples (more samples less noise but more expensive), default: 10 */
samples?: number
/** Depth focus, use it to shift the focal point (where the shadow is the sharpest), default: 0 (the beginning) */
focus?: number
}
```
Injects percent closer soft shadows (pcss) into threes shader chunk. Mounting and unmounting this component will lead to all shaders being be re-compiled, although it will only cause overhead if SoftShadows is mounted after the scene has already rendered, if it mounts with everything else in your scene shaders will compile naturally.
```jsx
```
#### shaderMaterial
[](https://drei.vercel.app/?path=/story/shaders-shadermaterial--shader-material-story)
Creates a THREE.ShaderMaterial for you with easier handling of uniforms, which are automatically declared as setter/getters on the object and allowed as constructor arguments.
```jsx
import { extend } from '@react-three/fiber'
const ColorShiftMaterial = shaderMaterial(
{ time: 0, color: new THREE.Color(0.2, 0.0, 0.1) },
// vertex shader
/*glsl*/`
varying vec2 vUv;
void main() {
vUv = uv;
gl_Position = projectionMatrix * modelViewMatrix * vec4(position, 1.0);
}
`,
// fragment shader
/*glsl*/`
uniform float time;
uniform vec3 color;
varying vec2 vUv;
void main() {
gl_FragColor.rgba = vec4(0.5 + 0.3 * sin(vUv.yxx + time) + color, 1.0);
}
`
)
// declaratively
extend({ ColorShiftMaterial })
...
// imperatively, all uniforms are available as setter/getters and constructor args
const material = new ColorShiftMaterial({ color: new THREE.Color("hotpink") })
material.time = 1
```
`shaderMaterial` attaches a unique `key` property to the prototype class. If you wire it to Reacts own `key` property, you can enable hot-reload.
```jsx
import { ColorShiftMaterial } from './ColorShiftMaterial'
extend({ ColorShiftMaterial })
// in your component
```
# Modifiers
#### CurveModifier
[](https://drei.pmnd.rs/?path=/story/modifiers-curvemodifier)
Given a curve will replace the children of this component with a mesh that move along said curve calling the property `moveAlongCurve` on the passed ref. Uses [three's Curve Modifier](https://threejs.org/examples/#webgl_modifier_curve)
```jsx
const curveRef = useRef()
const curve = React.useMemo(() => new THREE.CatmullRomCurve3([...handlePos], true, 'centripetal'), [handlePos])
return (
)
```
# Misc
#### useContextBridge
[](https://drei.pmnd.rs/?path=/story/misc-usecontextbridge--use-context-bridge-st)
Allows you to forward contexts provided above the `` to be consumed from within the `` normally
```jsx
function SceneWrapper() {
// bridge any number of contexts
// Note: These contexts must be provided by something above this SceneWrapper component
// You cannot render the providers for these contexts inside this component
const ContextBridge = useContextBridge(ThemeContext, GreetingContext)
return (
)
}
function Scene() {
// we can now consume a context within the Canvas
const theme = React.useContext(ThemeContext)
const greeting = React.useContext(GreetingContext)
return (
//...
)
}
```
#### Example
[](https://drei.vercel.app/?path=/story/misc-example--example-st)
> **Warning** solely for [`CONTRIBUTING`](CONTRIBUTING.md#example) purposes
A "counter" example.
```tsx
```
```tsx
type ExampleProps = {
font: string
color?: Color
debug?: boolean
bevelSize?: number
}
```
Ref-api:
```tsx
const api = useRef()
```
```tsx
type ExampleApi = {
incr: (x?: number) => void
decr: (x?: number) => void
}
```
#### Html
[](https://drei.vercel.app/?path=/story/misc-html--html-st) 


Allows you to tie HTML content to any object of your scene. It will be projected to the objects whereabouts automatically.
```jsx
number[]} // Override default positioning function. (default=undefined) [ignored in transform mode]
occlude={[ref]} // Can be true or a Ref[], true occludes the entire scene (default: undefined)
onOcclude={(hidden) => null} // Callback when the visibility changes (default: undefined)
{...groupProps} // All THREE.Group props are valid
{...divProps} // All HTMLDivElement props are valid
>
hello
world
```
Html can hide behind geometry using the `occlude` prop.
```jsx
```
When the Html object hides it sets the opacity prop on the innermost div. If you want to animate or control the transition yourself then you can use `onOcclude`.
```jsx
const [hidden, set] = useState()
```
**Blending occlusion**
Html can hide behind geometry as if it was part of the 3D scene using this mode. It can be enabled by using `"blending"` as the `occlude` prop.
```jsx
// Enable real occlusion
```
You can also give HTML material properties using the `material` prop.
```jsx
}
/>
```
Enable shadows using the `castShadow` and `recieveShadow` prop.
> Note: Shadows only work with a custom material. Shadows will not work with `meshBasicMaterial` and `shaderMaterial` by default.
```jsx
}
/>
```
> Note: Html 'blending' mode only correctly occludes rectangular HTML elements by default. Use the `geometry` prop to swap the backing geometry to a custom one if your Html has a different shape.
If transform mode is enabled, the dimensions of the rendered html will depend on the position relative to the camera, the camera fov and the distanceFactor. For example, an Html component placed at (0,0,0) and with a distanceFactor of 10, rendered inside a scene with a perspective camera positioned at (0,0,2.45) and a FOV of 75, will have the same dimensions as a "plain" html element like in [this example](https://codesandbox.io/s/drei-html-magic-number-6mzt6m).
A caveat of transform mode is that on some devices and browsers, the rendered html may appear blurry, as discussed in [#859](https://github.com/pmndrs/drei/issues/859). The issue can be at least mitigated by scaling down the Html parent and scaling up the html children:
```jsx
```
#### CycleRaycast


This component allows you to cycle through all objects underneath the cursor with optional visual feedback. This can be useful for non-trivial selection, CAD data, housing, everything that has layers. It does this by changing the raycasters filter function and then refreshing the raycaster.
For this to work properly your event handler have to call `event.stopPropagation()`, for instance in `onPointerOver` or `onClick`, only one element can be selective for cycling to make sense.
```jsx
console.log(objects, cycle)} // Optional onChanged event
/>
```
#### Select

```tsx
type Props = {
/** Allow multi select, default: false */
multiple?: boolean
/** Allow box select, default: false */
box?: boolean
/** Custom CSS border: default: '1px solid #55aaff' */
border?: string
/** Curom CSS color, default: 'rgba(75, 160, 255, 0.1)' */
backgroundColor?: string
/** Callback for selection changes */
onChange?: (selected: THREE.Object3D[]) => void
/** Callback for selection changes once the pointer is up */
onChangePointerUp?: (selected: THREE.Object3D[]) => void
/** Optional filter for filtering the selection */
filter?: (selected: THREE.Object3D[]) => THREE.Object3D[]
}
```
This component allows you to select/unselect objects by clicking on them. It keeps track of the currently selected objects and can select multiple objects (with the shift key). Nested components can request the current selection (which is always an array) with the `useSelect` hook. With the `box` prop it will let you shift-box-select objects by holding and draging the cursor over multiple objects. Optionally you can filter the selected items as well as define in which shape they are stored by defining the `filter` prop.
```jsx
items}>
function Foo() {
const selected = useSelect()
```
#### Sprite Animator


```tsx
type Props = {
/** The start frame of the animation */
startFrame?: number
/** The end frame of the animation */
endFrame?: number
/** The desired frames per second of the animaiton */
fps?: number
/** The frame identifier to use, has to be one of animationNames */
frameName?: string
/** The URL of the texture JSON (if using JSON-Array or JSON-Hash) */
textureDataURL?: string
/** The URL of the texture image */
textureImageURL?: string
/** Whether or not the animation should loop */
loop?: boolean
/** The number of frames of the animation (required if using plain spritesheet without JSON) */
numberOfFrames?: number
/** Whether or not the animation should auto-start when all assets are loaded */
autoPlay?: boolean
/** The animation names of the spritesheet (if the spritesheet -with JSON- contains more animation sequences) */
animationNames?: Array
/** Event callback when the animation starts */
onStart?: Function
/** Event callback when the animation ends */
onEnd?: Function
/** Event callback when the animation loops */
onLoopEnd?: Function
/** Event callback when each frame changes */
onFrame?: Function
/** @deprecated Control when the animation runs*/
play?: boolean
/** Control when the animation pauses */
pause?: boolean
/** Whether or not the Sprite should flip sides on the x-axis */
flipX?: boolean
/** Sets the alpha value to be used when running an alpha test. https://threejs.org/docs/#api/en/materials/Material.alphaTest */
alphaTest?: number
/** Displays the texture on a SpriteGeometry always facing the camera, if set to false, it renders on a PlaneGeometry */
asSprite?: boolean
/** Allows for manual update of the sprite animation e.g: via ScrollControls */
offset?: number
/** Allows the sprite animation to start from the end towards the start */
playBackwards: boolean
/** Allows the animation to be paused after it ended so it can be restarted on demand via auto */
resetOnEnd?: boolean
/** An array of items to create instances from */
instanceItems?: any[]
/** The max number of items to instance (optional) */
maxItems?: number
/** External parsed sprite data, usually from useSpriteLoader ready for use */
spriteDataset?: any
}
```
The SpriteAnimator component provided by drei is a powerful tool for animating sprites in a simple and efficient manner. It allows you to create sprite animations by cycling through a sequence of frames from a sprite sheet image or JSON data.
Notes:
- The SpriteAnimator component internally uses the useFrame hook from react-three-fiber (r3f) for efficient frame updates and rendering.
- The sprites (without a JSON file) should contain equal size frames
- Trimming of spritesheet frames is not yet supported
- Internally uses the `useSpriteLoader` or can use data from it directly
```jsx
```
ScrollControls example
```jsx
;
function FireScroll() {
const sprite = useSpriteAnimator()
const scroll = useScroll()
const ref = React.useRef()
useFrame(() => {
if (sprite && scroll) {
sprite.current = scroll.offset
}
})
return null
}
```
#### Stats
[](https://drei.vercel.app/?path=/story/misc-stats--default-story)
Adds [stats](https://github.com/mrdoob/stats.js/) to document.body. It takes over the render-loop!
```jsx
```
You can choose to mount Stats to a different DOM Element - for example, for custom styling:
```jsx
const node = useRef(document.createElement('div'))
useEffect(() => {
node.current.id = 'test'
document.body.appendChild(node.current)
return () => document.body.removeChild(node.current)
}, [])
return
```
#### StatsGl
[](https://drei.vercel.app/?path=/story/misc-statsgl--default-story)
Adds [stats-gl](https://github.com/RenaudRohlinger/stats-gl/) to document.body. It takes over the render-loop!
```jsx
```
#### Wireframe
[](https://drei.vercel.app/?path=/story/staging-wireframe--wireframe-st)
Renders an Antialiased, shader based wireframe on or around a geometry.
```jsx
// Will apply wireframe on top of existing material on this mesh
// OR
```
#### useDepthBuffer

Renders the scene into a depth-buffer. Often effects depend on it and this allows you to render a single buffer and share it, which minimizes the performance impact. It returns the buffer's `depthTexture`.
Since this is a rather expensive effect you can limit the amount of frames it renders when your objects are static. For instance making it render only once by setting `frames: 1`.
```jsx
const depthBuffer = useDepthBuffer({
size: 256, // Size of the FBO, 256 by default
frames: Infinity, // How many frames it renders, Infinity by default
})
return
```
#### useFBO
[](https://drei.vercel.app/?path=/story/misc-usefbo--use-fbo-st)
Creates a `THREE.WebGLRenderTarget`.
```tsx
type FBOSettings = {
/** Defines the count of MSAA samples. Can only be used with WebGL 2. Default: 0 */
samples?: number
/** If set, the scene depth will be rendered into buffer.depthTexture. Default: false */
depth?: boolean
} & THREE.RenderTargetOptions
export function useFBO(
/** Width in pixels, or settings (will render fullscreen by default) */
width?: number | FBOSettings,
/** Height in pixels */
height?: number,
/**Settings */
settings?: FBOSettings
): THREE.WebGLRenderTarget {
```
```jsx
const target = useFBO({ stencilBuffer: false })
```
The rendertarget is automatically disposed when unmounted.
#### useCamera
[](https://drei.vercel.app/?path=/story/misc-usecamera--use-camera-st)

A hook for the rare case when you are using non-default cameras for heads-up-displays or portals, and you need events/raytracing to function properly (raycasting uses the default camera otherwise).
```jsx
```
#### useCubeCamera
[](https://drei.vercel.app/?path=/story/misc-usecubecamera)
Creates a [`THREE.CubeCamera`](https://threejs.org/docs/#api/en/cameras/CubeCamera) that renders into a `fbo` renderTarget and that you can `update()`.
```tsx
export function useCubeCamera({
/** Resolution of the FBO, 256 */
resolution?: number
/** Camera near, 0.1 */
near?: number
/** Camera far, 1000 */
far?: number
/** Custom environment map that is temporarily set as the scenes background */
envMap?: THREE.Texture
/** Custom fog that is temporarily set as the scenes fog */
fog?: Fog | FogExp2
})
```
```jsx
const { fbo, camera, update } = useCubeCamera()
```
#### useDetectGPU
[](https://drei.pmnd.rs/?path=/story/misc-usedetectgpu)
This hook uses [DetectGPU by @TimvanScherpenzeel](https://github.com/TimvanScherpenzeel/detect-gpu), wrapped into suspense, to determine what tier should be assigned to the user's GPU.
👉 This hook CAN be used outside the @react-three/fiber `Canvas`.
```jsx
function App() {
const GPUTier = useDetectGPU()
// show a fallback for mobile or lowest tier GPUs
return (
{(GPUTier.tier === "0" || GPUTier.isMobile) ? : ...
```
#### useAspect
[](https://drei.vercel.app/?path=/story/misc-useaspect--default-story)
This hook calculates aspect ratios (for now only what in css would be `image-size: cover` is supported). You can use it to make an image fill the screen. It is responsive and adapts to viewport resize. Just give the hook the image bounds in pixels. It returns an array: `[width, height, 1]`.
```jsx
const scale = useAspect(
1024, // Pixel-width
512, // Pixel-height
1 // Optional scaling factor
)
return (
```
#### useCursor

A small hook that sets the css body cursor according to the hover state of a mesh, so that you can give the user visual feedback when the mouse enters a shape. Arguments 1 and 2 determine the style, the defaults are: onPointerOver = 'pointer', onPointerOut = 'auto'.
```jsx
const [hovered, set] = useState()
useCursor(hovered, /*'pointer', 'auto', document.body*/)
return (
set(true)} onPointerOut={() => set(false)}>
```
#### useIntersect
A very cheap frustum check that gives you a reference you can observe in order to know if the object has entered the view or is outside of it. This relies on [THREE.Object3D.onBeforeRender](https://threejs.org/docs/#api/en/core/Object3D.onBeforeRender) so it only works on objects that are effectively rendered, like meshes, lines, sprites. It won't work on groups, object3d's, bones, etc.
```jsx
const ref = useIntersect((visible) => console.log('object is visible', visible))
return
```
#### useBoxProjectedEnv
The cheapest possible way of getting reflections in threejs. This will box-project the current environment map onto a plane. It returns an object that you need to spread over its material. The spread object contains a ref, onBeforeCompile and customProgramCacheKey. If you combine it with drei/CubeCamera you can "film" a single frame of the environment and feed it to the material, thereby getting realistic reflections at no cost. Align it with the position and scale properties.
```jsx
const projection = useBoxProjectedEnv(
[0, 0, 0], // Position
[1, 1, 1] // Scale
)
{(texture) => (
)}
```
#### useTrail
[](https://drei.vercel.app/?path=/story/misc-trail--use-trail-st)
A hook to obtain an array of points that make up a [Trail](#trail). You can use this array to drive your own `MeshLine` or make a trail out of anything you please.
Note: The hook returns a ref (`MutableRefObject`) this means updates to it will not trigger a re-draw, thus keeping this cheap.
```js
const points = useTrail(
target, // Required target object. This object will produce the trail.
{
length, // Length of the line
decay, // How fast the line fades away
local, // Wether to use the target's world or local positions
stride, // Min distance between previous and current point
interval, // Number of frames to wait before next calculation
}
)
// To use...
useFrame(() => {
meshLineRef.current.position.setPoints(points.current)
})
```
#### useSurfaceSampler
[](https://drei.vercel.app/?path=/story/misc-decal--decal-st)
A hook to obtain the result of the [``](#sampler) as a buffer. Useful for driving anything other than `InstancedMesh` via the Sampler.
```js
const buffer = useSurfaceSampler(
mesh, // Mesh to sample
count, // [Optional] Number of samples (default: 16)
transform, // [Optional] Transformation function. Same as in ``
weight, // [Optional] Same as in ``
instancedMesh // [Optional] Instanced mesh to scatter
)
```
### FaceLandmarker

A @mediapipe/tasks-vision [`FaceLandmarker`](https://developers.google.com/mediapipe/api/solutions/js/tasks-vision.facelandmarker) provider, as well as a `useFaceLandmarker` hook.
```tsx
{/* ... */}
```
It will instanciate a FaceLandmarker object with the following defaults:
```tsx
{
basePath: "https://cdn.jsdelivr.net/npm/@mediapipe/[email protected]/wasm", // x.y.z will value the @mediapipe/tasks-vision version, eg: 0.10.2
options: {
baseOptions: {
modelAssetPath: "https://storage.googleapis.com/mediapipe-models/face_landmarker/face_landmarker/float16/1/face_landmarker.task",
delegate: "GPU",
},
runningMode: "VIDEO",
outputFaceBlendshapes: true,
outputFacialTransformationMatrixes: true,
}
}
```
You can override defaults, like for example self-host tasks-vision's `wasm/` and `face_landmarker.task` model in you `public/` directory:
```sh
$ ln -s ../node_modules/@mediapipe/tasks-vision/wasm/ public/tasks-vision-wasm
$ curl https://storage.googleapis.com/mediapipe-models/face_landmarker/face_landmarker/float16/1/face_landmarker.task -o public/face_landmarker.task
```
```tsx
import { FaceLandmarkerDefaults } from '@react-three/drei'
const visionBasePath = new URL("/tasks-vision-wasm", import.meta.url).toString()
const modelAssetPath = new URL("/face_landmarker.task", import.meta.url).toString()
const faceLandmarkerOptions = { ...FaceLandmarkerDefaults.options };
faceLandmarkerOptions.baseOptions.modelAssetPath = modelAssetPath;
```
# Loading
#### Loader

A quick and easy loading overlay component that you can drop on top of your canvas. It's intended to "hide" the whole app, so if you have multiple suspense wrappers in your application, you should use multiple loaders. It will show an animated loadingbar and a percentage.
```jsx
```
You can override styles, too.
```jsx
`Loading ${p.toFixed(2)}%`} // Text
initialState={(active) => active} // Initial black out state
>
```
#### useProgress
[](https://drei.vercel.app/?path=/story/misc-useprogress--use-progress-scene-st)
A convenience hook that wraps `THREE.DefaultLoadingManager`'s progress status.
```jsx
function Loader() {
const { active, progress, errors, item, loaded, total } = useProgress()
return {progress} % loaded
}
return (
}>
)
```
If you don't want your progress component to re-render on all changes you can be specific as to what you need, for instance if the component is supposed to collect errors only. Look into [zustand](https://github.com/react-spring/zustand) for more info about selectors.
```jsx
const errors = useProgress((state) => state.errors)
```
👉 Note that your loading component does not have to be a suspense fallback. You can use it anywhere, even in your dom tree, for instance for overlays.
#### useGLTF
[](https://drei.pmnd.rs/?path=/story/loaders-gltf)
A convenience hook that uses `useLoader` and `GLTFLoader`, it defaults to CDN loaded draco binaries (`https://www.gstatic.com/draco/v1/decoders/`) which are only loaded for compressed models.
```jsx
useGLTF(url)
useGLTF(url, '/draco-gltf')
useGLTF.preload(url)
```
If you want to use your own draco decoder globally, you can pass it through `useGLTF.setDecoderPath(path)`:
> **Note**
If you are using the CDN loaded draco binaries, you can get a small speedup in loading time by prefetching them.
>
> You can accomplish this by adding two `` tags to your `` tag, as below. The version in those URLs must exactly match what [useGLTF](src/core/useGLTF.tsx#L18) uses for this to work. If you're using create-react-app, `public/index.html` file contains the `` tag.
>
> ```html
> rel="prefetch"
> crossorigin="anonymous"
> href="https://www.gstatic.com/draco/versioned/decoders/1.5.5/draco_wasm_wrapper.js"
> />
> rel="prefetch"
> crossorigin="anonymous"
> href="https://www.gstatic.com/draco/versioned/decoders/1.5.5/draco_decoder.wasm"
> />
> ```
>
> It is recommended that you check your browser's network tab to confirm that the correct URLs are being used, and that the files do get loaded from the prefetch cache on subsequent requests.
#### useFBX
[](https://drei.pmnd.rs/?path=/story/loaders-fbx)
A convenience hook that uses `useLoader` and `FBXLoader`:
```jsx
useFBX(url)
function SuzanneFBX() {
let fbx = useFBX('suzanne/suzanne.fbx')
return
}
```
#### useTexture
[](https://drei.pmnd.rs/?path=/story/loaders-texture)
A convenience hook that uses `useLoader` and `TextureLoader`
```jsx
const texture = useTexture(url)
const [texture1, texture2] = useTexture([texture1, texture2])
```
You can also use key: url objects:
```jsx
const props = useTexture({
metalnessMap: url1,
map: url2,
})
return
```
#### useKTX2
[](https://drei.pmnd.rs/?path=/story/loaders-ktx2--use-ktx-2-scene-st)
A convenience hook that uses `useLoader` and `KTX2Loader`
```jsx
const texture = useKTX2(url)
const [texture1, texture2] = useKTX2([texture1, texture2])
return
```
#### useCubeTexture
[](https://drei.pmnd.rs/?path=/story/loaders-cubetexture)
A convenience hook that uses `useLoader` and `CubeTextureLoader`
```jsx
const envMap = useCubeTexture(['px.png', 'nx.png', 'py.png', 'ny.png', 'pz.png', 'nz.png'], { path: 'cube/' })
```
#### useVideoTexture
[](https://drei.pmnd.rs/?path=/story/loaders-videotexture) 

A convenience hook that returns a `THREE.VideoTexture` and integrates loading into suspense. By default it falls back until the `canplay` event. Then it starts playing the video, which, if the video is muted, is allowed in the browser without user interaction.
```tsx
type VideoTextureProps = {
unsuspend?: 'canplay' | 'canplaythrough' | 'loadedmetadata'
muted?: boolean
loop?: boolean
start?: boolean
crossOrigin?: string
}
export function useVideoTexture(src: string, props: VideoTextureProps) {
const { unsuspend, start, crossOrigin, muted, loop } = {
unsuspend: 'canplay',
crossOrigin: 'Anonymous',
muted: true,
loop: true,
start: true
...props,
}
```
```jsx
const texture = useVideoTexture("/video.mp4")
return (
```
It also accepts a [`MediaStream`](https://developer.mozilla.org/en-US/docs/Web/API/MediaStream) from eg. [`.getDisplayMedia()`](https://developer.mozilla.org/en-US/docs/Web/API/MediaDevices/getDisplayMedia) or [`.getUserMedia()`](https://developer.mozilla.org/en-US/docs/Web/API/MediaDevices/getUserMedia):
```jsx
const [stream, setStream] = useState()
return (
setStream(await navigator.mediaDevices.getDisplayMedia({ video: true }))}>
}>
```
```jsx
function VideoMaterial({ src }) {
const texture = useVideoTexture(src)
return
}
```
NB: It's important to wrap `VideoMaterial` into `React.Suspense` since, `useVideoTexture(src)` here will be suspended until the user shares its screen.
HLS - useVideoTexture supports .m3u8 HLS manifest via (https://github.com/video-dev/hls.js).
You can fine-tune via the hls configuration:
```
const texture = useVideoTexture('https://test-streams.mux.dev/x36xhzz/x36xhzz.m3u8', {
hls: { abrEwmaFastLive: 1.0, abrEwmaSlowLive: 3.0, enableWorker: true }
})
```
> Available options: https://github.com/video-dev/hls.js/blob/master/docs/API.md#fine-tuning
#### useTrailTexture
This hook returns a `THREE.Texture` with a pointer trail which can be used in shaders to control displacement among other things, and a movement callback `event => void` which reads from `event.uv`.
```tsx
type TrailConfig = {
/** texture size (default: 256x256) */
size?: number
/** Max age (ms) of trail points (default: 750) */
maxAge?: number
/** Trail radius (default: 0.3) */
radius?: number
/** Canvas trail opacity (default: 0.2) */
intensity?: number
/** Add points in between slow pointer events (default: 0) */
interpolate?: number
/** Moving average of pointer force (default: 0) */
smoothing?: number
/** Minimum pointer force (default: 0.3) */
minForce?: number
/** Blend mode (default: 'screen') */
blend?: CanvasRenderingContext2D['globalCompositeOperation']
/** Easing (default: easeCircOut) */
ease?: (t: number) => number
}
```
```jsx
const [texture, onMove] = useTrailTexture(config)
return (
```
#### useFont
Uses THREE.FontLoader to load a font and returns a `THREE.Font` object. It also accepts a JSON object as a parameter. You can use this to preload or share a font across multiple components.
```jsx
const font = useFont('/fonts/helvetiker_regular.typeface.json')
return
```
In order to preload you do this:
```jsx
useFont.preload('/fonts/helvetiker_regular.typeface.json')
```
#### useSpriteLoader
Loads texture and JSON files with multiple or single animations and parses them into appropriate format. These assets can be used by multiple SpriteAnimator components to save memory and loading times.
```jsx
/** The texture url to load the sprite frames from */
input?: Url | null,
/** The JSON data describing the position of the frames within the texture (optional) */
json?: string | null,
/** The animation names into which the frames will be divided into (optional) */
animationNames?: string[] | null,
/** The number of frames on a standalone (no JSON data) spritesheet (optional)*/
numberOfFrames?: number | null,
/** The callback to call when all textures and data have been loaded and parsed */
onLoad?: (texture: Texture, textureData?: any) => void
```
```jsx
const { spriteObj } = useSpriteLoader(
'multiasset.png',
'multiasset.json',
['orange', 'Idle Blinking', '_Bat'],
null
)
```
# Performance
#### Instances

A wrapper around [THREE.InstancedMesh](https://threejs.org/docs/#api/en/objects/InstancedMesh). This allows you to define hundreds of thousands of objects in a single draw call, but declaratively!
```jsx
// As many as you want, make them conditional, mount/unmount them, lazy load them, etc ...
```
You can nest Instances and use relative coordinates!
```jsx
```
Instances can also receive non-instanced objects, for instance annotations!
```jsx
hello from the dom
```
You can define events on them!
```jsx
```
👉 Note: While creating instances declaratively keeps all the power of components with reduced draw calls, it comes at the cost of CPU overhead. For cases like foliage where you want no CPU overhead with thousands of intances you should use THREE.InstancedMesh such as in this [example](https://codesandbox.io/s/grass-shader-5xho4?file=/src/Grass.js).
#### Merged
This creates instances for existing meshes and allows you to use them cheaply in the same scene graph. Each type will cost you exactly one draw call, no matter how many you use. `meshes` has to be a collection of pre-existing THREE.Mesh objects.
```jsx
{(Box, Sphere) => (
<>
>
)}
```
You may also use object notation, which is good for loaded models.
```jsx
function Model({ url }) {
const { nodes } = useGLTF(url)
return (
{({ Screw, Filter, Pipe }) => (
<>
>
)}
)
}
```
#### Points
A wrapper around [THREE.Points](https://threejs.org/docs/#api/en/objects/Points). It has the same api and properties as Instances.
```jsx
// As many as you want, make them conditional, mount/unmount them, lazy load them, etc ...
```
If you just want to use buffers for position, color and size, you can use the alternative API:
```jsx
```
#### Segments
[](https://drei.pmnd.rs/?path=/story/performance-segments--many-segments)
A wrapper around [THREE.LineSegments](https://threejs.org/docs/#api/en/objects/LineSegments). This allows you to use thousands of segments under the same geometry.
##### Prop based:
```jsx
```
##### Ref based (for fast updates):
```jsx
const ref = useRef()
// E.g. to change segment position each frame.
useFrame(() => {
ref.current.start.set(0,0,0)
ref.current.end.set(10,10,0)
ref.current.color.setRGB(0,0,0)
})
// ...
```
#### Detailed
[](https://drei.vercel.app/?path=/story/abstractions-detailed--detailed-st)
A wrapper around [THREE.LOD](https://threejs.org/docs/#api/en/objects/LOD) (Level of detail).
```jsx
```
#### Preload
The WebGLRenderer will compile materials only when they hit the frustrum, which can cause jank. This component precompiles the scene using [gl.compile](https://threejs.org/docs/#api/en/renderers/WebGLRenderer.compile) which makes sure that your app is responsive from the get go.
By default gl.compile will only preload visible objects, if you supply the `all` prop, it will circumvent that. With the `scene` and `camera` props you could also use it in portals.
```jsx
```
#### BakeShadows
Sets `gl.shadowMap.autoUpdate` to `false` while mounted and requests a single `gl.shadowMap.needsUpdate = true` afterwards. This freezes all shadow maps the moment this component comes in, which makes shadows performant again (with the downside that they are now static). Mount this component in lock-step with your models, for instance by dropping it into the same suspense boundary of a model that loads.
```jsx
```
#### meshBounds
[](https://drei.vercel.app/?path=/story/misc-meshbounds--mesh-bounds-st)
A very fast, but often good-enough bounds-only raycast for meshes. You can use this if performance has precedence over pointer precision.
```jsx
```
#### AdaptiveDpr
Drop this component into your scene and it will cut the pixel-ratio on regress according to the canvas's performance min/max settings. This allows you to temporarily reduce visual quality in exchange for more performance, for instance when the camera moves (look into drei's controls regress flag). Optionally, you can set the canvas to a pixelated filter, which would be even faster.
```jsx
```
#### AdaptiveEvents
Drop this component into your scene and it will switch off the raycaster while the system is in regress.
```jsx
```
#### Bvh
[](https://drei.vercel.app/?path=/story/performance-usebvh--default-story)
An abstraction around [gkjohnson/three-mesh-bvh](https://github.com/gkjohnson/three-mesh-bvh) to speed up raycasting exponentially. Use this component to wrap your scene, a sub-graph, a model or single mesh, and it will automatically compute boundsTree and assign acceleratedRaycast. This component is side-effect free, once unmounted or disabled it will revert to the original raycast.
```tsx
export interface BVHOptions {
/** Split strategy, default: SAH (slowest to construct, fastest runtime, least memory) */
splitStrategy?: 'CENTER' | 'AVERAGE' | 'SAH'
/** Print out warnings encountered during tree construction, default: false */
verbose?: boolean
/** If true then the bounding box for the geometry is set once the BVH has been constructed, default: true */
setBoundingBox?: boolean
/** The maximum depth to allow the tree to build to, default: 40 */
maxDepth?: number
/** The number of triangles to aim for in a leaf node, default: 10 */
maxLeafTris?: number
/** If false then an index buffer is created if it does not exist and is rearranged */
/** to hold the bvh structure. If false then a separate buffer is created to store the */
/** structure and the index buffer (or lack thereof) is retained. This can be used */
/** when the existing index layout is important or groups are being used so a */
/** single BVH hierarchy can be created to improve performance. */
/** default: false */
/** Note: This setting is experimental */
indirect?: boolean
}
export type BvhProps = BVHOptions &
JSX.IntrinsicElements['group'] & {
/**Enabled, default: true */
enabled?: boolean
/** Use .raycastFirst to retrieve hits which is generally faster, default: false */
firstHitOnly?: boolean
}
```
```jsx
```
#### PerformanceMonitor
This component will collect the average fps (frames per second) over time. If after a couple of iterations the averages are below or above a threshold it will trigger onIncline and onDecline callbacks that allow you to respond. Typically you would reduce the quality of your scene, the resolution, effects, the amount of stuff to render, or, increase it if you have enough framerate to fill.
Since this would normally cause ping-ponging between the two callbacks you define upper and lower framerate bounds, as long as you stay within that margin nothing will trigger. Ideally your app should find its way into that margin by gradually altering quality.
```tsx
type PerformanceMonitorProps = {
/** How much time in milliseconds to collect an average fps, 250 */
ms?: number
/** How many interations of averages to collect, 10 */
iterations?: number
/** The percentage of iterations that are matched against the lower and upper bounds, 0.75 */
threshold?: number
/** A function that receive the max device refreshrate to determine lower and upper bounds which create a margin where neither incline nor decline should happen, (refreshrate) => (refreshrate > 90 ? [50, 90] : [50, 60]) */
bounds: (refreshrate: number) => [lower: number, upper: number]
/** How many times it can inline or decline before onFallback is called, Infinity */
flipflops?: number
/** The factor increases and decreases between 0-1, this prop sets the initial value, 0.5 */
factor?: number
/** The step that gets added or subtracted to or from the factor on each incline/decline, 0.1 */
step?: number
/** When performance is higher than the upper bound (good!) */
onIncline?: (api: PerformanceMonitorApi) => void
/** When performance is lower than the upper bound (bad!) */
onDecline?: (api: PerformanceMonitorApi) => void
/** Incline and decline will change the factor, this will trigger when that happened */
onChange?: (api: PerformanceMonitorApi) => void
/** Called after when the number of flipflops is reached, it indicates instability, use the function to set a fixed baseline */
onFallback?: (api: PerformanceMonitorApi) => void
/** Children may use the usePerformanceMonitor hook */
children?: React.ReactNode
}
```
All callbacks give you the following data:
```tsx
type PerformanceMonitorApi = {
/** Current fps */
fps: number
/** Current performance factor, between 0 and 1 */
factor: number
/** Current highest fps, you can use this to determine device refresh rate */
refreshrate: number
/** Fps samples taken over time */
frames: number[]
/** Averages of frames taken over n iterations */
averages: number[]
}
```
A simple example for regulating the resolution. It starts out with 1.5, if the system falls below the bounds it goes to 1, if it's fast enough it goes to 2.
```jsx
function App() {
const [dpr, setDpr] = useState(1.5)
return (
setDpr(2)} onDecline={() => setDpr(1)} />
```
You can also use the `onChange` callback to get notified when the average changes in whichever direction. This allows you to make gradual changes. It gives you a `factor` between 0 and 1, which is increased by incline and decreased by decline. The `factor` is initially 0.5 by default. If your app starts with lowest defaults and gradually increases quality set `factor` to 0. If it starts with highest defaults and decreases quality, set it to 1. If it starts in the middle and can either increase or decrease, set it to 0.5.
The following starts at the highest dpr (2) and clamps the gradual dpr between 0.5 at the lowest and 2 at the highest. If the app is in trouble it will reduce `factor` by `step` until it is either 0 or the app has found its sweet spot above that.
```jsx
const [dpr, setDpr] = useState(2)
return (
setDpr(Math.floor(0.5 + 1.5 * factor, 1))} />
```
If you still experience flip flops despite the bounds you can define a limit of `flipflops`. If it is met `onFallback` will be triggered which typically sets a lowest possible baseline for the app. After the fallback has been called PerformanceMonitor will shut down.
```jsx
setDpr(1)} />
```
PerformanceMonitor can also have children, if you wrap your app in it you get to use `usePerformanceMonitor` which allows individual components down the nested tree to respond to performance changes on their own.
```jsx
;
function Effects() {
usePerformanceMonitor({ onIncline, onDecline, onFallback, onChange })
// ...
}
```
# Portals
#### Hud
Renders a heads-up-display (HUD). Each HUD is a scene on top of the previous. That scene is inside a React `createPortal` and is completely isolated, you can have your own cameras in there, environments, etc. The first HUD (`renderpriotity === 1`) will clear the scene and render the default scene, it needs to be the first to execute! Make sure to be explicit about the `renderpriority` of your HUDs.
```tsx
type HudProps = {
/** Any React node */
children: React.ReactNode
/** Render priority, default: 1 */
renderPriority?: number
}
```
```jsx
{
/* Renders on top of the default scene with a perspective camera */
}
;
{
/* Renders on top of the previous HUD with an orthographic camera */
}
;
```
#### View

Views use gl.scissor to cut the viewport into segments. You tie a view to a tracking div which then controls the position and bounds of the viewport. This allows you to have multiple views with a single, performant canvas. These views will follow their tracking elements, scroll along, resize, etc.
It is advisable to re-connect the event system to a parent that contains both the canvas and the html content.
This ensures that both are accessible/selectable and even allows you to mount controls or other deeper
integrations into your view.
> Note that `@react-three/fiber` newer than `^8.1.0` is required for `View` to work correctly if the
> canvas/react three fiber root is not fullscreen. A warning will be logged if drei is used with older
> versions of `@react-three/fiber`.
```tsx
export type ViewProps = {
/** Root element type, default: div */
as?: string
/** CSS id prop */
id?: string
/** CSS classname prop */
className?: string
/** CSS style prop */
style?: React.CSSProperties
/** If the view is visible or not, default: true */
visible?: boolean
/** Views take over the render loop, optional render index (1 by default) */
index?: number
/** If you know your view is always at the same place set this to 1 to avoid needless getBoundingClientRect overhead */
frames?: number
/** The scene to render, if you leave this undefined it will render the default scene */
children?: React.ReactNode
/** The tracking element, the view will be cut according to its whereabouts
* @deprecated You can use inline Views now, see: https://github.com/pmndrs/drei/pull/1784
*/
track?: React.MutableRefObject
}
export type ViewportProps = { Port: () => React.ReactNode } & React.ForwardRefExoticComponent<
ViewProps & React.RefAttributes
>
```
You can define as many views as you like, directly mix them into your dom graph, right where you want them to appear. `View` is an unstyled HTML DOM element (by default a div, and it takes the same properties as one). Use `View.Port` inside the canvas to output them. The canvas should ideally fill the entire screen with absolute positioning, underneath HTML or on top of it, as you prefer.
```jsx
return (
Html content here
)
```
#### RenderTexture

This component allows you to render a live scene into a texture which you can then apply to a material. The contents of it run inside a portal and are separate from the rest of the canvas, therefore you can have events in there, environment maps, etc.
```tsx
type Props = JSX.IntrinsicElements['texture'] & {
/** Optional width of the texture, defaults to viewport bounds */
width?: number
/** Optional height of the texture, defaults to viewport bounds */
height?: number
/** Optional fbo samples */
samples?: number
/** Optional stencil buffer, defaults to false */
stencilBuffer?: boolean
/** Optional depth buffer, defaults to true */
depthBuffer?: boolean
/** Optional generate mipmaps, defaults to false */
generateMipmaps?: boolean
/** Optional render priority, defaults to 0 */
renderPriority?: number
/** Optional event priority, defaults to 0 */
eventPriority?: number
/** Optional frame count, defaults to Infinity. If you set it to 1, it would only render a single frame, etc */
frames?: number
/** Optional event compute, defaults to undefined */
compute?: (event: any, state: any, previous: any) => false | undefined
/** Children will be rendered into a portal */
children: React.ReactNode
}
```
```jsx
```
#### RenderCubeTexture
This component allows you to render a live scene into a cubetexture which you can then apply to a material, for instance as an environment map (via the envMap property). The contents of it run inside a portal and are separate from the rest of the canvas, therefore you can have events in there, environment maps, etc.
```tsx
export type RenderCubeTextureProps = Omit & {
/** Optional stencil buffer, defaults to false */
stencilBuffer?: boolean
/** Optional depth buffer, defaults to true */
depthBuffer?: boolean
/** Optional generate mipmaps, defaults to false */
generateMipmaps?: boolean
/** Optional render priority, defaults to 0 */
renderPriority?: number
/** Optional event priority, defaults to 0 */
eventPriority?: number
/** Optional frame count, defaults to Infinity. If you set it to 1, it would only render a single frame, etc */
frames?: number
/** Optional event compute, defaults to undefined */
compute?: ComputeFunction
/** Flip cubemap, see https://github.com/mrdoob/three.js/blob/master/src/renderers/WebGLCubeRenderTarget.js */
flip?: boolean
/** Cubemap resolution (for each of the 6 takes), null === full screen resolution, default: 896 */
resolution?: number
/** Children will be rendered into a portal */
children: React.ReactNode
near?: number
far?: number
position?: ReactThreeFiber.Vector3
rotation?: ReactThreeFiber.Euler
scale?: ReactThreeFiber.Vector3
quaternion?: ReactThreeFiber.Quaternion
matrix?: ReactThreeFiber.Matrix4
matrixAutoUpdate?: boolean
}
export type RenderCubeTextureApi = {
scene: THREE.Scene
fbo: THREE.WebGLCubeRenderTarget
camera: THREE.CubeCamera
}
```
```jsx
const api = useRef(null!)
// ...
```
### Fisheye
```tsx
export type FisheyeProps = JSX.IntrinsicElements['mesh'] & {
/** Zoom factor, 0..1, 0 */
zoom?: number
/** Number of segments, 64 */
segments?: number
/** Cubemap resolution (for each of the 6 takes), null === full screen resolution, default: 896 */
resolution?: number
/** Children will be projected into the fisheye */
children: React.ReactNode
/** Optional render priority, defaults to 1 */
renderPriority?: number
}
```
This component will take over system rendering. It portals its children into a cubemap which is then projected onto a sphere. The sphere is rendered out on the screen, filling it. You can lower the resolution to increase performance. Six renders per frame are necessary to construct a full fisheye view, and since each facet of the cubemap only takes a portion of the screen full resolution is not necessary. You can also reduce the amount of segments (resulting in edgier rounds).
```jsx
```
#### Mask


Masks use the stencil buffer to cut out areas of the screen. This is usually cheaper as it doesn't require double renders or createPortal.
```tsx
```
First you need to define a mask, give it the shape that you want.
```jsx
```
Now refer to it with the `useMask` hook and the same id, your content will now be masked out by the geometry defined above.
```jsx
const stencil = useMask(1)
return (
```
You can build compound masks with multiple shapes by re-using an id. You can also use the mask as a normal mesh by providing `colorWrite` and `depthWrite` props.
```jsx
```
Invert masks individually by providing a 2nd boolean argument to the `useMask` hook.
```jsx
const stencil = useMask(1, true)
```
#### MeshPortalMaterial

```tsx
export type PortalProps = JSX.IntrinsicElements['shaderMaterial'] & {
/** Mix the portals own scene with the world scene, 0 = world scene render,
* 0.5 = both scenes render, 1 = portal scene renders, defaults to 0 */
blend?: number
/** Edge fade blur, 0 = no blur (default) */
blur?: number
/** SDF resolution, the smaller the faster is the start-up time (default: 512) */
resolution?: number
/** By default portals use relative coordinates, contents are affects by the local matrix transform */
worldUnits?: boolean
/** Optional event priority, defaults to 0 */
eventPriority?: number
/** Optional render priority, defaults to 0 */
renderPriority?: number
/** Optionally diable events inside the portal, defaults to false */
events?: boolean
}
```
A material that creates a portal into another scene. It is drawn onto the geometry of the mesh that it is applied to. It uses RenderTexture internally, but counteracts the perspective shift of the texture surface, the portals contents are thereby masked by it but otherwise in the same position as if they were in the original scene.
```jsx
```
You can optionally fade or blur the edges of the portal by providing a `blur` prop, do not forget to make the material transparent in that case. It uses SDF flood-fill to determine the shape, you can thereby blur any geometry.
```jsx
```
It is also possible to _enter_ the portal. If blend is 0 your scene will render as usual, if blend is higher it will start to blend the root scene and the portal scene, if blend is 1 it will only render the portal scene. If you put a ref on the material you can transition entering the portal, for instance lerping blend if the camera is close, or on click.
```jsx
```
# Staging
#### Center
[](https://drei.pmnd.rs/?path=/story/staging-center--default-story)

Calculates a boundary box and centers its children accordingly.
```tsx
export type Props = JSX.IntrinsicElements['group'] & {
top?: boolean
right?: boolean
bottom?: boolean
left?: boolean
front?: boolean
back?: boolean
/** Disable all axes */
disable?: boolean
/** Disable x-axis centering */
disableX?: boolean
/** Disable y-axis centering */
disableY?: boolean
/** Disable z-axis centering */
disableZ?: boolean
/** Precision, defaults to true, see https://threejs.org/docs/index.html?q=box3#api/en/math/Box3.setFromObject */
precise?: boolean
/** Callback, fires in the useLayoutEffect phase, after measurement */
onCentered?: (props: OnCenterCallbackProps) => void
}
```
```tsx
type OnCenterCallbackProps = {
/** The next parent above */
parent: THREE.Object3D
/** The outmost container group of the component */
container: THREE.Object3D
width: number
height: number
depth: number
boundingBox: THREE.Box3
boundingSphere: THREE.Sphere
center: THREE.Vector3
verticalAlignment: number
horizontalAlignment: number
depthAlignment: number
}
```
```jsx
```
Optionally you can define `onCentered` which calls you back when contents have been measured. This would allow you to easily scale to fit. The following for instance fits a model to screen height.
```jsx
function ScaledModel() {
const viewport = useThree((state) => state.viewport)
return (
container.scale.setScalar(viewport.height / height)}>
```
#### Resize
[](https://drei.pmnd.rs/?path=/story/staging-resize)

Calculates a boundary box and scales its children so the highest dimension is constrained by 1. NB: proportions are preserved.
```tsx
export type ResizeProps = JSX.IntrinsicElements['group'] & {
/** constrained by width dimension (x axis), undefined */
width?: boolean
/** constrained by height dimension (y axis), undefined */
height?: boolean
/** constrained by depth dimension (z axis), undefined */
depth?: boolean
/** You can optionally pass the Box3, otherwise will be computed, undefined */
box3?: THREE.Box3
/** See https://threejs.org/docs/index.html?q=box3#api/en/math/Box3.setFromObject */
precise?: boolean
}
```
```jsx
```
You can also specify the dimension to be constrained by:
```jsx
```
#### BBAnchor
[](https://drei.vercel.app/?path=/story/misc-bbanchor--bb-anchor-with-html)
A component using AABB (Axis-aligned bounding boxes) to offset children position by specified multipliers (`anchor` property) on each axis. You can use this component to change children positioning in regard of the parent's bounding box, eg. pinning [Html](#html) component to one of the parent's corners. Multipliers determine the offset value based on the `AABB`'s size:
```
childrenAnchor = boundingBoxPosition + (boundingBoxSize * anchor / 2)
```
```jsx
{children}
```
For instance, one could want the Html component to be pinned to `positive x`, `positive y`, and `positive z` corner of a [Box](#shapes) object:
```jsx
Hello world!
```
#### Bounds

Calculates a boundary box and centers the camera accordingly. If you are using camera controls, make sure to pass them the `makeDefault` prop. `fit` fits the current view on first render. `clip` sets the cameras near/far planes. `observe` will trigger on window resize. To control the damping animation, use `maxDuration` to set the animation length in seconds, and `interpolateFunc` to define how the animation changes over time (should be an increasing function in [0, 1] interval, `interpolateFunc(0) === 0`, `interpolateFunc(1) === 1`).
```jsx
const interpolateFunc = (t: number) => 1 - Math.exp(-5 * t) + 0.007 * t // Matches the default Bounds behavior
const interpolateFunc1 = (t: number) => -t * t * t + 2 * t * t // Start smoothly, finish linearly
const interpolateFunc2 = (t: number) => -t * t * t + t * t + t // Start linearly, finish smoothly
```
The Bounds component also acts as a context provider, use the `useBounds` hook to refresh the bounds, fit the camera, clip near/far planes, go to camera orientations or focus objects. `refresh(object?: THREE.Object3D | THREE.Box3)` will recalculate bounds, since this can be expensive only call it when you know the view has changed. `reset` centers the view. `moveTo` changes the camera position. `lookAt` changes the camera orientation, with the respect to up-vector, if specified. `clip` sets the cameras near/far planes. `fit` centers the view for non-orthographic cameras (same as reset) or zooms the view for orthographic cameras.
```jsx
function Foo() {
const bounds = useBounds()
useEffect(() => {
// Calculate scene bounds
bounds.refresh().clip().fit()
// Or, focus a specific object or box3
// bounds.refresh(ref.current).clip().fit()
// bounds.refresh(new THREE.Box3()).clip().fit()
// Or, move the camera to a specific position, and change its orientation
// bounds.moveTo([0, 10, 10]).lookAt({ target: [5, 5, 0], up: [0, -1, 0] })
// For orthographic cameras, reset has to be used to center the view (fit would only change its zoom to match the bounding box)
// bounds.refresh().reset().clip().fit()
}, [...])
}
```
#### CameraShake
[](https://drei.pmnd.rs/?path=/story/staging-camerashake--camera-shake-story)
A component for applying a configurable camera shake effect. Currently only supports rotational camera shake. Pass a ref to recieve the `ShakeController` API.
If you use shake in combination with controls make sure to set the `makeDefault` prop on your controls, in that case you do not have to pass them via the `controls` prop.
```js
const config = {
maxYaw: 0.1, // Max amount camera can yaw in either direction
maxPitch: 0.1, // Max amount camera can pitch in either direction
maxRoll: 0.1, // Max amount camera can roll in either direction
yawFrequency: 0.1, // Frequency of the the yaw rotation
pitchFrequency: 0.1, // Frequency of the pitch rotation
rollFrequency: 0.1, // Frequency of the roll rotation
intensity: 1, // initial intensity of the shake
decay: false, // should the intensity decay over time
decayRate: 0.65, // if decay = true this is the rate at which intensity will reduce at
controls: undefined, // if using orbit controls, pass a ref here so we can update the rotation
}
```
```ts
interface ShakeController {
getIntensity: () => number
setIntensity: (val: number) => void
}
```
#### Float
This component makes its contents float or hover.
```js
```
#### Stage
[](https://drei.pmnd.rs/?path=/story/staging-stage--stage-st)
Creates a "stage" with proper studio lighting, 0/0/0 top-centred, model-shadows, ground-shadows and optional zoom to fit. Make sure to set `makeDefault` on your controls when `adjustCamera` is true!
```tsx
type StageProps = {
/** Lighting setup, default: "rembrandt" */
preset?:
| 'rembrandt'
| 'portrait'
| 'upfront'
| 'soft'
| { main: [x: number, y: number, z: number]; fill: [x: number, y: number, z: number] }
/** Controls the ground shadows, default: "contact" */
shadows?: boolean | 'contact' | 'accumulative' | StageShadows
/** Optionally wraps and thereby centers the models using , can also be a margin, default: true */
adjustCamera?: boolean | number
/** The default environment, default: "city" */
environment?: PresetsType | Partial
/** The lighting intensity, default: 0.5 */
intensity?: number
/** To adjust centering, default: undefined */
center?: Partial
}
type StageShadows = Partial &
Partial &
Partial & {
type: 'contact' | 'accumulative'
/** Shadow plane offset, default: 0 */
offset?: number
/** Shadow bias, default: -0.0001 */
bias?: number
/** Shadow normal bias, default: 0 */
normalBias?: number
/** Shadow map size, default: 1024 */
size?: number
}
```
By default it gives you contact shadows and auto-centering.
```jsx
```
For a little more realistic results enable accumulative shadows, which requires that the canvas, and models, can handle shadows.
```jsx
```
#### Backdrop
A curved plane, like a studio backdrop. This is for presentational purposes, to break up light and shadows more interestingly.
```jsx
```
#### Shadow
[](https://drei.vercel.app/?path=/story/misc-shadow--shadow-st)
A cheap canvas-texture-based circular gradient.
```jsx
```
#### Caustics

Caustics are swirls of light that appear when light passes through transmissive surfaces. This component uses a raymarching technique to project caustics onto a catcher plane. It is based on [github/N8python/caustics](https://github.com/N8python/caustics).
```tsx
type CausticsProps = JSX.IntrinsicElements['group'] & {
/** How many frames it will render, set it to Infinity for runtime, default: 1 */
frames?: number
/** Enables visual cues to help you stage your scene, default: false */
debug?: boolean
/** Will display caustics only and skip the models, default: false */
causticsOnly: boolean
/** Will include back faces and enable the backsideIOR prop, default: false */
backside: boolean
/** The IOR refraction index, default: 1.1 */
ior?: number
/** The IOR refraction index for back faces (only available when backside is enabled), default: 1.1 */
backsideIOR?: number
/** The texel size, default: 0.3125 */
worldRadius?: number
/** Intensity of the prjected caustics, default: 0.05 */
intensity?: number
/** Caustics color, default: white */
color?: ReactThreeFiber.Color
/** Buffer resolution, default: 2048 */
resolution?: number
/** Camera position, it will point towards the contents bounds center, default: [5, 5, 5] */
lightSource?: [x: number, y: number, z: number] | React.MutableRefObject
}
```
It will create a transparent plane that blends the caustics of the objects it receives into your scene. It will only render once and not take resources any longer!
Make sure to use the `debug` flag to help you stage your contents. Like ContactShadows and AccumulativeShadows the plane faces Y up. It is recommended to use [leva](https://github.com/pmndrs/leva) to configue the props above as some can be micro fractional depending on the models (intensity, worldRadius, ior and backsideIOR especially).
```jsx
```
Sometimes you want to combine caustics for even better visuals, or if you want to emulate multiple lightsources. Use the `causticsOnly` flag in such cases and it will use the model inside only for calculations. Since all loaders in Fiber should be cached there is no expense or memory overhead doing this.
```jsx
```
The light source can either be defined by prop or by reference. Use the latter if you want to control the light source, for instance in order to move or animate it. Runtime caustics with frames set to `Infinity`, a low resolution and no backside can be feasible.
```jsx
const lightSource = useRef()
```
#### ContactShadows
[](https://drei.pmnd.rs/?path=/story/staging-contactshadows--contact-shadow-st)
A [contact shadow](https://threejs.org/examples/#webgl_shadow_contact) implementation, facing upwards (positive Y) by default. `scale` can be a positive number or a 2D array `[x: number, y: number]`.
```jsx
```
Since this is a rather expensive effect you can limit the amount of frames it renders when your objects are static. For instance making it render only once:
```jsx
```
### RandomizedLight
A randomized light that internally runs multiple lights and jiggles them. See below, you would normally pair it with `AccumulativeShadows`. This component is context aware, paired with AccumulativeShadows it will take the number of frames from its parent.
```tsx
type RandomizedLightProps = JSX.IntrinsicElements['group'] & {
/** How many frames it will jiggle the lights, 1.
* Frames is context aware, if a provider like AccumulativeShadows exists, frames will be taken from there! */
frames?: number
/** Light position, [0, 0, 0] */
position?: [x: number, y: number, z: number]
/** Radius of the jiggle, higher values make softer light, 5 */
radius?: number
/** Amount of lights, 8 */
amount?: number
/** Light intensity, 1 */
intensity?: number
/** Ambient occlusion, lower values mean less AO, hight more, you can mix AO and directional light, 0.5 */
ambient?: number
/** If the lights cast shadows, this is true by default */
castShadow?: boolean
/** Default shadow bias, 0 */
bias?: number
/** Default map size, 512 */
mapSize?: number
/** Default size of the shadow camera, 10 */
size?: number
/** Default shadow camera near, 0.5 */
near?: number
/** Default shadow camera far, 500 */
far?: number
}
```
```jsx
```
#### Refernce api
```jsx
interface AccumulativeLightContext {
/** Jiggles the lights */
update: () => void;
}
```
### AccumulativeShadows
A planar, Y-up oriented shadow-catcher that can accumulate into soft shadows and has zero performance impact after all frames have accumulated. It can be temporal, it will accumulate over time, or instantaneous, which might be expensive depending on how many frames you render.
You must pair it with lightsources (and scene objects!) that cast shadows, which go into the children slot. Best use it with the `RandomizedLight` component, which jiggles a set of lights around, creating realistic raycast-like shadows and ambient occlusion.
```tsx
type AccumulativeShadowsProps = JSX.IntrinsicElements['group'] & {
/** How many frames it can render, more yields cleaner results but takes more time, 40 */
frames?: number
/** If frames === Infinity blend controls the refresh ratio, 100 */
blend?: number
/** Can limit the amount of frames rendered if frames === Infinity, usually to get some performance back once a movable scene has settled, Infinity */
limit?: number
/** Scale of the plane, */
scale?: number
/** Temporal accumulates shadows over time which is more performant but has a visual regression over instant results, false */
temporal?: false
/** Opacity of the plane, 1 */
opacity?: number
/** Discards alpha pixels, 0.65 */
alphaTest?: number
/** Shadow color, black */
color?: string
/** Colorblend, how much colors turn to black, 0 is black, 2 */
colorBlend?: number
/** Buffer resolution, 1024 */
resolution?: number
/** Children should be randomized lights shining from different angles to emulate raycasting */
children?: React.ReactNode
}
```
```jsx
```
##### Reference api
```tsx
interface AccumulativeContext {
/** Returns the plane geometry onto which the shadow is cast */
getMesh: () => THREE.Mesh
/** Resets the buffers, starting from scratch */
reset: () => void
/** Updates the lightmap for a number of frames accumulartively */
update: (frames?: number) => void
/** Allows children to subscribe. AccumulativeShadows will call child.update() in its own update function */
setLights: React.Dispatch>
}
```
#### SpotLight
A Volumetric spotlight.
```jsx
```
Optionally you can provide a depth-buffer which converts the spotlight into a soft particle.
```jsx
function Foo() {
const depthBuffer = useDepthBuffer()
return
```
#### SpotLightShadow
[](https://drei.pmnd.rs/?path=/story/staging-spotlight--spotlight-shadows-st)
A shadow caster that can help cast shadows of different patterns (textures) onto the scene.
```jsx
```
An optional `shader` prop lets you run a custom shader to modify/add effects to your shadow texture. The shader provides the following uniforms and varyings.
| Type | Name | Notes |
| ------------------- | ------------ | -------------------------------------- |
| `varying vec2` | `vUv` | UVs of the shadow casting plane |
| `uniform sampler2D` | `uShadowMap` | The texture provided to the `map` prop |
| `uniform float` | `uTime` | Current time |
Treat the output of the shader like an alpha map where `1` is opaque and `0` is transparent.
```glsl
gl_FragColor = vec4(vec3(1.), 1.); // Opaque
gl_FragColor = vec4(vec3(0.), 1.); // Transparent
```
#### Environment
[](https://drei.pmnd.rs/?path=/story/staging-environment--environment-story)


Sets up a global cubemap, which affects the default `scene.environment`, and optionally `scene.background`, unless a custom scene has been passed. A selection of [presets](src/helpers/environment-assets.ts) from [HDRI Haven](https://hdrihaven.com/) are available for convenience.
```jsx
```
The simplest way to use it is to provide a preset (linking towards common HDRI Haven assets hosted on github). 👉 Note: `preset` property is not meant to be used in production environments and may fail as it relies on CDNs.
Current presets are
- apartment: 'lebombo_1k.hdr'
- city: 'potsdamer_platz_1k.hdr'
- dawn: 'kiara_1_dawn_1k.hdr'
- forest: 'forest_slope_1k.hdr'
- lobby: 'st_fagans_interior_1k.hdr'
- night: 'dikhololo_night_1k.hdr'
- park: 'rooitou_park_1k.hdr'
- studio: 'studio_small_03_1k.hdr'
- sunset: 'venice_sunset_1k.hdr'
- warehouse: 'empty_warehouse_01_1k.hdr'
```jsx
```
Otherwise use the files property. It will use RGBELoader for _.hdr, EXRLoader for _.exr, HDRJPGLoader for [gainmap](https://github.com/MONOGRID/gainmap-js) _.jpg, GainMapLoader for gainmap _.webp, CubeTextureLoader for an array of images. Of all these, gainmap has the smallest footprint.
```jsx
```
You can also use [@pmndrs/assets](https://github.com/pmndrs/assets) to easily self host common assets. Always use dynamic imports to avoid making this part of your main bundle.
```jsx
import { suspend } from 'suspend-react'
const city = import('@pmndrs/assets/hdri/city.exr').then((module) => module.default)
```
If you already have a cube texture you can pass it directly:
```jsx
{(texture) => }
```
If you provide children you can even render a custom environment. It will render the contents into an off-buffer and film a single frame with a cube camera (whose props you can configure: near=1, far=1000, resolution=256).
```jsx
```
You can even mix a generic HDRI environment into a custom one with either the `preset` or the `files` prop.
```jsx
return (
```
Declarative environment content can also animate with the `frames` prop, the envmap can be live. Give it a low resolution and this will happen at little cost
```jsx
return (
```
Environment can also be ground projected, that is, put your model on the "ground" within the environment map.
```jsx
```
You can provide optional options to configure this projecion.
```jsx
```
#### Lightformer
This component draws flat rectangles, circles or rings, mimicking the look of a light-former. You can set the output `intensity`, which will effect emissiveness once you put it into an HDRI ``, where it mostly belong. It will act like a real light without the expense, you can have as many as you want.
```jsx
```
#### Sky
[](https://drei.pmnd.rs/?path=/story/staging-sky--sky-st)
Adds a [sky](https://threejs.org/examples/#webgl_shaders_sky) to your scene.
```jsx
```
#### Stars
[](https://drei.pmnd.rs/?path=/story/staging-stars--stars-st)
Adds a blinking shader-based starfield to your scene.
```jsx
```
#### Sparkles
Floating, glowing particles.
```tsx
```
Custom shaders are allowed. Sparkles will use the following attributes and uniforms:
```glsl
attribute float size;
attribute float speed;
attribute float opacity;
attribute vec3 noise;
attribute vec3 color;
```
```json
{ "time": 0, "pixelRatio": 1 }
```
#### Cloud
[](https://drei.pmnd.rs/?path=/story/staging-cloud--cloud-st) 

Particle based cloud.
```tsx
type CloudsProps = JSX.IntrinsicElements['group'] & {
/** Optional cloud texture, points to a default hosted on rawcdn.githack */
texture?: string
/** Maximum number of segments, default: 200 (make this tight to save memory!) */
limit?: number
/** How many segments it renders, default: undefined (all) */
range?: number
/** Which material it will override, default: MeshLambertMaterial */
material?: typeof Material
/** Frustum culling, default: true */
frustumCulled?: boolean
}
type CloudProps = JSX.IntrinsicElements['group'] & {
/** A seeded random will show the same cloud consistently, default: Math.random() */
seed?: number
/** How many segments or particles the cloud will have, default: 20 */
segments?: number
/** The box3 bounds of the cloud, default: [5, 1, 1] */
bounds?: ReactThreeFiber.Vector3
/** How to arrange segment volume inside the bounds, default: inside (cloud are smaller at the edges) */
concentrate?: 'random' | 'inside' | 'outside'
/** The general scale of the segments */
scale?: ReactThreeFiber.Vector3
/** The volume/thickness of the segments, default: 6 */
volume?: number
/** The smallest volume when distributing clouds, default: 0.25 */
smallestVolume?: number
/** An optional function that allows you to distribute points and volumes (overriding all settings), default: null
* Both point and volume are factors, point x/y/z can be between -1 and 1, volume between 0 and 1 */
distribute?: (cloud: CloudState, index: number) => { point: Vector3; volume?: number }
/** Growth factor for animated clouds (speed > 0), default: 4 */
growth?: number
/** Animation factor, default: 0 */
speed?: number
/** Camera distance until the segments will fade, default: 10 */
fade?: number
/** Opacity, default: 1 */
opacity?: number
/** Color, default: white */
color?: ReactThreeFiber.Color
}
```
Use the `` provider to glob all clouds into a single, instanced draw call.
```jsx
```
#### useEnvironment
A convenience hook to load an environment map. The props are the same as on the `` component.
```tsx
export type EnvironmentLoaderProps = {
files?: string | string[]
path?: string
preset?: PresetsType
extensions?: (loader: Loader) => void
encoding?: TextureEncoding
```
You can use it without properties, which will default to px, nx, py, ny, pz, nz as \*.png files inside your /public directory.
```jsx
const cubeTexture = useEnvironment()
```
Or you can specificy from where to load the files.
```jsx
const presetTexture = useEnvironment({ preset: 'city' })
const rgbeTexture = useEnvironment({ files: 'model.hdr' })
const cubeTexture = useEnvironment({ files: ['px', 'nx', 'py', 'ny', 'pz', 'nz'].map((n) => `${n}.png`) })
```
#### useMatcapTexture
[](https://drei.pmnd.rs/?path=/story/staging-usematcaptexture--use-matcap-texture-st) 
Loads matcap textures from this repository: https://github.com/emmelleppi/matcaps
(It is a fork of this repository: https://github.com/nidorx/matcaps)
👉 Note: `useMatcapTexture` hook is not meant to be used in production environments as it relies on third-party CDN.
```jsx
const [matcap, url] = useMatcapTexture(
0, // index of the matcap texture https://github.com/emmelleppi/matcaps/blob/master/matcap-list.json
1024 // size of the texture ( 64, 128, 256, 512, 1024 )
)
return (
...
...
)
```
👉 You can also use the exact name of the matcap texture, like so:
```jsx
const [matcap] = useMatcapTexture('3E2335_D36A1B_8E4A2E_2842A5')
```
👉 Use the `url` to download the texture when you are ready for production!
#### useNormalTexture
[](https://drei.pmnd.rs/?path=/story/staging-usenormaltexture--use-normal-texture-st) 
Loads normal textures from this repository: https://github.com/emmelleppi/normal-maps
👉 Note: `useNormalTexture` hook is not meant to be used in production environments as it relies on third-party CDN.
```jsx
const [normalMap, url] = useNormalTexture(
1, // index of the normal texture - https://github.com/emmelleppi/normal-maps/blob/master/normals.json
// second argument is texture attributes
{
offset: [0, 0],
repeat: [normRepeat, normRepeat],
anisotropy: 8
}
)
return (
...
...
)
```
#### ShadowAlpha
Makes an object's shadow respect its opacity and alphaMap.
```jsx
```
> Note: This component uses Screendoor transparency using a dither pattern. This pattern is notacible when the camera gets close to the shadow.