Ecosyste.ms: Awesome
An open API service indexing awesome lists of open source software.
https://github.com/aws/aws-iot-device-sdk-js
SDK for connecting to AWS IoT from a device using JavaScript/Node.js
https://github.com/aws/aws-iot-device-sdk-js
Last synced: about 2 months ago
JSON representation
SDK for connecting to AWS IoT from a device using JavaScript/Node.js
- Host: GitHub
- URL: https://github.com/aws/aws-iot-device-sdk-js
- Owner: aws
- License: apache-2.0
- Created: 2015-09-30T18:52:35.000Z (over 8 years ago)
- Default Branch: master
- Last Pushed: 2024-03-15T16:26:58.000Z (3 months ago)
- Last Synced: 2024-04-18T08:09:02.065Z (2 months ago)
- Language: JavaScript
- Homepage:
- Size: 461 KB
- Stars: 962
- Watchers: 75
- Forks: 381
- Open Issues: 1
-
Metadata Files:
- Readme: README.md
- Changelog: CHANGELOG.md
- License: LICENSE.txt
Lists
- awesome-aws - Repo for JavaScript :fire::fire::fire:
- awesome-stars - aws-iot-device-sdk-js
- awesome-aws - Repo for JavaScript :fire::fire::fire:
- awesome-aws - Repo for JavaScript :fire::fire::fire:
README
## New Version Available
A new AWS IoT Device SDK is [now available](https://github.com/awslabs/aws-iot-device-sdk-js-v2). It is a complete rework, built to improve reliability, performance, and security. We invite your feedback!
This SDK will no longer receive feature updates, but will receive security updates.
# AWS IoT SDK for JavaScript
The aws-iot-device-sdk.js package allows developers to write JavaScript
applications which access the AWS IoT Platform via [MQTT or MQTT over the Secure WebSocket Protocol](http://docs.aws.amazon.com/iot/latest/developerguide/protocols.html). It can be used in Node.js environments as well as in browser applications.
* [Overview](#overview)
* [Installation](#install)
* [Mac-Only TLS Behavior](#mac-tls-warning)
* [Examples](#examples)
* [API Documentation](#api)
* [Connection Types](#connections)
* [Example Programs](#programs)
* [Browser Applications](#browser)
* [Troubleshooting](#troubleshooting)
* [Unit Tests](#unittests)
* [License](#license)
* [Support](#support)
## Overview
This document provides instructions on how to install and configure the AWS
IoT device SDK for JavaScript, and includes examples demonstrating use of the
SDK APIs.
### MQTT Connection
This package is built on top of [mqtt.js](https://github.com/mqttjs/MQTT.js/blob/master/README.md) and provides three classes: 'device', 'thingShadow' and 'jobs'. The 'device' class wraps [mqtt.js](https://github.com/mqttjs/MQTT.js/blob/master/README.md) to provide a
secure connection to the AWS IoT platform and expose the [mqtt.js](https://github.com/mqttjs/MQTT.js/blob/master/README.md) interfaces upward. It provides features to simplify handling of intermittent connections, including progressive backoff retries, automatic re-subscription upon connection, and queued offline publishing with configurable drain rate.
### Collection of Metrics
Beginning with Release v2.2.0 of the SDK, AWS collects usage metrics indicating which language and version of the SDK is being used. This allows us to prioritize our resources towards addressing issues faster in SDKs that see the most and is an important data point. However, we do understand that not all customers would want to report this data by default. In that case, the sending of usage metrics can be easily disabled by set options.enableMetrics to false.
### Thing Shadows
The 'thingShadow' class implements additional functionality for accessing Thing Shadows via the AWS IoT
API; the thingShadow class allows devices to update, be notified of changes to,
get the current state of, or delete Thing Shadows from AWS IoT. Thing
Shadows allow applications and devices to synchronize their state on the AWS IoT platform.
For example, a remote device can update its Thing Shadow in AWS IoT, allowing
a user to view the device's last reported state via a mobile app. The user
can also update the device's Thing Shadow in AWS IoT and the remote device
will synchronize with the new state. The 'thingShadow' class supports multiple
Thing Shadows per mqtt connection and allows pass-through of non-Thing-Shadow
topics and mqtt events.
### Jobs
The 'jobs' class implements functionality to interact with the AWS IoT Jobs service. The
IoT Job service manages deployment of IoT fleet wide tasks such as device software/firmware
deployments and updates, rotation of security certificates, device reboots, and custom device
specific management tasks.
Included in this package is an example 'agent'. The agent can be used either as a stand-alone
program to manage installation and maintenance of files and other running processes or it can
be incorporated into a customized agent to meet specific application needs.
**NOTE:** AWS IoT Node.js SDK will only support Node version 8.17 or above.
You can check your node version by
```sh
node -v
```
Installing with npm:
```sh
npm install aws-iot-device-sdk
```
Installing from github:
```sh
git clone https://github.com/aws/aws-iot-device-sdk-js.git
cd aws-iot-device-sdk-js
npm install
```
Please note that on Mac, once a private key is used with a certificate,
that certificate-key pair is imported into the Mac Keychain.
All subsequent uses of that certificate will use the stored private key and
ignore anything passed in programmatically.
### Device Class
```js
// Copyright Amazon.com, Inc. or its affiliates. All Rights Reserved.
// SPDX-License-Identifier: MIT-0
var awsIot = require('aws-iot-device-sdk');
//
// Replace the values of '' and ''
// with a unique client identifier and custom host endpoint provided in AWS IoT.
// NOTE: client identifiers must be unique within your AWS account; if a client attempts
// to connect with a client identifier which is already in use, the existing
// connection will be terminated.
//
var device = awsIot.device({
keyPath: ,
certPath: ,
caPath: ,
clientId: ,
host:
});
//
// Device is an instance returned by mqtt.Client(), see mqtt.js for full
// documentation.
//
device
.on('connect', function() {
console.log('connect');
device.subscribe('topic_1');
device.publish('topic_2', JSON.stringify({ test_data: 1}));
});
device
.on('message', function(topic, payload) {
console.log('message', topic, payload.toString());
});
```
### Thing Shadow Class
```js
// Copyright Amazon.com, Inc. or its affiliates. All Rights Reserved.
// SPDX-License-Identifier: MIT-0
var awsIot = require('aws-iot-device-sdk');
//
// Replace the values of '' and ''
// with a unique client identifier and custom host endpoint provided in AWS IoT cloud
// NOTE: client identifiers must be unique within your AWS account; if a client attempts
// to connect with a client identifier which is already in use, the existing
// connection will be terminated.
//
var thingShadows = awsIot.thingShadow({
keyPath: ,
certPath: ,
caPath: ,
clientId: ,
host:
});
//
// Client token value returned from thingShadows.update() operation
//
var clientTokenUpdate;
//
// Simulated device values
//
var rval = 187;
var gval = 114;
var bval = 222;
thingShadows.on('connect', function() {
//
// After connecting to the AWS IoT platform, register interest in the
// Thing Shadow named 'RGBLedLamp'.
//
thingShadows.register( 'RGBLedLamp', {}, function() {
// Once registration is complete, update the Thing Shadow named
// 'RGBLedLamp' with the latest device state and save the clientToken
// so that we can correlate it with status or timeout events.
//
// Thing shadow state
//
var rgbLedLampState = {"state":{"desired":{"red":rval,"green":gval,"blue":bval}}};
clientTokenUpdate = thingShadows.update('RGBLedLamp', rgbLedLampState );
//
// The update method returns a clientToken; if non-null, this value will
// be sent in a 'status' event when the operation completes, allowing you
// to know whether or not the update was successful. If the update method
// returns null, it's because another operation is currently in progress and
// you'll need to wait until it completes (or times out) before updating the
// shadow.
//
if (clientTokenUpdate === null)
{
console.log('update shadow failed, operation still in progress');
}
});
});
thingShadows.on('status',
function(thingName, stat, clientToken, stateObject) {
console.log('received '+stat+' on '+thingName+': '+
JSON.stringify(stateObject));
//
// These events report the status of update(), get(), and delete()
// calls. The clientToken value associated with the event will have
// the same value which was returned in an earlier call to get(),
// update(), or delete(). Use status events to keep track of the
// status of shadow operations.
//
});
thingShadows.on('delta',
function(thingName, stateObject) {
console.log('received delta on '+thingName+': '+
JSON.stringify(stateObject));
});
thingShadows.on('timeout',
function(thingName, clientToken) {
console.log('received timeout on '+thingName+
' with token: '+ clientToken);
//
// In the event that a shadow operation times out, you'll receive
// one of these events. The clientToken value associated with the
// event will have the same value which was returned in an earlier
// call to get(), update(), or delete().
//
});
```
### Jobs Class
```js
// Copyright Amazon.com, Inc. or its affiliates. All Rights Reserved.
// SPDX-License-Identifier: MIT-0
var awsIot = require('aws-iot-device-sdk');
//
// Replace the values of '' and ''
// with a unique client identifier and custom host endpoint provided in AWS IoT cloud
// NOTE: client identifiers must be unique within your AWS account; if a client attempts
// to connect with a client identifier which is already in use, the existing
// connection will be terminated.
//
var jobs = awsIot.jobs({
keyPath: ,
certPath: ,
caPath: ,
clientId: ,
host:
});
//
// Jobs is built on top of awsIot.device and inherits all of the same functionality.
//
jobs
.on('connect', function() {
console.log('connect');
device.subscribe('topic_1');
device.publish('topic_2', JSON.stringify({ test_data: 1}));
});
jobs
.on('message', function(topic, payload) {
console.log('message', topic, payload.toString());
});
//
// To subscribe to job execution events call the subscribeToJobs method which takes
// a callback that will be invoked when a job execution is available or an error
// occurs. The job object passed to the callback contains information about the job
// execution and methods for updating the job execution status. Details covered
// in the API documentation below.
//
jobs.subscribeToJobs(thingName, function(err, job) {
if (isUndefined(err)) {
console.log('default job handler invoked, jobId: ' + job.id.toString());
console.log('job document: ' + job.document);
}
else {
console.error(err);
}
});
jobs.subscribeToJobs(thingName, 'customJob', function(err, job) {
if (isUndefined(err)) {
console.log('customJob operation handler invoked, jobId: ' + job.id.toString());
console.log('job document: ' + job.document);
}
else {
console.error(err);
}
});
//
// After calling subscribeToJobs for each operation on a particular thing call
// startJobNotifications to cause any existing queued job executions for the given
// thing to be published to the appropriate subscribeToJobs handler. Only needs
// to be called once per thing.
//
jobs.startJobNotifications(thingName, function(err) {
if (isUndefined(err)) {
console.log('job notifications initiated for thing: ' + thingName);
}
else {
console.error(err);
}
});
```
* awsIot.device()
* awsIot.thingShadow()
* awsIot.jobs()
* awsIot.thingShadow#register()
* awsIot.thingShadow#unregister()
* awsIot.thingShadow#update()
* awsIot.thingShadow#get()
* awsIot.thingShadow#delete()
* awsIot.thingShadow#publish()
* awsIot.thingShadow#subscribe()
* awsIot.thingShadow#unsubscribe()
* awsIot.thingShadow#end()
* awsIot.jobs#subscribeToJobs()
* awsIot.jobs#unsubscribeFromJobs()
* awsIot.jobs#startJobNotifications()
* job
* job#document
* job#id
* job#operation
* job#status
* job#inProgress()
* job#failed()
* job#succeeded()
-------------------------------------------------------
### awsIot.device(options)
Returns a wrapper for the [mqtt.Client()](https://github.com/mqttjs/MQTT.js/blob/master/README.md#client)
class, configured for a TLS connection with the AWS IoT platform and with
arguments as specified in `options`. The AWSIoT-specific arguments are as
follows:
* `host`: the AWS IoT endpoint you will use to connect
* `clientId`: the client ID you will use to connect to AWS IoT
* `certPath`: path of the client certificate file
* `keyPath`: path of the private key file associated with the client certificate
* `caPath`: path of your CA certificate file
* `clientCert`: same as `certPath`, but can also accept a buffer containing client certificate data
* `privateKey`: same as `keyPath`, but can also accept a buffer containing private key data
* `caCert`: same as `caPath`, but can also accept a buffer containing CA certificate data
* `autoResubscribe`: set to 'true' to automatically re-subscribe to topics after reconnection (default 'true')
* `offlineQueueing`: set to 'true' to automatically queue published messages while offline (default 'true')
* `offlineQueueMaxSize`: enforce a maximum size for the offline message queue (default 0, e.g. no maximum)
* `offlineQueueDropBehavior`: set to 'oldest' or 'newest' to define drop behavior on a full queue when offlineQueueMaxSize > 0
* `drainTimeMs`: the minimum time in milliseconds between publishes when draining after reconnection (default 250)
* `baseReconnectTimeMs`: the base reconnection time in milliseconds (default 1000)
* `maximumReconnectTimeMs`: the maximum reconnection time in milliseconds (default 128000)
* `minimumConnectionTimeMs`: the minimum time in milliseconds that a connection must be maintained in order to be considered stable (default 20000)
* `protocol`: the connection type, either 'mqtts' (default), 'wss' (WebSocket/TLS), or 'wss-custom-auth' (WebSocket/TLS with custom authentication). Note that when set to 'wss', values must be provided for the Access Key ID and Secret Key in either the following options or in environment variables as specified in [WebSocket Configuration](#websockets). When set to 'wss-custom-auth', valid headers must be provided as specified in [Custom Auth](#custom-auth)
* `websocketOptions`: if `protocol` is set to 'wss', you can use this parameter to pass additional options to the underlying WebSocket object; these options are documented [here](https://github.com/websockets/ws/blob/master/doc/ws.md#class-wswebsocket).
* `filename`: used to load credentials from the file different than the default location when `protocol` is set to 'wss'. Default value is '~/.aws/credentials'
* `profile`: used to specify which credential profile to be used when `protocol` is set to 'wss'. Default value is 'default'
* `accessKeyId`: used to specify the Access Key ID when `protocol` is set to 'wss'. Overrides the environment variable `AWS_ACCESS_KEY_ID` and `AWS_ACCESS_KEY_ID` from `filename` if set.
* `secretKey`: used to specify the Secret Key when `protocol` is set to 'wss'. Overrides the environment variable `AWS_SECRET_ACCESS_KEY`and `AWS_SECRET_ACCESS_KEY` from `filename` if set.
* `sessionToken`: (required when authenticating via Cognito, optional otherwise) used to specify the Session Token when `protocol` is set to 'wss'. Overrides the environment variable `AWS_SESSION_TOKEN` if set.
* `region`: used to specify AWS account region (e.g. 'us-east-1') when `protocol` is set to `wss`. If undefined, a value is derived from `host`.
* `customAuthHeaders`: used to specify your custom authorization headers when `protocol` is set to 'wss-custom-auth'. The fields 'X-Amz-CustomAuthorizer-Name', 'X-Amz-CustomAuthorizer-Signature', and the field for your token name are required.
* `servername`: used for SNI. If undefined, a value is derived from `host`.
* `port`: used to specify which port to connect to. If undefined, 443 or 8883 will be chosen depending on `protocol`.
* `customAuthQueryString`: used to specify the token credentials in a query string for custom authorization when `protocol` is set to `wss-custom-auth`. More info can be found [here](https://docs.aws.amazon.com/iot/latest/developerguide/custom-auth.html#custom-auth-websockets).
* `keepalive`: used to specify the time interval for each ping request. Default is set to 300 seconds to connect to AWS IoT.
* `enableMetrics`: used to report SDK version usage metrics. It is set to true by default. To disable metrics collection, set value to false.
* `debug`: set to 'true' for verbose logging (default 'false').
All certificates and keys must be in PEM format.
`options` also contains arguments specific to mqtt. See [the mqtt client documentation]
(https://github.com/mqttjs/MQTT.js/blob/master/README.md#client) for details
of these arguments. Note, AWS IoT doesn't support retained messages; setting `retain` flag to
'true' for message publishing, including Last Will and Testament messages, will result in
connection termination. For AWS IoT protocol specifics, please visit [here](http://docs.aws.amazon.com/iot/latest/developerguide/protocols.html).
Supports all events emitted by the [mqtt.Client()](https://github.com/mqttjs/MQTT.js/blob/master/README.md#client) class.
### awsIot.device#updateWebSocketCredentials(accessKeyId, secretKey, sessionToken, expiration)
Update the credentials set used to authenticate via WebSocket/SigV4. This method is designed to be invoked during the callback of the [getCredentialsForIdentity method](http://docs.aws.amazon.com/AWSJavaScriptSDK/latest/AWS/CognitoIdentity.html#getCredentialsForIdentity-property) in the [AWS SDK for JavaScript](http://docs.aws.amazon.com/AWSJavaScriptSDK/guide/index.html).
* `accessKeyId`: the latest Access Key to use when connecting via WebSocket/SigV4
* `secretKey`: the latest Secret Key to use when connecting via WebSocket/SigV4
* `sessionToken`: the latest Session Token to use when connecting via WebSocket/SigV4
* `expiration`: the time this credentials set will expire
-------------------------------------------------------
### awsIot.thingShadow(deviceOptions, thingShadowOptions)
The `thingShadow` class wraps an instance of the `device` class with additional
functionality to operate on Thing Shadows via the AWS IoT API. The
arguments in `deviceOptions` include all those in the [device class](#device).
thingShadowOptions has the addition of the following arguments specific to the `thingShadow` class:
* `operationTimeout`: the timeout for thing operations (default 10 seconds)
Supports all events emitted by the [mqtt.Client()](https://github.com/mqttjs/MQTT.js/blob/master/README.md#client) class; however, the semantics for the
`message` event are slightly different and additional events are available
as described below:
### Event `'message'`
`function(topic, message) {}`
Emitted when a message is received on a topic not related to any Thing Shadows:
* `topic` topic of the received packet
* `message` payload of the received packet
### Event `'status'`
`function(thingName, stat, clientToken, stateObject) {}`
Emitted when an operation `update|get|delete` completes.
* `thingName` name of the Thing Shadow for which the operation has completed
* `stat` status of the operation `accepted|rejected`
* `clientToken` the operation's clientToken
* `stateObject` the stateObject returned for the operation
Applications can use clientToken values to correlate status events with the
operations that they are associated with by saving the clientTokens returned
from each operation.
### Event `'delta'`
`function(thingName, stateObject) {}`
Emitted when a delta has been received for a registered Thing Shadow.
* `thingName` name of the Thing Shadow that has received a delta
* `stateObject` the stateObject returned for the operation
### Event `'foreignStateChange'`
`function(thingName, operation, stateObject) {}`
Emitted when a different client's update or delete operation is accepted on
the shadow.
* `thingName` name of the Thing Shadow for which the operation has completed
* `operation` operation performed by the foreign client `update|delete`
* `stateObject` the stateObject returned for the operation
This event allows an application to be aware of successful update or
delete operations performed by different clients.
### Event `'timeout'`
`function(thingName, clientToken) {}`
Emitted when an operation `update|get|delete` has timed out.
* `thingName` name of the Thing Shadow that has received a timeout
* `clientToken` the operation's clientToken
Applications can use clientToken values to correlate timeout events with the
operations that they are associated with by saving the clientTokens returned
from each operation.
-------------------------------------------------------
### awsIot.thingShadow#register(thingName, [options], [callback] )
Register interest in the Thing Shadow named `thingName`. The thingShadow class will
subscribe to any applicable topics, and will fire events for the Thing Shadow
until [awsIot.thingShadow#unregister()](#unregister) is called with `thingName`. `options`
can contain the following arguments to modify how this Thing Shadow is processed:
* `ignoreDeltas`: set to `true` to not subscribe to the `delta` sub-topic for this Thing Shadow; used in cases where the application is not interested in changes (e.g. update only.) (default `false`)
* `persistentSubscribe`: set to `false` to unsubscribe from all operation sub-topics while not performing an operation (default `true`)
* `discardStale`: set to `false` to allow receiving messages with old version numbers (default `true`)
* `enableVersioning`: set to `true` to send version numbers with shadow updates (default `true`)
The `persistentSubscribe` argument allows an application to get faster operation
responses at the expense of potentially receiving more irrelevant response
traffic (i.e., response traffic for other clients who have registered interest
in the same Thing Shadow). When `persistentSubscribe` is set to `false`, operation
sub-topics are only subscribed to during the scope of that operation;
note that in this mode, update, get, and delete operations will be much slower;
however, the application will be less likely to receive irrelevant response traffic.
The `discardStale` argument allows applications to receive messages which have
obsolete version numbers. This can happen when messages are received out-of-order;
applications which set this argument to `false` should use other methods to
determine how to treat the data (e.g. use a time stamp property to know how old/stale
it is).
If `enableVersioning` is set to true, version numbers will be sent with each operation.
AWS IoT maintains version numbers for each shadow, and will reject operations which
contain the incorrect version; in applications where multiple clients update the same
shadow, clients can use versioning to avoid overwriting each other's changes.
If the `callback` parameter is provided, it will be invoked after registration is complete (i.e., when subscription ACKs have been received for all shadow topics). Applications should wait until shadow registration is complete before performing update/get/delete operations.
-------------------------------------------------------
### awsIot.thingShadow#unregister(thingName)
Unregister interest in the Thing Shadow named `thingName`. The thingShadow class
will unsubscribe from all applicable topics and no more events will be fired
for `thingName`.
-------------------------------------------------------
### awsIot.thingShadow#update(thingName, stateObject)
Update the Thing Shadow named `thingName` with the state specified in the
JavaScript object `stateObject`. `thingName` must have been previously
registered
using [awsIot.thingShadow#register()](#register). The thingShadow class will subscribe
to all applicable topics and publish `stateObject` on the update sub-topic.
This function returns a `clientToken`, which is a unique value associated with
the update operation. When a 'status' or 'timeout' event is emitted,
the `clientToken` will be supplied as one of the parameters, allowing the
application to keep track of the status of each operation. The caller may
create their own `clientToken` value; if `stateObject` contains a `clientToken`
property, that will be used rather than the internally generated value. Note
that it should be of atomic type (i.e. numeric or string). This function
returns 'null' if an operation is already in progress.
-------------------------------------------------------
### awsIot.thingShadow#get(thingName, [clientToken])
Get the current state of the Thing Shadow named `thingName`, which must have
been previously registered using [awsIot.thingShadow#register()](#register). The
thingShadow class will subscribe to all applicable topics and publish on the
get sub-topic.
This function returns a `clientToken`, which is a unique value associated with
the get operation. When a 'status or 'timeout' event is emitted,
the `clientToken` will be supplied as one of the parameters, allowing the
application to keep track of the status of each operation. The caller may
supply their own `clientToken` value (optional); if supplied, the value of
`clientToken` will be used rather than the internally generated value. Note
that this value should be of atomic type (i.e. numeric or string). This
function returns 'null' if an operation is already in progress.
-------------------------------------------------------
### awsIot.thingShadow#delete(thingName, [clientToken])
Delete the Thing Shadow named `thingName`, which must have been previously
registered using [awsIot.thingShadow#register()](#register). The thingShadow class
will subscribe to all applicable topics and publish on the delete
sub-topic.
This function returns a `clientToken`, which is a unique value associated with
the delete operation. When a 'status' or 'timeout' event is emitted,
the `clientToken` will be supplied as one of the parameters, allowing the
application to keep track of the status of each operation. The caller may
supply their own `clientToken` value (optional); if supplied, the value of
`clientToken` will be used rather than the internally generated value. Note
that this value should be of atomic type (i.e. numeric or string). This
function returns 'null' if an operation is already in progress.
-------------------------------------------------------
### awsIot.thingShadow#publish(topic, message, [options], [callback])
Identical to the [mqtt.Client#publish()](https://github.com/mqttjs/MQTT.js/blob/master/README.md#publish)
method, with the restriction that the topic may not represent a Thing Shadow.
This method allows the user to publish messages to topics on the same connection
used to access Thing Shadows.
-------------------------------------------------------
### awsIot.thingShadow#subscribe(topic, [options], [callback])
Identical to the [mqtt.Client#subscribe()](https://github.com/mqttjs/MQTT.js/blob/master/README.md#subscribe)
method, with the restriction that the topic may not represent a Thing Shadow.
This method allows the user to subscribe to messages from topics on the same
connection used to access Thing Shadows.
-------------------------------------------------------
### awsIot.thingShadow#unsubscribe(topic, [callback])
Identical to the [mqtt.Client#unsubscribe()](https://github.com/mqttjs/MQTT.js/blob/master/README.md#unsubscribe)
method, with the restriction that the topic may not represent a Thing Shadow.
This method allows the user to unsubscribe from topics on the same
used to access Thing Shadows.
-------------------------------------------------------
### awsIot.thingShadow#end([force], [callback])
Invokes the [mqtt.Client#end()](https://github.com/mqttjs/MQTT.js/blob/master/README.md#end)
method on the MQTT connection owned by the `thingShadow` class. The `force`
and `callback` parameters are optional and identical in function to the
parameters in the [mqtt.Client#end()](https://github.com/mqttjs/MQTT.js/blob/master/README.md#end) method.
-------------------------------------------------------
### awsIot.jobs(deviceOptions)
The `jobs` class wraps an instance of the `device` class with additional functionality to
handle job execution management through the AWS IoT Jobs platform. Arguments in `deviceOptions`
are the same as those in the [device class](#device) and the `jobs` class supports all of the
same events and functions as the `device` class.
The `jobs` class also supports the following methods:
-------------------------------------------------------
### awsIot.jobs#subscribeToJobs(thingName, [operationName], callback)
Subscribes to job execution notifications for the thing named `thingName`. If
`operationName` is specified then the callback will only be called when a job
ready for execution contains a property called `operation` in its job document with
a value matching `operationName`. If `operationName` is omitted then the callback
will be called for every job ready for execution that does not match another
`subscribeToJobs` subscription.
* `thingName` name of the Thing to receive job execution notifications
* `operationName` optionally filter job execution notifications to jobs with a value
for the `operation` property that matches `operationName`
* `callback` - function (err, job) callback for when a job execution is ready for processing or an error occurs
- `err` a subscription error or an error that occurs when client is disconnecting
- `job` an object that contains [job](#job) execution information and functions for updating job execution status.
-------------------------------------------------------
### awsIot.jobs#unsubscribeFromJobs(thingName, [operationName], callback)
Unsubscribes from job execution notifications for the thing named `thingName` having
operations with a value of the given `operationName`. If `operationName` is omitted then
the default handler for the thing with the given name is unsubscribed.
* `thingName` name of the Thing to cancel job execution notifications for
* `operationName` optional name of previously subscribed operation names
* `callback` - function (err) callback for when the unsubscribe operation completes
-------------------------------------------------------
### awsIot.jobs#startJobNotifications(thingName, [callback])
Causes any existing queued job executions for the given thing to be published
to the appropriate subscribeToJobs handler. Only needs to be called once per thing.
* `thingName` name of the Thing to cancel job execution notifications for
* `callback` - function (err) callback for when the startJobNotifications operation completes
-------------------------------------------------------
## job
Object that contains job execution information and functions for updating job execution status.
-------------------------------------------------------
### job.document
The JSON document describing details of the job to be executed eg.
```
{
"operation": "install",
"otherProperty": "value",
...
}
```
-------------------------------------------------------
### job.id
Returns the job id.
-------------------------------------------------------
### job.operation
Returns the job operation from the job document. Eg. 'install', 'reboot', etc.
-------------------------------------------------------
### job.status
Returns the current job status according to AWS Orchestra.
```
{
"status":"IN_PROGRESS|QUEUED",
"statusDetails": {
"progress":"50%"
}
}
```
-------------------------------------------------------
### job.inProgress([statusDetails],[callback])
Update the status of the job execution to be IN_PROGRESS for the thing associated with the job.
* `statusDetails` optional document describing the status details of the in progress job e.g.
```
{
"string": "string",
"progress": "50%"
}
```
* `callback` - function(err) optional callback for when the operation completes, err is null if no error occurred
-------------------------------------------------------
### job.failed([statusDetails],[callback])
Update the status of the job execution to be FAILED for the thing associated with the job.
* `statusDetails` optional document describing the status details of the in progress job e.g.
```
{
"string": "string",
"progress": "0%"
}
```
* `callback` - function(err) optional callback for when the operation completes, err is null if no error occurred
-------------------------------------------------------
### job.succeeded([statusDetails],[callback])
Update the status of the job execution to be SUCCESS for the thing associated with the job.
* `statusDetails` optional document describing the status details of the in progress job e.g.
```
{
"string": "string",
"progress": "100%"
}
```
* `callback` - function(err) optional callback for when the operation completes, err is null if no error occurred
This SDK supports three types of connections to the AWS IoT platform:
* MQTT over TLS with mutual certificate authentication using port 8883
* MQTT over WebSocket/TLS with SigV4 authentication using port 443
* MQTT over WebSocket/TLS using a custom authorization function to authenticate
The default connection type is MQTT over TLS with mutual certificate authentication; to
configure a WebSocket/TLS connection, set the `protocol` option to `wss` when instantiating
the [awsIot.device()](#device) or [awsIot.thingShadow()](#thingShadow) classes. To use custom auth,
set the `protocol` option to `wss-custom-auth`.
### Custom Authorization Configuration
To use custom authorization, you must first set up an authorizer function in Lambda and register it
with IoT. Once you do, you will be able to authenticate using this function. There are two ways to use custom auth:
* set the `customAuthHeaders` option to your headers object when instantiating the [awsIotDevice()](#device)
or [awsIot.thingShadow()](#thingShadow) classes. The headers object is an object containing the header name
and values as key-value pairs:
```js
{
'X-Amz-CustomAuthorizer-Name': 'TestAuthorizer',
'X-Amz-CustomAuthorizer-Signature': 'signature',
'TestAuthorizerToken': 'token'
}
```
* set the `customAuthQueryString` option to your headers object when instantiating the [awsIotDevice()](#device) class. The query string is a string containing the values as key-value pairs:
```js
'?X-Amz-CustomAuthorizer-Name=TestAuthorizer&X-Amz-CustomAuthorizer-Signature=signature&TestAuthorizerToken=token'
```
The 'examples' directory contains several programs which demonstrate usage
of the AWS IoT APIs:
* device-example.js: demonstrate simple MQTT publish and subscribe
operations.
* [echo-example.js](#echoExample): test Thing Shadow operation by echoing all delta
state updates to the update topic; used in conjunction with the [AWS
IoT Console](https://console.aws.amazon.com/iot) to verify connectivity
with the AWS IoT platform.
* thing-example.js: use a Thing Shadow to automatically synchronize
state between a simulated device and a control application.
* thing-passthrough-example.js: demonstrate use of a Thing Shadow with
pasthrough of standard MQTT publish and subscribe messages.
* temperature-control/temperature-control.js: an interactive device simulation which uses
Thing Shadows.
* [jobs-example.js](#jobsExample): receive example job execution messages and update
job execution status.
* [jobs-agent.js](#jobsAgent): example agent to handle standard operations such as reboot,
report system status, and shutdown. It also handles installation of files including but not
limited to configuration files, program updates and security certificates. It also can install
and launch other programs and manage their executions (start, stop and restart).
The example programs use command line parameters to set options. To see
the available options, run the program and specify the '-h' option as
follows:
```sh
node examples/ -h
```
**NOTE:** You have to use the certificate created in the same region as your host end point.
You will also need to use unique custom endpoint with '-H' command line option when connect examples to IoT cloud.
### WebSocket Configuration
The example programs can be configured to use a WebSocket/TLS connection to
the AWS IoT platform by adding '--protocol=wss' to the command line to
override the default setting of 'mqtts'.
```sh
-P, --protocol=PROTOCOL connect using PROTOCOL (mqtts|wss)
```
When using a WebSocket/TLS connection, you have the following options to set credentials.
#### Export variables to system environment
```sh
export AWS_ACCESS_KEY_ID=[a valid AWS access key ID]
export AWS_SECRET_ACCESS_KEY=[a valid AWS secret access key]
```
#### Load IAM credentials from shared credential file
The default shared credential file is located in `~/.aws/credentials` for Linux
users and `%UserProfile%\.aws\credentials` for Windows users. This could be
configured using AWS CLI [visit the AWS CLI home page.](https://aws.amazon.com/cli/)
Alternatively, you could provide credential file in different path or another profile by specifying in the `awsIot.device(options)` .
The values of `AWS_ACCESS_KEY_ID` and `AWS_SECRET_ACCESS_KEY` must contain valid
AWS Identity and Access Management (IAM) credentials. For more information about AWS
IAM, [visit the AWS IAM home page.](https://aws.amazon.com/iam/)
When not configured to use a WebSocket/TLS connection, the example programs
require a client certificate and private key (created using either the [AWS
IoT Console](https://console.aws.amazon.com/iot) or the
[AWS IoT CLI](https://aws.amazon.com/cli/)) in order to authenticate with
AWS IoT. Each example program uses command line options to specify the
names and/or locations of certificates as follows:
#### Specify a directory containing default-named certificates
```sh
-f, --certificate-dir=DIR look in DIR for certificates
```
The --certificate-dir (-f) option will read all certificate and key files from the
directory specified. Default certificate/key file names are as follows:
* certificate.pem.crt: your AWS IoT certificate
* private.pem.key: the private key associated with your AWS IoT certificate
* root-CA.crt: the root CA certificate [(available from the AWS documentation here)](https://docs.aws.amazon.com/iot/latest/developerguide/server-authentication.html#server-authentication-certs)
#### Specify certificate names and locations individually
```sh
-k, --private-key=FILE use FILE as private key
-c, --client-certificate=FILE use FILE as client certificate
-a, --ca-certificate=FILE use FILE as CA certificate
```
The '-f' (certificate directory) option can be combined with these so that
you don't have to specify absolute pathnames for each file.
The [AWS IoT Console](https://console.aws.amazon.com/iot) can generate JSON
configuration data specifying the parameters required to connect a device
to the AWS IoT Platform. The JSON configuration data includes pathnames
to certificates, the hostname and port number, etc... The command line
option '--configuration-file (-F)' is used when reading parameters from a
configuration file.
```sh
-F, --configuration-file=FILE use FILE (JSON format) for configuration
```
The configuration file is in JSON format, and may contain the following
properties:
* host - the host name to connect to
* port - the port number to use when connecting to the host (8883 for AWS IoT with client certificate)
* clientId - the client ID to use when connecting
* privateKey - file containing the private key
* clientCert - file containing the client certificate
* caCert - file containing the CA certificate
* thingName - thing name to use
##### Tips for using JSON configuration files
* _The '-f' (certificate directory) and '-F' (configuration file) options
can be combined so that you don't have to use absolute pathnames in the
configuration file._
* _When using a configuration file to run any of the example programs other
than [echo-example.js](#echoExample), you **must** specify different client
IDs for each process using the '-i' command line option._
### device-example.js
device-example.js is run as two processes which communicate with one
another via the AWS IoT platform using MQTT publish and subscribe.
The command line option '--test-mode (-t)' is used to set which role
each process performs. It's easiest to run each process in its own
terminal window so that you can see the output generated by each. Note
that in the following examples, all certificates are located in the
~/certs directory and have the default names as specified in the
[Certificate Configuration section](#certificates).
#### _Terminal Window 1_
```sh
node examples/device-example.js -f ~/certs --test-mode=1 -H .iot..amazonaws.com
```
#### _Terminal Window 2_
```sh
node examples/device-example.js -f ~/certs --test-mode=2 -H .iot..amazonaws.com
```
### thing-example.js
Similar to device-example.js, thing-example.js is also run as two
processes which communicate with one another via the AWS IoT platform.
thing-example.js uses a Thing Shadow to synchronize state between the
two processes, and the command line option '--test-mode (-t)' is used
to set which role each process performs. As with device-example.js,
it's best to run each process in its own terminal window or on separate
hosts. In this example, the example programs are configured to use
WebSocket/TLS connections to the AWS IoT platform as specified in the
[WebSocket Configuration](#websockets).
#### _Terminal Window 1_
```sh
node examples/thing-example.js -P=wss --test-mode=1 -H .iot..amazonaws.com
```
#### _Terminal Window 2_
```sh
node examples/thing-example.js -P=wss --test-mode=2 -H .iot..amazonaws.com
```
### thing-passthrough-example.js
Similar to thing-example.js, thing-passthrough-example.js is also run
as two processes which communicate with one another via the AWS IoT platform.
thing-passthrough-example.js uses a Thing Shadow to synchronize state
from one process to another, and uses MQTT publish/subscribe to send
information in the other direction. The command line option '--test-mode (-t)'
is used to set which role each process performs. As with thing-example.js,
it's best to run each process in its own terminal window. Note
that in the following examples, all certificates are located in the
~/certs directory and have the default names as specified in the
[Certificate Configuration section](#certificates).
#### _Terminal Window 1_
```sh
node examples/thing-passthrough-example.js -f ~/certs --test-mode=1 -H .iot..amazonaws.com
```
#### _Terminal Window 2_
```sh
node examples/thing-passthrough-example.js -f ~/certs --test-mode=2 -H .iot..amazonaws.com
```
### echo-example.js
echo-example.js is used in conjunction with the
[AWS IoT Console](https://console.aws.amazon.com/iot) to verify
connectivity with the AWS IoT platform and to perform interactive
observation of Thing Shadow operation. In the following example, the
program is run using the configuration file '../config.json', and
the certificates are located in the '~/certs' directory. Here, the
'-f' (certificate directory) and '-F' (configuration file) options
are combined so that the configuration file doesn't need to contain
absolute pathnames.
```sh
node examples/echo-example.js -F ../config.json -f ~/certs --thing-name testThing1
```
### temperature-control.js
temperature-control.js is an interactive simulation which demonstrates
how Thing Shadows can be used to easily synchronize applications
and internet-connected devices.
Like thing-example.js, temperature-control.js runs in two
separate terminal windows and is configured via command-line options;
in the following example, all certificates are located in the ~/certs
directory and have the default names as specified in the
[Certificate Configuration section](#certificates). The process running
with '--test-mode=2' simulates an internet-connected temperature control
device, and the process running with '--test-mode=1' simulates a mobile
application which is monitoring/controlling it. The processes may be
run on different hosts if desired.
#### _Installing Dependencies_
temperature-control.js
uses the [blessed.js](https://github.com/chjj/blessed) and [blessed-contrib.js](https://github.com/yaronn/blessed-contrib) libraries to provide an
interactive terminal interface; it looks best on an 80x25 terminal with a
black background and white or green text and requires UTF-8 character
encoding. You'll need to install these libraries in the examples/temperature-control
directory as follows:
```sh
cd examples/temperature-control
npm install
```
#### _Running the Simulation - Terminal Window 1_
```sh
node examples/temperature-control/temperature-control.js -f ~/certs --test-mode=1 -H .iot..amazonaws.com
```
#### _Running the Simulation - Terminal Window 2_
```sh
node examples/temperature-control/temperature-control.js -f ~/certs --test-mode=2 -H .iot..amazonaws.com
```
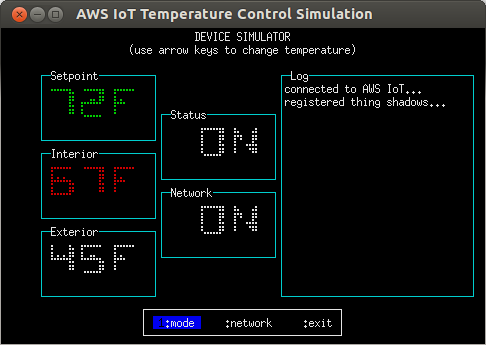
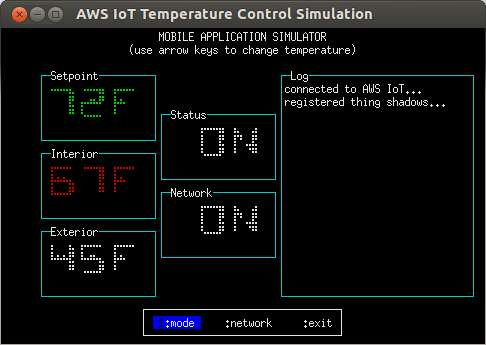
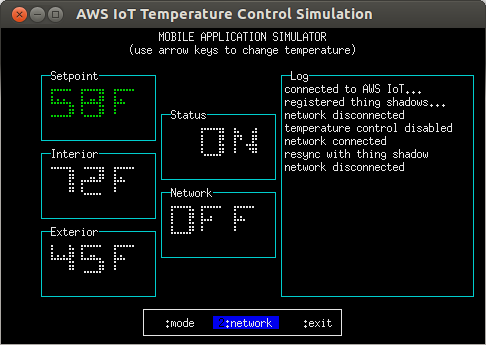
#### _Using the simulation_
The simulated temperature control device has two controls; _Setpoint_ and
_Status_. _Status_ controls whether or not the device is active, and
_Setpoint_ controls the interior temperature the device will attempt to
achieve. In addition, the device reports the current interior and exterior
temperatures as well as its operating state (_heating_, _cooling_, or
_stopped_).
Two Thing Shadows are used to connect the simulated device and mobile
application; one contains the controls and the other contains the
measured temperatures and operating state. Both processes can update the
controls, but only the device can update the measured temperatures and
the operating state.
Controlling the simulation is done using the up,
down, left, right, and
Enter keys as follows:
* up increase the Setpoint
* down decrease the Setpoint
* left move left on the menu bar
* right move right on the menu bar
* Enter select the current menu option
##### Operating State
The operating state of the device is indicated by the color of the
Interior temperature field as follows:
* Red: _heating_
* Cyan: _cooling_
* White: _stopped_
The following example shows the temperature control simulation in 'device' mode
while the operating state is 'heating'.
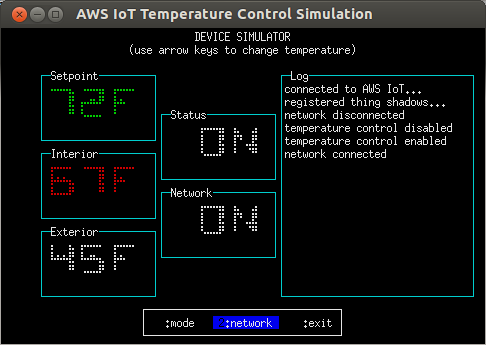
##### Log
The log window displays events of interest, e.g. network connectivity,
_Status_ toggles, re-synchronization with the Thing Shadow, etc...
##### Menu Options
* Mode: Toggle the device _Status_. _Status_ can be controlled from both
the simulated device and the mobile application.
* Network: Toggle the network connectivity of the device or mobile
application; this can be used to observe how both sides re-synchronize
when connectivity is restored.
In this example, the mobile application is disconnected from the network. Although it has
requested that the Setpoint be lowered to 58 degrees, the command can't be sent to
the device as there is no network connectivity, so the operating state still shows as
'stopped'. When the mobile application is reconnected to the network, it will attempt
to update the Thing Shadow for the device's controls; if no control changes have been
made on the device side during the disconnection period, the device will synchronize to
the mobile application's requested state; otherwise, the mobile application will re-
synchronize to the device's current state.
##### Exiting the Simulation
The simulation can be exited at any time by pressing q,
Ctrl+c, or by selecting 'exit' on the menu bar.
### jobs-example.js
jobs-example.js, like the [echo-example.js](#echoExample) can receive messages via the [AWS IoT Console](https://console.aws.amazon.com/iot)
to verify connectivity with the AWS IoT platform. But it can also receive and process job
executions initiated through the AWS IoT device jobs management platform. See the AWS IoT
Jobs documentation [here](https://aws.amazon.com/documentation/iot/) for more information on creating and deploying jobs.
#### _Running the jobs-example_
```sh
node examples/jobs-example.js -f ~/certs -H .iot..amazonaws.com -T thingName
```
### jobs-agent.js
jobs-agent.js can be run on a device as-is or it can be modified to suit specific use cases.
Example job documents are provided below. For more information see the AWS IoT connected device
management documentation [here](https://aws.amazon.com/documentation/iot/).
#### _Running the jobs-agent_
```sh
node examples/jobs-agent.js -f ~/certs -H .iot..amazonaws.com -T agentThingName
```
#### _Using the jobs-agent_
##### systemStatus operation
The jobs-agent will respond to the AWS IoT jobs management platform with system status
information when it receives a job execution notification with a job document that looks like this:
```
{
"operation": "systemStatus"
}
```
##### reboot operation
When the jobs-agent receives a reboot job document it will attempt to reboot the device it is
running on while sending updates on its progress to the AWS IoT jobs management platform.
After the reboot the job execution status will be marked as IN_PROGRESS until the jobs-agent
is also restarted at which point the status will be updated to SUCCESS. To avoid manual steps
during reboot it is suggested that device be configured to automatically start the jobs-agent
at device startup time. Job document format:
```
{
"operation": "reboot"
}
```
##### shutdown operation
When the jobs-agent receives a shutdown job document it will attempt to shutdown the device.
```
{
"operation": "shutdown"
}
```
##### install operation
When the jobs-agent receives an install job document it will attempt to install the files specified
in the job document. An install job document should follow this general format.
```
{
"operation": "install",
"packageName": "uniquePackageName",
"workingDirectory": "../jobs-example-directory",
"launchCommand": "node jobs-example.js -f ~/certs -H .iot..amazonaws.com -T thingName",
"autoStart": "true",
"files": [
{
"fileName": "jobs-example.js",
"fileVersion": "1.0.2.10",
"fileSource": {
"url": "https://some-bucket.s3.amazonaws.com/jobs-example.js"
},
"checksum": {
"inline": {
"value": "9569257356cfc5c7b2b849e5f58b5d287f183e08627743498d9bd52801a2fbe4"
},
"hashAlgorithm": "SHA256"
}
},
{
"fileName": "config.json",
"fileSource": {
"url": "https://some-bucket.s3.amazonaws.com/config.json"
}
}
]
}
```
* `packageName`: Each install operation must have a unique package name. If the packageName
matches a previous install operation then the new install operation overwrites the previous one.
* `workingDirectory`: Optional property for working directory
* `launchCommand`: Optional property for launching an application/package. If omitted copy files only.
* `autoStart`: If set to true then agent will execute launch command when agent starts up.
* `files`: Specifies files to be installed
* `fileName`: Name of file as written to file system
* `fileSource.url`: Location of file to be downloaded from
* `checksum`: Optional file checksum
* `inline.value`: Checksum value
* `hashAlgorithm`: Checksum hash algorithm used
##### start operation
When the jobs-agent receives a start job document it will attempt to startup the specified package.
```
{
"operation": "start",
"packageName": "somePackageName"
}
```
##### stop operation
When the jobs-agent receives a stop job document it will attempt to stop the specified package.
```
{
"operation": "stop",
"packageName": "somePackageName"
}
```
##### restart operation
When the jobs-agent receives a restart job document it will attempt to restart the specified package.
```
{
"operation": "restart",
"packageName": "somePackageName"
}
```
## Browser Applications
This SDK can be packaged to run in a browser using [browserify](http://browserify.org/) or [webpack](https://webpack.js.org/), and includes helper scripts and example application code to help you get started writing browser applications that use AWS IoT.
### Background
Browser applications connect to AWS IoT using [MQTT over the Secure WebSocket Protocol](http://docs.aws.amazon.com/iot/latest/developerguide/protocols.html). There are some important differences between Node.js and browser environments, so a few adjustments are necessary when using this SDK in a browser application.
When running in a browser environment, the SDK doesn't have access to the filesystem or process environment variables, so these can't be used to store credentials. While it might be possible for an application to prompt the user for IAM credentials, the [Amazon Cognito Identity Service](https://aws.amazon.com/cognito/) provides a more user-friendly way to retrieve credentials which can be used to access AWS IoT. The [temperature-monitor](#temperature-monitor-browser-example) browser example application illustrates this use case.
### Using SDK with browserify
#### Installing browserify
This SDK could also work with web applications using `browserify`. First, you'll need to make sure that `browserify` is installed. The following instructions and the scripts in this package assume that it is installed globally, as with:
```sh
npm install -g browserify
```
#### Browser Application Utility
This SDK includes a utility script called `scripts/browserize.sh`. This script can create a browser bundle containing both the [AWS SDK for JavaScript](https://aws.amazon.com/sdk-for-browser/) and this SDK, or you can use it to create application bundles for browser applications, like the ones under the `examples/browser` directory. For Windows user who does not want to use bash shell, the SDK also includes batch file `windows-browserize.bat` which does the same job as `browserize.sh` but able to run in Windows CMD. To create the combined AWS SDK browser bundle, run this command in the SDK's top-level directory:
```sh
npm run-script browserize
```
This command will create a browser bundle in `browser/aws-iot-sdk-browser-bundle.js`. The browser bundle makes both the `aws-sdk` and `aws-iot-device-sdk` modules available so that you can `require` them from your browserified application bundle.
**NOTE**: For Windows user who running scripts in CMD, since batch script file does not work well with NPM package script, Windows user could just call script directly to replace `npm run-script browserize`. This also applies for example applications demonstrated below.
```sh
.\scripts\windows-browserize.bat
```
#### Creating Application Bundles
You can also use the `scripts/browserize.sh` script to browserify your own applications and use them with the AWS SDK browser bundle. For example, to prepare the [temperature-monitor](#temperature-monitor-browser-example) browser example application for use, run this command in the SDK's top-level directory:
```sh
npm run-script browserize examples/browser/temperature-monitor/index.js
```
This command does two things. First, it creates an application bundle from `examples/browser/temperature-monitor/index.js` and places it in `examples/browser/temperature-monitor/bundle.js`. Second, it copies the `browser/aws-iot-sdk-browser-bundle.js` into your application's directory where it can be used, e.g.:
```html
```
#### Temperature Monitor Browser Example Application
This SDK includes a companion browser application to the [Temperature Control Example Application](#temp-control). The browser application allows you to monitor the status of the simulated temperature control device.
1. Follow the instructions to install the [Temperature Control Example Application](#temp-control)
1. In order for the browser application to be able to authenticate and connect to AWS IoT, you'll need to configure a Cognito Identity Pool. In the [Amazon Cognito console](https://console.aws.amazon.com/cognito/), use Amazon Cognito to create a new identity pool, and allow unauthenticated identities to connect. Obtain the `PoolID` constant. Make sure that the policy attached to the [unauthenticated role](https://console.aws.amazon.com/iam/home?#roles) has permissions to access the required AWS IoT APIs. More information about AWS IAM roles and policies can be found [here](http://docs.aws.amazon.com/IAM/latest/UserGuide/access_policies_manage.html).
1. Edit `examples/browser/temperature-monitor/aws-configuration.js`, and replace the values of `poolId` and `region` with strings containing the ID of the Cognito Identity Pool and your AWS region (e.g., `'us-east-1'`) from the previous step.
1. Create the application browser bundle by executing the following command in the top-level directory of the SDK:
```sh
npm run-script browserize examples/browser/temperature-monitor/index.js
```
1. Start an instance of the device simulation using:
```sh
node examples/temperature-control/temperature-control.js -f ~/certs --test-mode=2 -H .iot..amazonaws.com
```
_NOTE_: _Although the above example shows connecting using a certificate/private key set, you can use any of the command line options described in the [Example Programs Section](#programs)._
1. Open `examples/browser/temperature-monitor/index.html` in your web browser. It should connect to AWS IoT and began displaying the status of the simulated temperature control device you started in the previous step. If you change the device's settings, the browser window should update and display the latest status values.
#### Lifecycle Event Monitor Browser Example Application
This SDK includes a browser application which demonstrates the functionality of [AWS IoT lifecycle events](http://docs.aws.amazon.com/iot/latest/developerguide/life-cycle-events.html). AWS IoT generates lifecycle events whenever clients connect or disconnect; applications can monitor these and take action when clients connect or disconnect from AWS IoT. Follow these instructions to run the application:
1. In order for the browser application to be able to authenticate and connect to AWS IoT, you'll need to configure a Cognito Identity Pool. In the [Amazon Cognito console](https://console.aws.amazon.com/cognito/), use Amazon Cognito to create a new identity pool, and allow unauthenticated identities to connect. Obtain the `PoolID` constant. Make sure that the policy attached to the [unauthenticated role](https://console.aws.amazon.com/iam/home?#roles) has permissions to access the required AWS IoT APIs. More information about AWS IAM roles and policies can be found [here](http://docs.aws.amazon.com/IAM/latest/UserGuide/access_policies_manage.html).
1. Edit `examples/browser/lifecycle/aws-configuration.js`, and replace the values of `poolId` and `region` with strings containing the ID of the Cognito Identity Pool and your AWS region (e.g., `'us-east-1'`) from the previous step.
1. Create the application browser bundle by executing the following command in the top-level directory of the SDK:
```sh
npm run-script browserize examples/browser/lifecycle/index.js
```
1. Open `examples/browser/lifecycle/index.html` in your web browser. After connecting to AWS IoT, it should display 'connected clients'.
1. Start programs which connect to AWS IoT (e.g., [the example programs in this package](#programs)). Make sure that these programs are connecting to the same AWS region that your Cognito Identity Pool was created in. The browser application will display a green box containing the client ID of each client which connects; when the client disconnects, the box will disappear.
1. If a DynamoDB table named `LifecycleEvents` exists in your account and has a primary key named `clientId`, the lifecycle event browser monitor browser application will display the client ID contained in each row. By updating this table using an [AWS IoT rule](http://docs.aws.amazon.com/iot/latest/developerguide/iot-rules.html) triggered by [lifecycle events](http://docs.aws.amazon.com/iot/latest/developerguide/life-cycle-events.html), you can maintain a persistent list of all of the currently connected clients within your account.
#### MQTT Explorer Browser Example Application
This SDK includes a browser application which implements a simple interactive MQTT client. You can use this application to subscribe to a topic and view the messages that arrive on it, or to publish to a topic. Follow these instructions to run the application:
1. In order for the browser application to be able to authenticate and connect to AWS IoT, you'll need to configure a Cognito Identity Pool. In the [Amazon Cognito console](https://console.aws.amazon.com/cognito/), use Amazon Cognito to create a new identity pool, and allow unauthenticated identities to connect. Obtain the `PoolID` constant. Make sure that the policy attached to the [unauthenticated role](https://console.aws.amazon.com/iam/home?#roles) has permissions to access the required AWS IoT APIs. More information about AWS IAM roles and policies can be found [here](http://docs.aws.amazon.com/IAM/latest/UserGuide/access_policies_manage.html).
1. Edit `examples/browser/mqtt-explorer/aws-configuration.js`, and replace the values of `poolId` and `region` with strings containing the ID of the Cognito Identity Pool and your AWS region (e.g., `'us-east-1'`) from the previous step.
1. Create the application browser bundle by executing the following command in the top-level directory of the SDK:
```sh
npm run-script browserize examples/browser/mqtt-explorer/index.js
```
1. Open `examples/browser/mqtt-explorer/index.html` in your web browser. After connecting to AWS IoT, it should display input fields allowing you to subscribe or publish to a topic. By subscribing to '#', for example, you will be able to monitor all traffic within your AWS account as allowed by the policy associated with the unauthenticated role of your Cognito Identity Pool.
#### Reducing Browser Bundle Size
After your application development is complete, you will probably want to reduce the size of the browser bundle. There are a couple of easy techniques to do this, and by combining both of them you can create much smaller browser bundles.
##### Eliminate unused features from the AWS SDK
1. The [AWS SDK for JavaScript](https://github.com/aws/aws-sdk-js) allows you to install only the features you use in your application. In order to use this feature when preparing a browser bundle, first you'll need to remove any existing bundle that you've already created:
```sh
rm browser/aws-iot-sdk-browser-bundle.js
```
2. Define the AWS features your application uses as a comma-separated list in the `AWS_SERVICES` environment variable. For example, the [MQTT Explorer example](#mqtt-explorer-browser-example) uses only AWS Cognito Identity, so to create a bundle containing only this feature, do:
```sh
export AWS_SERVICES=cognitoidentity
```
For a list of the AWS SDK feature names, refer to the [_features subdirectory_ of the AWS SDK for JavaScript](https://github.com/aws/aws-sdk-js/tree/master/features). As another example, if your application uses Cognito Identity, DynamoDB, S3, and SQS, you would do:
```sh
export AWS_SERVICES=cognitoidentity,dynamodb,s3,sqs
```
3. Create the browser app and bundle, e.g. for the [MQTT Explorer example](#mqtt-explorer-browser-example), do:
```sh
npm run-script browserize examples/browser/mqtt-explorer/index.js
```
#### Uglify the bundle source
[Uglify](https://www.npmjs.com/package/uglify) is an npm utility for minimizing the size of JavaScript source files. To use it, first install it as a global npm package:
```sh
npm install -g uglify
```
Once installed, you can use it to reduce the bundle size:
```sh
uglify -s ./browser/aws-iot-sdk-browser-bundle.js -o ./browser/aws-iot-sdk-browser-bundle-min.js
```
After you've created the minimized bundle, you'll need to make sure that your application loads this version rather than the non-minimized version, e.g:
```html
```
##### Optimization results
By using both of the above techniques for the [MQTT Explorer example](#mqtt-explorer-browser-example), the bundle size can be reduced from 2.4MB to 615KB.
### Using SDK with webpack
In order to work with webpack, you have to create a webpack package. You can put your file dependencies in `entry.js` and output it as `bundle.js`. An example is provided in the location `./examples/browser/mqtt-webpack`
```sh
cd ./examples/browser/mqtt-webpack
npm install
./node_modules/.bin/webpack --config webpack.config.js
```
The `index.html` will load the output file `bundle.js` and execute functions defined in `entry.js`. This duplicates the example of mqtt-explore above which loaded SDK into web browser using browserify.
## Troubleshooting
If you have problems connecting to the AWS IoT Platform when using this SDK or
running the example programs, there are a few things to check:
* _Region Mismatch_: You have to use the certificate created in the same
region as your host end point.
* _Duplicate Client IDs_: Within your AWS account, the AWS IoT platform
will only allow one connection per client ID. Many of the example programs
run as two processes which communicate with one another. If you don't
specify a client ID, the example programs will generate random client IDs,
but if you are using a [JSON configuration file](#configurationFile), you'll
need to explictly specify client IDs for both programs using the '-i' command
line option.
* _Invalid NPM Version_: To run the browserize.sh script which prepares the browser example applications, you'll need to use npm version 3. This is because browserize.sh expects package dependencies to be handled using the npm version 3 strategy, which is [different than the strategy used in npm version 2](https://docs.npmjs.com/how-npm-works/npm3). If you're having trouble running the browser application examples, make sure that you're using npm version 3. You can check your npm version with `npm -v`.
This package includes unit tests which can be run as follows:
```sh
npm test
```
Running the unit tests will also generate code coverage data in the 'reports'
directory.
This SDK is distributed under the [Apache License, Version 2.0](http://www.apache.org/licenses/LICENSE-2.0), see LICENSE.txt and NOTICE.txt for more information.
## Support
If you have technical questions about AWS IoT Device SDK, use the [AWS IoT Forum](https://forums.aws.amazon.com/forum.jspa?forumID=210).
For any other questions on AWS IoT, contact [AWS Support](https://aws.amazon.com/contact-us).