Ecosyste.ms: Awesome
An open API service indexing awesome lists of open source software.
https://github.com/malhotra5/Manim-Tutorial
A tutorial for manim, a mathematical animation engine made by 3b1b
https://github.com/malhotra5/Manim-Tutorial
3b1b animation graphics graphics-engine manim python tutorial
Last synced: 2 months ago
JSON representation
A tutorial for manim, a mathematical animation engine made by 3b1b
- Host: GitHub
- URL: https://github.com/malhotra5/Manim-Tutorial
- Owner: malhotra5
- Created: 2019-01-06T02:20:51.000Z (over 5 years ago)
- Default Branch: master
- Last Pushed: 2022-11-22T07:53:43.000Z (over 1 year ago)
- Last Synced: 2023-11-07T12:22:02.775Z (8 months ago)
- Topics: 3b1b, animation, graphics, graphics-engine, manim, python, tutorial
- Language: Python
- Size: 1.49 MB
- Stars: 611
- Watchers: 21
- Forks: 85
- Open Issues: 10
-
Metadata Files:
- Readme: README.md
Lists
- my-awesome-stars - malhotra5/Manim-Tutorial - A tutorial for manim, a mathematical animation engine made by 3b1b (Python)
- awesome-stars - malhotra5/Manim-Tutorial - A tutorial for manim, a mathematical animation engine made by 3b1b (Python)
README
# Manim-Tutorial
A tutorial for manim, a mathematical animation engine made by 3b1b for Python.
## Requirements
* Python 3.7 (I managed to run it on version 3.6.7, so I'm guessing 3.6 and above works)
* An operating system (Linux, Windows or Macintosh)
## Table of Contents
* [Installations](#Installations)
* [Linux Users](#Linux-Users)
* [Windows Users](#Windows-Users)
* [Macintosh Users](#Macintosh-Users)
* [Using Virtual Machine](#Using-Virtual-Box)
* [Common Problems](#Common-Problems)
* [Running Manim Projects](#Running-Manim-Projects)
* [What ClassName means](#classNames)
* [What are the possible args](#Args)
* [Tutorial!](#Tutorial)
* [Basics, Getting Started](#Basics)
* [Shapes](#Shapes)
* [Text](#Text)
* [Math Equations](#Math-Equations)
* [Graphing](#Graphing)
* [3D Graphing](#3D-Graphing)
* [Spheres and More](#Spheres-and-More)
* [Camera Works](#Camera-Works)
* [Custom Graphs](#Custom-Graphs)
* [Images](#Images)
* [YOUR GO TO GUIDE FOR EVERYDAY USE!!](#GO-TO-GUIDE)
* [Exploring the repo](#Exploring-the-Repo)
* [ManimLib](#ManimLib)
* [Animation](#Animations)
* [Mobject](#Mobjects)
* [Types](#Types)
* [Scene](#Scenes)
* [Utils](#Utils)
* [Media](#Media)
* [Old_Projects](#Old_Projects)
* [Putting it together](#Putting-it-together)
* [Resources](#Resources)
* [Further Work](#Further-Work)
* [Acknowledgments](#Acknowledgments)
## Installations
Lets first get the manim repo and python dependencies using the terminal -
> **OPTIONS:** Use either `Command 2` or `Command 3` below. For `Command 3`, you need to be inside the manim directory.
``` bash
git clone https://github.com/3b1b/manim.git #Command 1
pip3 install manimlib #Command 2
python3 -m pip install -r requirements.txt #Command 3
```
> **NOTE:** Although it is highly recommended, the following system installations are only required if you want to use `LaTeX`
### Linux Users
These are the final system requirements: `Cairo`, `Latex`, `ffmpeg` and `sox`.
```bash
sudo apt install ffmpeg sox
sudo apt-get install libcairo2-dev libjpeg-dev libgif-dev
sudo apt install texlive-latex-base texlive-full texlive-fonts-extra
```
### Windows Users
!!!to my knowledge manim only works with python 3.7 (yet)!!!
* install [Sox](https://sourceforge.net/projects/sox/)
* install [ffmpeg](https://ffmpeg.zeranoe.com/builds/)
* install [miktex](https://miktex.org/download)
* install [pycairo](https://www.lfd.uci.edu/~gohlke/pythonlibs/#pycairo), this can be pycairo‑1.19.1‑cp37‑cp37m‑win_amd64.whl or
pycairo‑1.19.1‑cp37‑cp37m‑win32.whl depending on your achitecture and python version. (The 37 stands for python 3.7)
* install pycairo using `pip install [your-pycairo-whl]` in the directory where the pycairo wheel is located.
* download manim zip file from the github repo and extract it
make a new venv, if you want to
delete pycairo from the requirentments.txt
run `pip install -r requirentments.txt`
### Macintosh Users
```bash
brew cask install mactex
```
### Common Problems
* Problem #1: Cairo System requirement
People are sometimes unable to install `Cairo` through the terminal. But, it is possible to install it using the Python.
``` bash
pip3 install pycairo
```
* Problem #2: **Exception: Latex error converting to dvi. See log output above or the log file**
This error can be frustrating. Especially when you don't know what to install. But if you followed my installation guide, this error is not due to missing a system requirement. Rather, there is a problem with the code.
* Problem #3: **No module named manim**
This error occurs when you use the command to run a manim project when your not in the parent directory. Make sure that your current directory is in manim, and no other sub directory.
### Using Virtual Box
If you still face problems in installation, you can use manim on Virtual Box.
It creates a virtual Ubuntu os on your host os. All the dependencies are pre-installed so that you are directly use manim.
1. [Install VirtualBox](https://www.virtualbox.org/).
2. Download [.ova file](https://drive.google.com/drive/folders/1H8XF9FDm5l_HY-MwevPSECUF5nGPGaQN?usp=sharing) for manim virtual machine.
3. Install the file
4. Use ```fossee``` as the password
5. Clone manim repository
```sh
git clone https://github.com/3b1b/manim.git
cd manim
python3 manim.py example_scenes.py SquareToCircle -pl
```
## Running Manim Projects
Easy way to test whether all your installations are working is by running the command below
```bash
python3 -m manim example_scenes.py SquareToCircle -pl
```
If it worked, then congratulations! Now you can run manim programs and get started with making animations.
Now, this will be the general command to run all manim projects
```python
python3 -m manim pythonFile.py className -args
```
> **NOTE 1**: Your videos that you make are saved in the folder called *videos*. \
**NOTE 2**: The command for running the manim programs should only be run in the parent directory.
### classNames
Manim programs have a certain structure. The Python program file requires you to make classes for all your series of animations. If you make more than a few classes, you have to run commands for every class you make. Seperate videos are made for every class.
### Args
Args are a list of arguements that can be stated when running the program. The most important agruements and it's explanations are provided in the [GO TO GUIDE.](#GO-TO-GUIDE)
I recommend to look at it later, and start with the tutorial.
## Tutorial!
Finally we can start. In this tutorial, we will learn by doing.
### Basics
``` python
from manimlib.imports import *
class Shapes(Scene):
def construct(self):
######Code######
#Making shapes
circle = Circle()
square = Square()
triangle=Polygon(np.array([0,0,0]),np.array([1,1,0]),np.array([1,-1,0]))
#Showing shapes
self.play(ShowCreation(circle))
self.play(FadeOut(circle))
self.play(GrowFromCenter(square))
self.play(Transform(square,triangle))
```
We will break this into parts:
* Import: The import in this code is the import we will use in all manim projects. It has almost all the imports we will ever require
* Class: For running animations, you have to make a class that has a base class from manim.
* Method: The construct method is special to manim. Manim calls on construct for creating animations. Therefore, every class that runs manim has to have this method.
* Code: You don't have to fully understand how the code works yet. But you can see that you first define your animations, and then you display it. You can experiment with the order in which you define and display.
> **NOTE:** If you recall, to run this animation, you would run the following in the terminal -
>```bash
> python3 -m manim fileName.py Shapes -pl
> ```
**Click for results on YouTube:**
[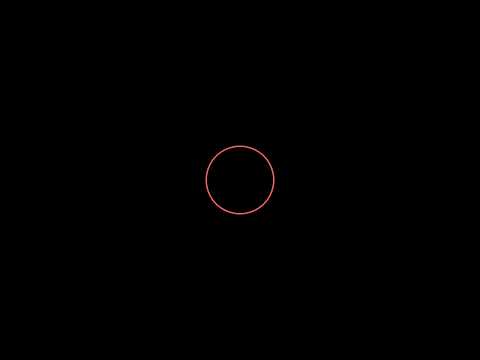](https://www.youtube.com/watch?v=AYCJHLIlbW0)
### Shapes
```python
from manimlib.imports import *
from math import cos, sin, pi
class Shapes(Scene):
def construct(self):
#######Code#######
#Making Shapes
circle = Circle(color=YELLOW)
square = Square(color=DARK_BLUE)
square.surround(circle)
rectangle = Rectangle(height=2, width=3, color=RED)
ring=Annulus(inner_radius=.2, outer_radius=1, color=BLUE)
ring2 = Annulus(inner_radius=0.6, outer_radius=1, color=BLUE)
ring3=Annulus(inner_radius=.2, outer_radius=1, color=BLUE)
ellipse=Ellipse(width=5, height=3, color=DARK_BLUE)
pointers = []
for i in range(8):
pointers.append(Line(ORIGIN, np.array([cos(pi/180*360/8*i),sin(pi/180*360/8*i), 0]),color=YELLOW))
#Showing animation
self.add(circle)
self.play(FadeIn(square))
self.play(Transform(square, rectangle))
self.play(FadeOut(circle), FadeIn(ring))
self.play(Transform(ring,ring2))
self.play(Transform(ring2, ring))
self.play(FadeOut(square), GrowFromCenter(ellipse), Transform(ring2, ring3))
self.add(*pointers)
self.wait(2)
```
After looking at a lot of pieces of code in this tutorial, you will eventually familiarize yourself with manim. So lets start!
Our focus is going to shift from understanding the structure of our code, to understanding the code itself. The first import statement imports many of the classes we will use.
The section for making shapes creates shapes that can be used in manim. You can define it's size, color,etc.
You will see some methods such as *surround* or *FadeOut*, we wil classify them later. The code is simple enough to read, most of it looks like English.
The section for showing the animaton displays the shapes, as specified in the code. Let's look at the what the code offers.
**Shapes:** The shapes defined in manim are known as mobjects. Manim has this classification for objects other than shapes. Keep reading for the formal definition of a mobject.
* Square
* Circle
* Rectangle
* Lines
* Annulus
**Animations:** These are animations that apply to objects known as mobjects. Mobjects are objects defined by manim. Manim creates these objects specifically, so that you can apply any animations or other special manim methods to them.
* FadeIn
* Transform
* FadeOut
* GrowFromCenter
**Adding:**
These are some of the methods for adding mobjects or playing Animations on mobjects. Note: If you play an animation, you don't have to add it to the screen. The animation does it for you.
* Play
* Add
In this code, I specifically included an example that I found useful to know.
``` python
pointers.append(Line(ORIGIN, np.array([cos(pi/180*360/8*i),sin(pi/180*360/8*i), 0]),color=YELLOW))
```
I am appending mobjects into an list. This way I can manipulate the mobjects in the list. However, some manim methods such as *FadeOut()* can't take multiple mobjects at once. This makes it hard to do multiple tasks with less lines of code. We will take a look at a way to overcome that problem later. Although, some methods do however take multiple mobjects.
For example: self.add() took the list. However, you have to unpack the list first.
```python
self.add(*pointers)
```
Here, mobjects in the list pointers, we unpacked and passed as arguments to *add()*. Notice the syntax for doing so. We put * before the list.
Last note. If you realized, the base class of the class above was *Scene*. This is provided by manim. Using it, we can access methods pertaining to manim. Manim also has many other base classes that we can use. If you realize, the lines of code below come from the base class.
```python
self.add()
self.play()
```
There are other bases classes we will explore for making Graphs, 3D Scenes,etc.
**Click for results on YouTube:**
[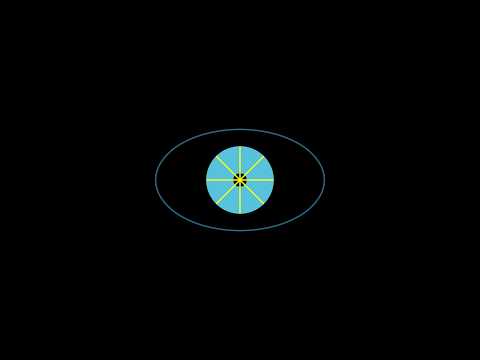](https://www.youtube.com/watch?v=kFCliVVACp4)
### Text
```python
from manimlib.imports import *
class makeText(Scene):
def construct(self):
#######Code#######
#Making text
first_line = TextMobject("Manim is fun")
second_line = TextMobject("and useful")
final_line = TextMobject("Hope you like it too!", color=BLUE)
color_final_line = TextMobject("Hope you like it too!")
#Coloring
color_final_line.set_color_by_gradient(BLUE,PURPLE)
#Position text
second_line.next_to(first_line, DOWN)
#Showing text
self.wait(1)
self.play(Write(first_line), Write(second_line))
self.wait(1)
self.play(FadeOut(second_line), ReplacementTransform(first_line, final_line))
self.wait(1)
self.play(Transform(final_line, color_final_line))
self.wait(2)
```
Hopefully, most of the code makes sense. In this section I'll introduce a new mobject known as TextMobject. It is used to store text. It is particulary useful because it helps you position text on the screen and you can use the animation *write()*.
I also included a nice coloring tool, *set_color_by_gradient*. You can pass constants in Manim such as *BLUE* or *PURPLE*. To pass a custom color you can specify the hex code of the color instead of using Manim color constants.
TextMobjects will be used later on to write good looking math equations.
**Click for results on YouTube:**
[](https://www.youtube.com/watch?v=3pxIVQxlpRQ)
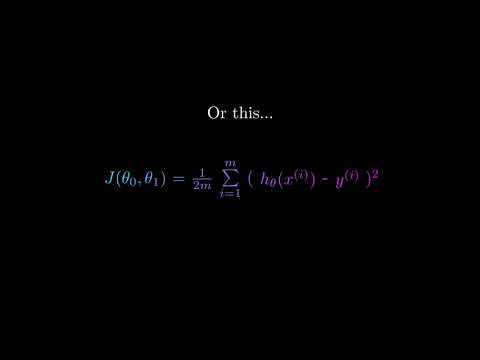
### Math Equations
```python
from manimlib.imports import *
class Equations(Scene):
def construct(self):
#Making equations
first_eq = TextMobject("$$J(\\theta) = -\\frac{1}{m} [\\sum_{i=1}^{m} y^{(i)} \\log{h_{\\theta}(x^{(i)})} + (1-y^{(i)}) \\log{(1-h_{\\theta}(x^{(i)}))}] $$")
second_eq = ["$J(\\theta_{0}, \\theta_{1})$", "=", "$\\frac{1}{2m}$", "$\\sum\\limits_{i=1}^m$", "(", "$h_{\\theta}(x^{(i)})$", "-", "$y^{(i)}$", "$)^2$"]
second_mob = TextMobject(*second_eq)
for i,item in enumerate(second_mob):
if(i != 0):
item.next_to(second_mob[i-1],RIGHT)
eq2 = VGroup(*second_mob)
des1 = TextMobject("With manim, you can write complex equations like this...")
des2 = TextMobject("Or this...")
des3 = TextMobject("And it looks nice!!")
#Coloring equations
second_mob.set_color_by_gradient("#33ccff","#ff00ff")
#Positioning equations
des1.shift(2*UP)
des2.shift(2*UP)
#Animating equations
self.play(Write(des1))
self.play(Write(first_eq))
self.play(ReplacementTransform(des1, des2), Transform(first_eq, eq2))
self.wait(1)
for i, item in enumerate(eq2):
if (i<2):
eq2[i].set_color(color=PURPLE)
else:
eq2[i].set_color(color="#00FFFF")
self.add(eq2)
self.wait(1)
self.play(FadeOutAndShiftDown(eq2), FadeOutAndShiftDown(first_eq), Transform(des2, des3))
self.wait(2)
```
Here, we will look at very important concepts that will help when using Manim.
That looks long, but it's very simple. Here I have provided 2 ways of making equation and displaying it to the screen. If you remember, we installed some latex system requirements. We will use LaTex to make our equations look nice.
LaTex will take it's own tutorial. However, you don't need to know a lot of LaTex. I will introduce some rules that will help you write any math equation. Notice that equations are specified in TextMobjects.
**LaTex:** When making an equation, the general rule is to put a *$* at the start and end of the text. For example:
```python
text = TextMobject("This is text") #Normal text
equation = TextMobject("$X$") #This is an equation X
```
Now for the fun part. In LaTex, you can represent symbols using a backslash and a keyword. THis include theta, alpha, summation, etc. In Manim, it is similar.
```python
theta = TextMobject("$\\theta$")
```
Notice, in Manim, you specify symbols by putting 2 backslash before the keyword.
Finally, the I will introduce the syntax for adding subscripts and superscripts. Here is the syntax for superscripts.
```python
superScript_equation = TextMobject("$r^{\\theta}$")
```
The ^ symbol signifies superscript. We put the symbol theta as the superscript. Also, when specifying superscript the {} brackets are not displayed in the equation. They help group all the elements you want to add to the superscript.
For subscripts, it is similar.
```python
subScript_equation = TextMobject("$\\theta_{1}$")
```
This is theta subscript 1. The _ signifies subscript. Like usual, the {} brackets aren't displayed in the equation. For more symbol options, go to the [resources](#Resources) section.
Now, we will look at a complex way of writing equations using VGroup. Let's look at what a VGroup is.
A VGroup is a list of mobjects who to which you can apply animations all at once. For example, if you have a list of circles, you could transform all of them into squares, by only transforming the VGroup.
Capabilities: You can animate all the mobjects at once, you can animate specific mobjects by indexing them in their list.
Let's look at the example where we make a VGroup for the math equation.
```python
second_eq = ["$J(\\theta_{0}, \\theta_{1})$", "=", "$\\frac{1}{2m}$", "$\\sum\\limits_{i=1}^m$", "(", "$h_{\\theta}(x^{(i)})$", "-", "$y^{(i)}$", "$)^2$"]
```
**Click for results on YouTube:**
[](https://www.youtube.com/watch?v=k9U4VjqTyPA)
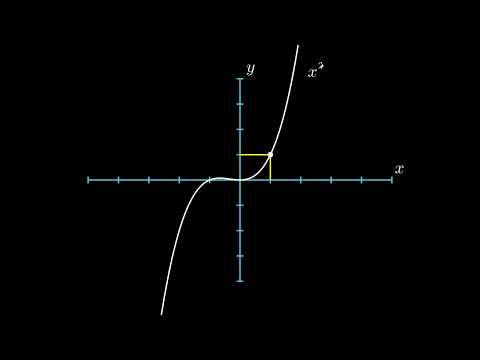
### Graphing
```python
from manimlib.imports import *
import math
class Graphing(GraphScene):
CONFIG = {
"x_min": -5,
"x_max": 5,
"y_min": -4,
"y_max": 4,
"graph_origin": ORIGIN,
"function_color": WHITE,
"axes_color": BLUE
}
def construct(self):
#Make graph
self.setup_axes(animate=True)
func_graph=self.get_graph(self.func_to_graph,self.function_color)
graph_lab = self.get_graph_label(func_graph, label = "x^{2}")
func_graph_2=self.get_graph(self.func_to_graph_2,self.function_color)
graph_lab_2 = self.get_graph_label(func_graph_2, label = "x^{3}")
vert_line = self.get_vertical_line_to_graph(1,func_graph,color=YELLOW)
x = self.coords_to_point(1, self.func_to_graph(1))
y = self.coords_to_point(0, self.func_to_graph(1))
horz_line = Line(x,y, color=YELLOW)
point = Dot(self.coords_to_point(1,self.func_to_graph(1)))
#Display graph
self.play(ShowCreation(func_graph), Write(graph_lab))
self.wait(1)
self.play(ShowCreation(vert_line))
self.play(ShowCreation(horz_line))
self.add(point)
self.wait(1)
self.play(Transform(func_graph, func_graph_2), Transform(graph_lab, graph_lab_2))
self.wait(2)
def func_to_graph(self, x):
return (x**2)
def func_to_graph_2(self, x):
return(x**3)
```
By now you should be able to identify similar patterns when coding with Manim. The config dictionary, specifies various parameters for graphing: the axis size, axis color or graph colors. The exact parameters are pretty self explanatory and are specified below.
To make a graph, you have to specify a method that returns the y value for evey x value inupt. This is specified in the method *func_to_graph*. The method *get_graph* creates a mobject out of the previous method, which can be manipulated. Note, that the graph method only specifies what the graph should look like given a point. But, the extent of how much is displayed (like from -5 to 5 on the x axis) is determined by the **CONFIG** dictionary.
Here is the default dictionary Manim uses for graphing.
```python
CONFIG = {
"x_min": -1,
"x_max": 10,
"x_axis_width": 9,
"x_tick_frequency": 1,
"x_leftmost_tick": None, # Change if different from x_min
"x_labeled_nums": None,
"x_axis_label": "$x$",
"y_min": -1,
"y_max": 10,
"y_axis_height": 6,
"y_tick_frequency": 1,
"y_bottom_tick": None, # Change if different from y_min
"y_labeled_nums": None,
"y_axis_label": "$y$",
"axes_color": GREY,
"graph_origin": 2.5 * DOWN + 4 * LEFT,
"exclude_zero_label": True,
"num_graph_anchor_points": 25,
"default_graph_colors": [BLUE, GREEN, YELLOW],
"default_derivative_color": GREEN,
"default_input_color": YELLOW,
"default_riemann_start_color": BLUE,
"default_riemann_end_color": GREEN,
"area_opacity": 0.8,
"num_rects": 50
}
```
**Click for results on YouTube:**
[](https://www.youtube.com/watch?v=6IyImPGDVUc)
### 3D Graphing
#### Spheres and more
```python
from manimlib.imports import *
class ThreeDObjects(SpecialThreeDScene):
def construct(self):
sphere = self.get_sphere()
cube = Cube()
prism = Prism()
self.play(ShowCreation(sphere))
self.play(ReplacementTransform(sphere, cube))
self.play(ReplacementTransform(cube, prism))
self.wait(2)
```
#### Camera Works
#### Custom Graphs
```python
from manimlib.imports import *
class ThreeDSurface(ParametricSurface):
def __init__(self, **kwargs):
kwargs = {
"u_min": -2,
"u_max": 2,
"v_min": -2,
"v_max": 2,
"checkerboard_colors": [BLUE_D]
}
ParametricSurface.__init__(self, self.func, **kwargs)
def func(self, x, y):
return np.array([x,y,x**2 - y**2])
class Test(ThreeDScene):
def construct(self):
self.set_camera_orientation(0.6, -0.7853981, 86.6)
surface = ThreeDSurface()
self.play(ShowCreation(surface))
d = Dot(np.array([0,0,0]), color = YELLOW)
self.play(ShowCreation(d))
self.wait()
self.move_camera(0.8*np.pi/2, -0.45*np.pi)
self.begin_ambient_camera_rotation()
self.wait(9)
```
Alright! Finally some 3D graphs. So, the first ThreeDSurface inherits from parametric surfaces. This will be used to define our 3D graph in terms of a mathematical equation. The **kwargs** parameter are just some tweaks that change the color of the the graph, or how much of the graph should be rendered. The method **func** defines the function. It returns the **z** given the x and y parameters (which are required for 3D graphs).
The ThreeDSurface is called in the Test class and is manipulated like a mobject. You render the 3D graph like any other mobject in manim.
A continuation of this tutorial will follow to explain how the camera works. For now, the camera is basically your eyes.
**Click for results on YouTube:**
[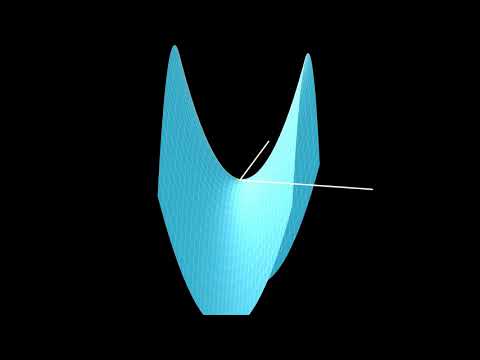](https://www.youtube.com/watch?v=_XMEQRshlp4)
### Images
Manim has a mobject made for images. You can resise them, invert their colors, etc by using Manim methods.
```python
from manimlib.imports import *
class Images(Scene):
def construct(self):
img = ImageMobject('pathToIm.png')
img.scale(2) # Resize to be twice as big
img.shift(2 * UP) # Move the image
self.play(ShowCreation(img)) # Display the image
```
Alternatively, you could load the image using OpenCV or PIL, and then display the image using Manim.
```python
from manimlib.imports import *
import cv2
class Images(Scene):
def construct(self):
img = cv2.imread('pathToImg.png')
imMob = ImageMobject(img) # Makes an image mobject of existing image
imMob.scale(2)
imMob.shift(2 * UP)
self.play(ShowCreation(imMob))
```
## GO TO GUIDE!
[Click Here For the Guide](https://github.com/malhotra5/Manim-Guide)
## Exploring-the-Repo
### ManimLib
#### Animations
#### Mobjects
##### Types
#### Scenes
#### Utils
### Media
### Old_Projects
## Putting it together
Manim is extremely powerful, and is capable of creating high quality graphics. You can make your animations using graphics and then overlay your voice over the video.
If you were able to follow this tutorial successfully, then Congrats! Hopefully you can proficiently use Manim!
## Resources
* [Latex](https://artofproblemsolving.com/wiki/index.php/LaTeX:Symbols)
* [Manim Guide](https://github.com/malhotra5/Manim-Guide)
## Further Work
I am missing a lot of aspects behind this powerful library after reverse engineering manim. There are things such as 3D scenes that still need to be documented. But hopefully this guide will cater to your basic needs.
## Acknowledgments
* 3 Blue 1 Brown: The creator of this engine who uses it for creating cool math videos. Visit his [YouTube channel](https://www.youtube.com/channel/UCYO_jab_esuFRV4b17AJtAw) and [manim repo](https://github.com/3b1b/manim).
* Todd Zimmerman: Recently made a new [documentation](https://talkingphysics.wordpress.com/tag/manim/) of manim in Python3.7.