Ecosyste.ms: Awesome
An open API service indexing awesome lists of open source software.
https://github.com/chrisgrieser/shimmering-obsidian
Alfred Workflow with dozens of features for controlling your Obsidian vault.
https://github.com/chrisgrieser/shimmering-obsidian
alfred alfred-workflow obsidian-md
Last synced: 28 days ago
JSON representation
Alfred Workflow with dozens of features for controlling your Obsidian vault.
- Host: GitHub
- URL: https://github.com/chrisgrieser/shimmering-obsidian
- Owner: chrisgrieser
- License: mit
- Created: 2021-08-22T15:41:18.000Z (almost 3 years ago)
- Default Branch: main
- Last Pushed: 2024-04-20T16:21:22.000Z (2 months ago)
- Last Synced: 2024-04-20T18:12:17.156Z (2 months ago)
- Topics: alfred, alfred-workflow, obsidian-md
- Language: JavaScript
- Homepage: https://alfred.app/workflows/chrisgrieser/shimmering-obsidian/
- Size: 111 MB
- Stars: 759
- Watchers: 7
- Forks: 37
- Open Issues: 2
-
Metadata Files:
- Readme: README.md
- Funding: .github/FUNDING.yml
- License: LICENSE
Lists
- my-awesome-stars - chrisgrieser/shimmering-obsidian - Alfred Workflow with dozens of features for controlling your Obsidian vault. (JavaScript)
- awesome-stars - chrisgrieser/shimmering-obsidian - Alfred Workflow with dozens of features for controlling your Obsidian vault. (others)
- awesome-stars - chrisgrieser/shimmering-obsidian - `★791` Alfred Workflow with dozens of features for controlling your Obsidian vault. (JavaScript)
- awesome-stars - chrisgrieser/shimmering-obsidian - Alfred Workflow with dozens of features for controlling your Obsidian vault. (JavaScript)
- project-awesome - chrisgrieser/shimmering-obsidian - Alfred Workflow with dozens of features for controlling your Obsidian vault. (JavaScript)
README
# Shimmering Obsidian 🎩
Alfred workflow with dozens of features for controlling your
[Obsidian](https://obsidian.md/) vault.
[⭐Featured in the Alfred Gallery.](https://alfred.app/workflows/chrisgrieser/shimmering-obsidian/)


- [Installation](#installation)
- [Alfred-based quick switcher](#alfred-based-quick-switcher)
* [How the search works](#how-the-search-works)
* [Main search](#main-search)
+ [Search for notes](#search-for-notes)
+ [Smart queries](#smart-queries)
+ [Search for aliases](#search-for-aliases)
+ [Search for folders](#search-for-folders)
+ [Search for headings](#search-for-headings)
+ [Browse links of a note](#browse-links-of-a-note)
* [Search notes by their tags](#search-notes-by-their-tags)
* [Search bookmarked files](#search-bookmarked-files)
* [Search recent files](#search-recent-files)
* [Search for attachments](#search-for-attachments)
* [Search all external links in the entire vault](#search-all-external-links-in-the-entire-vault)
* [Extra features](#extra-features)
+ [Supercharged icons](#supercharged-icons)
+ [Privacy mode](#privacy-mode)
+ [Vault search as Alfred fallback](#vault-search-as-alfred-fallback)
+ [Previewing notes via QuickLook](#previewing-notes-via-quicklook)
- [Note-related features](#note-related-features)
* [Create a new note](#create-a-new-note)
* [Scratchpad](#scratchpad)
- [Screenshot features](#screenshot-features)
* [OCR screenshots](#ocr-screenshots)
* [Image screenshot](#image-screenshot)
- [Utility features](#utility-features)
* [Workspace switcher](#workspace-switcher)
* [Vault switcher](#vault-switcher)
* [Back up your vault](#back-up-your-vault)
* [CSS files](#css-files)
* [Open various folders](#open-various-folders)
* [Update plugins & metadata](#update-plugins--metadata)
- [Plugins, themes, and settings](#plugins-themes-and-settings)
* [Plugins](#plugins)
* [Themes](#themes)
* [Settings & local plugins](#settings--local-plugins)
- [Documentation searches](#documentation-searches)
* [Official documentation](#official-documentation)
* [Plugin developer documentation](#plugin-developer-documentation)
- [Cheatsheet](#cheatsheet)
- [Credits](#credits)
- [About the developer](#about-the-developer)
## Installation
*This workflow requires Alfred 5 with [Powerpack](https://www.alfredapp.com/powerpack/).*
1. Install the Obsidian plugins [Advanced
URI](https://obsidian.md/plugins?id=obsidian-advanced-uri) & [Metadata
Extractor](https://obsidian.md/plugins?id=metadata-extractor). Enable both
plugins.
2. Download the [latest release at
GitHub](https://github.com/chrisgrieser/shimmering-obsidian/releases/latest).
Double-click the `.alfredworkflow` file to install it.
3. Set your vault path in the workflow configuration.
4. Run the Alfred Command `osetup`. Obsidian then restarts.
## Alfred-based quick switcher
The Alfred-based Quick Switcher is basically an enhanced version of [Obsidian's
Quick Switcher Core Plugin](https://help.obsidian.md/Plugins/Quick+switcher).
### How the search works
All the search features listed here do not *directly* search your vault, but
rather use the metadata created by the [Metadata Extractor
Plugin](https://obsidian.md/plugins?id=metadata-extractor) on a regular basis.
By default, this happens every 30 minutes, meaning recently created notes,
recently renamed notes, or recent tag changes are not picked up at once. You can
change the metadata refresh rate via the Metadata Extractor Plugin's settings.
### Main search
**`o`: Open files in your vault.**
This keyword searches all your notes, aliases, folders, and headings combined.
#### Search for notes
This works similar to Obsidian's built-in *Quick Switcher*, but can be triggered
without Obsidian running (in which case it opens Obsidian with the selected
note). Press `⏎` to open the selected file in Obsidian.
- `⌘ + ⏎`: Open the file in a new tab (requires Obsidian 0.16).
- `⌥ + ⏎`: Reveal the file in Finder.
- `fn + ⏎`: Append the content to the selected note.
- `⌃ + ⏎`: Copy the [Obsidian-URI to the selected file](https://help.obsidian.md/Advanced+topics/Using+obsidian+URI#Action+`hook-get-address`).
- `⇧ + ⏎`: Browse a list of all links of the selected note (outgoing links,
backlinks, external links.) See at the [section "Browse Links"
below](#browse-links-of-a-note) for further information.
- Press `⇧` or `⌘ y` to preview the selected note via macOS' Quick Look feature.
Press `⇧` or `⌘ y` again to close the preview. This feature requires
[QLMarkdown or Peek](#previewing-notes-via-quicklook) being installed.
- 💡 The `o`-search respects the `Excluded Files` setting from Obsidian and
ignore files and folders added there. (Regex-Filters do not work properly
though.)
> [!TIP]
> There are various settings for appending and opening notes, which can be
found in the workflow configuration.
#### Smart queries
- Add `filename` or `title` to your search query, to display only files and no
aliases, folders, or headings. For example, `o obsidian filename` displays
only notes that have the `obsidian` in their filename.
- Add `canvas` to your search to only display canvases (Obsidian 1.1).
- Similarly, you can also filter for starred or recent files by adding `starred`
or `recent` to your query.
- You can add `#tag` to your search query to search only for files with a
specific tag, for example, `o foobar #moc` only displays notes with the name
`foobar` that are also tagged with `#moc`.## Smart Queries
- Add `filename` or `title` to your search query, to display only files and no
aliases, folders, or headings. For example, `o obsidian filename` displays
only notes that have the `obsidian` in their filename.
- Add `canvas` to your search to only display canvases (Obsidian 1.1).
- Similarly, you can also filter for starred or recent files by adding `starred`
or `recent` to your query.
- You can add `#tag` to your search query to search only for files with a
specific tag, for example, `o foobar #moc` only displays notes with the name
`foobar` that are also tagged with `#moc`.
#### Search for aliases
This command also looks for **aliases**, when they are [defined in the YAML-Header](https://help.obsidian.md/How+to/Add+aliases+to+note#Set+aliases).
- Add `alias` to your search query, to only display aliases, for example, `o
obsidian alias` only displays notes that have the *alias* `obsidian`.# Search for Aliases
This command also looks for **aliases**, when they are [defined in the YAML-Header](https://help.obsidian.md/How+to/Add+aliases+to+note#Set+aliases).
- Add `alias` to your search query, to only display aliases, for example, `o
obsidian alias` only displays notes that have the *alias* `obsidian`.
#### Search for folders
When **selecting a folder**, you **"browse"** the selected folder—this means
that you are now searching only for files and folders inside that folder.
- When browsing a folder, you also have the option to create a new note *in that
folder*. Uses the template note defined with the setting `template_note_path`.
- Furthermore, you can go up and browse the *parent* folder of the current
folder. Basically, you can fully explore the folder structure of your vault
via Alfred.
- Add `folder` to your search query, to only display folders, for example, `o
foobar folder` only displays *folder* that have `foobar` in their name.
- When you are browsing inside a folder, use the query `..` or the `new` to
quickly access the item for going up to the parent folder or creating a new
note in that folder, respectively.# Search for Folders
When **selecting a folder**, you **"browse"** the selected folder—this means
that you are now searching only for files and folders inside that folder.
- When browsing a folder, you also have the option to create a new note *in that
folder*. Uses the template note defined with the setting `template_note_path`.
- Furthermore, you can go up and browse the *parent* folder of the current
folder. Basically, you can fully explore the folder structure of your vault
via Alfred.
- Add `folder` to your search query, to only display folders, for example, `o
foobar folder` only displays *folder* that have `foobar` in their name.
- When you are browsing inside a folder, use the query `..` or the `new` to
quickly access the item for going up to the parent folder or creating a new
note in that folder, respectively.
#### Search for headings
Displayed alongside the other search results are all headings in your vault.
Selecting a heading with `⏎` opens the file *at the respective heading*.
- `⌃ + ⏎`: Copies either a Markdown link [that uses the Obsidian
URI](https://help.obsidian.md/Advanced+topics/Using+obsidian+URI#Action+%60hook-get-address%60)
or the wikilink to the selected file, depending on the setting. Also work with
headings.
- Add `heading` to your search query, to only display headings, for example, `o
foobar heading` only displays *headings* that include `foobar`.
- Add `h1`, `h2`, … to your search query, to only display headings of a certain
level, for example, `o obsidian h2` only displays *level 2 headings* that
include `obsidian`.
- You can ignore certain (or all) heading levels with the respective workflow configuration.
> [!TIP]
> Add more heading levels to `h_lvl_ignore` if your search results become too
> crowded.## Search for Headings
Displayed alongside the other search results are all headings in your vault.
Selecting a heading with `⏎` opens the file *at the respective heading*.
- `⌃ + ⏎`: Copies either a Markdown link [that uses the Obsidian
URI](https://help.obsidian.md/Advanced+topics/Using+obsidian+URI#Action+%60hook-get-address%60)
or the wikilink to the selected file, depending on the setting. Also work with
headings.
- Add `heading` to your search query, to only display headings, for example, `o
foobar heading` only displays *headings* that include `foobar`.
- Add `h1`, `h2`, … to your search query, to only display headings of a certain
level, for example, `o obsidian h2` only displays *level 2 headings* that
include `obsidian`.
- You can ignore certain (or all) heading levels with the respective workflow configuration.
> [!TIP]
> Add more heading levels to `h_lvl_ignore` if your search results become too
> crowded.
#### Browse links of a note
**Use `⇧ + ⏎` on any search result of the main `o` search to browse the links of
that note**
- Displays a list of *all* links of the note: outgoing links, backlinks, and
external links. (As of now, unresolved internal links are not displayed
though.)
- Selecting an outgoing link or backlink opens the respective note.
* All the modifiers (`⌘/⌃/⌥/fn/⇧ + ⏎`) apply the same way as with the main `o` search.
* *Yes, this means you can repeatedly use `⇧ + ⏎` to basically traverse
your graph via Alfred. 😎*
- for external links:
* Selecting an external link with `⏎` opens the link in the default browser.
* Press `⌥ + ⏎` on an external link to copy the URL to the clipboard instead.
### Search notes by their tags
**`ot`: Search `t`ags and subsequently files with that tag**
- Display and search a full list of all tags in your vault.
* Select a tag with `⏎` to display & search all notes with that tag.
* In the following list of your notes, all the modifiers (`⌘/⌃/⌥/fn/⇧ + ⏎`)
apply the same way as they do with the `o` search.
* Press `⌘ + ⏎` instead to open Obsidian's search pane and search for the tag there.
- Use the workflow configuration to set whether nested tags should be merged
with their parent or not.
### Search bookmarked files
**`ob`: Search `b`ookmarked Files and Searches**
- When you select a starred *file*, all the modifiers (`⌘/⌃/⌥/fn/⇧ + ⏎`) apply
the same way as with the main `o` search.
- If you select a starred *search*, Obsidian opens the search pane with the
respective query.
- This feature requires the [Bookmark core
plugin](https://help.obsidian.md/Plugins/Bookmarks) being enabled.
### Search recent files
**`or`: Open `r`ecent Files**
- All the modifiers (`⌘/⌃/⌥/fn/⇧ + ⏎`) apply the same way as with the main `o` search.
- Only the 10 most recent files are displayed.
### Search for attachments
**`oa`: `a`ttachments**
- Searches only for attachments (non-Markdown files) in your vault. `⏎` opens
the selected files in your default app. (Obsidian itself is not opened.)
- The modifiers `⌘/⌃/⌥ + ⏎` and the previewing (`⇧` or `⌘y`) work the same way
as with the main `o` search.
- `⇧ + ⏎`, however, works differently: it opens the file in Obsidian, if
[Obsidian is able to open
them](https://help.obsidian.md/Advanced+topics/Accepted+file+formats). (If not,
the file simply is opened in your default app.)
### Search all external links in the entire vault
**`oe`: Search all `e`xternal links in your entire vault**
- `⏎`: Opens the link in the browser.
- `cmd + ⏎`: Reveal the link in Obsidian.
- `alt + ⏎`: Copies the URL to the clipboard.
### Extra features
#### Supercharged icons
You can prepend or append icons to the results of any search based on the notes'
tags, similar to the [Supercharged Links
Plugin](https://obsidian.md/plugins?id=supercharged-links-obsidian).
- To do so, you have to add a file containing your emojis to the workflow
configuration `Supercharged Icons`.
- Every line of the file should represent a pair of tag and emoji to be
assigned, separated by `,`. Use `,,` so that the emoji gets appended instead
of prepended.
**Example**
```csv
coding,💻
person,👤
seedling,,🌱
pkm,🧠,💡
```
…results in:
```text
💻 Filename1
👤 Filename2
Filename3 🌱
🧠 Filename4 💡
```
#### Privacy mode
When the "Privacy Mode" checkbox is enabled, all notes with the `cssclass`
`private` are censored when performing a search. This setting is meant to be
enabled temporarily, for example during screen-sharing.
#### Vault search as Alfred fallback
The main search (`o`) can also be used as [Fallback Search for
Alfred](https://www.alfredapp.com/help/features/default-results/fallback-searches/),
basically a search that shows up when any Alfred search has no result.
#### Previewing notes via QuickLook
To avoid accidentally triggering the Quick Look feature, it is suggested you
turn off activating QuickLook via shift and use `⌘ + Y` instead. You can do so
with in the Alfred Settings under `Features → Previews`:
[QLmarkdown](https://github.com/sbarex/QLMarkdown) and
[Peek](https://apps.apple.com/app/peek-quick-look-extension/id1554235898) both
enable previewing of Markdown documents. Peek works with a wide range of other
file types than Markdown, but costs around €5. `QLMarkdown` is free, but only
works for Markdown and requires some minor setup.
- The app `QLMarkdown.app` must be started at least once. You may need to
right-click the app and select `open`, to be able to allow macOS to trust the
app.
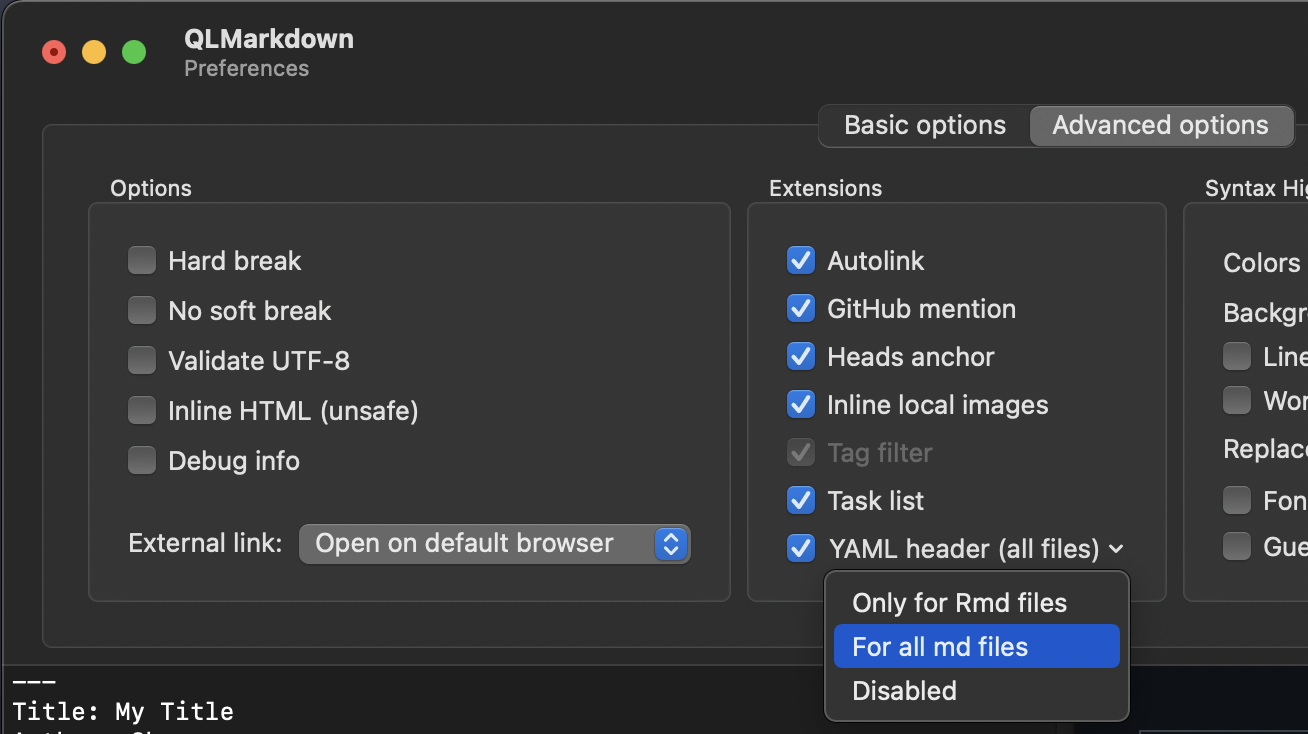
- To enable proper display of YAML headers, you need to enable the respective
setting in the Advanced Options of QLMarkdown:
## Note-related features
### Create a new note
**`on`: Create a `n`ew note.**
- **File Name:** Anything you type after the keyword `on` (for example, `on foobar`) becomes the file name of the new note (for example, `foobar.md`). (Note that the [Filename Heading Sync Plugin](https://obsidian.md/plugins?id=obsidian-filename-heading-sync) may interfere with this.)
* When triggered via `cmd + ⏎`, the new note is created in a new tab.
- **Content:** You can select a template note to use in the workflow configuration. Only `{{title}}` is supported as placeholder and is replaced with the file name. Be aware that the template might be overridden by Folder Templates from the [Templater plugin](https://obsidian.md/plugins?id=templater-obsidian).
- **Location:** The new note is placed in the folder specified in the workflow configuration. If the configuration is empty, it is placed in your vault root.
- 💡 There are various settings for creating new notes in the workflow configuration.
### Scratchpad
**`oo` or `triggered via hotkey`: Append to your Scratchpad Note**
- Quickly add text to the note set in the workflow configuration. (This command is basically a quicker version of the `fn + ⏎` mode of the [Alfred-based Quick Switcher](Alfred-based%20Quick%20Switcher.md#search-for-notes).)
* When using `oo foobar`, appends `foobar` to the note.
* Triggered via **hotkey**, appends the current selection.
* When you append `#foobar` (for example, `Inbox/Scratchpad-Note#Thoughts`) to path of the scratchpad file in the workflow configuration, the text is appended to the section with the heading "foobar."
- 💡 Using `- [ ]` as prefix and inserting below a specific heading enables you to add cards to a Kanban Board.
- 💡 There are various settings for the scratchpad in the workflow configuration.
## Screenshot features

### OCR screenshots
**`Triggered via Hotkey`: Take an OCR Screenshot.**
- Similar to the default Mac Hotkey `⌘ ⇧ + 4`, you are able to select part
of your screen for a screenshot. However, instead of saving a screenshot, a
new note is created which contains the OCR'ed content of the selection.
- For best results, you should set the languages to be recognized in the
workflow settings, such as `eng+deu` for English and German. You can find out the
code for your languages in [this
list](https://tesseract-ocr.github.io/tessdoc/Data-Files-in-different-versions.html).
- 💡 There are various settings in the workflow configurations for
OCR-screenshots.
**Requirement**
For the OCR-Screenshot Feature, you need to install [Tesseract](https://tesseract-ocr.github.io/tessdoc/Installation.html). If you use Homebrew, you can do so with the following command:
```bash
brew install tesseract tesseract-lang
```
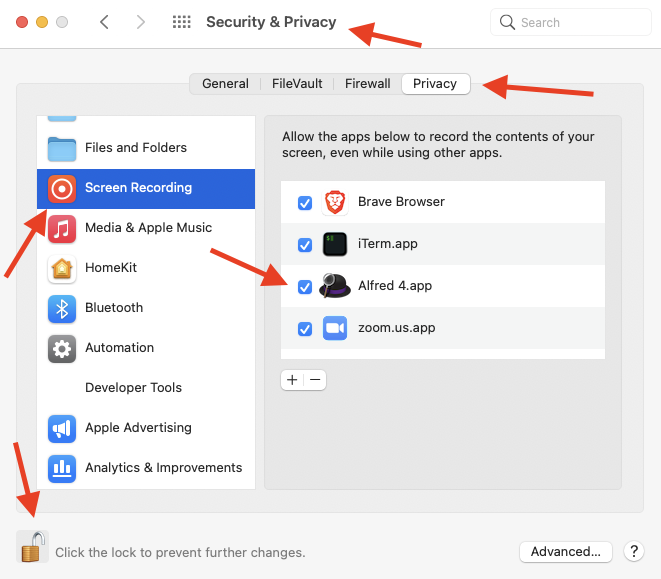
> [!TIP]
> The first time you use the OCR or image screenshot feature, you might need to
> give Alfred permission to record your screen. You can do so under the macOS
> system settings.
>
> 
### Image screenshot
**`Triggered via Hotkey`: Take an image screenshot.**
- Similar to the default Mac Hotkey `⌘ ⇧ + 4`, you are able to select part
of your screen for a screenshot. The image is directly saved in your
vault with the file name `Screenshot {date} {time}.png` and the image is
embedded (`![[image_file_name.png]]`) in the note `Images.md` in your vault
root.
- The images are saved in `{vault-path}/screenshots/` by default. You can
use the workflow configuration to specify a folder in your vault where to save
the images instead.
- If the file `Images.md` already exists in your vault root, any subsequent
screenshots are instead appended to this note. This is intended for taking
screenshots in quick succession, for instance during a live lecture or presentation.
- 💡 There are various settings in the workflow configurations for screenshots.
## Utility features
### Workspace switcher
**`ow`: Switch to a different `w`orkspace**
- Displays a list of your workspaces. Select one to open the workspace.
- You can also manage your Workspaces from here, that is, saving, loading &
deleting a workspace.
- Unsurprisingly, this workflow requires the [Workspaces Core Plugin](https://help.obsidian.md/Plugins/Workspaces) to be enabled.

### Vault switcher
**`ov`: Open `V`aults in Obsidian, Finder, or the Terminal**
- Select a Vault and press `⏎` to open it in Obsidian.
- `⌘ ⏎` opens the root of the selected vault in your default Terminal. You can
[change the default terminal in the Alfred
Settings](https://www.alfredapp.com/help/features/terminal/).
- `⌥ ⏎` opens the root in Finder.
> [!NOTE]
> To control/search a different vault, you have to change the vault path in the
> workflow configuration.
### Back up your vault
**`obackup`: Create a `backup` of your vault.**
- Your whole vault is compressed into a *zip* file and then moved to the
location you specified in the workflow configuration.
- This command respects the maximum number of backups you have set (workflow
configuration `max_number_of_bkps`) to prevent taking up too much disk space.
When the number is reached, every new backup causes the oldest backup to be
deleted.
- The hidden folders `.obsidian` and `.trash` are included in the backup, the
`.git` folder is excluded.
- 💡 Advanced users: you can use the following AppleScript snippet to trigger a
backup. This is useful to create automated backups via
[launchd](https://launchd.info/), [Cron
jobs](https://ostechnix.com/a-beginners-guide-to-cron-jobs/), or [Keyboard
Maestro](https://www.keyboardmaestro.com/main/).
```applescript
tell application id "com.runningwithcrayons.Alfred"
run trigger "backup-obsidian" in workflow "de.chris-grieser.shimmering-obsidian"
end tell
# pass 'no sound' as argument to turn off backup confirmation sound
```
> [!WARNING]
> Please be aware that this is a simplistic backup solution. While I did not
> have any problems with it, this workflow comes without any warranties, as
> stated in [the
> license](https://github.com/chrisgrieser/shimmering-obsidian/blob/main/LICENSE).
> If you want 100% safety, please use a professional backup solution.
### CSS files
**`ocss`: Access your `css` files.**
- Open a CSS snippet in your default text editor.
### Open various folders
- `o.obsidian`: The hidden `.obsidian` folder located in your vault root is opened in Finder.
- `o.trash`: Open the hidden [`.trash`
folder](https://help.obsidian.md/Advanced+topics/Deleting+files) located in
your vault root is opened in Finder. (Note that you have to select `Move to
Obsidian trash` in the Obsidian settings under the `Files & Links` tab before
deleted files can be found here.)
- `oapplicationsupport`: Open Obsidian's Application Support folder.
- `oplugins`: The plugin folder in `.obsidian` is opened in Finder.
- `opthemes`: The theme folder in `.obsidian` is opened in Finder.
### Update plugins & metadata
**`oupdate`: Update Plugins and Metadata used by this workflow**
- Update your community plugins (and beta plugins installed via [the BRAT
Plugin](https://github.com/TfTHacker/obsidian42-brat)).
- Refresh the metadata used for this workflow manually.
## Plugins, themes, and settings
### Plugins
**`op`: combined Search of community `p`lugins and community themes.**
- Press `⏎` to open the plugin's GitHub repository.
* Use `⌘ + ⏎` to open .the plugin in Obsidian's Community Plugin Browser
instead.
* Press `⌥ + ⏎` to copy the plugin URI (`obsidian://show-plugin?id=…`) to
your clipboard.
* `⌘⌥ + ⏎`: Copy the plugin link together with a description.
* `fn + ⏎`: open the plugin's page at [Obsidian Stats](https://www.moritzjung.dev/obsidian-stats/).
- Only plugins officially included in the community plugins are displayed —
plugins solely available via GitHub or still in review are not shown.
- Add `plugin` to the search query to only display plugin, for example, use `op
focus plugin` as search query to only display *plugins* with the term `focus`.
- The `op` search also considers the name of the plugin's author, meaning the
query `op JaneDoe` returns all plugins (and themes) authored by the user
`JaneDoe`.
### Themes
**`op`: Combined Search of community `p`lugins and community themes.**
- Press `⏎` to open the theme's GitHub repository in the browser.
* Use `⌘ + ⏎` to open the theme browser instead. (There are no separate
theme pages in Obsidian Theme Browser that can be opened.)
* Press `⌥ + ⏎` to copy the theme URI (`obsidian://show-theme?id=…`) to your
clipboard.
* `⌘⌥ + ⏎`: Copy the plugin link together with a description.
* Use `⇧` or `⌘ + Y` to open a Quick Look Preview of the theme's promo
screenshot. Press `⇧` or `⌘ + Y` again to close the preview.
* `fn + ⏎` to open the theme's page at [Obsidian Stats](https://www.moritzjung.dev/obsidian-stats/).
- Only themes officially included in the community themes are displayed — themes
solely available via GitHub or still in review are not shown.
- Add `theme` to the search query to only display themes, for instance use `op
focus theme` as search query to only display *themes* with the term `focus`.
- The `op` search also considers the name of the theme's author, meaning the
query `op JaneDoe` returns all themes (and plugins) authored by the user
`JaneDoe`.

### Settings & local plugins
**`o,`: Search and directly open specific setting tabs.[^1]**
- The search includes Obsidian main settings, quick access to the plugin and
theme browser, as well as settings for plugins. Press `⏎` to open the
respective setting *directly*.
- `⌥ + ⏎` opens the local plugin folder in `.obsidian/plugins/` in Finder.
- `⇧ + ⏎` enables/disables the plugin.
- *⚙️ For developers:*
* `⌘ + ⏎` opens the local plugin folder in your default Terminal.
(You can [change the default terminal in the Alfred
Settings](https://www.alfredapp.com/help/features/terminal/).)
* `⌃ + ⏎` copies the plugin's ID. (Hold `⌃` to see the plugin's id.)
* `fn + ⏎` runs `git pull` in the plugin's directory.
> [!TIP]
> `o,` refers to the `⌘ ,` shortcut used to open the settings.
## Documentation searches
### Official documentation
**`oh`: Get `h`elp by searching the official [Obsidian documentation](https://help.obsidian.md/Start+here) and the [Obsidian Hub](https://publish.obsidian.md/hub).**
- This command mimics the search behavior on the official documentation site,
meaning that it also searches for headings inside individual documentation
pages.
* Press `⏎` to open in your default browser.
* Use `⌥ + ⏎` to copy the link to your clipboard.
- After major updates of the Obsidian documentation, this Alfred workflow needs
to recreate its index of the Obsidian documentation. You can do so by
selecting the respective option when typing keyword `oupdate`. (Index
recreation can take a minute, depending on your internet connection. You
are notified when it is done.)
**`odv`: Search the [dataview](https://blacksmithgu.github.io/obsidian-dataview/) documentation.**
- Press `⏎` to open in your default browser.
- Use `⌥ + ⏎` to copy the link to your clipboard.
### Plugin developer documentation
**`odd`: `o`bsidian `d`eveloper `d`ocumentation Search**
Search the official [Obsidian developer docs](https://docs.obsidian.md/Home).
## Cheatsheet
- `o`: All notes
- `oe`: All external links
- `ot`: Tags
- `ob`: Bookmarked files/searches
- `or`: Recent files
- `oa`: Attachments
- `oo`: Append/open to scratchpad
- `on`: New note
- `ow`: Workspace switcher
- `ov`: Vault switcher
- `oh`: Documentation search
- `op`: Search plugins/themes
- `o,:` Search settings and installed plugins
- `ocss`: Open CSS snippets
## Credits
- Big shout-out to [@kometenstaub](https://github.com/kometenstaub) for
developing the [metadata extractor
plugin](https://github.com/kometenstaub/metadata-extractor), as this workflow
is its main client.
- Also thanks to [@Vinzent03](https://github.com/Vinzent03) for his invaluable
[Advanced URI plugin](https://github.com/Vinzent03/obsidian-advanced-uri),
which enables Alfred to control various aspects of Obsidian.
- Most icons created by [Freepik (Flaticon)](https://www.flaticon.com/authors/freepik).
## About the developer
In my day job, I am a sociologist studying the social mechanisms underlying the
digital economy. For my PhD project, I investigate the governance of the app
economy and how software ecosystems manage the tension between innovation and
compatibility. If you are interested in this subject, feel free to get in touch.
- [Academic Website](https://chris-grieser.de/)
- [ResearchGate](https://www.researchgate.net/profile/Christopher-Grieser)
- [Mastodon](https://pkm.social/@pseudometa)
- [LinkedIn](https://www.linkedin.com/in/christopher-grieser-ba693b17a/)
*Note that for questions, bug reports, or feature requests for this workflow,
please open a [GitHub
issue](https://github.com/chrisgrieser/shimmering-obsidian/issues), since it is
better suited for technical support.*