https://github.com/880831ian/ansible
Ansible 介紹與實作 (Inventory、Playbooks、Module、Template、Handlers)
https://github.com/880831ian/ansible
ansible cicd devops docker
Last synced: about 1 year ago
JSON representation
Ansible 介紹與實作 (Inventory、Playbooks、Module、Template、Handlers)
- Host: GitHub
- URL: https://github.com/880831ian/ansible
- Owner: 880831ian
- Created: 2022-05-16T06:35:10.000Z (about 4 years ago)
- Default Branch: master
- Last Pushed: 2022-05-18T02:47:21.000Z (about 4 years ago)
- Last Synced: 2025-06-08T18:03:25.469Z (about 1 year ago)
- Topics: ansible, cicd, devops, docker
- Language: Dockerfile
- Homepage:
- Size: 1.89 MB
- Stars: 9
- Watchers: 1
- Forks: 0
- Open Issues: 0
-
Metadata Files:
- Readme: README.md
Awesome Lists containing this project
README
# Ansible 介紹與實作 (Inventory、Playbooks、Module、Template、Handlers)
本篇文章是接續前面兩篇 [Jenkins 及 Ansible IT 自動化 CI/CD 介紹](https://pin-yi.me/jenkins-ansible/) 跟 [使用 Jenkins 設定 GitHub 觸發程序並通知 Telegram Bot](https://pin-yi.me/jenkins/) 文章,歡迎大家先去觀看前面兩篇文章 🤪
## Ansible 是如何運作的?
在 Ansible 世界裡,我們會透過 `Inventory 檔案` 來定義有哪些的 `Managed Node`,並藉由 `SSH` 與 `Python` 來進行溝通。那我們先來看一張圖:
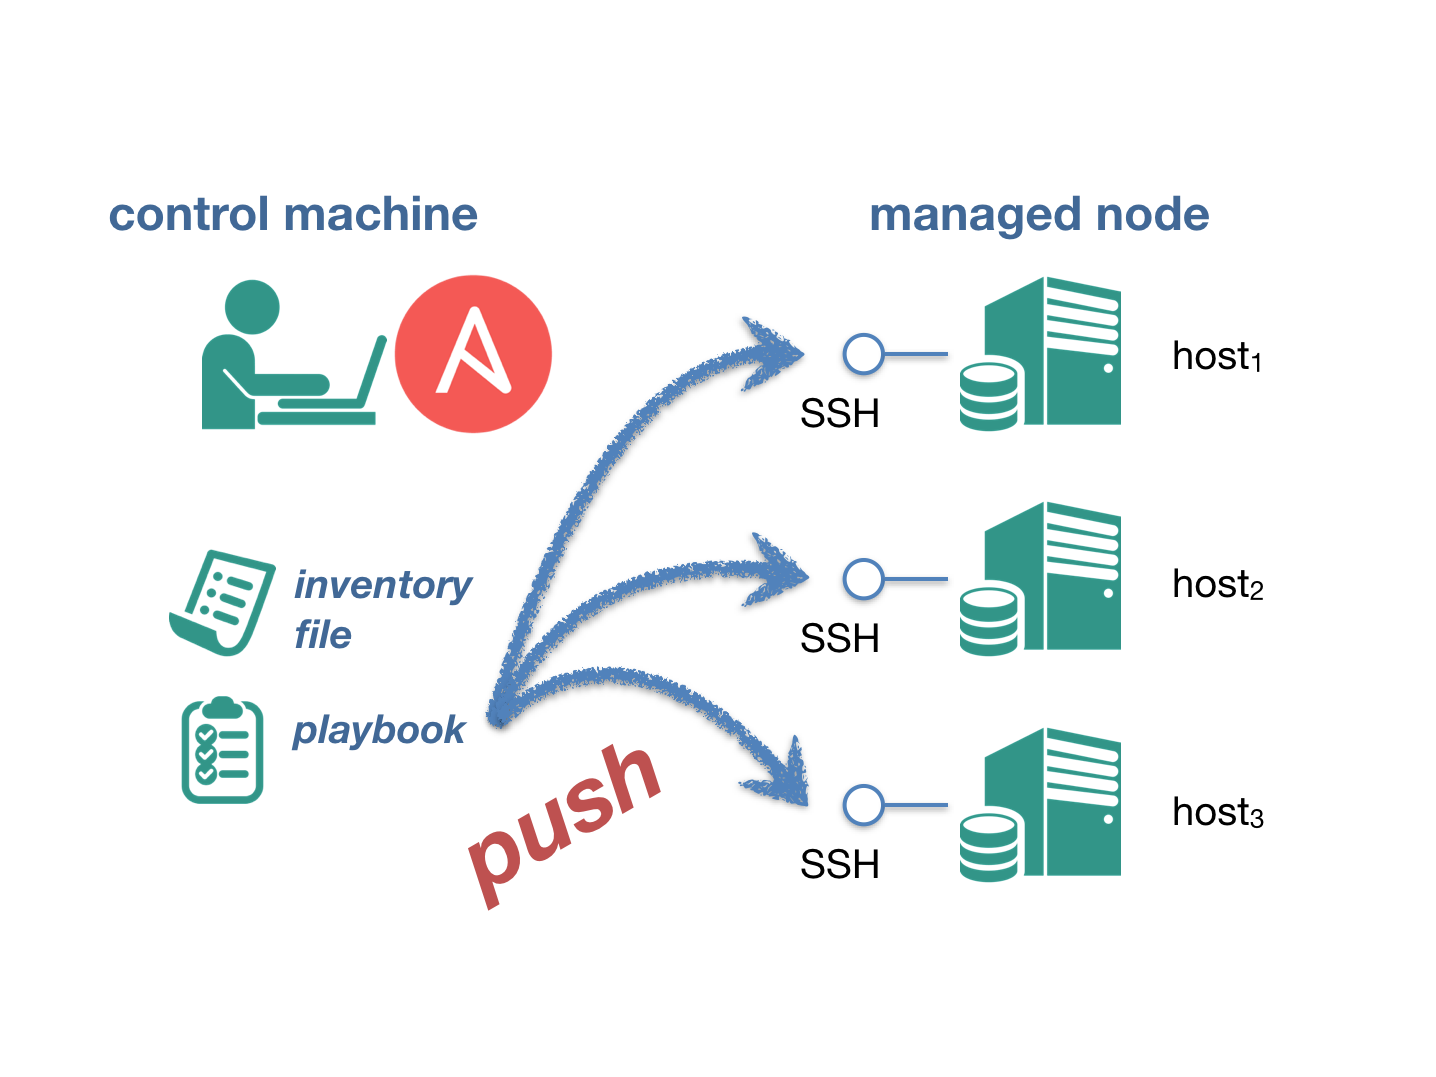
誒 😱 突然多了很多新名詞,沒關係我來一一解釋,首先我們先從 `Managed Node` 是什麼,以及圖片中的 `Control machine` 開始說起吧!
### 什麼是控制主機及被控節點?
在 Ansible 裡,我們會把所有機器的角色做以下的區分:
* 控制主機 (Control Machine):顧名思義,這類主機可以透過運行 Ansible 的劇本 (Playbooks) 對被控節點進行部署。
* 被控節點 (Managed Node):也稱為遙控節點 (Remote Node)。相對於控制主機,這類節點就是我們透過 Ansible 進行部署的對象。
所以代表我們在操作這邊就是 Control Machine,要部署的機器就是 Managed Node,透過 SSH 來做連線。但什麽是 `Inventory` 跟 `Playbooks` 呢?
### 什麼是 Ansible Inventory
`Inventory` 這個單字本身有**詳細目錄**、**清單**和**列表**的意思。在這裡我們可以把它理解成一份主機列表,可以透過它來定義每個 Managed Node 的代號、IP 位址、連線設定和群組。
```sh
$ vim hosts
# ansible_ssh_host:遠端 SSH 主機位址
# ansible_ssh_port:遠端 SSH Port
# ansible_ssh_user:遠端 SSH 使用者名稱
# ansible_ssh_private_key_file:本機 SSH 私鑰檔案路徑
# ansible_ssh_pass:遠端 SSH 密碼 (建議使用私鑰)
[local]
server1 ansible_ssh_host=127.0.0.1 ansible_ssh_port=55000 ansible_ssh_pass=docker
```
所以我們可以在這邊輸入很多個主機來做管理,可以把它想成一個設定檔。
### 什麼是 Ansible Playbooks
再談 Ansible Playbooks 之前,先說明我們要怎麼去操作 Ansible?一般來說,我們可以使用 Ad-Hoc Commands 和 Playbooks 兩種方式來操作 Ansible。
#### Ad-Hoc Commands 是什麼?
Ad hoc 可以翻譯成**簡短地指令**,也就是我們常用的指令模式,最常見的 `ping`和`echo` 為例。
* `ping`
```sh
$ ansible all -m ping
server1 | SUCCESS => {
"ansible_facts": {
"discovered_interpreter_python": "/usr/bin/python"
},
"changed": false,
"ping": "pong"
}
```
* `echo`
```sh
$ ansible all -m command -a "echo Hello World"
server1 | CHANGED | rc=0 >>
Hello World
```
從上面的例子中可以看到 Ad-Hoc Commands 一次只能處理一件事情,這是它與 Playbooks 最大的差異。
### Playbooks 是什麼?
Playbooks 就是字面上的意思為**劇本**,我們可以先透過寫好的**劇本 (Playbooks)** 來讓各個 Managed Node 進行指定的**動作 (Plays)** 和**任務 (Tasks)**。
簡而言之,Playbooks 就是 Ansible 的腳本 (Script),而且比傳統 Shell Script 還要強大好幾百倍的腳本!此外它是使用 **YAML** 格式,寫 Code 就如同寫文件一樣,簡單易讀。
有關詳細的**動作 (Plays)** 和**任務 (Tasks)**,等我們實際安裝好再來說明 😆
## Ansible 安裝與實作
安裝之前先讓大家看一下版本吧!大家要記得檢查自己的版本與教學是否相同,如果不同,記得要先查看官網是否有修改內容。
### 版本
* macOS:11.6
* Docker:Docker version 20.10.14, build a224086
* Aansible:ansible [core 2.12.5]
### 如何安裝 Ansible 在控制主機
由於 Ansible 是一套開源的軟體,所以在目前大部分主流作業系統上都可以透過對應的套件管理 (package manager) 進行安裝。
本人使用 macOS ,所以這邊僅列出 masOS 安裝方式,其他的可以參考[官方的安裝指南](https://docs.ansible.com/ansible/latest/installation_guide/intro_installation.html#installing-ansible-on-specific-operating-systems)。
macOS 安裝可以使用兩種方式,官方較推薦使用 `pip` 來做安裝:
* [Pip Install Packages (pip 官方較推薦)](https://pip.pypa.io/en/stable/#)
```sh
$ sudo pip install ansible
```
* [Homebrew (brew)](https://formulae.brew.sh/formula/ansible#default)
```sh
$ sudo brew install ansible
```
安裝完後,可以使用 `--version` 指令來檢查是否安裝完成:
```
$ ansible --version
ansible [core 2.12.5]
config file = None
configured module search path = ['/Users/ian_zhuang/.ansible/plugins/modules', '/usr/share/ansible/plugins/modules']
ansible python module location = /usr/local/Cellar/ansible/5.7.1/libexec/lib/python3.10/site-packages/ansible
ansible collection location = /Users/ian_zhuang/.ansible/collections:/usr/share/ansible/collections
executable location = /usr/local/bin/ansible
python version = 3.10.4 (main, Apr 26 2022, 19:43:24) [Clang 13.0.0 (clang-1300.0.29.30)]
jinja version = 3.1.2
libyaml = True
```
### 如何安裝 Ansible 在被控節點
不需要!!! 透過 Ansible 進行管理的被控節點完全不需要安裝 Ansible。我們只需要確保這個節點可以透過 SSH 與控制主機做溝通,並安裝 Python 2.6 以上版本就可以透過控制主機來進行部署及管理了。
那我們為了要模擬,所以我們使用 Docker 來模擬 Managed Node,首先老樣子,一樣先寫一個 Dockerfile 來建立我們的映像檔,此映像檔是微調 [chusiang/ansible-managed-node.dockerfile](https://github.com/chusiang/ansible-managed-node.dockerfile/blob/master/ubuntu-14.04/Dockerfile) 的內容,修改 ubuntu 版本以及內容作調整,我會把程式碼放在 [GitHub 連結](https://github.com/880831ian/Ansible) ,以及 [DockerHub 連結](https://hub.docker.com/r/880831ian/ansible-ubuntu-server),歡迎大家前去下載使用。
```dockerfile
FROM ubuntu:22.10
LABEL maintainer="880831ian@gmail.com"
# Update the index of available packages.
RUN apt-get update
# Install the requires package.
RUN apt-get install -y openssh-server sudo curl wget bash-completion openssl && apt-get clean
# Setting the sshd.
RUN mkdir /var/run/sshd
RUN echo 'root:root' | chpasswd
RUN sed -i 's/PermitRootLogin without-password/PermitRootLogin yes/' /etc/ssh/sshd_config
# SSH login fix. Otherwise user is kicked off after login
RUN sed 's@session\s*required\s*pam_loginuid.so@session optional pam_loginuid.so@g' -i /etc/pam.d/sshd
ENV NOTVISIBLE "in users profile"
RUN echo "export VISIBLE=now" >> /etc/profile
# Create a new user.
#
# - username: docker
# - password: docker
RUN useradd --create-home --shell /bin/bash \
--password $(openssl passwd -1 docker) docker
# Add sudo permission.
RUN echo 'docker ALL=(ALL) NOPASSWD: ALL' >> /etc/sudoers
# Setting ssh public key.
RUN wget https://raw.githubusercontent.com/chusiang/ansible-jupyter.dockerfile/master/files/ssh/id_rsa.pub \
-O /tmp/authorized_keys && \
mkdir /home/docker/.ssh && \
mv /tmp/authorized_keys /home/docker/.ssh/ && \
chown -R docker:docker /home/docker/.ssh/ && \
chmod 644 /home/docker/.ssh/authorized_keys && \
chmod 700 /home/docker/.ssh
EXPOSE 22
# Run ssh server daemon.
CMD ["/usr/sbin/sshd", "-D"]
```
接下來將它包成 Image 並啟動他:
```sh
$ docker build -t ansible-ubuntu-server . && docker run --name server1 -d -p 8888:22 ansible-ubuntu-server
64c51235e34a7ba42c0c45e690201dd80248c9aac76c3b855c99cf63f7f0af7c
```
可以用 `exec` 進入容器:
```sh
docker exec -it server1 /bin/bash
```
### 如何讓 Ansible 操控 Docker 容器?
我們在工作目錄下,新增一個 `ansible.cfg`:
```cfg
[defaults]
inventory = hosts
remote_user = docker
host_key_checking = False
```
設定 inventory hosts:
```hosts
[local]
server1 ansible_ssh_host=127.0.0.1 ansible_ssh_port=8888 ansible_ssh_pass=docker
```
其中 8888 是我們在啟動時所開放的 Port,也可以自行更改。
* `ansible_ssh_host`:設為本機的 IP。
* `ansible_ssh_port`:設為 `docker ps `取得的 SSH Port 也就是我們的 8888。
* `ansible_ssh_pass`:因為我們沒有連線用的金鑰,所以直接使用密碼方式做連結。(建議只用於練習環境使用)
### Hello World On Managed Node
當我們都設置完成後,就可以使用 Terminal 用 Docker 建立好的 Ansible 來練習了!
```sh
$ ansible all -m command -a 'echo Hello World on Docker.'
server1 | CHANGED | rc=0 >>
Hello World on Docker.
```
## 第一個 Playbook
在我們都安裝好後,要來說說我們剛剛有偷偷提到的 Playbooks 的動作 (Plays) 和任務 (Tasks)。在一份 Playbooks 裡面,可以有多個 Play、多個 Task 和多個 Module:
* Play:通常為某個特定的目的,例如:
* `Setup a official website with Drupal` 藉由 Drupal 建置官網
* `Restart the API Service` 重開 API 服務
* Task:要實行 Play 這個目的所需做的每個步驟,例如:
* `Install the Nginx` 安裝 Nginx
* `Kill the djnago process` 強制停止 django 的行程
* Module:Ansible 所提供的各種操作方式,例如:
* `apt: name=vim state=present` 使用 apt 套件安裝 vim
* `command: /sbin/shutdown -r now` 使用 shutdown 的指令關機
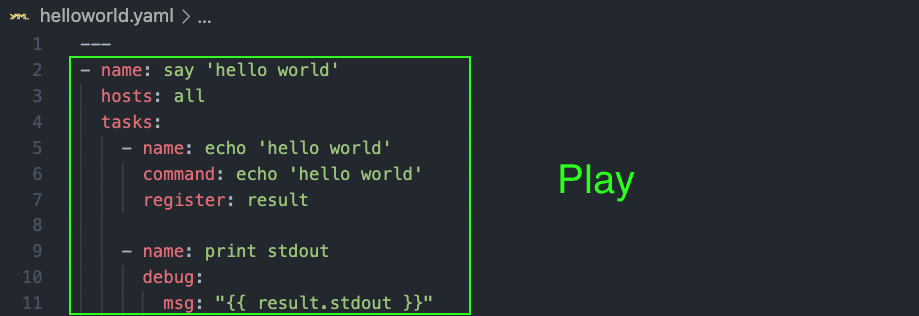
有點聽不懂吧!我來舉個例子,我們最熟悉的 Hello World,先建立一個 `helloworld.yaml` 的檔案:
```yaml
---
- name: say 'hello world'
hosts: all
tasks:
- name: echo 'hello world'
command: echo 'hello world'
register: result
- name: print stdout
debug:
msg: "{{ result.stdout }}"
```
可以看到這整個就是 Play,我們想要達到 say 'hello world' 的目的,其中有兩個 name 分別代表兩個 Task,也就是達成 Play 目的所需得步驟。最後 command 與 debug 就是我們的 Module 要怎麼達成這兩個步驟的操作方式。
我們使用 `ansible-playbook` 執行 Playbook,在這個範例中,我們執行了1個 Play、3 個 Tasks 和 2 個 Modules:
```sh
$ ansible-playbook helloworld.yaml
```
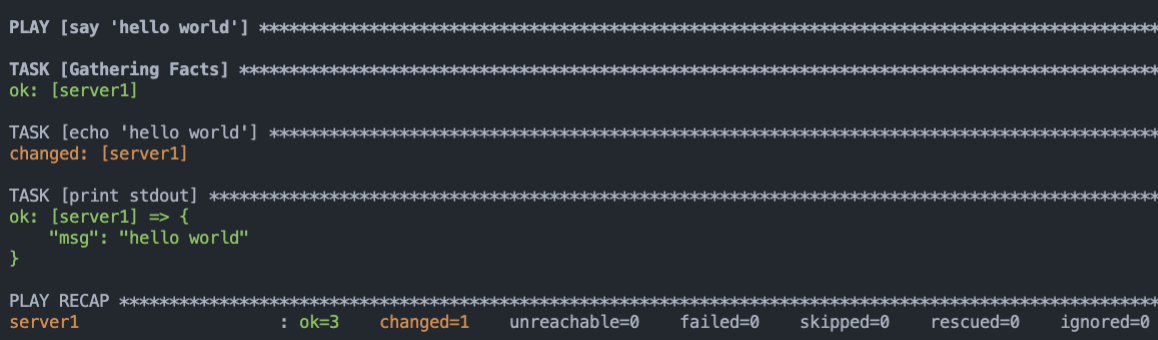
我們剛剛明明只寫兩個 tasks,為什麼執行就變成三個 tasks?
這是因為 Ansible 預設會使用 `Setup` task 來取得 Managed node 的 facts。關於 facts 的詳細說明,請滑到後面 [取得-managed-node-的-facts](#取得-managed-node-的-facts) 觀看😬
那如果沒有 Ansible 時,我們是怎麼操作的?我會附上 Shell Script 的做法,我們來比較看看吧!
* **Shell Script** 建立 `helloworld.sh` 檔案
```sh
#! /bin/bash
echo "Hello World"
```
* 執行 `helloworld.sh`
```sh
./ helloworld.sh
Hello World
```
看起來 Shell Script 已經夠用了,為什麼還要寫 Playbook 呢?這邊整理幾個理由給大家參考:
1. 用 Ansible 的 Module 可以把很多複雜的指令給標準化,例如不同的 Linux 發行版本在安裝套件時需代各種不同的參數。
2. 在現有的雲原生 (cloud native) 的架構下,傳統的 Shell Script 已經不敷使用,一般而言 Shell Script 只能對一台機器 (instance) 進行操作。
## 常用的 Ansible Module 有哪些?
接下來簡單介紹一下比較常用到的 8 個 Module:
### `ansible.builtin.apt`
[apt module](https://docs.ansible.com/ansible/latest/collections/ansible/builtin/apt_module.html#ansible-collections-ansible-builtin-apt-module) 是給 Debian, Ubuntu 等作業系統使用的套件模組 (Packing Modules),我們可以透過它管理 apt 套件。類似的有 `apt-get`、`dpkg`等。
1. 更新套件索引(快取),等同於 `apt-get update` 指令
```yaml
- name: Update repositories cache
ansible.builtin.apt:
update_cache: yes
```
2. 安裝 vim 套件
```yaml
- name: Install the package "vim"
ansible.builtin.apt:
name: vim
state: present
```
3. 移除 nano 套件
```yaml
- name: Remove "nano" package
ansible.builtin.apt:
name: nano
state: absent
```
### `ansible.builtin.command`
[command module](https://docs.ansible.com/ansible/latest/collections/ansible/builtin/command_module.html#ansible-collections-ansible-builtin-command-module) 是可以在遠端上執行指令的指令模組,但它不支援變數 (variables) 和 `<`、`>`、`|`、`;`、`&`,若有這類需求要改用 `shell` module。
1. 重新開機
```yaml
- name: Reboot at now
ansible.builtin.command: /sbin/shutdown -r now
```
2. 當某個檔案不存在時才執行指令
```yaml
- name: create .ssh directory
ansible.builtin.command: mkdir .ssh creates=.ssh/
```
3. 先切換目錄再執行指令
```yaml
- name: cat /etc/passwd
ansible.builtin.command: cat passwd
args:
chdir: /etc
```
### `ansible.builtin.copy`
[copy moudule](https://docs.ansible.com/ansible/latest/collections/ansible/builtin/copy_module.html#ansible-collections-ansible-builtin-copy-module) 是從本地複製檔案到遠端的檔案模組,若有使用變數需求,可以改用 `template`。它類似 Linux 指令的 `scp`。
1. 複製 ssh public key 到遠端 (chmod 644 /target/file)
```yaml
- name: copy ssh public key to remote node
ansible.builtin.copy:
src: files/id_rsa.pub
dest: /home/docker/.ssh/authorized_keys
owner: docker
group: docker
mode: 0644
```
2. 複製 ssh public key 到遠端 (chmod u=rw,g=r,o=r /target/file)
```yaml
- name: copy ssh public key to remote node
ansible.builtin.copy:
src: files/id_rsa.pub
dest: /home/docker/.ssh/authorized_keys
owner: docker
group: docker
mode: "u=rw,g=r,o=r"
```
3. 複製 nginx vhost 設定檔到遠端,並備份原有的檔案
```yaml
- name: copy nginx vhost and backup the original
ansible.builtin.copy:
src: files/ironman.conf
dest: /etc/nginx/sites-available/default
owner: root
group: root
mode: 0644
backup: yes
```
### `ansible.builtin.file`
[file module](https://docs.ansible.com/ansible/latest/collections/ansible/builtin/file_module.html#ansible-collections-ansible-builtin-file-module) 是在遠端建立和刪除檔案 (file)、目錄 (directory) 和軟連結 (symlinks) 的檔案模組。它類似的 Linux 指令為 `chown`、`mkdir` 和 `touch`。
1. 建立檔案 (touch),並設定權限為 644
```yaml
- name: touch a file, and set the permissions
ansible.builtin.file:
path: /etc/motd
state: touch
mode: "u=rw,g=r,o=r"
```
2. 建立目錄 (mkdir),並設定檔案擁有者為 docker
```yaml
- name: create a directory, and set the permissions
ansible.builtin.file:
path: /home/docker/.ssh/
state: directory
owner: docker
mode: "700"
```
3. 建立軟連結 (ln)
```yaml
- name: create a symlink file
ansible.builtin.file:
src: /tmp
dest: /home/docker/tmp
state: link
```
### `ansible.builtin.lineinfile`
[lineinfile](https://docs.ansible.com/ansible/latest/collections/ansible/builtin/lineinfile_module.html) module 是個可用正規表示法對檔案進行插入或取代文字的檔案模組。它類似的 Linux 指令是 `sed`。
1. 移除 docker 使用者的 sudo 權限
```yaml
- name: remove sudo permission of docker
ansible.builtin.lineinfile:
dest: /etc/sudoers
state: absent
regexp: '^docker'
```
2. 在 /etc/hosts 檔案裡用 127.0.0.1 localhost 取代開頭為 127.0.0.1 的一行
```yaml
- name: set localhost as 127.0.0.1
ansible.builtin.lineinfile:
dest: /etc/hosts
regexp: '^127\.0\.0\.1'
line: '127.0.0.1 localhost'
owner: root
group: root
mode: 0644
```
### `ansible.builtin.service`
[service module](https://docs.ansible.com/ansible/latest/collections/ansible/builtin/service_module.html#ansible-collections-ansible-builtin-service-module) 是用來管理遠端系統服務的系統模組。它類似的 Linux 指令為 `service`。
1. 啟動 Nginx
```yaml
- name: start nginx service
ansible.builtin.service:
name: nginx
state: started
```
2. 停止 Nginx
```yaml
- name: stop nginx service
ansible.builtin.service:
name: nginx
state: stopped
```
3. 重開網路服務
```yaml
- name: restart network service
ansible.builtin.service:
name: network
state: restarted
args: eth0
```
### `ansible.builtin.shell`
[shell module](https://docs.ansible.com/ansible/latest/collections/ansible/builtin/shell_module.html#ansible-collections-ansible-builtin-shell-module) 是可以在遠端用 `/bin/sh` 執行指令的指令模組,支援變數 (variables) 和 `<`、`>`、`|`、`;` 和 `&` 等運算。
1. 藉由 `ls` 和 `wc` 檢查檔案數量
```yaml
- name: check files number
ansible.builtin.shell: ls /home/docker/ | wc -l
```
2. 把所有的 Python 行程給砍掉
```yaml
- name: kill all python process
ansible.builtin.shell: kill -9 $(ps aux | grep python | awk '{ print $2 }')
```
### `ansible.builtin.stat`
[stat module](https://docs.ansible.com/ansible/latest/collections/ansible/builtin/stat_module.html#ansible-collections-ansible-builtin-stat-module) 是用來檢查檔案狀態的檔案模組。其類似的 Linux 指令為 `stat`。
1. 檢查檔案是否存在,若不存在則建立他。
```yaml
- name: check the 'vimrc' target exists
ansible.builtin.stat:
path: /home/docker/.vimrc
register: stat_vimrc
- name: touch vimrc
file:
path: /home/docker/.vimrc
ansible.builtin.state: touch
mode: "u=rw,g=r,o=r"
when: stat_vimrc.stat.exists == false
```
2. 取的某檔案的 md5sum
```yaml
- name: Use md5sum to calculate checksum
ansible.builtin.stat:
path: /path/to/something
checksum_algorithm: md5sum
```
### 其他
其他還有很多可以使用的 Module ,詳情可以查看 [Ansible.Builtin](https://docs.ansible.com/ansible/latest/collections/ansible/builtin/index.html)。
## Ansible 發送通知到 Telegram Bot
剛剛看了很多內建的模組,當然 Ansible 還有很多好玩的模組可以使用,我們就跟 [使用 Jenkins 設定 GitHub 觸發程序並通知 Telegram Bot 文章](https://pin-yi.me/jenkins/) 一樣,將我們取得的內容傳送到 Telegram Bot 吧!那首先我們要先創造一個 Telegram Bot,在 Telegram 找到一個機器人叫 `BotFather` 的官方機器人帳號。並使用指令 `/newbot`,會看到一下畫面:

他詢問你要幫機器人取叫什麼名稱,可以直接在輸入欄位輸入想要取的名稱,當然不能是別人已經取過的:

看到它回覆你 `Done!` 代表成功了,接下來你會拿到一組 API Token,像我的是 `5335968936:AAEDO_Tudhy0t577jtbF9TpgrzqOsL99h9c` (已更換,大家放心 😂 ),接下來開啟瀏覽器輸入以下網址 `https://api.telegram.org/bot{API Token}/getupdates`,其中的 `{API Token}` 請帶入自己的 Token,直到出現 `{"ok":true,"result":[]}` 代表完成。
接下來開啟你自己的 Bot ,打上 `/start` 指令,重新整理剛剛的網頁就可以看到以下這樣的文字:
```
{"ok":true,"result":[{"update_id":606594112,"message":{"message_id":1,"from":{"id":493995679,"is_bot":false,"first_name":"\u54c1\u6bc5","last_name":"Ian","username":"pinyichuchu","language_code":"zh-hans"},"chat":{"id":493995679,"first_name":"\u54c1\u6bc5","last_name":"Ian","username":"pinyichuchu","type":"private"},"date":1652695148,"text":"/start","entities":[{"offset":0,"length":6,"type":"bot_command"}]}}
```
這是你傳訊息給 Bot 它所收到的 API,資料很多沒關係,我們找到 `id`,像我的是 `493995679`,這個就是我跟機器人的聊天室,我們就先回到 Ansible 這邊吧!
開啟一個新的檔案叫 `send_notify_tg.yaml`,打以下內容:
```yaml
---
- name: Send notify
hosts: all
tasks:
- name: Send notify to Telegram
community.general.telegram:
token: "9999999:XXXXXXXXXXXXXXXXXXXXXXX"
api_args:
chat_id: 000000
parse_mode: "markdown"
text: "Your precious application has been deployed: https://example.com"
disable_web_page_preview: True
disable_notification: True
```
可以看到我們使用的模組不是 Ansible 內建的,而是社群別人寫的,詳細可以參考 [community.general.telegram module – module for sending notifications via telegram](https://docs.ansible.com/ansible/latest/collections/community/general/telegram_module.html#ansible-collections-community-general-telegram-module):
其中 token 就是我們剛剛在 `BotFather` 那邊所拿到的 Token,chat_id 就是我們剛剛在網頁上看到的 id,把資料都輸入進去後,我們可以修改 text 內容,改成 "Send notify to Telegram 測試傳送通知",接著執行 `ansible-ploybook send_notify_tg.yaml` ,看看能不能正常收到通知!

我們可能需要將機器人加入群組內,這時候需要更換一下 chat_id,先將機器人加入群組,再次到剛剛瀏覽器的網頁刷新,查看 chat 後面的 id 帶有 `-`,像是 `-540226836` 這樣,這個就是該群組的 ID,將 send_notify_tg.yaml 的 chat_id 修改成 `-540226836` 在測試看看,他就會在群組中發送通知囉!
```
{"update_id":606594124,"message":{"message_id":14,"from":{"id":493995679,"is_bot":false,"first_name":"\u54c1\u6bc5","last_name":"Ian","username":"pinyichuchu","language_code":"zh-hans"},"chat":{"id":-540226836,"title":"\u54c1\u6bc5 & AnsibleSendMessageBot","type":"group","all_members_are_administrators":true},"date":1652696181,"group_chat_created":true}}
```

## 取得 Managed node 的 facts
還記得我們在執行任務 (Tasks) 時,明明只有兩個,但最後結果顯示三個嗎?是因為在使用 Playbooks 時,Ansible 會自動執行 [Setup module](https://docs.ansible.com/ansible/latest/collections/ansible/builtin/setup_module.html#ansible-collections-ansible-builtin-setup-module) 以蒐集各個 Managed node 的 **facts**。 這個 facts 就好比是系統變數一樣,從 IP 位址、作業系統、CPU 等資訊應有盡有。
### Ad-Hoc Commands
通常我們都會先使用 Ad-Hoc Commands 來呼叫 `setup` 看看有哪些可用的資訊,這對於我們稍後撰寫較為複雜的 Playbooks 會很有幫助。
1. 可以藉由 ``less`` 快速搜尋所有的變數
```sh
$ ansible all -m setup | less
server1 | SUCCESS => {
"ansible_facts": {
"ansible_apparmor": {
"status": "disabled"
},
"ansible_architecture": "x86_64",
"ansible_bios_date": "03/14/2014",
"ansible_bios_vendor": "BHYVE",
"ansible_bios_version": "1.00",
"ansible_board_asset_tag": "NA",
"ansible_board_name": "NA",
"ansible_board_serial": "NA",
"ansible_board_vendor": "NA",
"ansible_board_version": "NA",
```
2. 搭配 `filter` 將發行版本 (distribution) 資訊給過濾出來
```sh
$ ansible all -m setup -a "filter=ansible_distribution*"
server1 | SUCCESS => {
"ansible_facts": {
"ansible_distribution": "Ubuntu",
"ansible_distribution_file_parsed": true,
"ansible_distribution_file_path": "/etc/os-release",
"ansible_distribution_file_variety": "Debian",
"ansible_distribution_major_version": "22",
"ansible_distribution_release": "kinetic",
"ansible_distribution_version": "22.10",
"discovered_interpreter_python": "/usr/bin/python3"
},
"changed": false
}
```
3. 取得套件管理員的種類資訊,例子中取得的值是 **apt**
```sh
$ ansible all -m setup -a "filter=ansible_pkg_mgr"
server1 | SUCCESS => {
"ansible_facts": {
"ansible_pkg_mgr": "apt",
"discovered_interpreter_python": "/usr/bin/python3"
},
"changed": false
}
```
### 轉寫 Playbooks
我來出個題目,我想要知道 Ansible 所使用的公鑰,並透過 Telegram Bot 發送到群組,要怎麼做呢!?
首先要利用剛剛的 Ad-Hoc Commands filter,找到公鑰,再將公鑰透過 Telegram Bot 傳送,所以我們會有兩個 Tasks,那我們開始實作囉 🤓
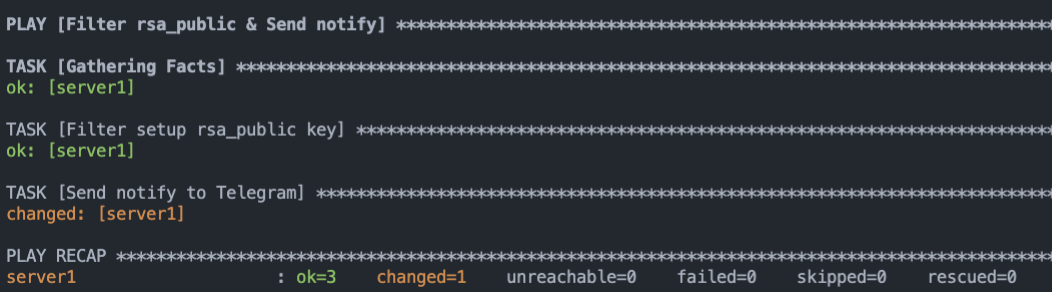
1.找到公鑰
```yaml
---
- name: Filter rsa_public & Send notify
hosts: all
tasks:
- name: Filter setup rsa_public key
ansible.builtin.setup:
filter:
- "ansible_ssh_host_key_rsa_public"
register: result
```
可以看到我們將 filter setup 從 Ad-Hoc 轉成 Playbooks,並使用 result 來存在找到的公鑰。
2. 發送通知至 Telegram Bot
```yaml
- name: Send notify to Telegram
community.general.telegram:
token: "5335968936:AAFhxxMRJy-rucGKgSE80Xss7qPq2iOHWlc"
api_args:
chat_id: -540226836
parse_mode: "markdown"
text: "{{ result }}"
disable_web_page_preview: True
disable_notification: True
```
老樣子,我們就使用上次 `send_notify_tg.yaml` 內的 Send notify to Telegram 任務來傳送通知。
執行後,看看群組是否有收到我們找到的 ansible_ssh_host_key_rsa_public 通知。
## 使用 Ansible 的 Template 系統
[Template module](https://docs.ansible.com/ansible/latest/collections/ansible/builtin/template_module.html#ansible-collections-ansible-builtin-template-module) 是常使用的檔案模組之一,我們在 [常用的 Ansible Module 有哪些?](#常用的-ansible-module-有哪些) 文章中有提到,可以用它和變數 (Variables) 來操作檔案。
我們只需要事先定義變數和模板 (Templates),即可用它動態產生遠端的 Shell Script、設定檔 (Configure)等。換句話說,我們可以用一份 template 來開發 (Development)、測試 (Test)、正式環境 (Production) 等不同環境設定。
舉例說明:
1. 建立 template 檔案
```j2
$ vim hello_world.txt.j2
Hello "{{ dynamic_word }}"
```
* 由於 Ansible 是就由 [Jinja2](https://jinja.palletsprojects.com/en/3.1.x/) 來實作 template 系統,所以需要使用 `*.j2` 的副檔名。
* 上面的 `"{{ dynamic_word }}""` 代表我們在 template 裡使用了名為 `dynameic_word` 的變數。
2. 建立 playbook,並加入變數 `vim template_demo.yaml`
```yaml
---
- name: Play the template module
hosts: localhost
vars:
dynamic_word: "World"
tasks:
- name: generation the hello_world.txt file
ansible.builtin.template:
src: hello_world.txt.j2
dest: /tmp/hello_world.txt
- name: show file context
command: cat /tmp/hello_world.txt
register: result
- name: print stdout
debug:
msg: "{{ result.stdout_lines }}"
```
* 在第 5 行,我們幫 `dynamic_word` 變數設了一個預設值 `World`。
* 在 8 行的第 1 個 task 裡,我們使用 template module,並指定了檔案的來源 (src) 和目的地 (dest)。
* 之後的 2 個 task 則是把 template module 產生的檔案給印出來。
3. 直接使用 `ansible-playbook template_demo.yaml` 執行 Playbook。
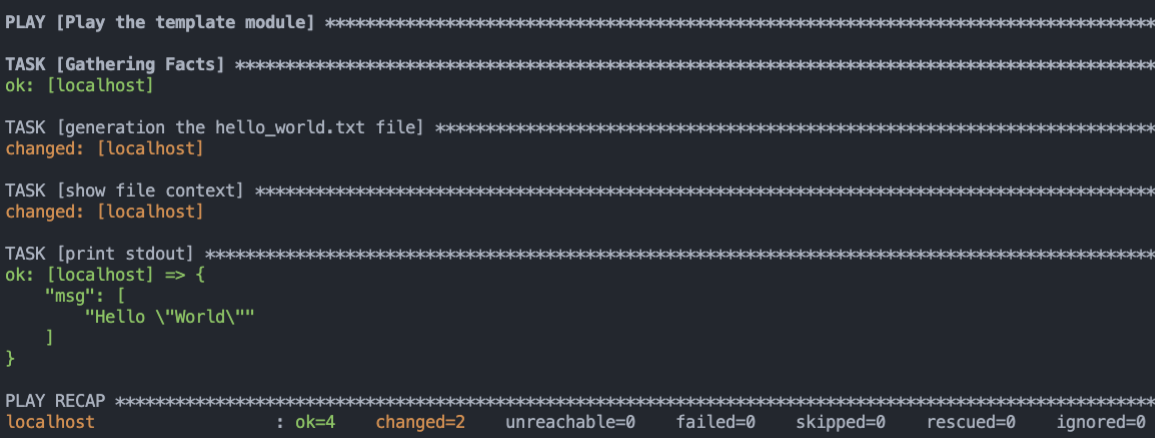
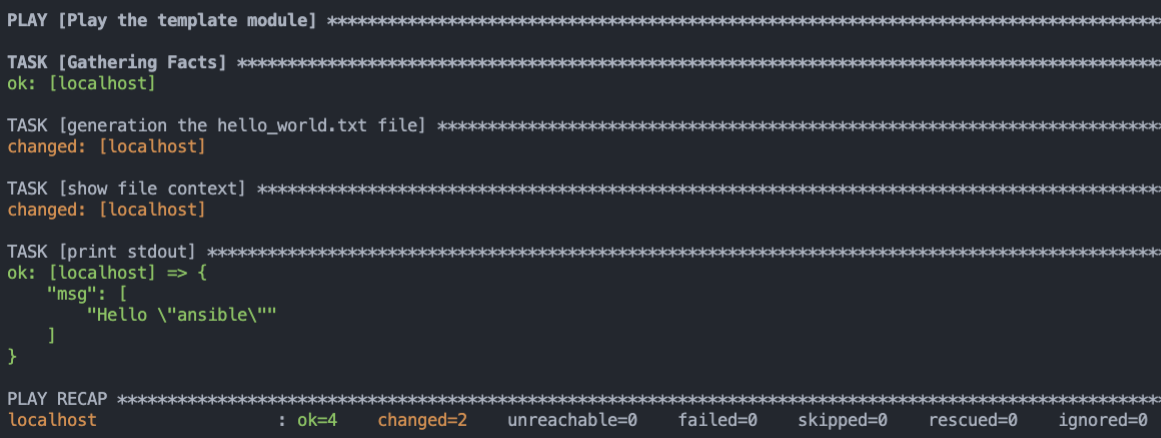
也可以透過 `-e` 參數將 `dynamic_word` 覆寫成 "ansible"
```sh
$ ansible-playbook template_demo.yaml -e "dynamic_word=ansible"
```
### 如何切換不同環境
1. 除了我們剛剛用 `vars` 來宣告變以外,還可以使用 `vars_files` 來 include 其他的變數檔:`$ vim template_demo2.yaml`
```yaml
---
- name: Play the template module
hosts: localhost
vars:
env: "development"
vars_files:
- vars/{{ env }}.yml
tasks:
- name: generation the hello_world.txt file
ansible.builtin.template:
src: hello_world.txt.j2
dest: /tmp/hello_world.txt
- name: show file context
command: cat /tmp/hello_world.txt
register: result
- name: print stdout
debug:
msg: "{{ result.stdout_lines }}"
```
可以看到上面例子中第 7 行,就是我們使用 `vars_files` 來 include 其他的變數檔。
2. 建立 `vars/development.yaml`、`vars/test.yaml`、`vars/production.yaml` 檔案,接下來將依不同得環境 include 不同的檔案變數檔案 (vars files),這樣就可以用一份 Playbook 切換環境了!
* Development
```sh
$ vim vars/development.yaml
dynamic_word: "development"
```
* Test
```sh
$ vim vars/test.yaml
dynamic_word: "test"
```
* Production
```sh
$ vim vars/production.yaml
dynamic_word: "production"
```
3. 執行 `ansible-playbook template_demo2.yaml -e "dynamic_word=Test"`,並有 `-e` 去修改各個環境。
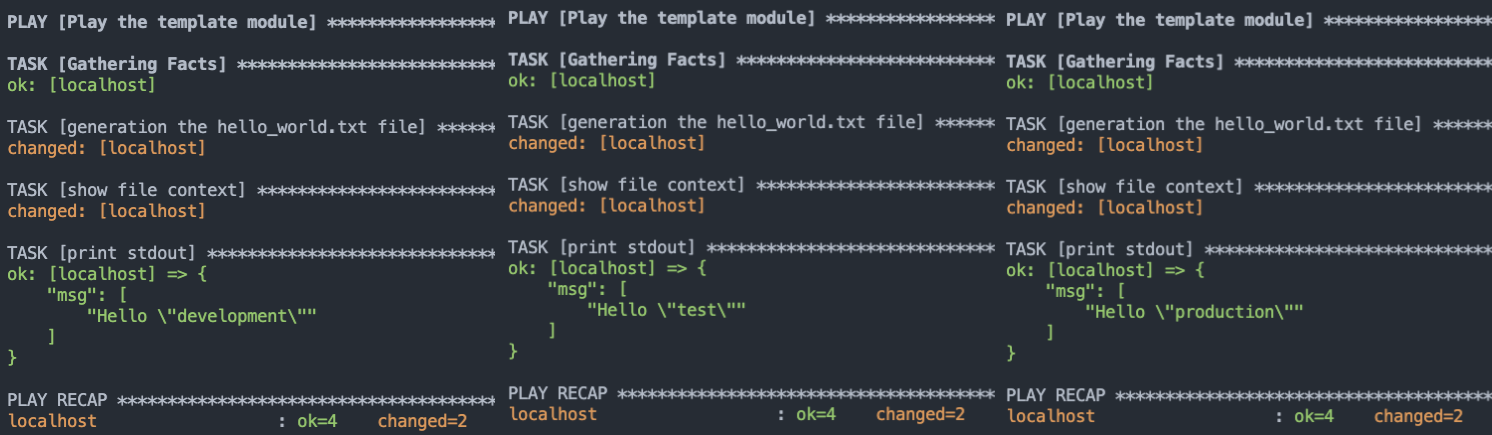
Template 系統是實務上很常見的手法之一,藉由它我們可以很輕鬆地讓開發、測試、正式環境無縫接軌。但若是在大型的 Playbook 裡切換環境,建議使用較為進階的 `group_vars` 跟 `host_vars`。
## 在 Playbooks 使用 Handlers
[Handlers](https://docs.ansible.com/ansible/latest/user_guide/playbooks_handlers.html) 是我們在 Ansible Playbooks 裡很常用來重開系統服務 (Service) 的手法,我們這邊透過安裝 Nginx 來介紹它。
那什麼是 Handlers 呢?Handler 本身是一種非同步的 callback function ; 在這裡則是指關聯於特定 tasks 的事件 (event) 觸發機制。當這些特定的 tasks 狀態為 **被改變 (changed)** 且都已被執行,才會觸發一次的 event。
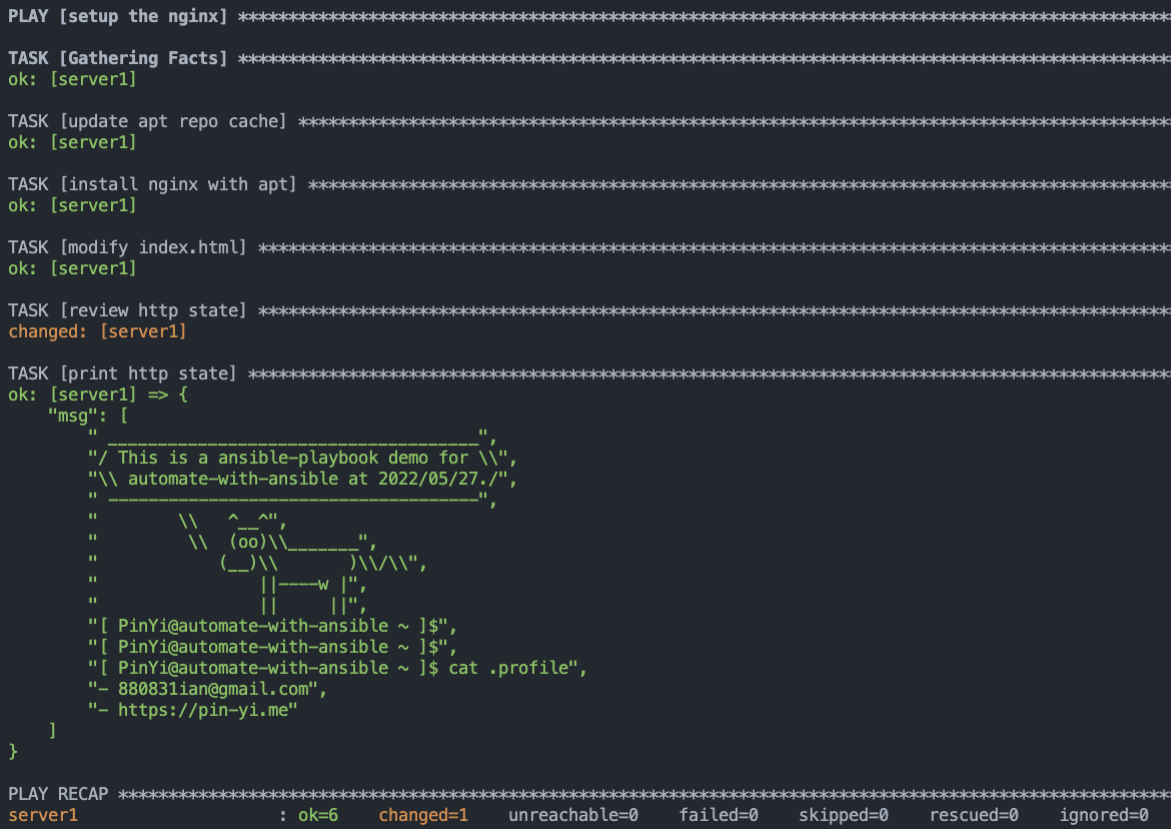
1. 我們建立 setup_nginx.yaml
```yaml
---
- name: setup the nginx
hosts: all
become: true
vars:
username: "PinYi"
mail: "880831ian@gmail.com"
blog: "https://pin-yi.me"
tasks:
# 執行 'apt-get update' 指令。
- name: update apt repo cache
apt: name=nginx update_cache=yes
# 執行 'apt-get install nginx' 指令。
- name: install nginx with apt
apt: name=nginx state=present
# 於網頁根目錄 (DocumentRoot) 編輯 index.html。
- name: modify index.html
ansible.builtin.template: src=templates/index.html.j2
dest=/var/www/html/index.html
owner=www-data
group=www-data
mode="644"
backup=yes
notify: restart nginx
# handlers
#
# * 當確認事件有被觸發才會動作。
# * 一個 handler 可被多個 task 通知 (notify),並於 tasks 跑完才會執行。
handlers:
# 執行 'sudo service nginx restart' 指令。
- name: restart nginx
service: name=nginx enabled=yes state=restarted
# post_tasks:
#
# 在 tasks 之後執行的 tasks。
post_tasks:
# 檢查網頁內容。
- name: review http state
command: "curl -s http://localhost"
register: web_context
# 印出檢查結果。
- name: print http state
debug: msg={{ web_context.stdout_lines }}
```
來說明一下上面這個 yaml 檔案:
* 首先我們想要安裝 Nginx,我們給了三個參數,分別是 username、mail、blog,等等會帶入我們的 template。
* 我們一開始有 3 個 task,分別代表執行更新、安裝、編輯 index.html 檔案。
* 以及 1 個 handlers 他會等 `modify index.html` 有改變且執行後才會動作。
* 最後是 post_tasks 他是等 tasks 之後執行的 tasks。
2. 接下建立 Nginx html 的 template:`vim templates/index.html.j2`
```yaml
_____________________________________
/ This is a ansible-playbook demo for \
\ automate-with-ansible at 2022/05/17./
-------------------------------------
\ ^__^
\ (oo)\_______
(__)\ )\/\
||----w |
|| ||
[ {{ username }}@automate-with-ansible ~ ]$
[ {{ username }}@automate-with-ansible ~ ]$
[ {{ username }}@automate-with-ansible ~ ]$ cat .profile
- {{ mail }}
- {{ blog }}
```
3. 執行 Playbook
可以看到因為我們 `modify index.html` 沒有被改變,notify 沒有通知 handlers,所以他不會執行 handlers 該段程式。(正常來說,修改 html 不需要重啟,此為範例🤣 )
4. 那我們修改一下 index.html 來測試一下會不會把 index.html 的狀態**被改變**,而讓 handlers 執行呢!我們隨意修改 index.html 內容,修改日期改成 05/17:
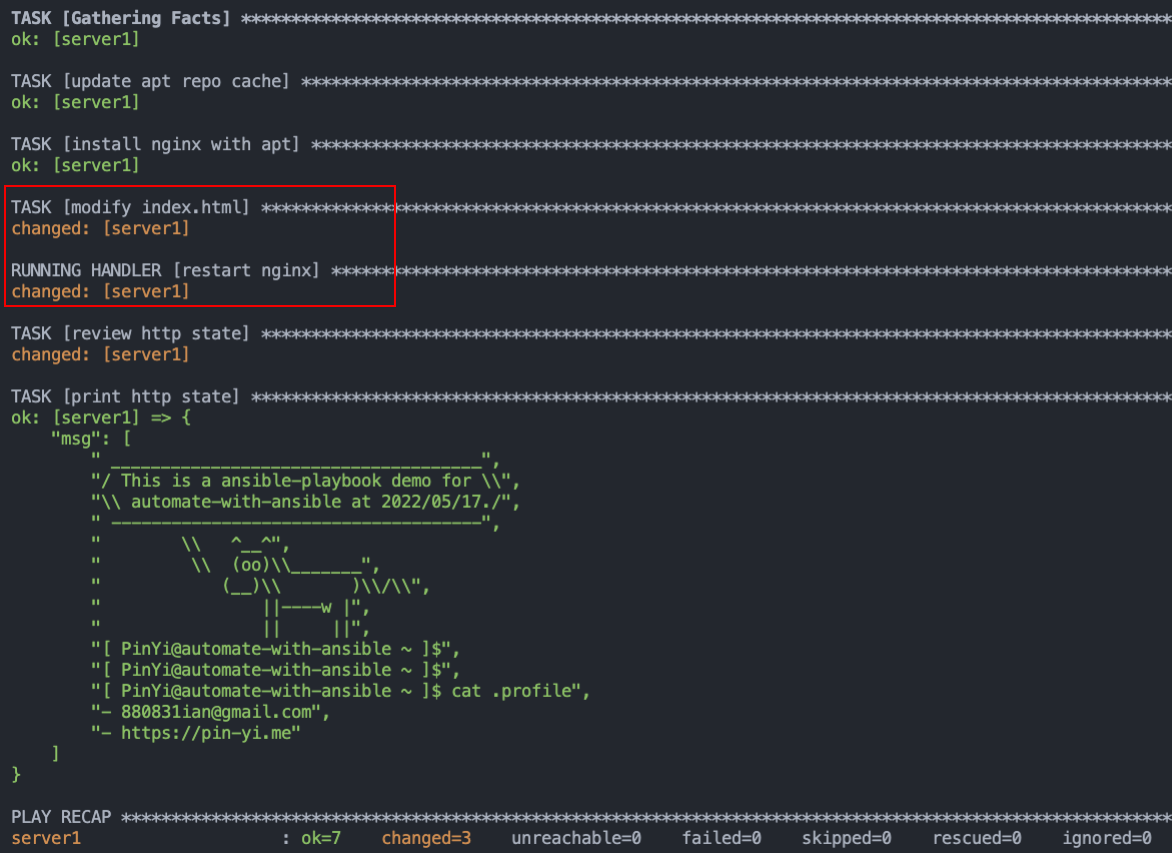
可以看到我們的 `modify index.html` 被改變了,所以 notify 通知 handlers 執行重新啟動。
## 在 Playbooks 使用 loops
在 Shell Script 中,我們會使用 for 和 while 等迴圈 (loop) 來簡化重複的程式碼,而在 Ansible 我們也可以使用 loop 來簡化**重複的任務 (Tasks)**。
### 標準迴圈
首先我們先以簡單的方式重複印出三筆資料。
* Shell Script
1. 建立 for loop 的 Script
```sh
$ vim bash_loop.sh
#!/bin/bash
for x in 0 1 2; do
echo Loop $x
done
```
* 在第 4 行,我們用 `for`,並代入 0,1,2 三個值到 `$x` 變數
* 在第 5 行,則用了 `echo`,印出訊息和 `$x` 變數
2. 執行 Script:可以看到底下跑了 3 次的 loop
```sh
$ chmod a+x bash_loop.sh
$ ./bash_loop.sh
Loop 0
Loop 1
Loop 2
```
* Ansible Playbooks
我們需要透過 `item` 和 `with_items` 來使用 Ansible 的 loop,其 `item` 為預設名。在 Ansible 2.5 中添加了 `loop`,所以我們後續兩者都會提到 (目前兩者都可以使用!)
1. 建立 loop 的 playbook `vim playbook_with_items.yaml`
```yaml
---
- name: a basic loop with playbook
hosts: localhost
tasks:
- name: print loop message
ansible.builtin.debug:
msg: "Loop {{ item }}"
with_items:
- 0
- 1
- 2
```
* 在第 6、7 行裡,我們用 `debug` module 來印出訊息,並定義 `item`
* 在第 8 ~ 11 行,則用了 `with_item` 將 0,1,2 的值傳入 `item`
2. 執行 `ansible-playbook playbook_with_items.yaml` 後會得到:
```yaml
TASK [print loop message] *************************************************************************************************************
ok: [server1] => (item=0) => {
"msg": "Loop 0"
}
ok: [server1] => (item=1) => {
"msg": "Loop 1"
}
ok: [server1] => (item=2) => {
"msg": "Loop 2"
}
```
另一種 在 Ansible 新增的 `loop`
1. 建立 loop 的 playbook `vim playbook_loop.yaml `
```yaml
---
- name: a basic loop with playbook
hosts: all
tasks:
- name: print loop message
ansible.builtin.debug:
msg: "{{ item }} {{ my_idx }}"
loop:
- Loop
- Loop
- Loop
loop_control:
index_var: my_idx
```
2. 執行 `ansible-playbook playbook_loop.yaml` 後會得到:
```yaml
TASK [print loop message] *************************************************************************************************************
ok: [server1] => (item=0) => {
"msg": "Loop 0"
}
ok: [server1] => (item=1) => {
"msg": "Loop 1"
}
ok: [server1] => (item=2) => {
"msg": "Loop 2"
}
```
會使用 Loop 就可以減少我們在寫重複的程式碼,當然上面的只是簡單的範例,詳細請參考 [Loops - Ansible Documentation](https://docs.ansible.com/ansible/latest/user_guide/playbooks_loops.html#query-vs-lookup)。
## ansible 安裝時常見問題
1. server1 | FAILED | rc=-1 >> to use the 'ssh' connection type with passwords or pkcs11_provider, you must install the sshpass program
Ans1. 會遇到這個問題是因為需要多安裝 sshpass,一般系統安裝 sshpass 很簡單,但在 macOS 上稍微麻煩,詳細可以參考[這篇文章](https://stackoverflow.com/questions/32255660/how-to-install-sshpass-on-mac)。
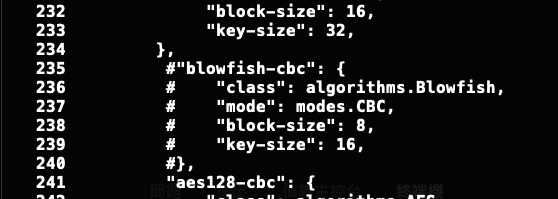
2. ~paramiko/transport.py:236: CryptographyDeprecationWarning: Blowfish has been deprecated
Ans2. 在我安裝過程中,發現上前幾天才出現這個 Bug 詳細情形可以參考 [GitHub issues](https://github.com/paramiko/paramiko/issues/2038),目前解決辦法有降板或是先將錯誤訊息給註解掉,之後再等新的版本出來再更新,大家可以自行選擇,我這邊是直接把出現問題的 `transport.py` 內容註解掉,大概位於236行,可以看下方圖片。
## 參考資料
[現代 IT 人一定要知道的 Ansible 自動化組態技巧](https://chusiang.gitbooks.io/automate-with-ansible/content/)
[Ansible 安裝](https://tso-liang-wu.gitbook.io/learn-ansible-and-jenkins-in-30-days/ansible/ansible/ansible-installation)
[怎麼用 Docker 練習 Ansible?](https://chusiang.gitbooks.io/automate-with-ansible/content/05.how-to-practive-the-ansible-with-docker.html)
[community.general.telegram module – module for sending notifications via telegram](https://docs.ansible.com/ansible/latest/collections/community/general/telegram_module.html#ansible-collections-community-general-telegram-module)