Ecosyste.ms: Awesome
An open API service indexing awesome lists of open source software.
https://github.com/880831ian/jenkins-github-tg-bot
使用 Jenkins 來對 GitHub 專案做持續整合並使用插件來通知 Telegram Bot
https://github.com/880831ian/jenkins-github-tg-bot
cicd devops docker jenkins
Last synced: about 12 hours ago
JSON representation
使用 Jenkins 來對 GitHub 專案做持續整合並使用插件來通知 Telegram Bot
- Host: GitHub
- URL: https://github.com/880831ian/jenkins-github-tg-bot
- Owner: 880831ian
- Created: 2022-05-13T08:43:33.000Z (over 2 years ago)
- Default Branch: master
- Last Pushed: 2024-11-11T16:53:55.000Z (2 months ago)
- Last Synced: 2025-01-10T09:56:14.587Z (7 days ago)
- Topics: cicd, devops, docker, jenkins
- Language: Dockerfile
- Homepage: https://pin-yi.me/blog/git-or-cicd/jenkins-github-tg-bot/
- Size: 3.66 MB
- Stars: 0
- Watchers: 2
- Forks: 0
- Open Issues: 0
-
Metadata Files:
- Readme: README.md
Awesome Lists containing this project
README
# 使用 Jenkins 設定 GitHub 觸發程序並通知 Telegram Bot
## Jenkins 安裝與實作
我這次會使用 Docker-compose 來進行安裝,除了 Docker 以外也有不同的安裝方式,可以參考 [Jenkins download and deployment](https://www.jenkins.io/download/),本次使用的環境版本如下:
### 版本
* macOS:11.6
* Docker:Docker version 20.10.14, build a224086
* Jenkins:jenkins/jenkins:lts-jdk11
* yamllint:1.26.0
### 安裝
這邊會使用 Jenkins 提供的 [官方 LTS 映像檔](https://hub.docker.com/layers/jenkins/jenkins/jenkins/lts-jdk11/images/sha256-ec98cb8b367b0f9426f71345efe11e001c901704cea0e61fd91beb37af34ef98?context=explore) 來作為基底,因為我們要多安裝測試程式 [yamllint](https://yamllint.readthedocs.io/en/stable/index.html),所以就自己寫一個 Docker-compose:(同樣的程式碼會放在 [GitHub](https://github.com/880831ian/jenkins-github-tg-bot),也直接包成映像檔放在 [DockerHub](https://hub.docker.com/r/880831ian/jenkins-github-tg-bot),歡迎大家自行取用)
[yamlint](https://github.com/adrienverge/yamllint),它是語法檢查工具,可以用來檢查 yaml 檔案的語法是否正確以及符合規範,我們看一下實際操作的畫面:
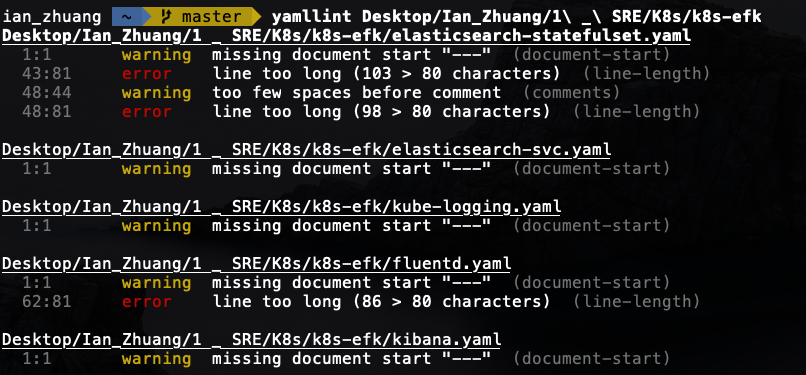
可以看到如果不符合 yaml 規範就會跳出錯誤訊息。
接下來先看一下整個 Docker-compose 結構以及各參數:
```sh
.
├── Docker-compose.yaml
├── jenkins
│ └── Dockerfile
```
**Docker-compose.yaml**
```yaml
version: "3.8"
services:
jenkins:
build: ./jenkins/
container_name: jenkins
ports:
- 8080:8080
- 50000:50000
restart: always
volumes:
- ./jenkins_home:/var/jenkins_home
```
參數說明:
* `build: ./jenkins/`:因為要先安裝 yamllint,所以使用 Dockerfile 另外寫。
* `container_name:jenkins`:容器的名稱。
* `ports: -8080:8080 - 50000:50000`:8080 是待會我們瀏覽儀表板會使用到的 Port,如果本機上 8080 已經被佔用,可以自行更換,50000 是 Jenkins 所使用的 Port。
* `restart: always`:當容器停止時,會自動重新啟動容器。
* `volumes: - ./jenkins_home:/var/jenkins_home`:掛載目錄,就算刪除容器一樣可以保留其他設定。我將啟動 `Docker-compose.yaml` 的資料夾下多一個 jenkins_home 與容器內 /var/jenkins_home 做映射,大家可以自己去調整。
**jenkins/Dockerfile**
```dockerfile
FROM jenkins/jenkins:lts-jdk11
LABEL maintainer="[email protected]"
USER root
RUN apt-get upgrade -y\
&& apt-get update -y\
&& apt-get install yamllint -y
```
參數說明:
* `FROM`:我們使用 Jenkins 官方提供的 LTS 維護版本。
* `USER`:因為要先安裝東西,所以直接給 root 權限。
* `RUN`:先升級完後,再更新,最後再裝 [yamllint](https://yamllint.readthedocs.io/en/stable/index.html)。(-y 是同意所以詢問)
最後使用 `docker-compose` 來執行:
```sh
$ docker-compose up -d
```
要在 Docker-compose.yaml 資料夾下指令才有用。
下完指令後,他就會在背景開始安裝,可以試著用瀏覽器瀏覽 `http://localhost:8080`,查看有沒有跳出下面這個畫面:
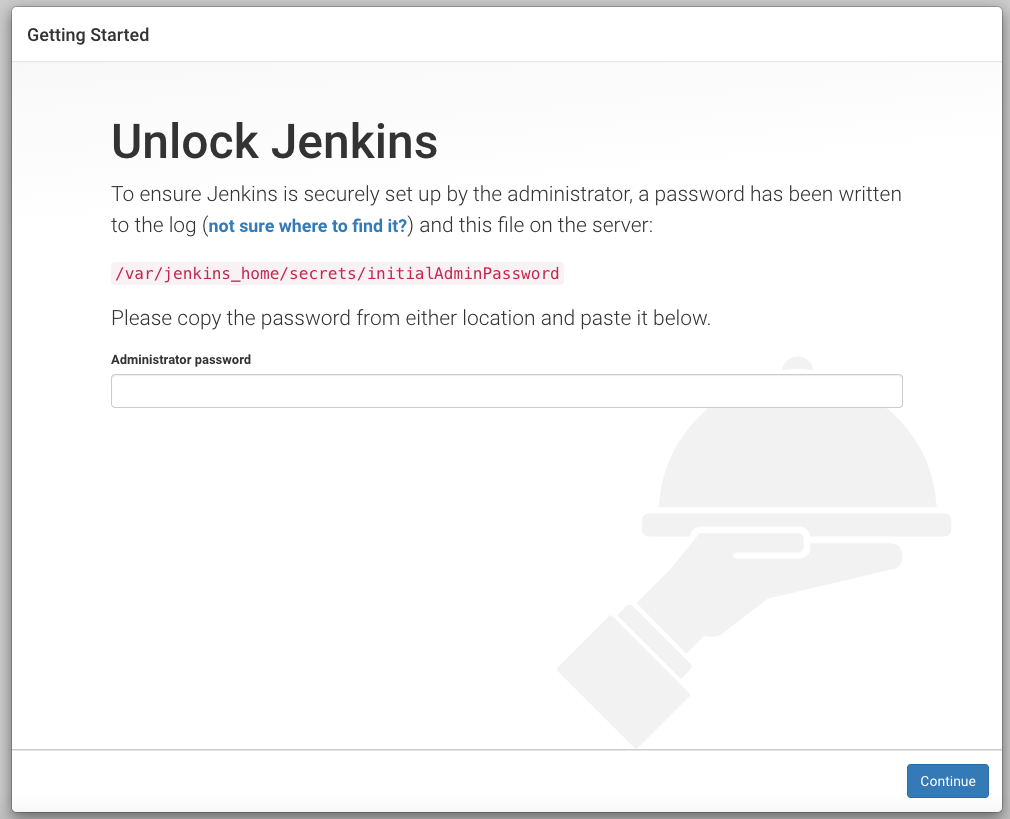
我們看到它需要輸入一組 Administrator password,我們要使用 `docker logs` 來查看,會發現最後會有寫 Please use the following password to proceed to installation 的地方:
```sh
$ docker logs jenkins
*************************************************************
*************************************************************
*************************************************************
Jenkins initial setup is required. An admin user has been created and a password generated.
Please use the following password to proceed to installation:
70c0780f62a7441f90286be106908378
This may also be found at: /var/jenkins_home/secrets/initialAdminPassword
*************************************************************
*************************************************************
*************************************************************
```
其中的 `70c0780f62a7441f90286be106908378` ,就是我們的 Administrator password,直接複製並貼到欄位後按 Continue。
我們可以看到它詢問是否要安裝套件,我們選擇左邊 Install suggested plugins 安裝推薦的套件即可:

等待它安裝套件,安裝完後會自動跳到註冊畫面:

輸入完基本的資料後,按 Save and Continue:
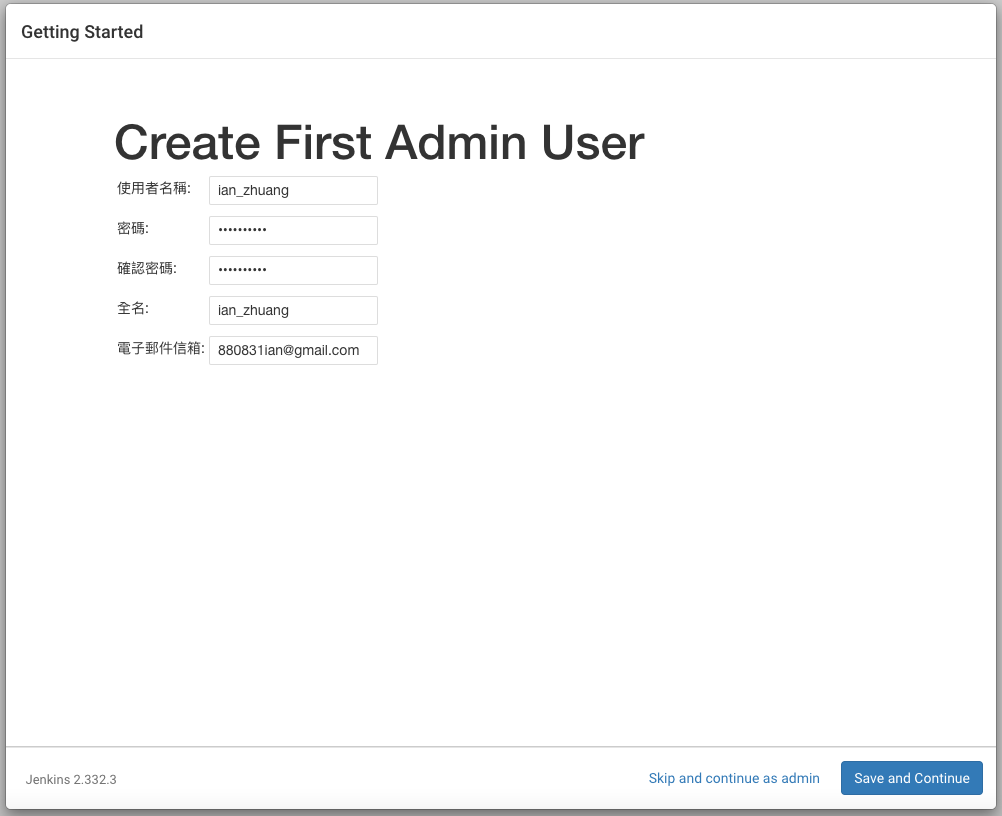
最後看到下面這個畫面就代表我們安裝好囉!

### 建立第一個 Jenkins Job
我們已經成功安裝好並進入到 Jenkins 儀表板,我們先來建立第一個 Job,它的功用是告訴我們系統檔案的即時使用狀況,讓我們對 Jenkins 有初步的了解:
1. 點選儀表板的新增作業或是 Create a Job:
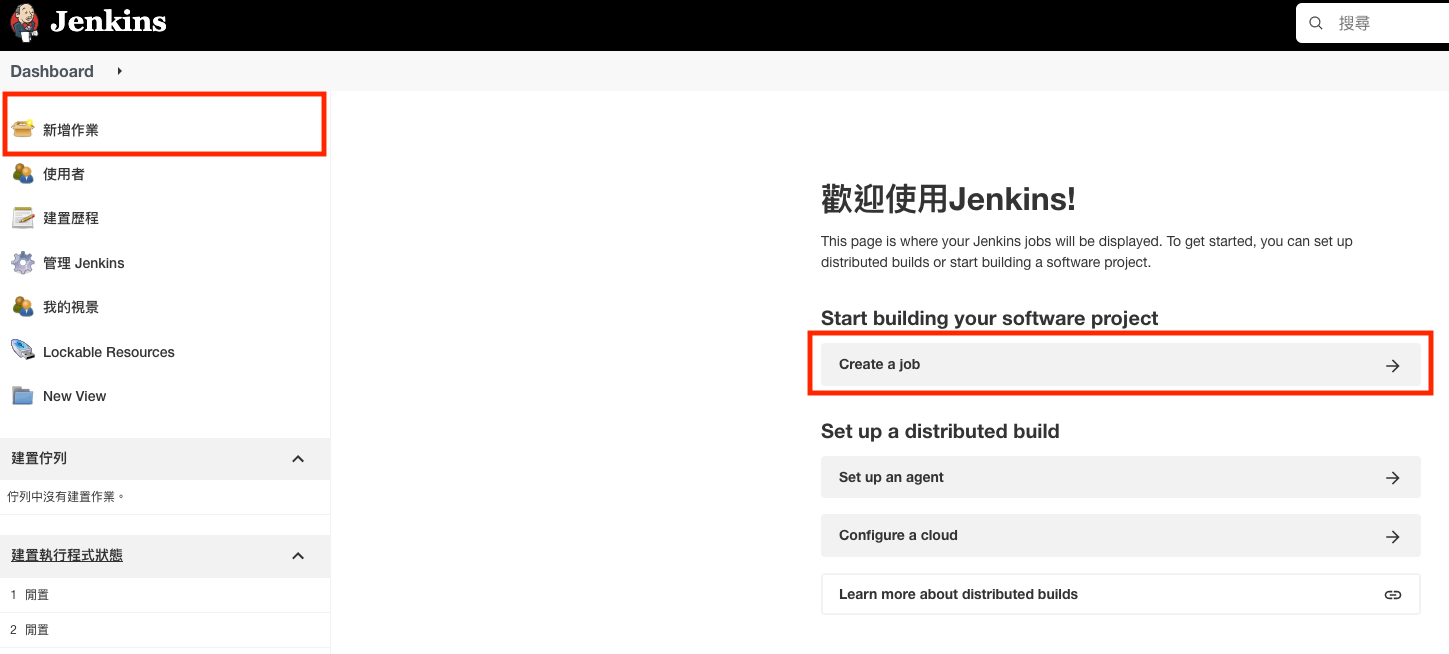
2. 輸入 Job 專案名稱並選擇建立 Free-Style 軟體專案:

可以看到這邊有不同的專案類型可以選擇,**Free-Style** 以及 **Pipeline** 這兩種類型的專案基本上就涵蓋大部分的需求。**Free-Style** 類型的專案提供了非常大的彈性讓使用者來做原始碼管理以及建置。如果建置流程涉及多個專案,則可以使用 **Pipeline** 類型的專案來組合及定義建置邏輯。
3. 接下來設定專案組態:
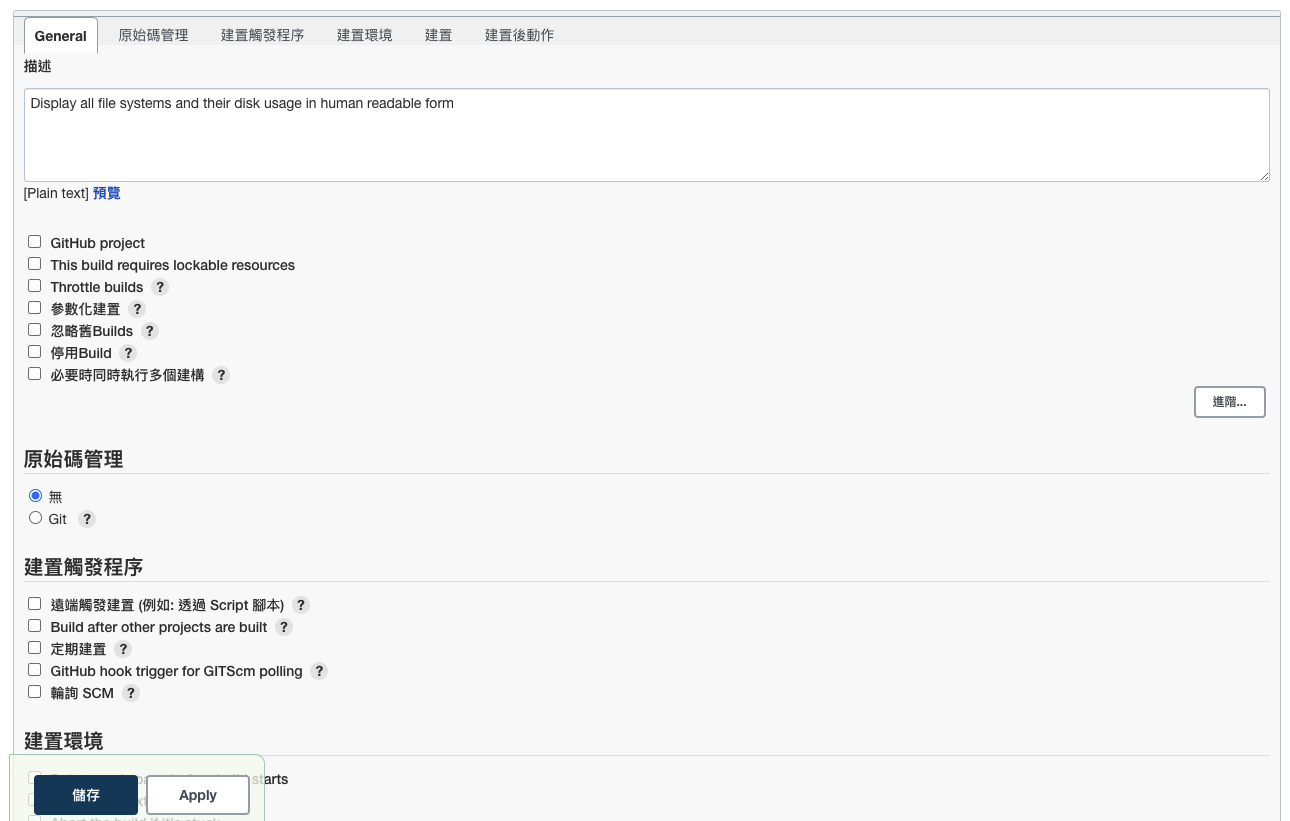
要記得幫每一個專案都加上描述,讓其他人知道該專案的用途或是使用時機等。
接著,在**建置**的下拉式欄位選擇 `選擇建置步驟 > 執行 Shell`

輸入 `df -h` 指令:
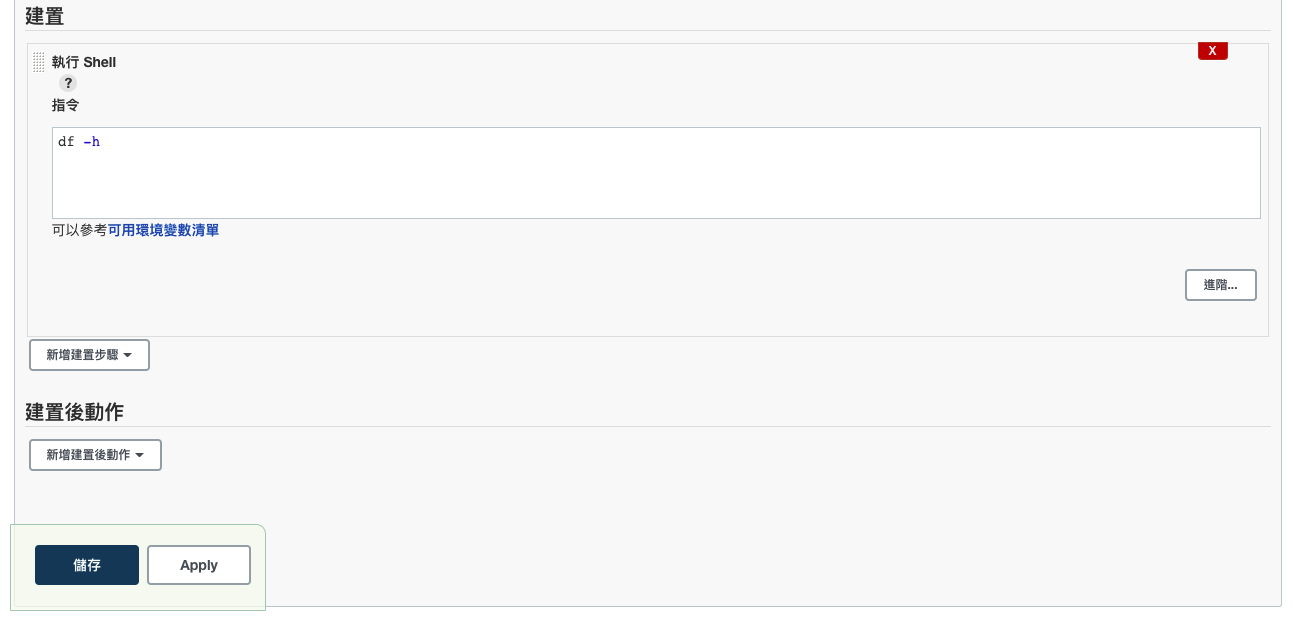
我們這邊透過建置 `執行 Shell` 這個建置步驟來告訴 Jenkins,未來這個專案被建置,就會執行 `df -h` 這個指令。
4. 專案組態設置完後,我們點選左邊的**馬上建置**來建置剛剛建好的專案,如果我們設定上沒有問題,應該會在左下角的**建置歷程**這邊看到我們的第一個建置紀錄:

5. 點進去後,再點 **Console Output**,可以看到這次建置的結果:

這樣我們的第一個 Jenkins Job 就設定完成囉!Jenkins 也確實的執行我們所設定的指令,並將系統的使用狀況呈現在終端機的輸出上。
以上就是我們第一個簡單的專案建置流程,當然,Jenkins 可以做到的事情不僅如此,在後面我們會透過安裝不同的套件來強化 Jenkins,來達到完整的持續整合 😁
## 原始碼管理與建置觸發程序
上面有提到 Jenkins 作為一個持續整合的工具,與原始碼管理系統的整合尤其重要。我們這一章節,會介紹如何在 Jenkins 上透過原始碼管理 (source code management,SCM) 系統,例如從 GitHub 獲得專案的原始碼,並設置建置觸發程序 (build triggers) 來實踐持續整合。
### 建置專案
#### HTTPS
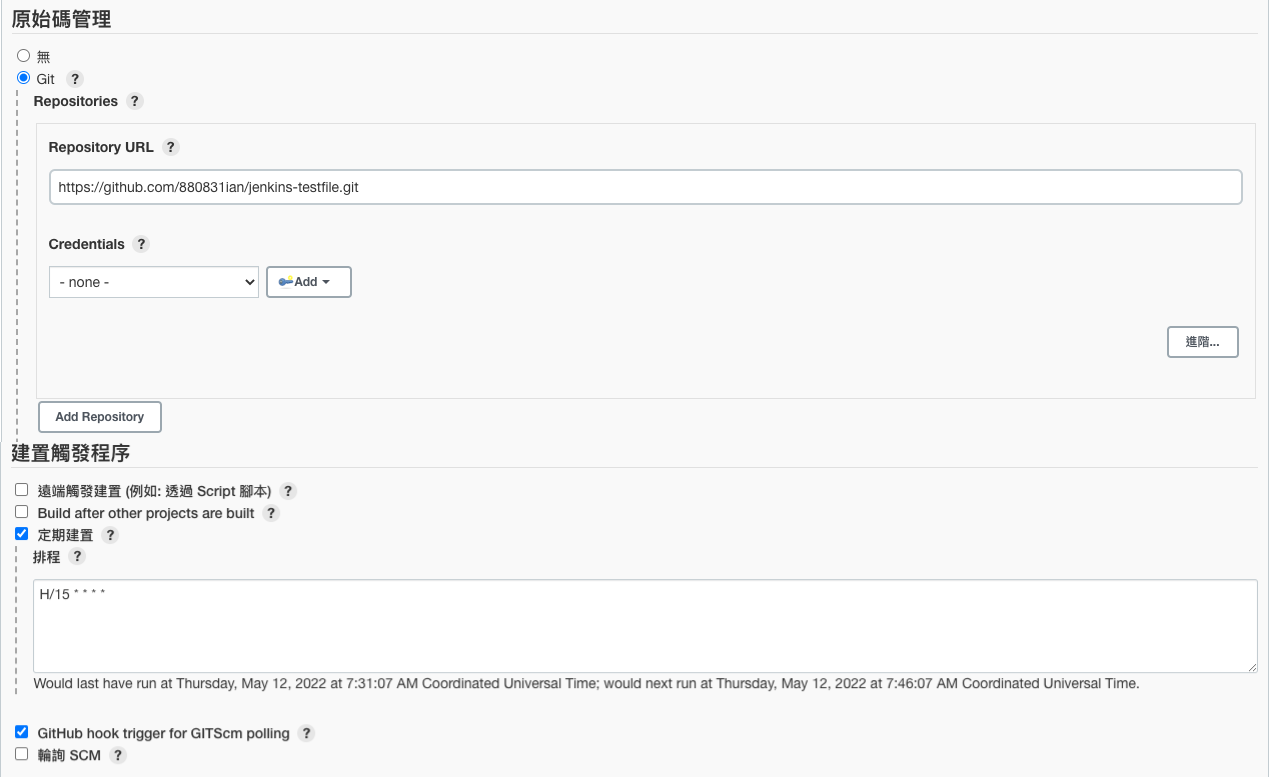
接下來我們先建立一個新的 Job,選擇 Free-style 模式,這次要在原始碼管理裡面選擇 Git,在 Repositories > Repository URL 裡面輸入我們這次要測試的 [repository URL](https://github.com/880831ian/jenkins-github-tg-bot):

#### SSH
如果我們想要透過 SSH 來存取專案,我們會遇到以下狀況:
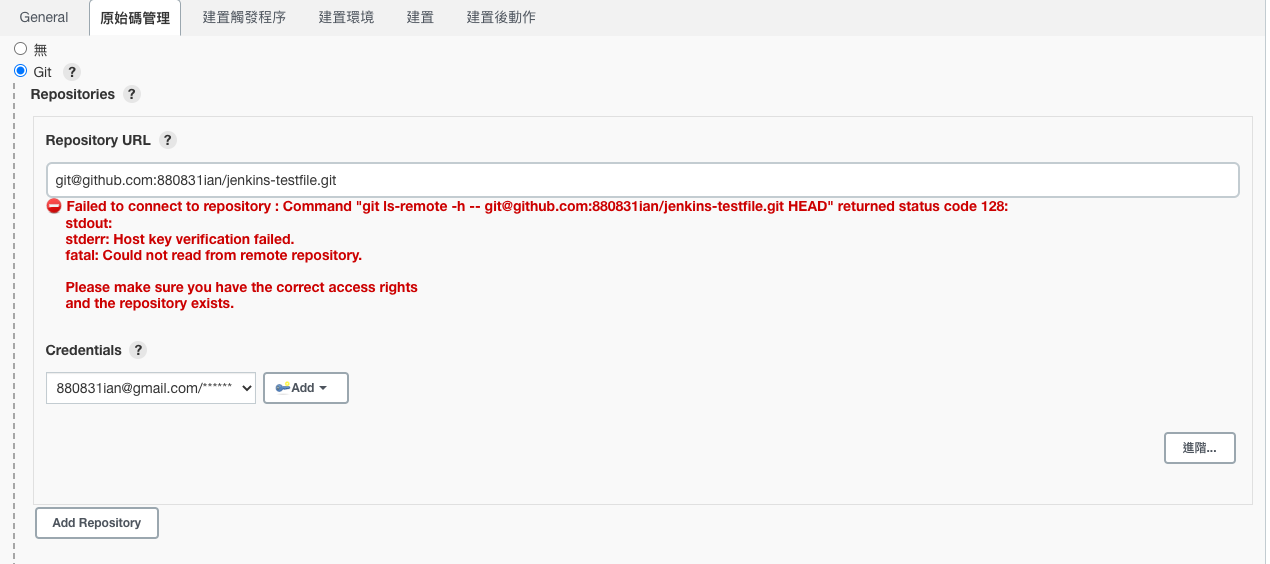
會有錯誤訊息是因為我們還沒有把 Jenkins 與 GitHub 做 SSH 金鑰配對,所以 GitHub 拒絕 Jenkins 透過 SSH 存取。那要怎麼解決呢?
最簡單的方法就是在 Jenkins 主機下[建立 SSH 金鑰](https://help.github.com/articles/generating-a-new-ssh-key-and-adding-it-to-the-ssh-agent/),並[將公開金鑰 Key 加入到 GitHub 帳號中](https://help.github.com/articles/adding-a-new-ssh-key-to-your-github-account/),有需要的朋友可以再自行使用,該範例使用 HTTPS 來做設定。
### 建置觸發程序
由於我們還沒有定義任何建置的觸發程序,所以除非我們手動去操作 Jenkins,不然 Jenkins 並不會主動幫我們進行建置。因此,在**建置觸發程序**這個欄位內,我們可以自由設定我們希望 Jenkins 何時自動幫我們進行建置專案。那依照專案的屬性不同,我們也可以採用不同的建置時機。那最常見的有以下兩種:
#### 定期建置
在 Jenkins 中,我們是採用 [Cron Format](https://cloud.google.com/scheduler/docs/configuring/cron-job-schedules) 的方式來定義建置行程。Cron Format 總共五個欄位,欄位與欄位之間可用空白或 Tab 鍵做區隔:
1. 分 (minute):0 - 59 分
2. 時 (hour):0 - 23 時
3. 日 (day of month):1 - 31 日
4. 月 (month):1 - 12 月
5. 星期 (day of week):星期 0 - 7 (其中 0 與 7 都代表星期天)
假設我們希望每個 30 分鐘就建置一次當前專案,我們可以在定義規則裡面填入 `H/15 * * * *`:

#### GitHub hook trigger for GITScm polling
這種觸發方式在持續整合時非常實用。我們可以讓 Jenkins 自動監測當在原始碼專案有任何的 push event 發生時就進行建置。為了要使用這種方式建置,需要以下幾個步驟來設定:
##### 新增 GitHub personal access token
1. 進入 GitHub 首頁,點選右上角下拉選單,點選 **Settings**:
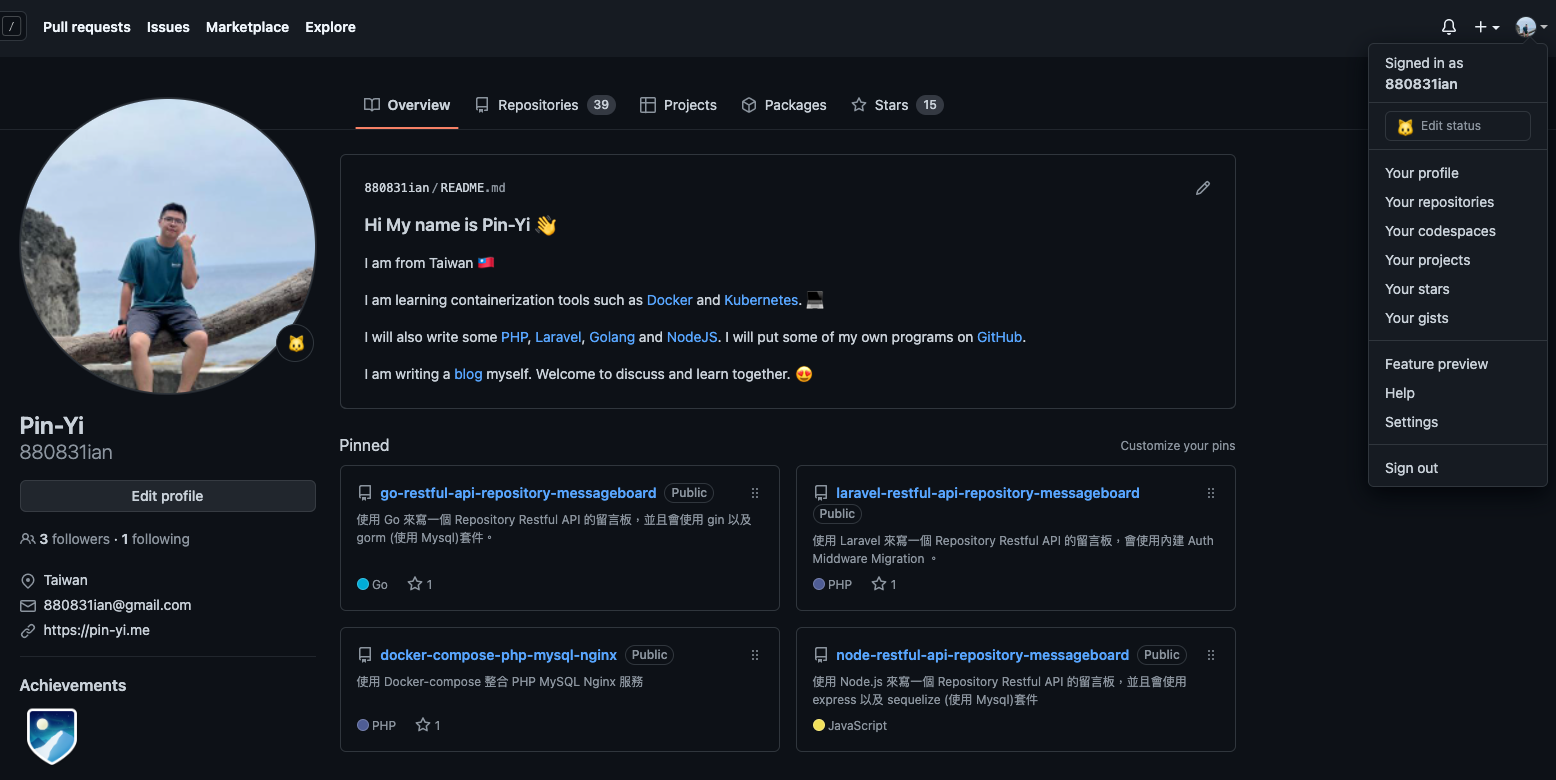
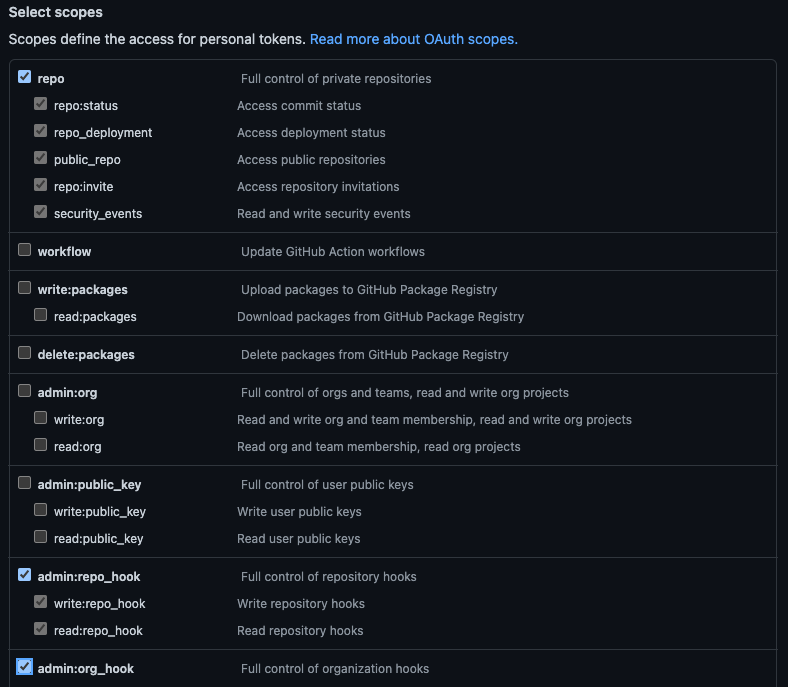
2. 先點選左邊的 **Developer settings** > 點選左邊的 **Personal access tokens** > 點選右上角的 **Generate new token**,輸入 token 的描述並勾選 `repo` scope 以及 `admin:repo_hook` scope 跟 `admin:org_hook` scope,點選 **Generate token**:
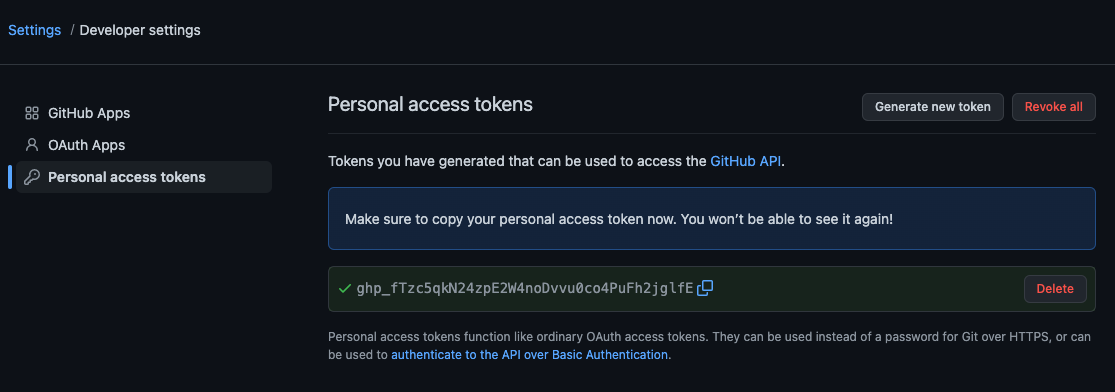
3. 會產生一個 token,請先把 token 複製下來,離開這個畫面後,token 就會看不到了!(此 token 已刪除 ✌️)
##### 設定 Jenkins GitHub
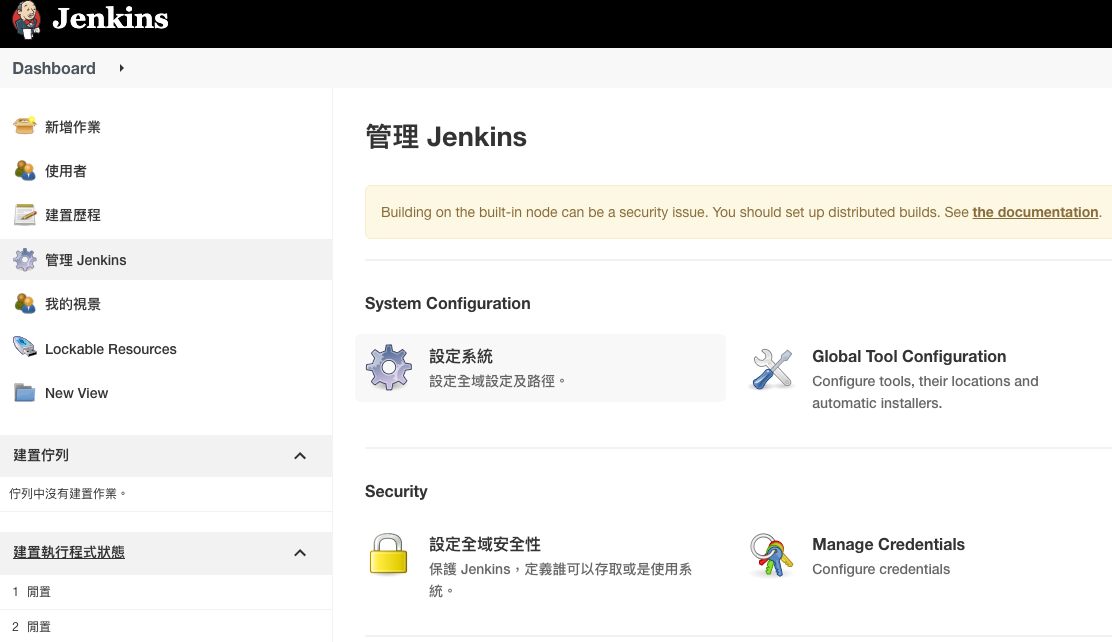
1. 進入 Jenkins 儀表板頁面,點選左邊**管理 Jenkins** > System Configuration 的**設定系統**,往下滑找到 GitHub:
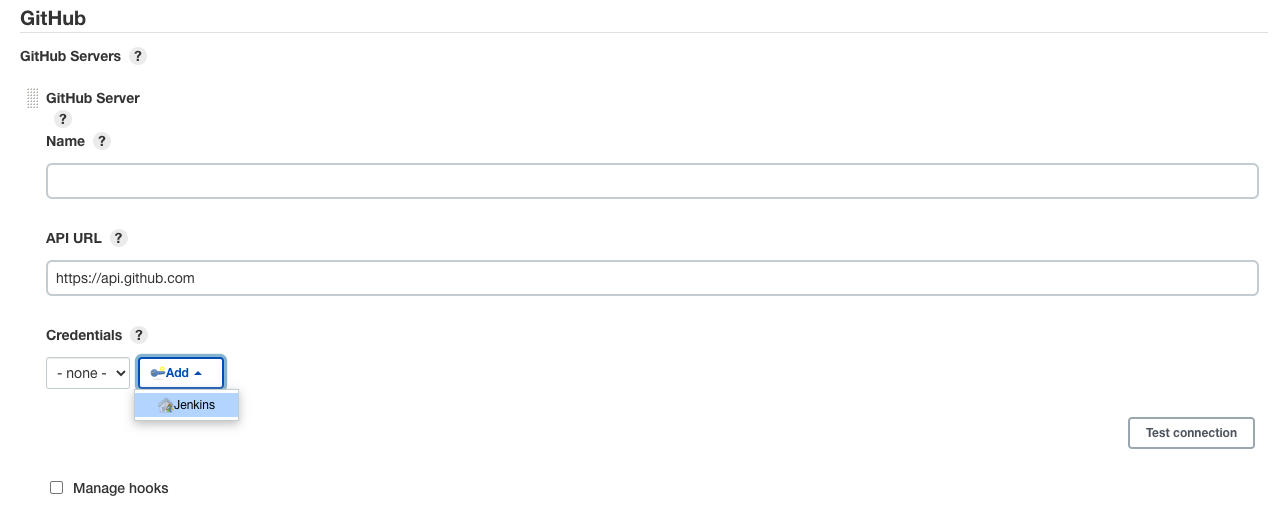
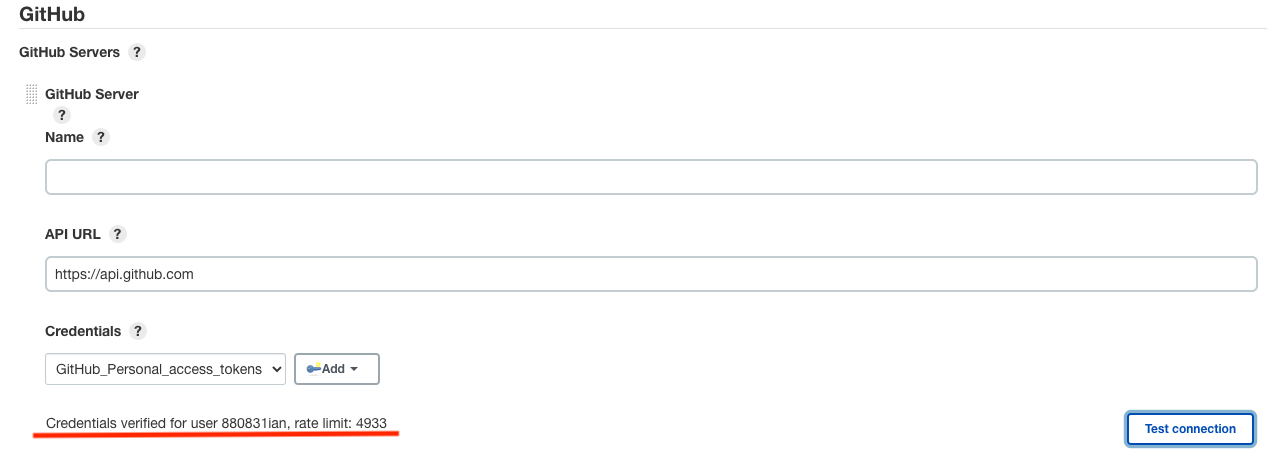
2. 找到後,再 GitHub Servers 下拉欄位選擇 Add GitHub Server,會看到下面畫面,API URL 輸入 `https://api.github.com`,Credentials 點 Add:
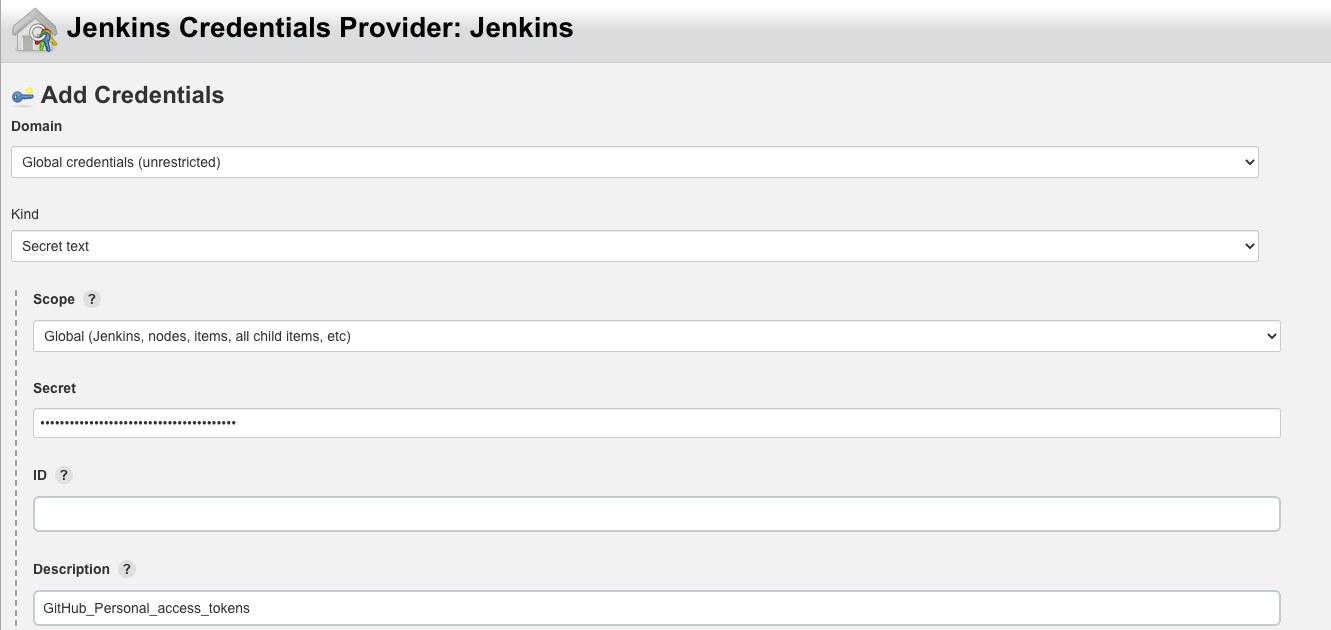
3. Kind 選擇 Secret Text,Secret 輸入剛剛存的 Personal Access Token,Description 簡單描述一下:
4. 設定完後,點選一下右邊的 **Test connection**,如果我顯示 `Credentials verified for user UserName, rate limit: xxx` 就代表成功囉!
##### 設定專案組態
1. 接著我們跳回來剛剛的專案組態,並勾選 **GitHub hook trigger for GITScm polling**:
2. 寫一個 Shell Script 來建置專案:
```sh
for file in $(find . -type f -name "*yaml")
do
yamllint $file
done
```

這邊利用一個簡單的 Shell Script 迴圈來對所有 YAML file 進行 yamllint 的檢查,最後點選儲存離開。
##### GitHub 上整合 Jenkins
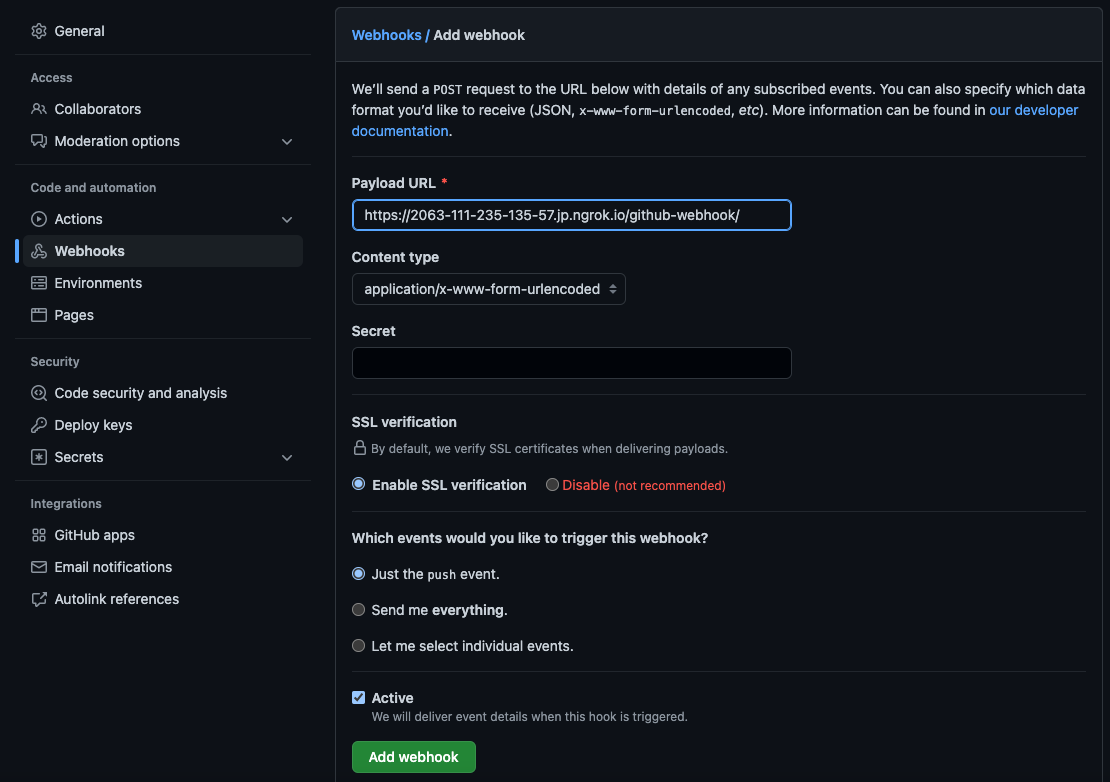
1. 先到 GitHub 被建置專案的頁面下點 **Setting** 標籤 > 點選左邊的 **Webhook** > 點選右上角的 **Add webhook** > 輸入 **Jenkins Hook URL** 到 Payload URL:
記得 Jenkins Hook URL 後面要加 `/github-webhook/`,小弟我卡在這裡很久😢 😢
{{< admonition tip "Jenkins Hook URL 設定">}}
由於我們是將 Jenkins 運行在本機端,所以 Jenkins Hook URL `http://localhost:8080` 是 Private IP。GitHub 沒有辦法抓 Private IP,為了練習,我們可以透過 [ngrok](https://ngrok.com/) 這套簡單小工具來暫時將 `http://localhost:8080` 變成 Public IP。
[ngrok](https://ngrok.com/) 的使用方式很簡單,只要先下載 `brew install ngrok/ngrok/ngrok` ,並使用 `ngrok http 8080` 指令,將 Private IP 變成 Public IP:

圖片中 `https://2063-111-235-135-57.jp.ngrok.io` 就是 Public 的 Jenkins Hook URL
{{< /admonition >}}
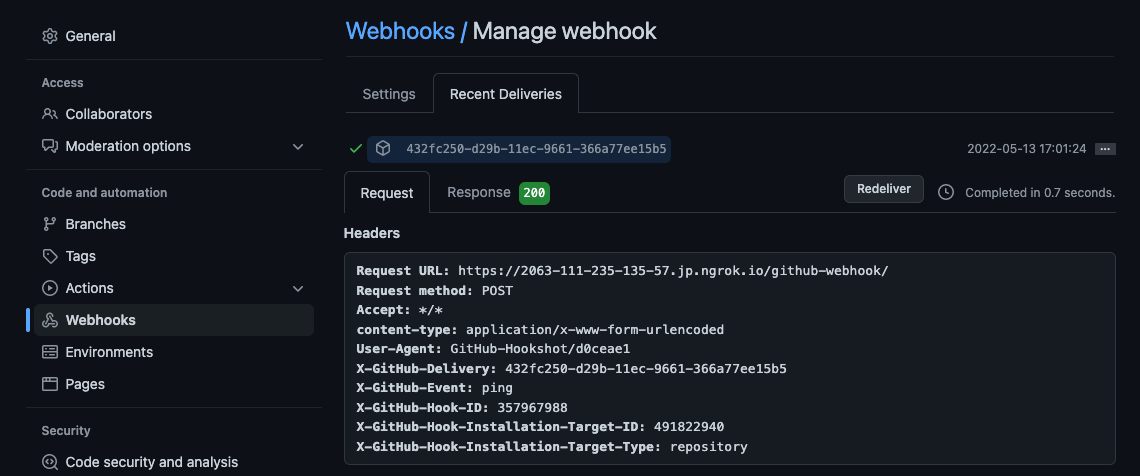
完成後,先點選 **Recent Deliveries** 檢查是否成功,底下的 Response 需要是 200,才是對的歐!(這裡一定要先檢查,不然後面會找問題到死 XD)
### 測試
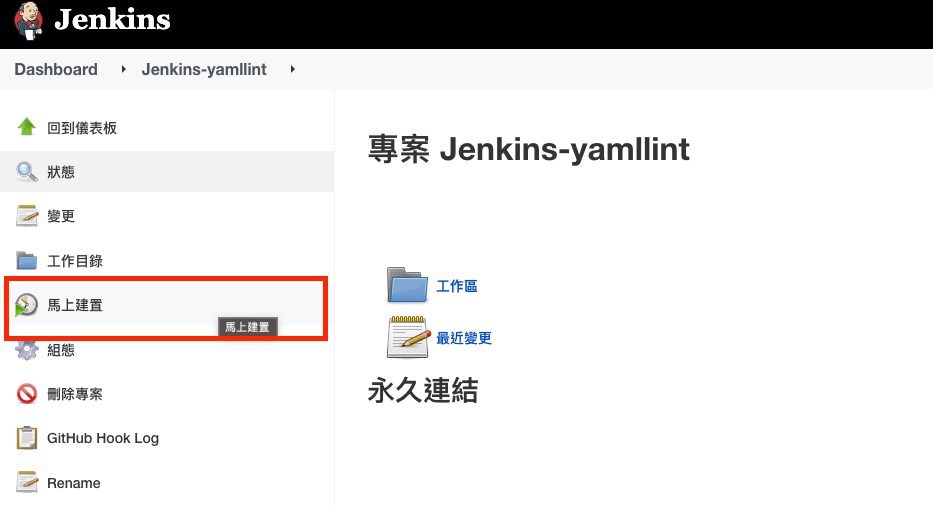
我們都設定好後,要開始來測試,我們可以直接先點選 **馬上建置**,來測試是否可以透過 **GitHub personal access token**,抓取 GitHub 的檔案。
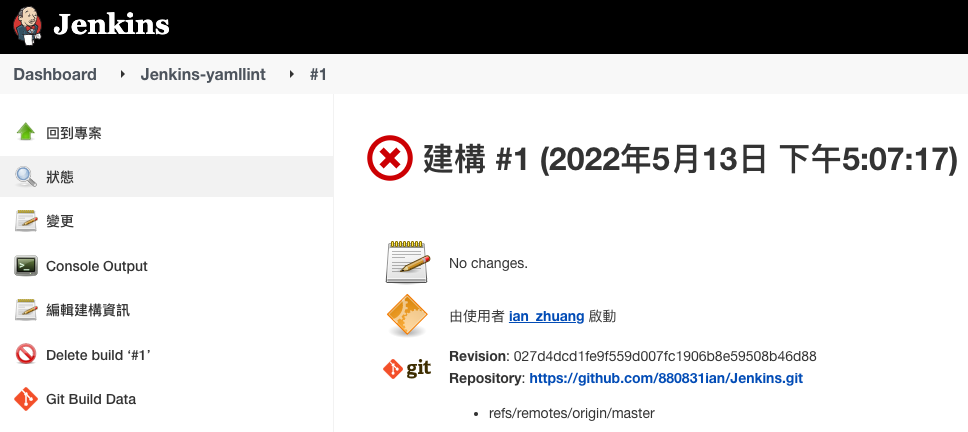
可以看到在建置流程那邊發現建置失敗,點進去可以看詳細內容,
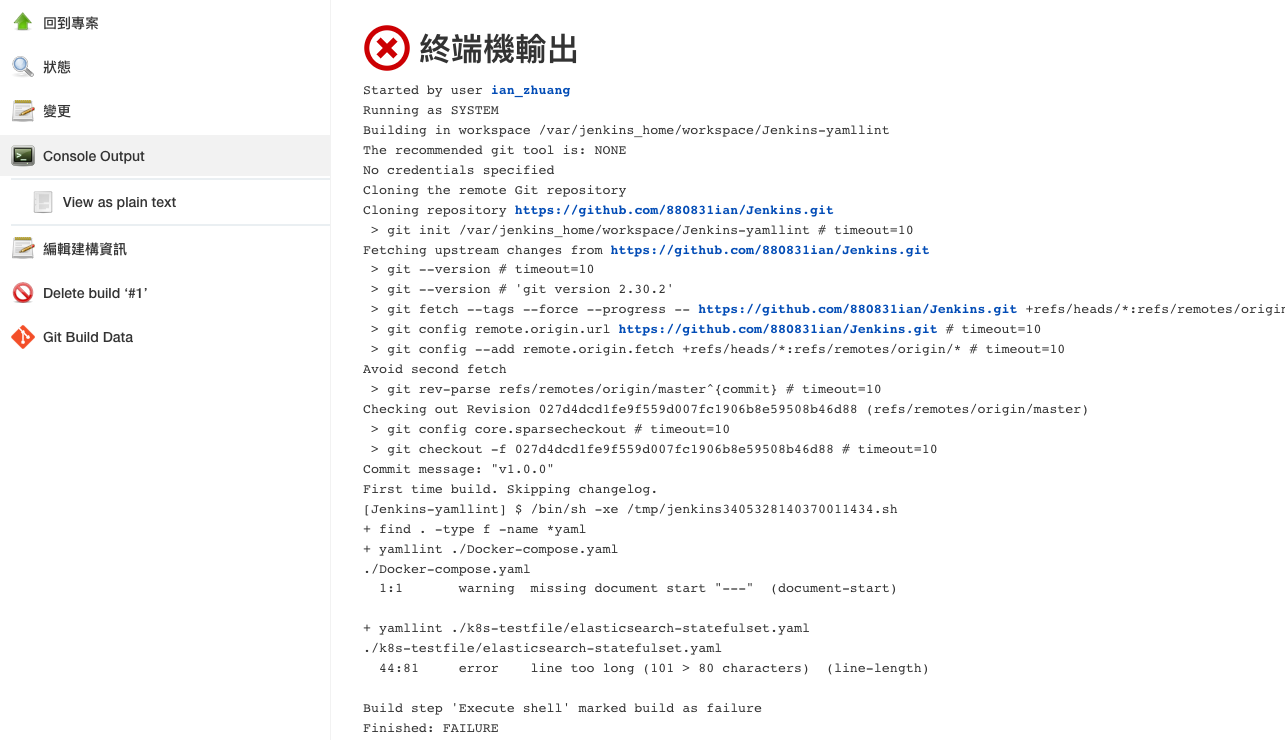
點選左側的 **Console Output**,可以看到我們有成功獲取 GitHub 上得專案,並且執行我們的 Shell 來檢查 yaml 的檔案格式,發現是因為格式有錯誤,所以建置才會失敗 ❌
接下來我們先修改一下 yaml 的檔案,後重新 push 到 Github 上,並觀察 Jenkins 會不會自動建置 !(修改位置大家可以直接看 [Commit 結果](https://github.com/880831ian/jenkins-github-tg-bot/commit/729556412ef8796477a351040604aad8c8083c05))
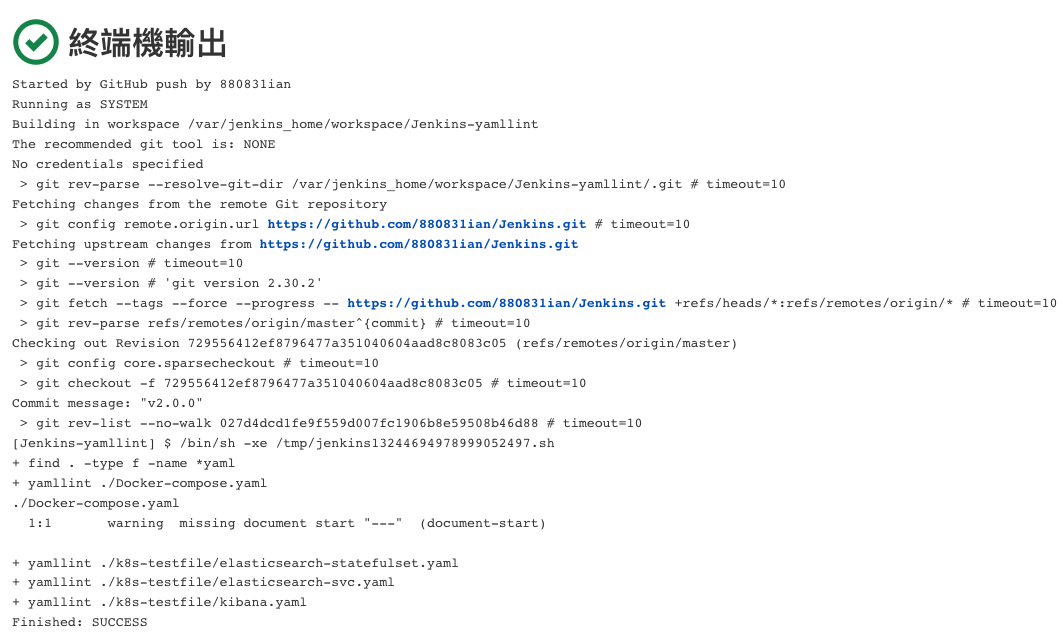
當你 push 完後,發現它會自動建置,請因為我們修改成正確格式,所以他也建置成功囉!
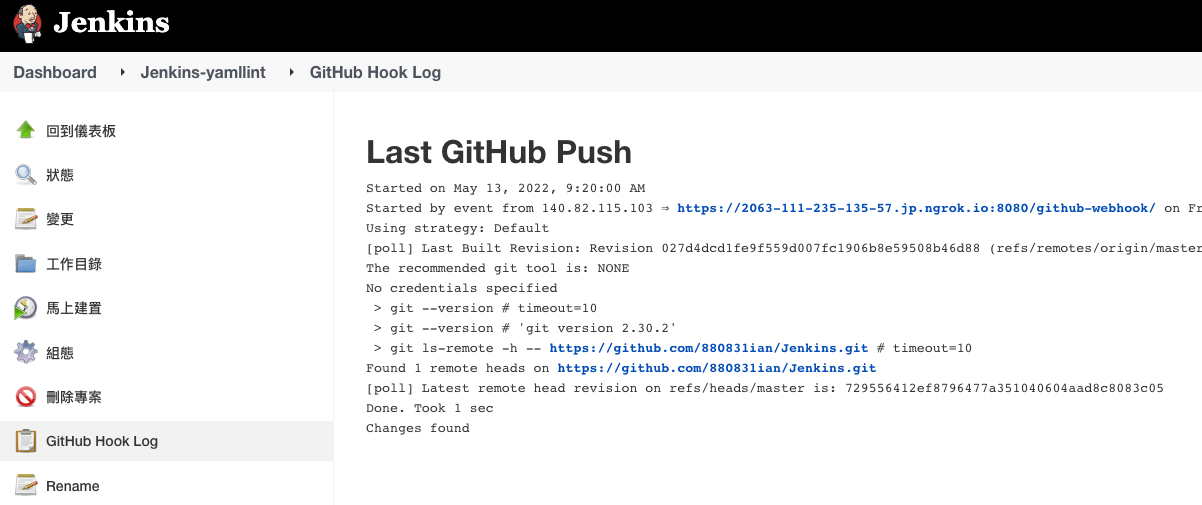
也可以點選左側有一個新的 **GitHub Hook Log** ,可以看到我們成功透過 **GitHub hook trigger for GITScm polling** 偵測到有新的 event,透過 WebHook 讓 Jenkins 知道。
### 建置後觸發通知
當我們自動建置成功當然沒什麼問題,但如果失敗有可能就會影響後續程式的上線時間,所以我們希望建置完成後,可以收到通知,通知除了可以用 email 以外,也可以使用套件去串接我們常用的平台,例如 Telegram、Slack、Line 等等,接下來我會教大家要怎麼去串接這些服務,在開始之前要請大家先安裝兩個套件:
#### 安裝/設定 Build Timestamp
[Build Timestamp](https://plugins.jenkins.io/build-timestamp/) 這個套件可以幫我們在稍後傳送通知時加上當下的時間戳,那要怎麼安裝套件呢?先到儀表板首頁,點選左側的 **管理 Jenkins** > 點選 **管理外掛程式**:

再 Plugin Manager 的 可用的裡面搜尋 Build Timestamp,選擇後點下方的 **Download now and install after restart**,等待他安裝後會自動重啟。

重啟後從儀表板點選左側 **管理 Jenkins** > 點選 **設定系統**,找到 **Build Timestamp**,開啟設定,並設定 Timezone 為 `Asia/Taipei` 以及 pattern `yyyy-MM-dd HH:mm:ss z`,這樣我們待會就可以使用 `BUILD_TIMESTAMP` 參數來獲取當下時間,記得要按下儲存歐!

#### 安裝/設定 Notify.Events
[Notify.Events](https://plugins.jenkins.io/notify-events/) 這個套件可以串接很多的平台,例如 Telegram、Slack、Line 等,也可以透過它寄發郵件,是一個十分方便的套件,但缺點是他需要註冊,免費版只有每個月 300 次的訊息傳輸量,但在我們測試階段已經十分夠用。一樣我們用剛剛的方法安裝 **Notify.Events**。

安裝好後,Notify.Events 他不需要先設定,它可以依據不同的 Job 有不同的設定,所以我們開啟剛剛的 Job 組態,拉到最下面找到 **建置後動作** ,選擇 **Notify.Events**:

可以看到這邊要先輸入 Token,那 Token 就必須去官網註冊後設定。
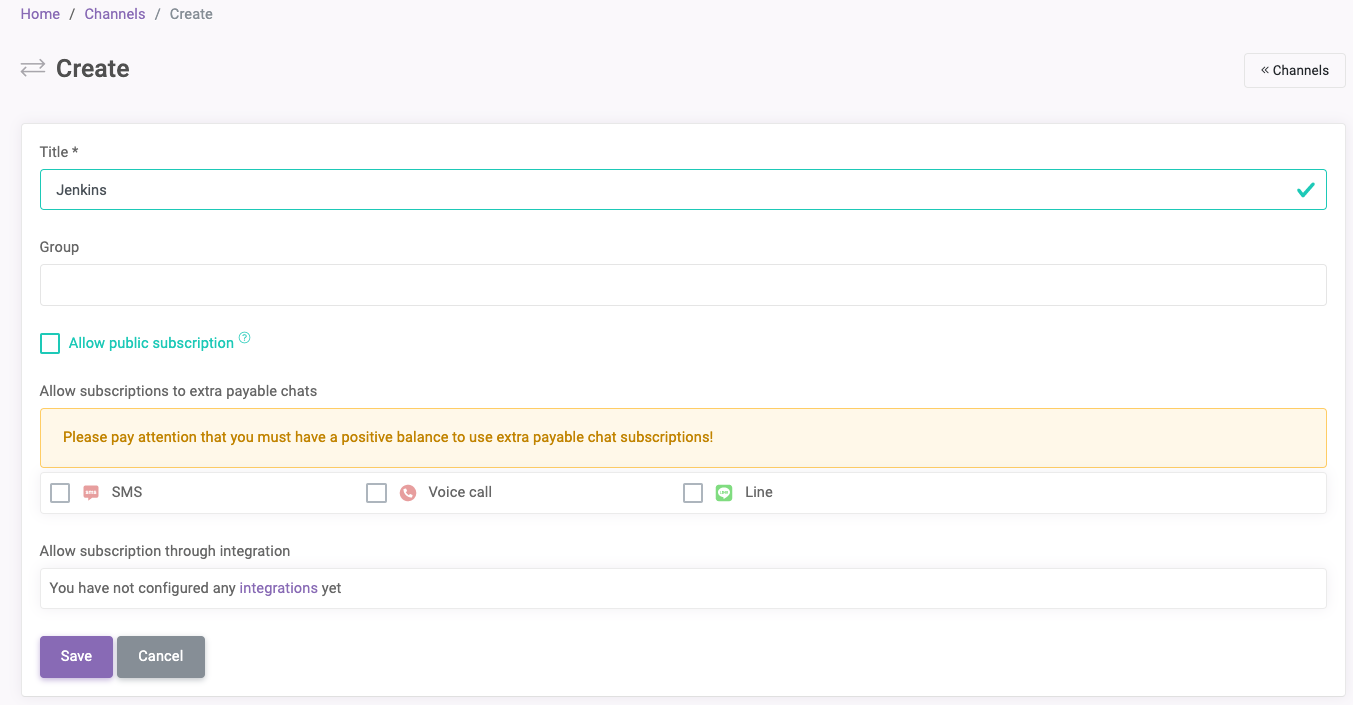
我們先開啟瀏覽器,搜尋 [Notify.Events](https://notify.events/en),註冊帳號後,在 Channels 點選 **Create**,輸入一下 Title 按下 **Save**。
完成後,應該可以看到以下畫面,這邊就可以讓我們選擇來源,以及要發送到哪裡:
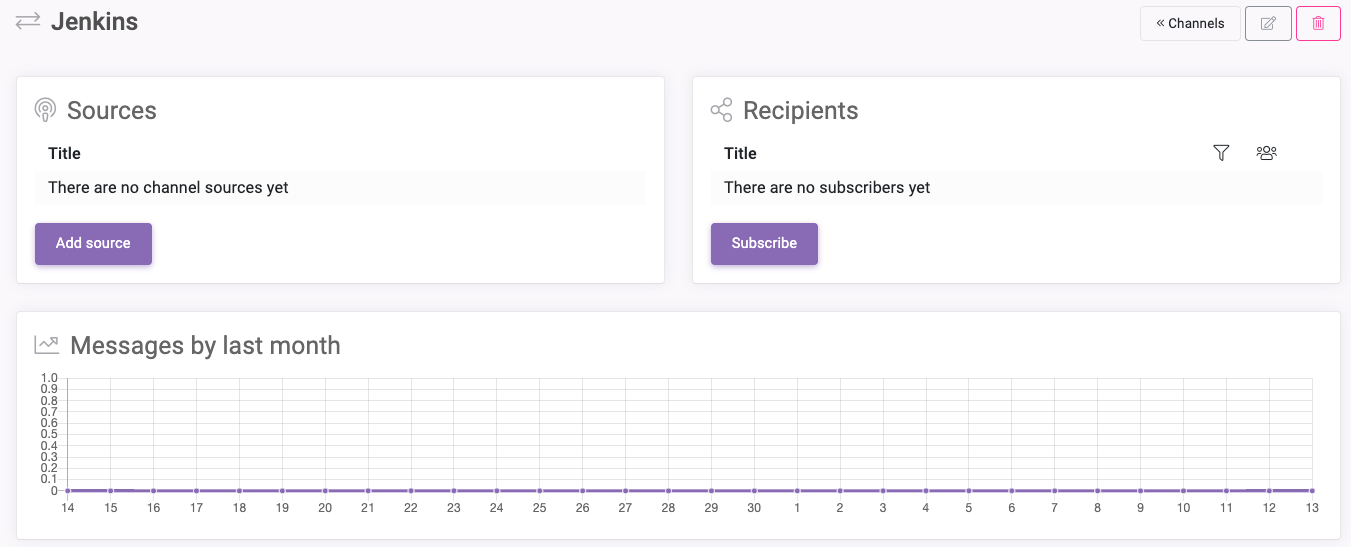
我們先選擇 Sources,點選 **Add source**,可以看到很多來源,選擇 **CI/CD and Version control** ,再選擇 **Jenkins**:
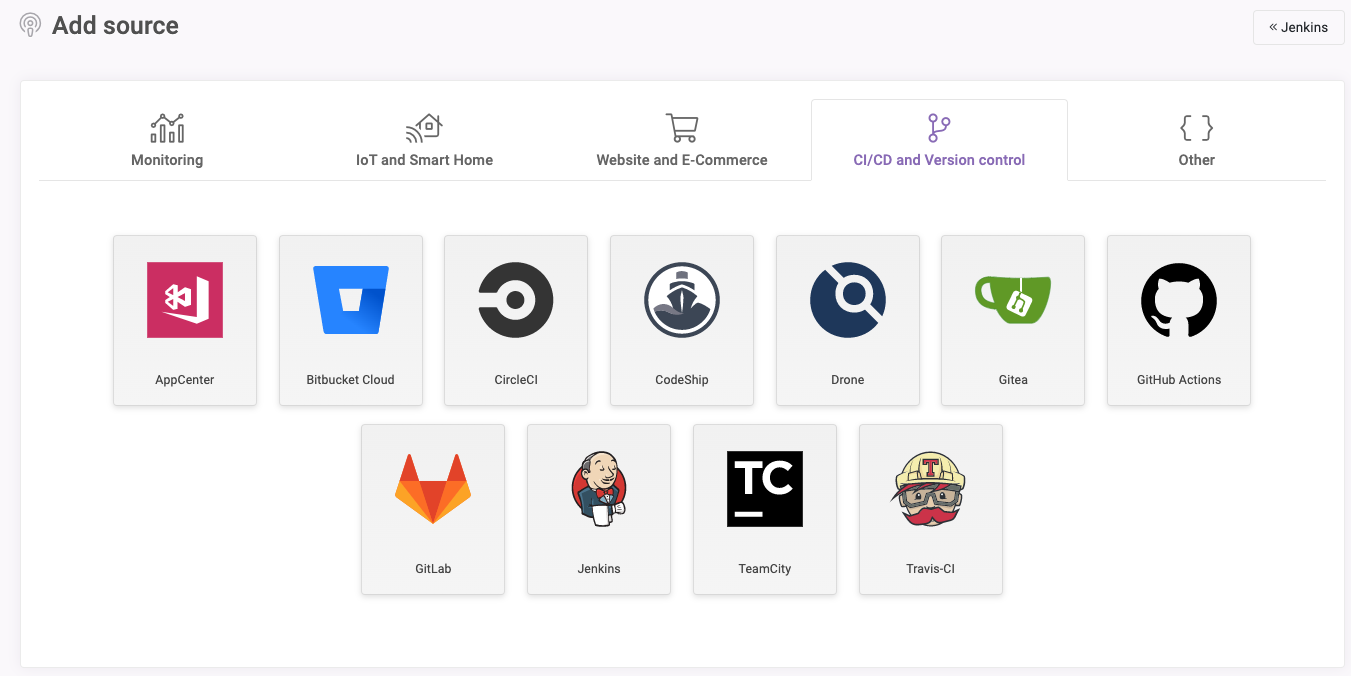
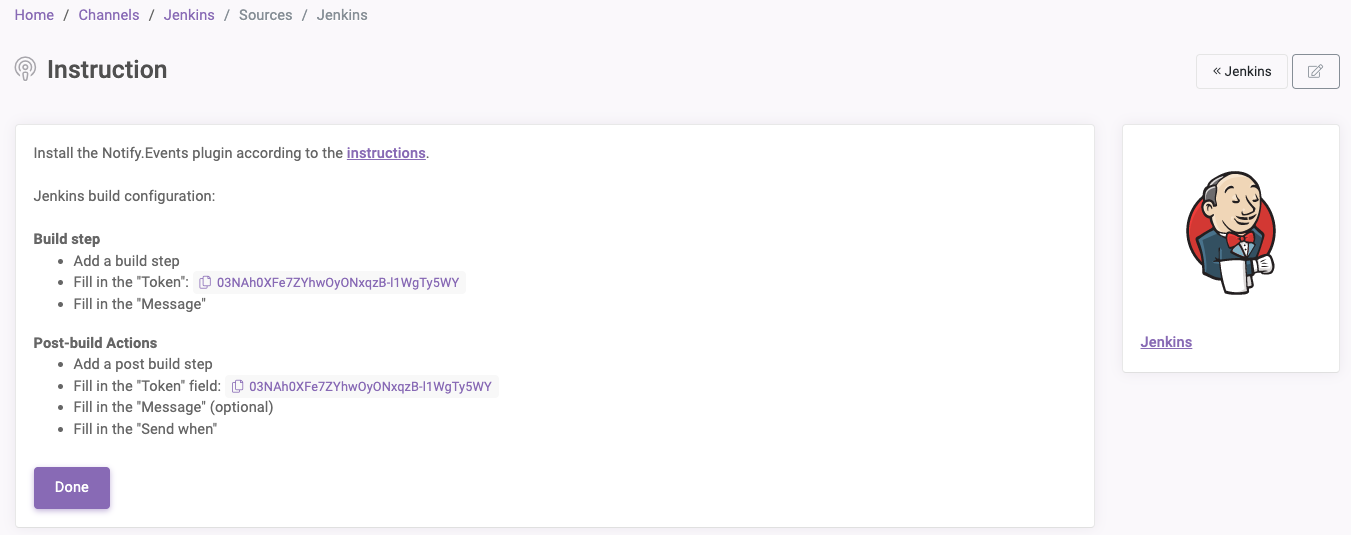
點選 **Next**,就可以看到以下畫面,它告訴我們要將它提供的 `Token` 貼入設定檔,也就是我們剛剛在 Job 組態裡面的那個 Token:
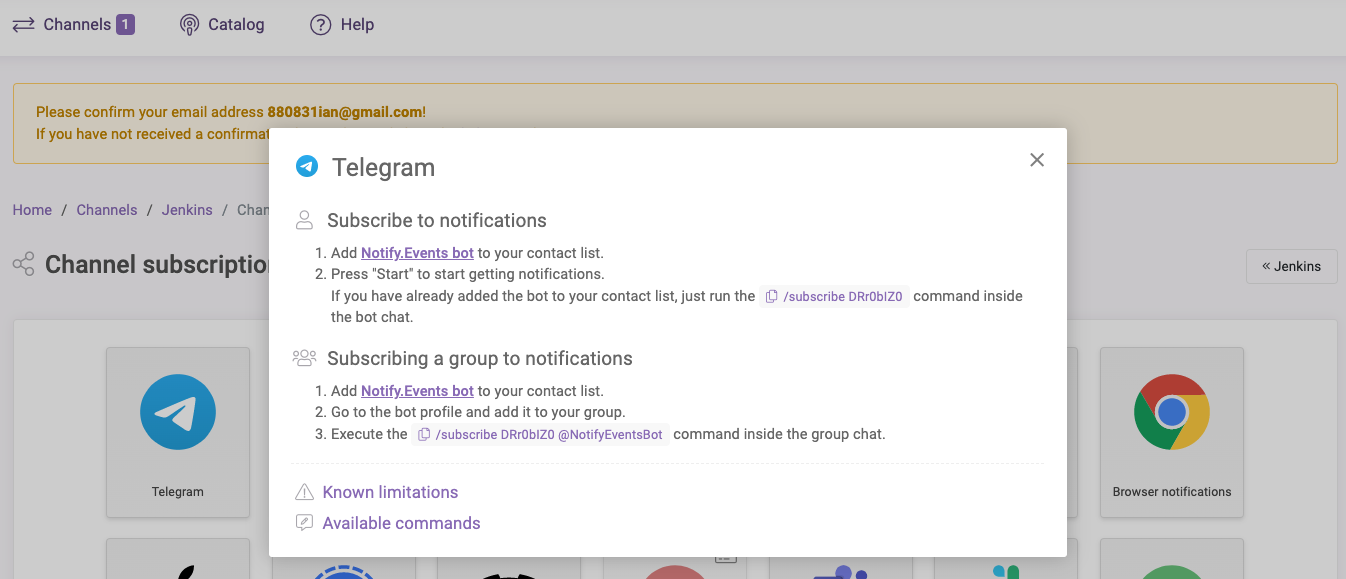
設定好 Sources,接下來要設定接收方,回到剛剛 Notify.Events 的儀表板,點選 **Subscribe**,我們測試使用 Telegram 來當接收方,它會跳出一個視窗,告訴你要怎麼把他的機器人加成好友或是加入群組,這邊就依大家需要自行選擇,那我就將它加入群組,使用 `/subscribe DRr0bIZ0 @NotifyEventsBot` 指令來綁定
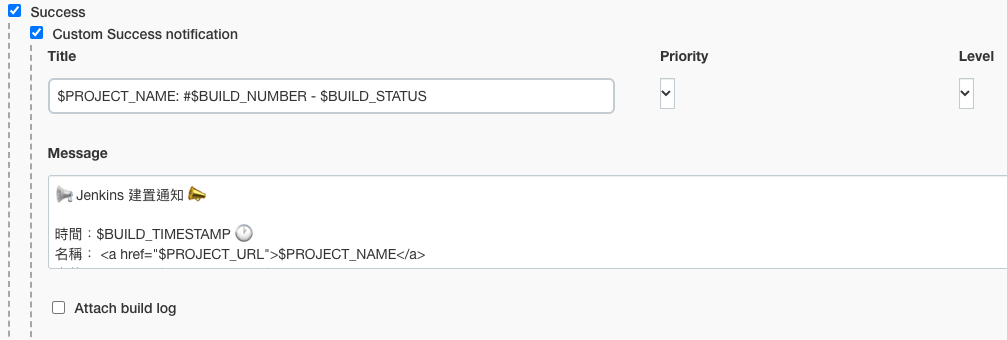
這時候我們都設定好了,我們回到 Job 組態的 Notify.Events 設定位置,將 Token 貼上去,它可以自訂訊息的模板,可以全部都一樣,也可以針對建置後的狀態,產生不同的訊息模板,我們來自定義設計一下:
**Success**
```
📢 Jenkins 建置通知 📣
時間:$BUILD_TIMESTAMP 🕐
名稱: $PROJECT_NAME
次數: #$BUILD_NUMBER
建置狀態: 🟢 $BUILD_STATUS 🟢
--------- 😍😍😍 ---------
```
**Failure**
```
📢 Jenkins 建置通知 📣
時間:$BUILD_TIMESTAMP 🕐
名稱: $PROJECT_NAME
次數: #$BUILD_NUMBER
建置狀態: 🔴 $BUILD_STATUS 🔴
--------- 😭😭😭 ---------
```

#### Telegram 通知測試
最後我們都設定好了,就來測試一下吧!我們先故意將程式碼格式用錯,[讓他先跳出錯誤](https://github.com/880831ian/jenkins-github-tg-bot/commit/e88d35d56f2b2d1b999682c0f748431999bb4b9e),[再修改](https://github.com/880831ian/jenkins-github-tg-bot/commit/ec0e9f9c2148cecde6f70ec391d4c775fc180029),來看看結果如何吧!(文字連結是對應的 Commit )
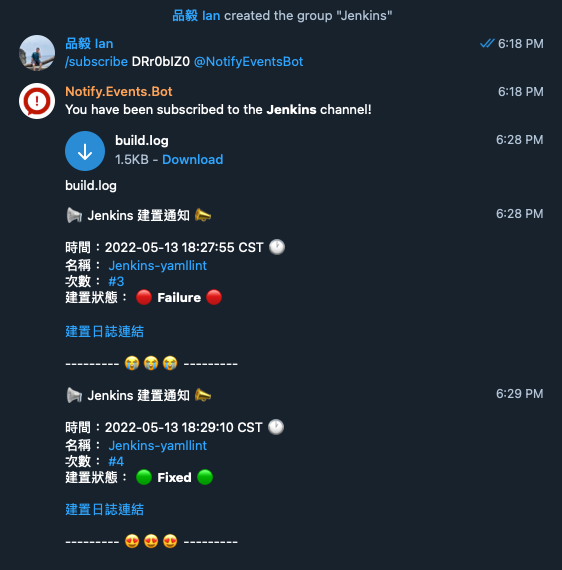
可以看到,我們分別兩次的測試,會依據我們建置後的結果,觸發不同的通知模板。
## 參考資料
[30 天入門 Ansible 及 Jenkins](https://ithelp.ithome.com.tw/users/20103346/ironman/1473)
[Day12 什麼是 CICD](https://ithelp.ithome.com.tw/articles/10219083)
[Jenkins和Ansible的對比和區別](http://www.srcmini.com/21799.html)
[[CI]設定jenkins連結GitHub Private Repo by Webhook](https://medium.com/@BuzonXXXX/ci-%E8%A8%AD%E5%AE%9Ajenkins%E9%80%A3%E7%B5%90github-private-repo-111c53d29047)