https://github.com/Anwarvic/Speaker-Recognition
This repo contains my attempt to create a Speaker Recognition and Verification system using SideKit-1.3.1
https://github.com/Anwarvic/Speaker-Recognition
gmm gmm-ubm i-vector identity-vector identity-verification sidekit speaker-identification speaker-recognition speaker-verification ubm
Last synced: 11 months ago
JSON representation
This repo contains my attempt to create a Speaker Recognition and Verification system using SideKit-1.3.1
- Host: GitHub
- URL: https://github.com/Anwarvic/Speaker-Recognition
- Owner: Anwarvic
- Created: 2019-02-20T13:42:26.000Z (over 7 years ago)
- Default Branch: master
- Last Pushed: 2019-05-22T09:33:05.000Z (about 7 years ago)
- Last Synced: 2024-08-08T23:21:36.293Z (almost 2 years ago)
- Topics: gmm, gmm-ubm, i-vector, identity-vector, identity-verification, sidekit, speaker-identification, speaker-recognition, speaker-verification, ubm
- Language: Python
- Homepage:
- Size: 22.9 MB
- Stars: 108
- Watchers: 4
- Forks: 32
- Open Issues: 7
-
Metadata Files:
- Readme: README.md
Awesome Lists containing this project
README
# Speaker Recognition using SideKit
This repo contains my Speaker Recognition/Verification project using SideKit.
Speaker recognition is the identification of a person given an audio file. It is used to answer the question "Who is speaking?" Speaker verification (also called speaker authentication) is simliar to speaker recognition, but instead of return the speaker who is speaking, it returns whether the speaker (who is claiming to be a certain one) is truthful or not. Speaker Verification is considered to be a little easier than speaker recognition.
Recognizing the speaker can simplify the task of translating speech in systems that have been trained on specific voices or it can be used to authenticate or verify the identity of a speaker as part of a security process. Speaker recognition has a history dating back some four decades and uses the acoustic features of speech that have been found to differ between individuals. These acoustic patterns reflect both anatomy and learned behavioral patterns.
## SideKit
SIDEKIT is an open source package for Speaker and Language recognition. The aim of SIDEKIT is to provide an educational and efficient toolkit for speaker/language recognition including the whole chain of treatment that goes from the audio data to the analysis of the system performance.
Authors: Anthony Larcher & Kong Aik Lee & Sylvain Meignier
Version: 1.3.1 of 2019/01/22
You can check the official documentation, altough I don't recommend it, from [here](https://projets-lium.univ-lemans.fr/sidekit/). Also [here](https://projets-lium.univ-lemans.fr/sidekit/api/index.html) is the API documentation.
To run SIDEKIT on your machine, you need to:
- Install the dependencies by running `pip install -r requirements.txt`
- Install `pytorch` by running the following command: `pip3 install https://download.pytorch.org/whl/cpu/torch-1.0.1.post2-cp36-cp36m-linux_x86_64.whl`.
- Install `torchvision` by running `pip3 install torchvision`.
- Install tkinter by running `sudo apt-get install python3.6-tk`.
- Install libSVM by running `sudo apt-get install libsvm-dev`. This library dedicated to SVM classifiers.
**IMPORTANT NOTE**:
There is no need to install SIDEKIT as the library isn't stable and requires some manuevering so I cloned the project from gitLab using`git clone https://git-lium.univ-lemans.fr/Larcher/sidekit.git` and did some editing. So, you just need to clone my project and you are ready to go!!
## Download Dataset
This project is just a proof-of-concept, so it was built using the merged vesion of a small open-source dataset called the "Arabic Corpus of Isolated Words" made by the [University of Stirling](http://www.cs.stir.ac.uk/) located in the Central Belt of Scotland. This dataset can be downloaded from [here](https://www.kaggle.com/mohamedanwarvic/merged-arabic-corpus-of-isolated-words).
This dataset is a voice-recorded dataset of 50 Native-Arabic speakers saying 20 words about 10 times. It has been recorded with a 44100 Hz sampling rate and 16-bit resolution. This dataset can be used for tasks Speaker Recognition, Speaker Verification, Voice biometrics, ... etc.
This dataset (1GB) is divided into:
- 50 Speakers (starting from S01 ending at S50.
- 47 of these speakers are Male and just 3 are females and they are: S11, S36, and S44.
- Each speaker is in a separate directory named after the speaker id.
- Each speaker recorded 2 waves, about 10 times (sessions). So, each speaker should contain 20 wave files.
- These two waves are names as `{speaker_id}.{session_id}.digits.wav` which contain the recordings of the Arabic digits from zero to 9. And `{speaker_id}.{session_id}.words.wav` which contain the recordings of some random Arabic words.
After downloading the dataset and extracting it, you will find about 50 folders with the name of "S+speakerId" like so S01, S02, ... S50. Each one of these folders should contain around 20 audio files for every speaker, each audio file contains the audio of the speaker speaking 10 in a single WAV file words. This is repeated for 10 times/sessions. And these words are:
```
first_wav_words = {
"01": "صِفْرْ",
"02":"وَاحِدْ",
"03":"إِثنَانِْ",
"04":"ثَلَاثَةْ",
"05":"أَربَعَةْ",
"06":"خَمْسَةْ",
"07":"سِتَّةْ",
"08":"سَبْعَةْ",
"09":"ثَمَانِيَةْ",
"10":"تِسْعَةْ"
}
second_wav_words = {
"01":"التَّنْشِيطْ",
"02":"التَّحْوِيلْ",
"03":"الرَّصِيدْ",
"04":"التَّسْدِيدْ",
"05":"نَعَمْ",
"06":"لَا",
"07":"التَّمْوِيلْ",
"08":"الْبَيَانَاتْ",
"09":"الْحِسَابْ",
"10":"إِنْهَاءْ"
}
```
## How it Works
The sideKit pipeline consists of six steps as shown in the following image:
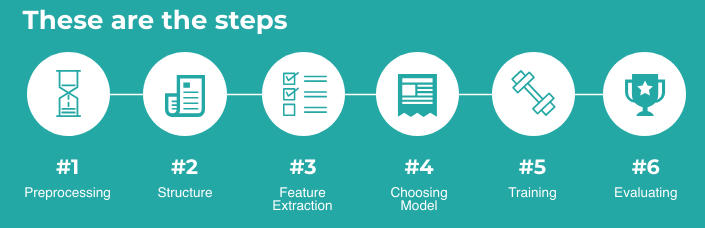
As we can see, the pipeline consists of six main steps:
- **Preprocessing**: In this step, we perform some processing over the wav files to be consistent like changing the bit-rate, sampling rare, number of channels, ... etc. Besides dividing the data into *training (or enroll)* and *testing*.
- **Structure**: In this step, we produce some files that will be helpful when training and evaluating our model.
- **Feature Extraction**: In this step, we extract pre-defind features from the wav files.
- **Choosing A Model**: In this step, we choose a certain model, out of four, to be trained. We have five models that can be trained:
- UBM
- SVM with GMM (NOT READY YET)
- I-vector
- Deep Learning (NOT READY YET)
- **Training**: This step is pretty self-explanatory ... com'on.
- **Evaluating**: This step is used to evaluate our model using a test set.
All the configuration options for all previous steps can be found in a YAML file called `conf.yaml`. We will discuss most of these configurations, each at its associated section.
Now, let's talk about each one of these processes in more details:
### 1. Preprocessing
The file responsible for data pre-processing is `data_init.py` in which I split the whole data into two groups (one for training -enroll- and the other for testing). Then doing some preprocessing over the two sets to match the case that I'm creating this model for, like:
- Setting the sample rate to 16000.
- Setting the number of channels to one (mono).
- Setting the precision to 16-bit.
In the configuration file `conf.yaml`, you can modify only these:
- `inpath`: the absolute path of the directory where the audio data exist.
- `outpath`: the absolute path of the directory where the output of running the model shoudl be. I recommend putting them in a standalone directory `exp`.
- `enroll_sessions`: the number of sessions to be included in the training (enroll).
- `test_sessions`: the number of sessions to be included in the test . I set the `enroll_sessions=3` and `test_sessions=5` knwoing that there are a total of 10 sessions in the data.
- `ENROLL_REPS`: which determines how many repetition a word will be repeated in the training. Three is pretty realistic.
- `sampling_rate`: the sampling rate of the audio files after preprocessing.
- `bit_precision`: the bit-precision of the audio files after preprocessing.
- `no_channels`: the number of channels of the audio files after preprocessing, (1 for mono, and 2 for stereo).
The output from this step can be found at `audio` directory inside the `outpath` directory defined in the configuration file as YAML variable.
### 2. Structure
This step is done in the `data_init.py` script as well. By structuring, I mean create index files and idmap files for Sidekit to use. Basically, we need to create three files at least:
- `enroll_idmap.h5`: HDF5 file that maps the enroll acoustic features to speakers.
- `test_trails.txt`: text file that enumerates the trials that we need to evaluate our model upon.
- `test_ndx.h5`: HDF5 file that saves the index of test files and their speakers generated from `test_trials.txt`.
The output of this step can be found at `task` directory inside the `outpath` directory defined in the configuration file as YAML variable.
### 3. Feature Extraction
The file responsible for the feature extraction is `extract_features.py` in which I extract features from the preprocessed audio files and save them into a new folder called `feat` at the directory represented by `outpath` yaml variable.
This process uses the following yaml variables inside `conf.yaml`:
- `features`: the list of features to be extracted. The list of features I used are These features are `fb`: Filter Banks, `cep`: Cepstral Coefficients, `eneregy` and `vad`: Voice Activity Detection. If you chose `vad` within the least of features, you need to set the alogrithm that will be used between either `snr` or `energy`. I chose `snr`: Signal-to-Noise Ratio. If you don't want to include anyone of them, just comment the line that contains the feature.
- `cepstral_coefficients`: the number of cepstral coeffiecients to be used when applyig MFCC.
- `filter_bank`: The type of filter-banknig used. It can be either `log`: logarithmic or `lin`:linear.
- `filter_bank_size`: Size of the filter bank.
- `lower_frequency`: the lower frequency (in Hz) of the filter bank.
- `higher_frequency`: the higher frequency (in Hz) of the filter bank.
- `vad`: The Voice Activity Detection algorithm used. It can be either "energy", "snr", "percentil" or "lbl".
- `snr_ratio`: The Signal-to-Noise ratio of the SNR algortihm (in db). It's useful only if "snr" is chosen as a vad algorithm.
- `window_size`: the size of the window for cep features.
- `window_shift`: The step that the window is moving (in sec).
There is also a method called `review_member_variables` that resets these member varibales back to `None` based on the `features` used in the configuration file.
The output of this step can be found at `feat` directory inside the `outpath` directory defined in the configuration file as YAML variable.
You can download the features used in my model from [here](http://www.mediafire.com/file/03o7i80o7a2taza/feat.zip/file) (32MB). After downloading, you should extract them at directory defined as the `outpath` YAML variable.
### 4. Choosing Model
In Sidekit, there are different models that we can train. I haven't been able to implement all the models, but the following are the ready ones:
- UBM: This is a Universal Background Model. You can modify the `num_gaussians` option in the configuraion file.
- i-vector: This is an Identity Vector model. You can modify these configurations:
- `batch_size`: the size of batch used for training i-vectors.
- `tv_rank`: the rank (size) of the Total Variability matrix.
- `tv_iterations`: number of iterations to train Total Variability matrix (>20).
- `enable_plda`: use PLDA with training or not
- `scoring`: the scoring metric used for this model. It can be either "cosine", "mahalanobis", or "two_covariance". The only one working for now is "cosine".
### 5. Train
Now, we have everything ready for training our chosen model. See, we have preprocessed the input data, split them into train (enroll) and test, extracted features, chose the prefered model and its configuration. Now, we are ready to train this model. Each model has a script to train that model. If you chose UBM, then run `ubm.py` file. If you chose ivector, then run `i-vector.py`.
### 5. Evaluate
By evaluate the mode, I mean get the accuracy over the test set and drawing DET graph. This step is done in the model's script
TO BE CONTINUED :)