https://github.com/BuilderIO/nextjs-shopify
The ultimate starter for headless Shopify stores
https://github.com/BuilderIO/nextjs-shopify
drag-and-drop headless nextjs nextjs-starter react
Last synced: 9 months ago
JSON representation
The ultimate starter for headless Shopify stores
- Host: GitHub
- URL: https://github.com/BuilderIO/nextjs-shopify
- Owner: BuilderIO
- License: mit
- Created: 2021-01-29T00:33:03.000Z (almost 5 years ago)
- Default Branch: master
- Last Pushed: 2024-04-25T23:23:47.000Z (over 1 year ago)
- Last Synced: 2024-08-01T16:55:47.879Z (over 1 year ago)
- Topics: drag-and-drop, headless, nextjs, nextjs-starter, react
- Language: TypeScript
- Homepage: https://headless.builders
- Size: 4.12 MB
- Stars: 432
- Watchers: 13
- Forks: 211
- Open Issues: 9
-
Metadata Files:
- Readme: README.md
- License: license.md
- Roadmap: docs/ROADMAP.md
Awesome Lists containing this project
- Awesome-NextJs - nextjs-shopify - [demo](https://headless.builders/) (Nextjs Templates)
README
# Next.js + Shopify + Builder.io example
Demo live at: [headless.builders](https://headless.builders/)
## Goals and Features
- Ultra high performance
- SEO optimized
- Themable
- Personalizable (internationalization, a/b testing, etc)
- Builder.io Visual CMS integrated
## Video walkthrough
Learn how to get started with this Builder + Next.js + Shopify example with this step by step video guide here:
## Table of contents
- [Getting Started](#getting-started)
- [1: Create an account for Builder.io](#1-create-an-account-for-builderio)
- [2: Your Builder.io private key](#2-your-builderio-private-key)
- [3: Clone this repository and initialize a Builder.io space](#3-clone-this-repository-and-initialize-a-builderio-space)
- [4. Shopify private app](#4-shopify-private-app)
- [5. Connecting Builder to Shopify](#5-connecting-builder-to-shopify)
- [6. Configure the project to talk to Shopify](#6-configure-the-project-to-talk-to-shopify)
- [7. Up and Running!](#7-up-and-running)
- [Deploy](#deploy)
## Getting Started
**Pre-requisites**
This guide will assume that you have the following software installed:
- nodejs (>=12.0.0)
- npm
- git
You should already have a [Shopify](https://www.shopify.com/online-store) account and store created before starting as well.
**Introduction**
After following this guide you will have
- A Next.js app, ready to deploy to a hosting provider of your choice
- Pulling live collection and product information from Shopify
- Powered by the Builder.io visual CMS
### 1: Create an account for Builder.io
Before we start, head over to Builder.io and [create an account](https://builder.io/signup).
### 2: Your Builder.io private key
Head over to your [organization settings page](https://builder.io/account/organization?root=true) and create a
private key, copy the key for the next step.
- Visit the [organization settings page](https://builder.io/account/organization?root=true), or select
an organization from the list

- Click "Account" from the left hand sidebar
- Click the edit icon for the "Private keys" row
- Copy the value of the auto-generated key, or create a new one with a name that's meaningful to you

### 3: Clone this repository and initialize a Builder.io space
Next, we'll create a copy of the starter project, and create a new
[space](https://www.builder.io/c/docs/spaces) for it's content to live
in.
In the example below, replace `` with the key you copied
in the previous step, and change `` to something that's
meaningful to you -- don't worry, you can change it later!
```
git clone https://github.com/BuilderIO/nextjs-shopify.git
cd nextjs-shopify
unzip builder
npm install --global "@builder.io/cli"
builder create --key "" --name "" --debug
```
Note:
if you're only interested in using this starter for a landing page with Shopify use this command instead:
```
unzip builder-landing-page-only
builder create --key "" --name "" --input builder-landing-page-only --debug
```
If this was a success you should be greeted with a message that
includes a public API key for your newly minted Builder.io space.
_Note: This command will also publish some starter builder.io cms
content from the ./builder directory to your new space when it's
created._
```bash
____ _ _ _ _ _ _
| __ ) _ _ (_) | | __| | ___ _ __ (_) ___ ___ | | (_)
| _ \ | | | | | | | | / _` | / _ \ | '__| | | / _ \ / __| | | | |
| |_) | | |_| | | | | | | (_| | | __/ | | _ | | | (_) | | (__ | | | |
|____/ \__,_| |_| |_| \__,_| \___| |_| (_) |_| \___/ \___| |_| |_|
|████████████████████████████████████████| shopify-product | 0/0
|████████████████████████████████████████| product-page: writing generic-template.json | 1/1
|████████████████████████████████████████| shopify-collection | 0/0
|████████████████████████████████████████| collection-page: writing generic-collection.json | 1/1
|████████████████████████████████████████| page: writing homepage.json | 2/2
Your new space "next.js shopify starter" public API Key: 012345abcdef0123456789abcdef0123
```
Copy the public API key ("012345abcdef0123456789abcdef0123" in the example above) for the next step.
This starter project uses dotenv files to configure environment variables.
Open the files [.env.development](./.env.development) and
[.env.production](./.env.production) in your favorite text editor, and
set the value of `BUILDER_PUBLIC_KEY` to the public key you just copied.
You can ignore the other variables for now, we'll set them later.
```diff
+ BUILDER_PUBLIC_KEY=012345abcdef0123456789abcdef0123
- BUILDER_PUBLIC_KEY=
SHOPIFY_STOREFRONT_API_TOKEN=
SHOPIFY_STORE_DOMAIN=
```
### 4. Shopify Custom App
Create a [custom app](https://help.shopify.com/en/manual/apps/custom-apps) for your Shopify store. If you don't have a Shopify store already, you can create a [development store](https://help.shopify.com/en/partners/dashboard/managing-stores/development-stores).
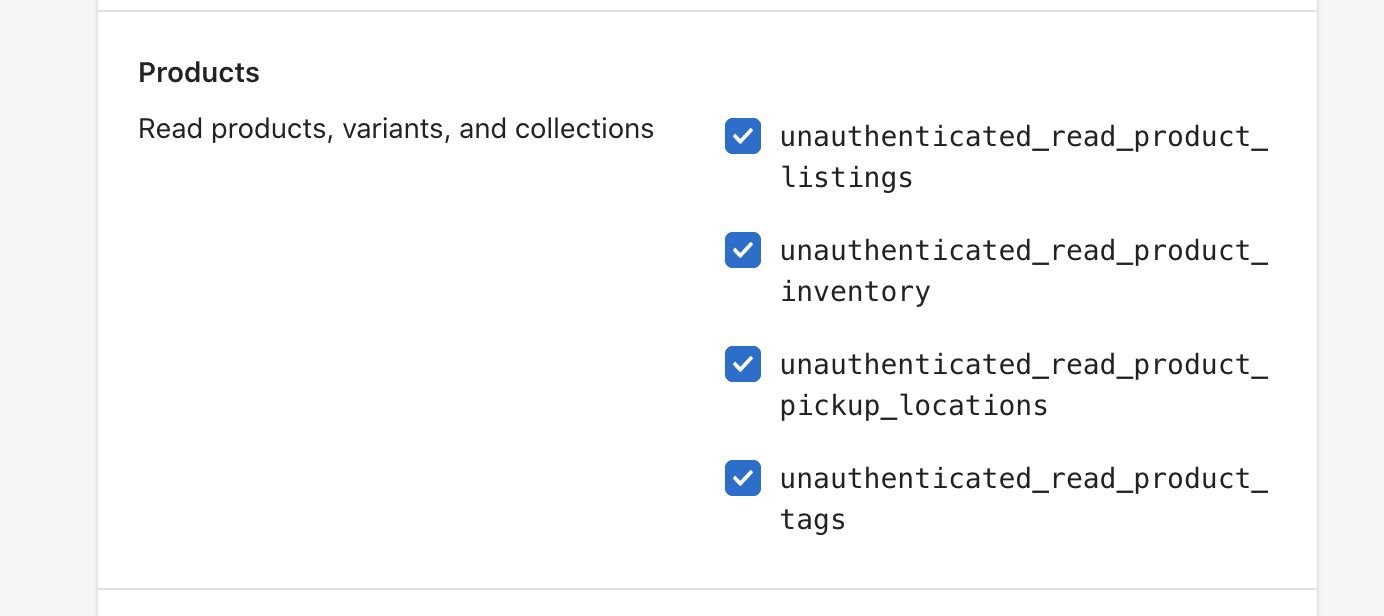
When creating the private app you'll have to set a number of permissions so that builder can retrieve your Shopify inventory. For this press on `Storefront API` in the configuration tab and choose all the following permissions:

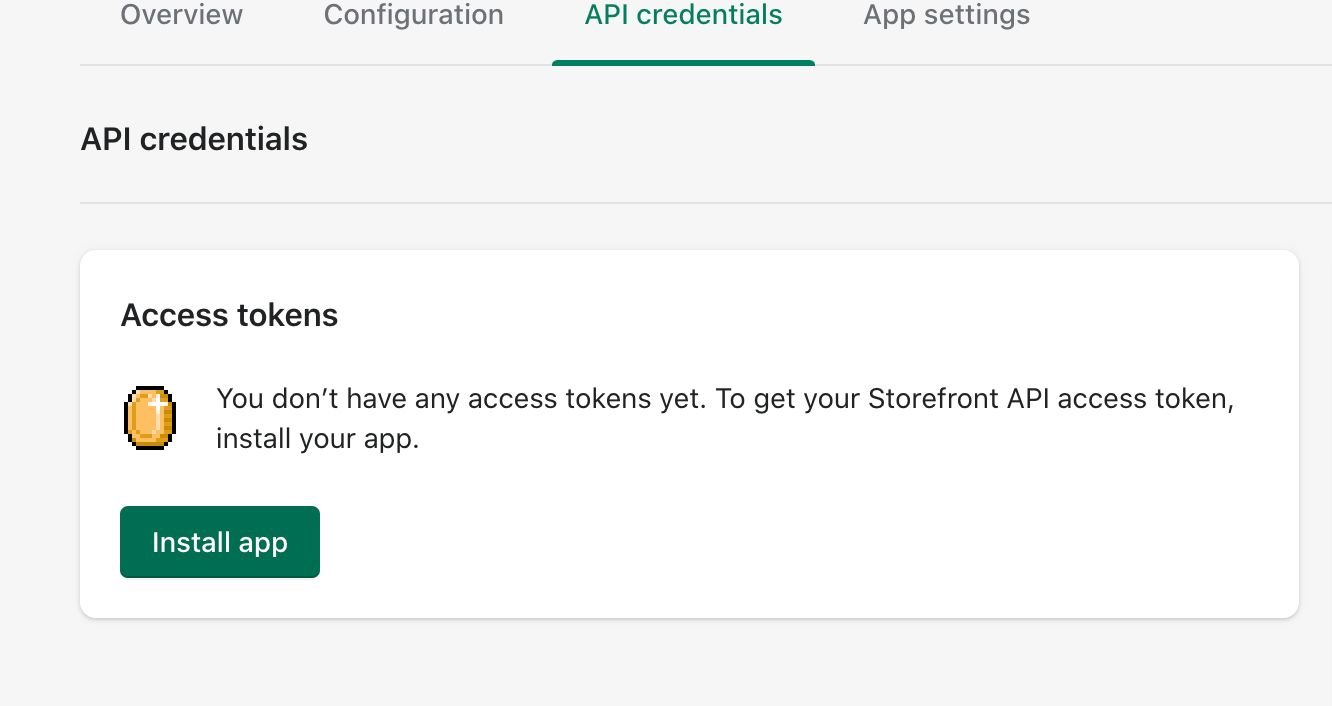
Then in the `API Credentials` tab, click `install`:

And copy the generated access token.
### 5. Connecting Builder to Shopify
Access your newly created space by selecting it from the [list of spaces](https://builder.io/spaces?root=true)
in your organization.
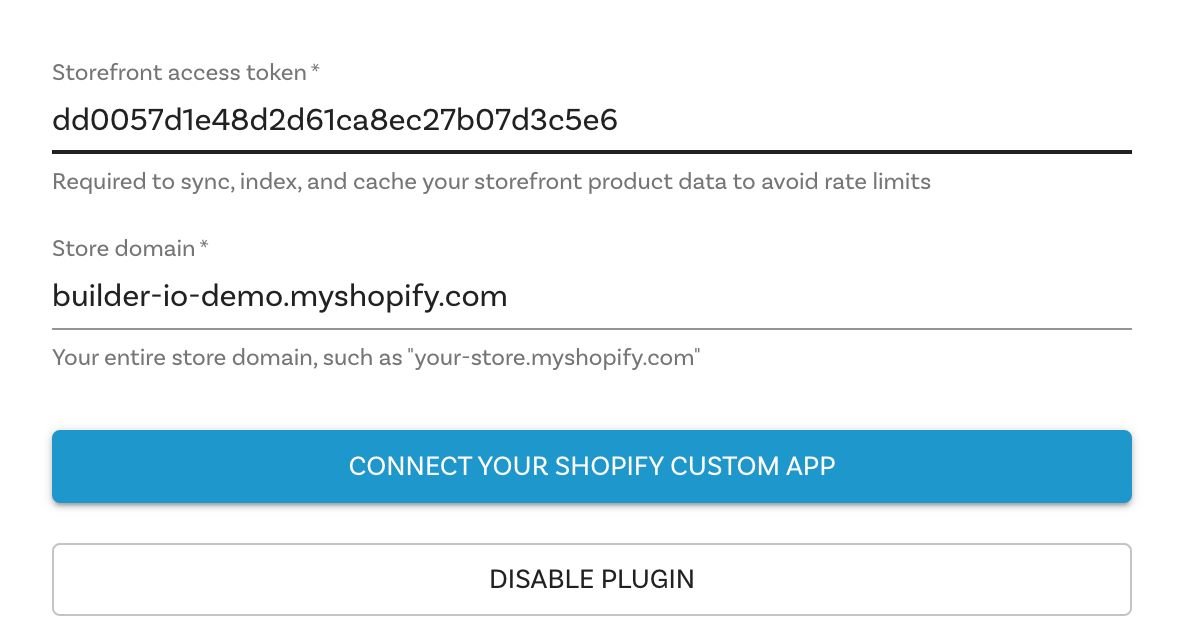
You should be greeted by a modal asking for various your storefront Access toke (from preview step) and your store domain, this will allow Builder.io to communicate with your store API:

Fill in the required keys and press "Connect your Shopify Custom App"!
### 6. Configure the project to talk to Shopify
Open up [.env.development](./.env.development) and [.env.production](./.env.production) again,
but this time set the other two Shopify keys.
```diff
BUILDER_PUBLIC_KEY=012345abcdef0123456789abcdef0123
+ SHOPIFY_STOREFRONT_API_TOKEN=c11b4053408085753bd76a45806f80dd
- SHOPIFY_STOREFRONT_API_TOKEN=
+ SHOPIFY_STORE_DOMAIN=dylanbuilder.myshopify.com
- SHOPIFY_STORE_DOMAIN=
```
### 7. Up and Running!
The hard part is over, all you have to do is start up the project now.
```bash
npm install
npm run dev
```
This will start a server at `http://localhost:3000`.
### 8. Start building
Now that we have everything setup, start building and publishing pages on builder.io, for a demo on building something similar to the [demo homepage](https://headless.builders), follow the steps in this [short video](https://www.loom.com/share/9b947acbbf714ee3ac6c319c130cdb85)
## Deployment Options
You can deploy this code anywhere you like - you can find many deployment options for Next.js [here](https://nextjs.org/docs/deployment). The following options support one click installs and are super easy to start with:
[](https://vercel.com/new/git/external?repository-url=https%3A%2F%2Fgithub.com%2Fbuilderio%2Fnextjs-shopify)
- Vercel: for more information check [Vercel docs on Next.js deployments](https://vercel.com/docs/next.js/overview) Or try the one click install by clicking the button above.
[](https://app.netlify.com/start/deploy?repository=https://github.com/BuilderIO/nextjs-shopify)
- Netlify: For more information check [Netlify docs on Next.js deployments](https://www.netlify.com/blog/2020/11/30/how-to-deploy-next.js-sites-to-netlify/) Or try the one click install by clicking the button above.
