https://github.com/Crabor/Quadcopter
电子科技大学信息与软件工程学院综合课程设计课题:基于STM32F401RE的四轴飞行器
https://github.com/Crabor/Quadcopter
Last synced: about 2 months ago
JSON representation
电子科技大学信息与软件工程学院综合课程设计课题:基于STM32F401RE的四轴飞行器
- Host: GitHub
- URL: https://github.com/Crabor/Quadcopter
- Owner: Crabor
- License: mit
- Created: 2019-07-20T11:23:25.000Z (almost 6 years ago)
- Default Branch: master
- Last Pushed: 2020-06-13T08:04:16.000Z (almost 5 years ago)
- Last Synced: 2024-08-02T03:01:44.966Z (10 months ago)
- Language: C
- Size: 157 MB
- Stars: 53
- Watchers: 1
- Forks: 7
- Open Issues: 0
-
Metadata Files:
- Readme: README.md
- License: LICENSE
Awesome Lists containing this project
- awesome-es - Quadcopter
README
# Quadcopter
README [English](README_EN.md) | [中文](README.md)
## 项目介绍
[](LICENSE)

本项目是电子科技大学信息与软件工程学院综合课程设计课题:基于STM32F4的四轴飞行器。主要内容包括:
* STM32嵌入式开发平台上扩展姿态传感模块,用于确定四轴飞行器的飞行姿态
* 姿态传感器采集数据后,在STM32上完成姿态解算
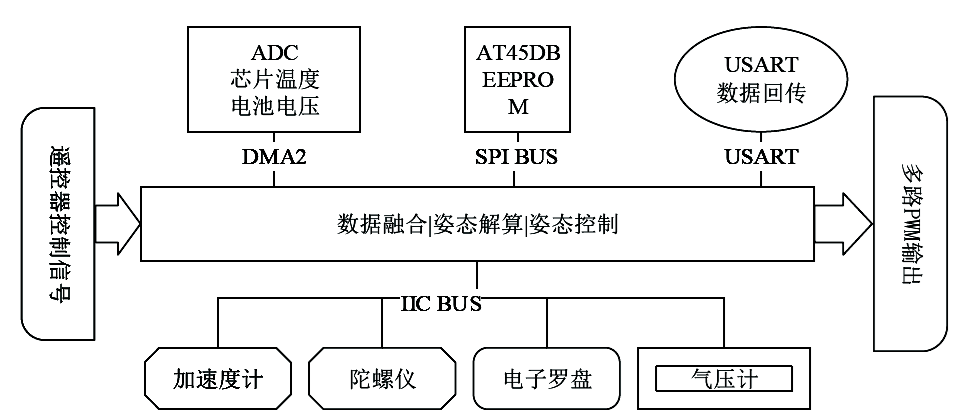
* STM32上通过PID控制及PWM电机调速,使四轴飞行器能够通过调节四轴的扇叶转速保持平稳的飞行,并不断调整以达到稳定,如图所示
## 硬件要求
| 部件 | 型号 |
| :----------------: | :----------------------------: |
| 机架 | F450 (螺旋桨螺距为450mm) |
| 无刷电机 | 好盈Skywalker-20A |
| 马达 | A2212/13T(1000KV) |
| 螺旋桨 | 乾丰1045 |
| 电池 | 格氏航模电池(2200mAh 25C) |
| 开发板 | STM32F401RE(最高频84MHz) |
| 加速度计、陀螺仪 | MPU6050(集成在GY-86/MPU-9150) |
| 电子罗盘 | HMC5883L(集成在GY-86) 或者 AK8975(集成在MPU-9150) |
| 遥控器 | RadioLink T4EU-6(6通道) |
| 遥控接收器 | RadioLink R7EH-S(6通道) |
| 蓝牙 | HM-10 * 2 |
| 扩展板 | Altium Designer软件设计 |
## 软件要求
操作系统:`Windows`或者`Linux`
IDE:`Keil v5`
编译器:`ARM Compiler`(`Keil uVision`内置)或者 `gcc-arm-none-eabi`(`Linux`)
## 工程结构
```txt
├── docs
│ ├── 电压分配.txt
│ ├── 引脚配置.txt
│ └── 九轴数据变化.txt
├── PCB
│ ├── IntLib
│ └── PCB
│ ├── pcb.PcbDoc //PCB文件
│ ├── PCB_Project.PrjPcb //AD工程文件
│ └── pcb.SchDoc //原理图文件
└── Project
├── APP //用户定义
│ ├── app_cfg.h //选择编译宏开关、APP_FUNC自定义库开关
│ ├── includes.h //头文件引用包含集合,详情见开发说明
│ ├── main.c //主程序
│ ├── os_cfg.h //ucosii模块功能开关
│ └── RTE_Components.h //ST库函数开关
├── APP_FUNC //用户自定义库
│ ├── delay.c //硬延时,与OSTimeDly()不同
│ ├── delay.h
│ ├── gpio.c
│ ├── gpio.h
│ ├── iic.c
│ ├── iic.h
│ ├── IMU.c //姿态解算
│ ├── IMU.h
│ ├── led.c
│ ├── led.h
│ ├── MPU9150.c //GY-86、MPU9150
│ ├── MPU9150.h
│ ├── nvic.c
│ ├── nvic.h
│ ├── pid.c //PID算法
│ ├── pid.h
│ ├── pwm.c
│ ├── pwm.h
│ ├── pwm_led.c
│ ├── pwm_led.h
│ ├── tim_led.c
│ ├── tim_led.h
│ ├── usart.c
│ └── usart.h
├── BSP_SELF //硬件相关,需自己改动
│ ├── BSP.c //外设初始化(包含系统时钟中断)
│ ├── BSP.h
│ ├── startup_stm32f401xx.s //启动文件,修改PendSV中断
│ ├── stm32f4xx_it.c //中断函数
│ ├── stm32f4xx_it.h
│ ├── system_stm32f4xx.c //系统时钟配置
│ └── system_stm32f4xx.h
├── BSP_SYS //硬件相关,无需改动
│ ├── core_cm4.h
│ ├── core_cm4_simd.h
│ ├── core_cmFunc.h
│ ├── core_cmInstr.h
│ ├── stm32f4xx_conf.h
│ ├── stm32f4xx.h
│ ├── system_stm32f4xx.c
│ └── system_stm32f4xx.h
├── CLIB //C语言库
├── STLIB //ST标准库
├── UCOS_PORT //ucosii硬件相关
│ ├── os_cpu_a.s
│ ├── os_cpu_c.c
│ ├── os_cpu.h
│ └── os_dbg.c
└── UCOS_SOURCE //ucosii模块
├── os_core.c
├── os_core.h
├── os_flag.c
├── os_mbox.c
├── os_mem.c
├── os_mutex.c
├── os_q.c
├── os_sem.c
├── os_task.c
├── os_time.c
├── os_tmr.c
├── ucos_ii.c
└── ucos_ii.h
```
## 开发说明
头文件包含关系:
```txt
includes.h
├── BSP.h
├── core_cm4.h
├── stm32f4xx.h
│ └── stm32f4xx_conf.h
│ └── RTE_Components.h //标准库文件开关
│ ├── stm32f4xx_gpio.h
│ ├── ......
│ └── stm32f4xx_rcc.h
└── ucosii.h
├── app_cfg.h //用户自定义库文件开关
│ ├── gpio.h
│ ├── ......
│ └── pid.h
└── os_cfg.h
```
需要注意的是,stm32f4xx.h文件中有这样一段代码:
```c
#ifdef USE_STDPERIPH_DRIVER
#includes "stm32f4xx_conf.h"
#endif
```
也就是说必须要定义**USE_STDPERIPH_DRIVER**这个宏才会包含**stm32f4xx_conf.h**文件。
用户如果需要向**APP_FUNC**文件夹中添加自己写的文件,那么头文件和C文件统一格式如下并在**app_cfg.h**中打开相应开关:
```c
//xx.h
#ifndef XX_H
#define XX_H
#includes "includes.h"
//#includes "math.h"
//C语言库函数需要单独包含,如果需要用到的话
......
#endif
```
```c
//xx.c
#includes "xx.h"
......
```
## 快速开始
* `Windows`(已安装`Keil uVision`)
1. 打开`Project/exp4.uvprojx`
1. 点击`Build`按钮
1. 点击`Download`按钮烧录
* `Linux`(已安装`gcc-arm-none-eabi`、`st-flash`)(**暂未实现**)
1. 输入命令`make`生成`hex`文件
1. 输入命令`make burn`进行烧录
## 鸣谢
廖勇老师、[施荣圳师兄](https://github.com/AlronSze)
## 联系
[](https://www.jianshu.com/u/68e65b750b62)


[](https://twitter.com/Arya_PPGYR)
## 关于
我学习四轴的一些重要知识、疑难解答等记录过程都放在了[Wiki](https://github.com/Crabor/Quadcopter/wiki)上!欢迎查看!
## 实验总结报告
链接:[https://pan.baidu.com/s/1mlYsZHq7C65B-kLWfse6bw](https://pan.baidu.com/s/1mlYsZHq7C65B-kLWfse6bw) 提取码:45un