https://github.com/OpenLinkSoftware/mcp-odbc-server
Typescript based Model Context Procotol (MCP) Server for Open Database Connectivity (ODBC)
https://github.com/OpenLinkSoftware/mcp-odbc-server
Last synced: 8 months ago
JSON representation
Typescript based Model Context Procotol (MCP) Server for Open Database Connectivity (ODBC)
- Host: GitHub
- URL: https://github.com/OpenLinkSoftware/mcp-odbc-server
- Owner: OpenLinkSoftware
- Created: 2025-03-27T22:06:52.000Z (8 months ago)
- Default Branch: main
- Last Pushed: 2025-03-27T23:08:56.000Z (8 months ago)
- Last Synced: 2025-03-27T23:29:08.272Z (8 months ago)
- Language: TypeScript
- Size: 6.84 KB
- Stars: 0
- Watchers: 4
- Forks: 0
- Open Issues: 0
-
Metadata Files:
- Readme: README.md
Awesome Lists containing this project
- awesome-mcp-servers - mcp-server-odbc - An MCP server for enabling generic Database Management System (DBMS) connectivity via the ODBC protocol, supporting broad MCP integration use cases. ([Read more](/details/mcp-server-odbc.md)) `mcp` `database` `odbc` `integration` (Database & Messaging MCP Servers)
- awesome-mcp-zh - openlink/mcp-server-odbc
- metorial-index - ODBC Server - Provides access to ODBC data sources for executing SQL queries and interacting with databases through a standardized interface. Facilitates seamless database management and data retrieval for AI models using ODBC-compatible drivers. (Databases)
- awesome-mcp-servers - **mcp-odbc-server** - Typescript based Model Context Procotol (MCP) Server for Open Database Connectivity (ODBC) `typescript` `mcp` `server` `database` `http` `npm install OpenLinkSoftware/mcp-odbc-server` (🌐 Web Development)
- awesome-mcp-servers - MCP ODBC Bridge - Typescript based Model Context Procotol (MCP) Server for Open Database Connectivity (ODBC) (Table of Contents / Other Tools and Integrations)
README
# Introduction
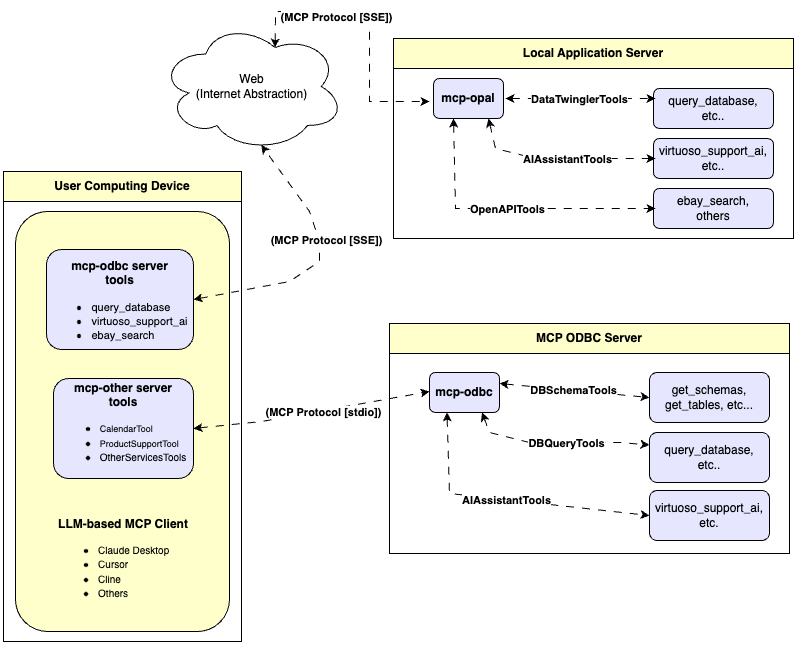
This document covers the setup and use of a generic ODBC server for the Model Context Protocol (MCP), referred to as an mcp-odbc server. It has been developed to provide Large Language Models with transparent access to ODBC-accessible data sources via a Data Source Name configured for a specific ODBC Connector (or Driver).
## Server Implementation
This MCP Server for ODBC is a small TypeScript layer built on top of `node-odbc`. It routes calls to the host system's local ODBC Driver Manager via node.js (specifically using 'npx' for TypeScript).
## Operating Environment Setup & Prerequisites
While the examples that follow are oriented toward the Virtuoso ODBC Connector, this guide will also work with other ODBC Connectors. We *strongly* encourage code contributions and usage demo submissions related to other database management systems for incorporation into this project.
### Key System Components
1. Check the node.js version; if it's not 21.1.0, upgrade or install explicitly using: `nvm install v21.1.0`
2. Install MCP components using: `npm install @modelcontextprotocol/sdk zod tsx odbc`
3. Set the `nvm` version using: `nvm alias default 21.1.0`
### Environment Variables
As good security practice, you should use the `.env` file situated in the same directory as the `mcp-ser` to set bindings for the target Large Language Model API Key (if you want to use the OpenLink AI Layer (OPAL) via ODBC), ODBC Data Source Name (ODBC_DSN), User (ODBC_USER), Password (ODBC_PWD), and ODBC INI (ODBCINI).
```sh
API_KEY=sk-xxx
ODBC_DSN=Local Virtuoso
ODBC_USER=dba
ODBC_PASSWORD=dba
ODBCINI=/Library/ODBC/odbc.ini
```
# Usage
## Tools
After successful installation, the following tools will be available to MCP client applications.
|name|description|
|---|---|
|get_schemas|List database schemas accessible to connected database management system (DBMS).|
|get_tables|List tables associated with a selected database schema.|
|describe_table|Provide the description of a table associated with a designated database schema. This includes information about column names, data types, nulls handling, autoincrement, primary key, and foreign keys|
|filter_table_names|List tables, based on a substring pattern from the `q` input field, associated with a selected database schema.|
|query_database|Execute a SQL query and return results in JSONL format.|
|execute_query|Execute a SQL query and return results in JSONL format.|
|execute_query_md|Execute a SQL query and return results in Markdown table format.|
|spasql_query|Execute a SPASQL query and return results.|
|sparql_query|Execute a SPARQL query and return results.|
|virtuoso_support_ai|Interact with the Virtuoso Support Assistant/Agent -- a Virtuoso-specific feature for interacting with LLMs|
## Basic Installation Testing & Troubleshooting
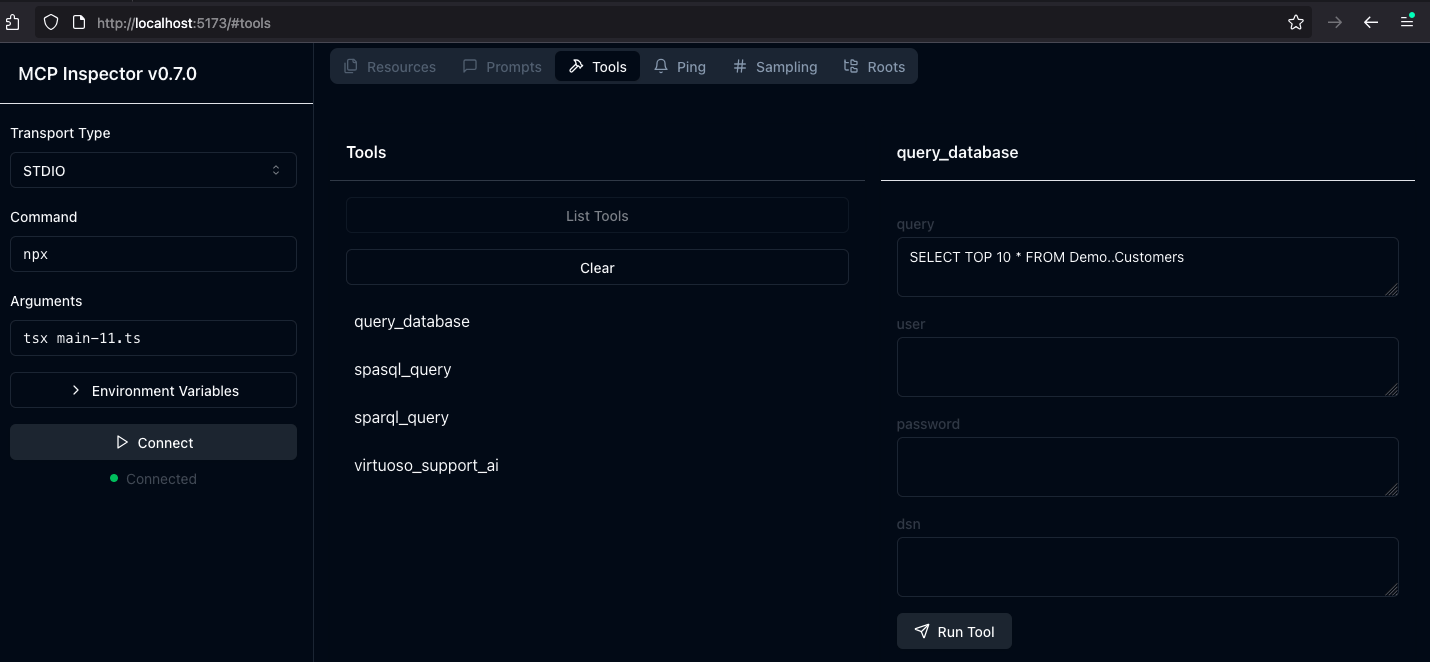
1. Start the inspector from the mcp-server directory/folder using the following command:
```sh
npx -y @modelcontextprotocol/inspector npx tsx main.ts
```
2. Click on the "Connect" button, then click on the "Tools" tab to get started.
[](https://www.openlinksw.com/data/screenshots/mcp-server-inspector-demo-1.png)
## MCP Application Usage
### Claude Desktop Configuration
The path for this config file is: `~{username}/Library/Application Support/Claude/claude_desktop_config.json` .
```json
{
"mcpServers": {
"ODBC": {
"command": "/path/to/.nvm/versions/node/v21.1.0/bin/node",
"args": [
"/path/to/tsx",
"/path/to/mcp-odbc-server/main.ts"
],
"env": {
"ODBCINI": "/Library/ODBC/odbc.ini",
"NODE_VERSION": "v21.1.0",
"PATH": "~/.nvm/versions/node/v21.1.0/bin:${PATH}"
},
"disabled": false,
"autoApprove": []
}
}
}
```
### Claude Desktop Usage
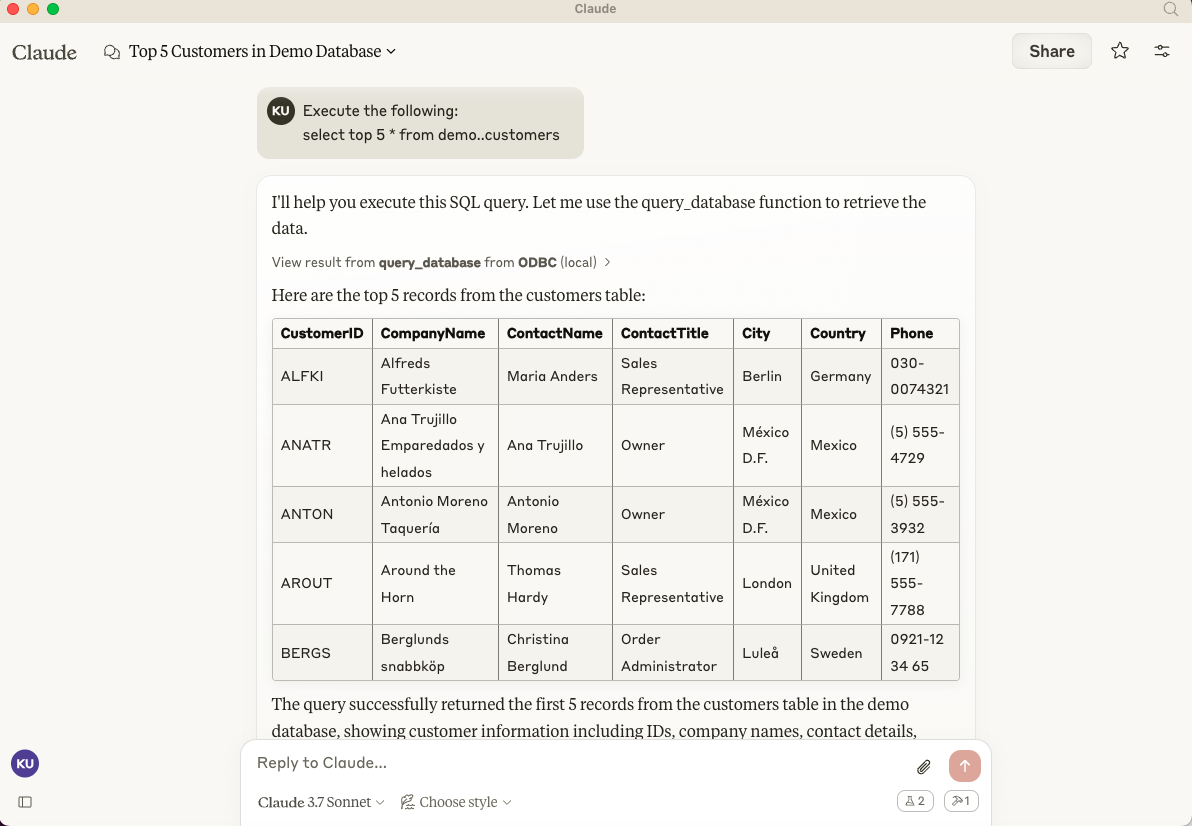
1. Start the application
2. Apply configuration (from above) via Settings | Developer user interface
3. Ensure you have a working ODBC connection to a Data Source Name (DSN)
4. Present a prompt requesting query execution, e.g., `Execute the following query: SELECT TOP * from Demo..Customers`
[](https://www.openlinksw.com/data/screenshots/claude-desktp-mcp-odbc-server-demo-1.png)
### Cline (Visual Studio Extension) Configuration
The path for this config file is: `~{username}/Library/Application\ Support/Code/User/globalStorage/saoudrizwan.claude-dev/settings/cline_mcp_settings.json`
```json
{
"mcpServers": {
"ODBC": {
"command": "/path/to/.nvm/versions/node/v21.1.0/bin/node",
"args": [
"/path/to/mcp-odbc-server/node_modules/.bin/tsx",
"/path/to/mcp-odbc-server/main.ts"
],
"env": {
"ODBCINI": "/Library/ODBC/odbc.ini",
"NODE_VERSION": "v21.1.0",
"PATH": "/path/to/.nvm/versions/node/v21.1.0/bin:${PATH}"
},
"disabled": false,
"autoApprove": []
}
}
}
```
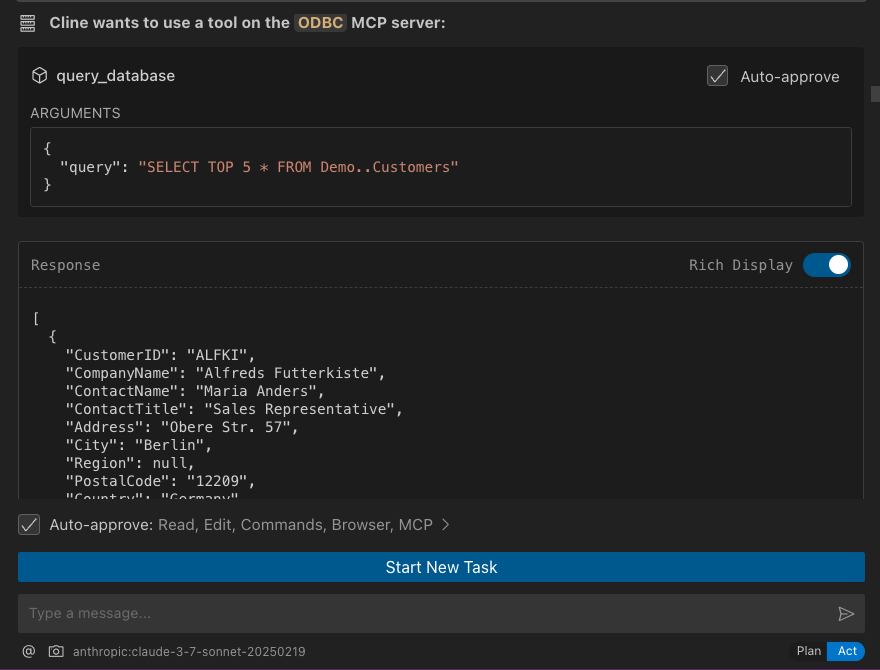
### Cline (Visual Studio Extension) Usage
1. Use Shift+Command+P to open the Command Palette
2. Type in: Cline
3. Select: Cline View, which opens the Cline UI in the VSCode sidebar
4. Use the four-squares icon to access the UI for installing and configuring MCP servers
6. Apply the Cline Config (from above)
7. Return to the extension's main UI and start a new task requesting processing of the following prompt: "Execute the following query: SELECT TOP 5 * from Demo..Customers"
[](https://www.openlinksw.com/data/screenshots/cline-extension-mcp-server-odbc-demo-1.png)
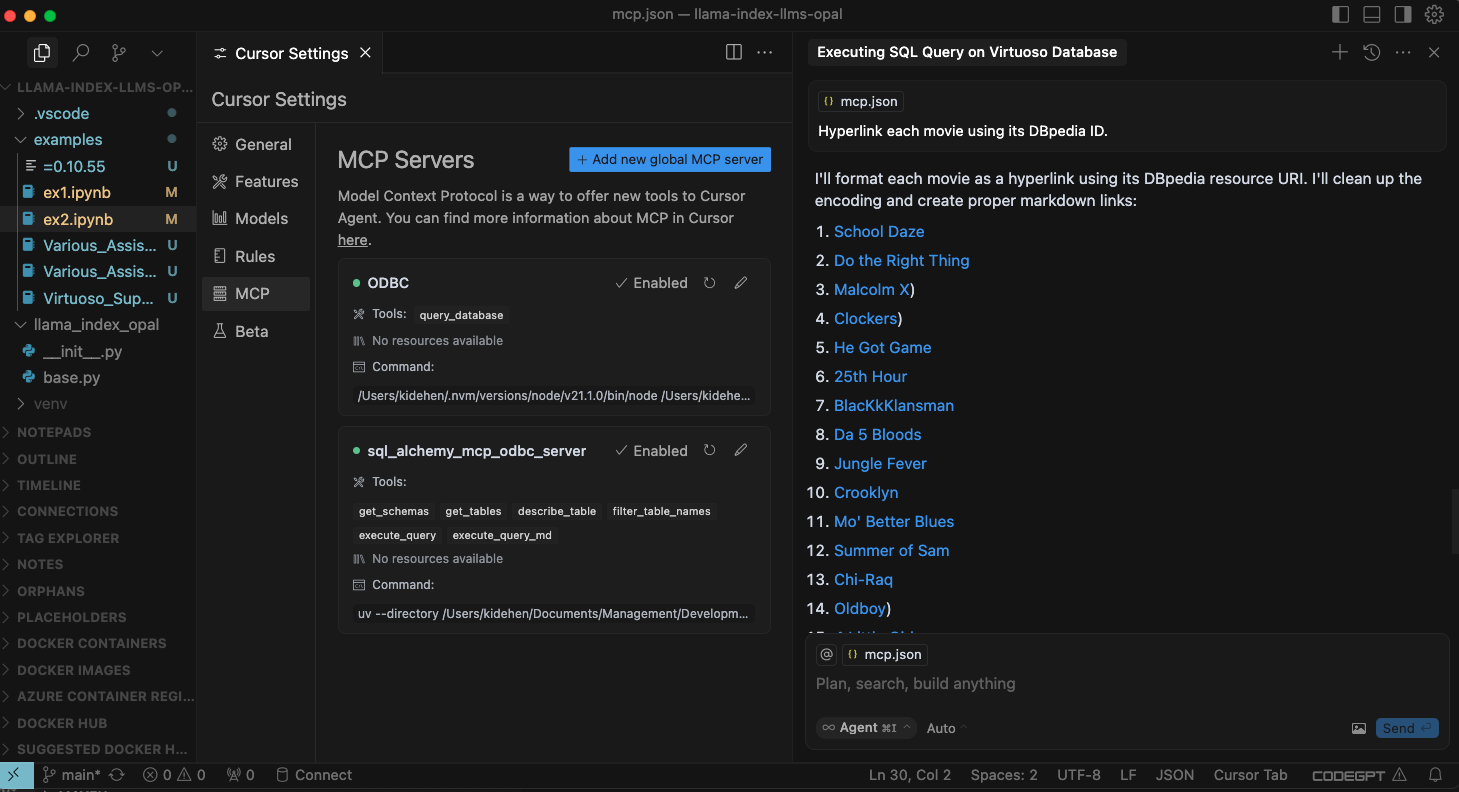
### Cursor Configuration
Use the settings gear to open the configuration menu that includes the MCP menu item for registering and configuring `mcp servers`.
### Cursor Usage
1. Use the `Command or Control + I` key combination to open the Chat Interface
2. Select `Agent` from the drop-down at the bottom left of the UI, since the default is `Ask`
3. Enter your prompt, qualifying the use of the `mcp-server for odbc` using the pattern: `@odbc {rest-of-prompt}`
4. Click on "Accept" to execute the prompt.
[](https://www.openlinksw.com/data/screenshots/cursor-editor-mcp-config-for-odbc-server-1.png)
# Related
* [MCP Inspector Usage Screencast](https://www.openlinksw.com/data/screencasts/mcp-inspector-odbc-sparql-spasql-demo-1.mp4)
* [Basic Claude Desktop Usage Screencast](https://www.openlinksw.com/data/screencasts/claude-odbc-mcp-sql-spasql-demo-1.mp4)
* [Basic Cline Visual Studio Code Extension Usage Screencast](https://www.openlinksw.com/data/screencasts/cline-vscode-mcp-odbc-sql-spasql-1.mp4)
* [Basic Cursor Editor Usage Screencast](https://www.openlinksw.com/data/screencasts/cursor-odbc-mcp-sql-spasql-demo-1.mp4)