https://github.com/RyanFitzgerald/devfolio
A modern and production-ready personal portfolio + blog template built with GatsbyJs and TailwindCSS
https://github.com/RyanFitzgerald/devfolio
gatbsy personal-website portfolio portfolio-template portfolio-website tailwindcss
Last synced: over 1 year ago
JSON representation
A modern and production-ready personal portfolio + blog template built with GatsbyJs and TailwindCSS
- Host: GitHub
- URL: https://github.com/RyanFitzgerald/devfolio
- Owner: RyanFitzgerald
- License: mit
- Created: 2020-10-15T01:31:20.000Z (over 5 years ago)
- Default Branch: master
- Last Pushed: 2025-02-20T21:11:21.000Z (over 1 year ago)
- Last Synced: 2025-03-31T03:14:12.207Z (over 1 year ago)
- Topics: gatbsy, personal-website, portfolio, portfolio-template, portfolio-website, tailwindcss
- Language: JavaScript
- Homepage: https://monumental-chimera-b1ace3.netlify.app/
- Size: 709 KB
- Stars: 485
- Watchers: 8
- Forks: 346
- Open Issues: 0
-
Metadata Files:
- Readme: README.md
- License: LICENSE.md
Awesome Lists containing this project
README
# Devfolio

Devfolio is a modern and production-ready personal portfolio and blog template built on GatsbyJS and styled with TailwindCSS. Easily show off your projects, experience, and skills, as well as write blog posts showcasing your knowledge.
Some of the features include:
- Built with React on GatsbyJS (however, no React knowledge required)
- Styled with Tailwind
- Simple Configuration
- Production-ready & Deployable in Seconds
- Write Blog Posts in Markdown (with Syntax Highlighting)
- Mobile Friendly
- Extend and Customize as Needed
- Blazing Fast 🙄
**[Need help with the template or have suggestions? Reach out on Twitter anytime!](https://twitter.com/rfitzio)**
## Demo
For a live demo of the base template, [click here](https://monumental-chimera-b1ace3.netlify.app/).
For a live demo of a slightly customized version of the template (my own personal site), [click here](https://rfitz.io).
## Contents
- [Adding Your Information](#adding-your-information)
- [General](#general)
- [About Me](#about-me)
- [Projects](#projects)
- [Experience](#experience)
- [Skills](#skills)
- [Setting Up The Blog](#setting-up-the-blog)
- [Running Locally](#running-locally)
- [Deploying](#deploying)
- [Customization](#customization)
- [Contributing](#contributing)
- [License](#license)
## Adding Your Information
To get started, either fork or clone the repo. Next, open `gatsby-config.js` which has configuration options under `siteMetadata`. The config comes with some default example content and code comments to make it easy to understand how to set it up. The following provides a more in-depth explanation of each section:
### General
| Option | Description | Required |
| ------------- | ---------------------------- | -------- |
| `siteUrl` | The URL of your site | Yes |
| `name` | Your name | Yes |
| `title` | The title of your site | Yes |
| `description` | The description of your site | Yes |
| `author` | Your Twitter Handle | No |
| `github` | Your GitHub Profile URL | No |
| `linkedin` | Your LinkedIn Profile URL | No |
### About Me
The _About Me_ section is defined under `about` and is a simple string type. This section is required.
### Projects
The _Projects_ section is defined as an array under the `projects` key in the config and is optional. Projects have the following format:
```js
{
name: 'Devfolio', // Required
description: 'A zero-config and blazing fast personal site + blog built with GatsbyJs and TailwindCSS', // Required
link: 'https://github.com/RyanFitzgerald/devfolio', // Optional
}
```
### Experience
The _Experience_ section is defined as an array under the `experience` key in the config and is optional. Experience items have the following format:
```js
{
name: 'Hooli', // Required
description: 'Full-Stack Developer, May 2015 - December 2017', // Required
link: 'https://github.com/RyanFitzgerald/devfolio', // Optional
},
```
### Skills
The _Skills_ section is defined as an array under the `skills` key in the config and is optional. Skills have the following format:
```js
{
name: 'Languages & Frameworks',
description: 'JavaScript (ES6+), Golang, Node.js, Express.js, React, Ruby on Rails, PHP',
},
```
## Setting Up The Blog
The blog is an optional portion of the template and the content for it exists in the `content/blog` folder. All blog posts are written in Markdown by default and the template ships with a couple sample posts so you can get an idea of what's possible (i.e. syntax highlighting). If you'd rather not have a blog, simply delete the sample posts inside the folder while ensuring that the folder itself (`content/blog`) is kept as Gatsby still looks for it (you may also need to add `.gitkeep` to the folder so git recognizes it). If there are no posts in the folder, you will not see a Blog link at the top nor will you see the _Latest Posts_ section on the homepage. Once you add your first post, this will re-appear.
### Adding a New Blog Post
To create a new blog post, create a new folder in `content/blog` with the name being the URL you want for the blog post. For example, if you create a folder `content/blog/hello-world`, the resulting path to your blog post will be `mysite.com/blog/hello-world`.
Next, create an `index.md` file in the new folder with the following at the top of the file (including the lines):
```
---
title: My Blog Title
date: '2020-09-20T12:00:00.00Z'
description: 'Some Short Blog Post Description'
---
My blog post starts here.
```
The portion between both lines (`---`) is the metadata for the blog post. The `title` attribute is the post's title, the `date` is the date that shows on the blog post, and the `description` is a brief excerpt of the post that shows on the home page and the blog page for the post summary. Below the metadata is where the content of your blog post would start.
After that is done, you should now see you're latest blog post on your site (if you deploy or run it locally). One thing to keep in mind is that by default, the homepage will show only the latest 5 blog posts based on the `date` field entered. If you added a new blog post but it's not showing up, it's possible that you entered an older date by accident.
## Running Locally
If you're happy with the current layout and design, you can simply edit your `gatsby-config.js` without the need to run it locally. With that said, if you want to spin it up locally, simply run `npm install` to install the required dependencies and then `npm run develop` to start the Gatsby development server. You can also run `npm run format` to run Prettier on the code.
## Deploying
Devfolio is a fully static website by default, so the deployment options are fairly endless. Regardless of the deployment method, the same general idea applies. You first build the static production site by running `npm run build` and then deploy the resulting static assets wherever you want.
With that said, some deployment options are even easier so I will provide a couple examples below:
### Netlify
My deployment source of choice is [Netlify](https://www.netlify.com/) and is where my own [personal site](https://rfitz.io) is hosted. They have a Free Plan and automatically deploy changes to your `master` branch if you connect with GitHub or GitLab.
For the easiest setup possible, simply click:

If you'd rather run through the steps manually, start by creating a free Netlify account with your GitHub.
Next, click **New Site From Git** and click **GitHub** (or another) as the provider.
After that, select the repository where you cloned this into. If you don't see it, you may need to configure the Netlify App on Github via the link they provide.
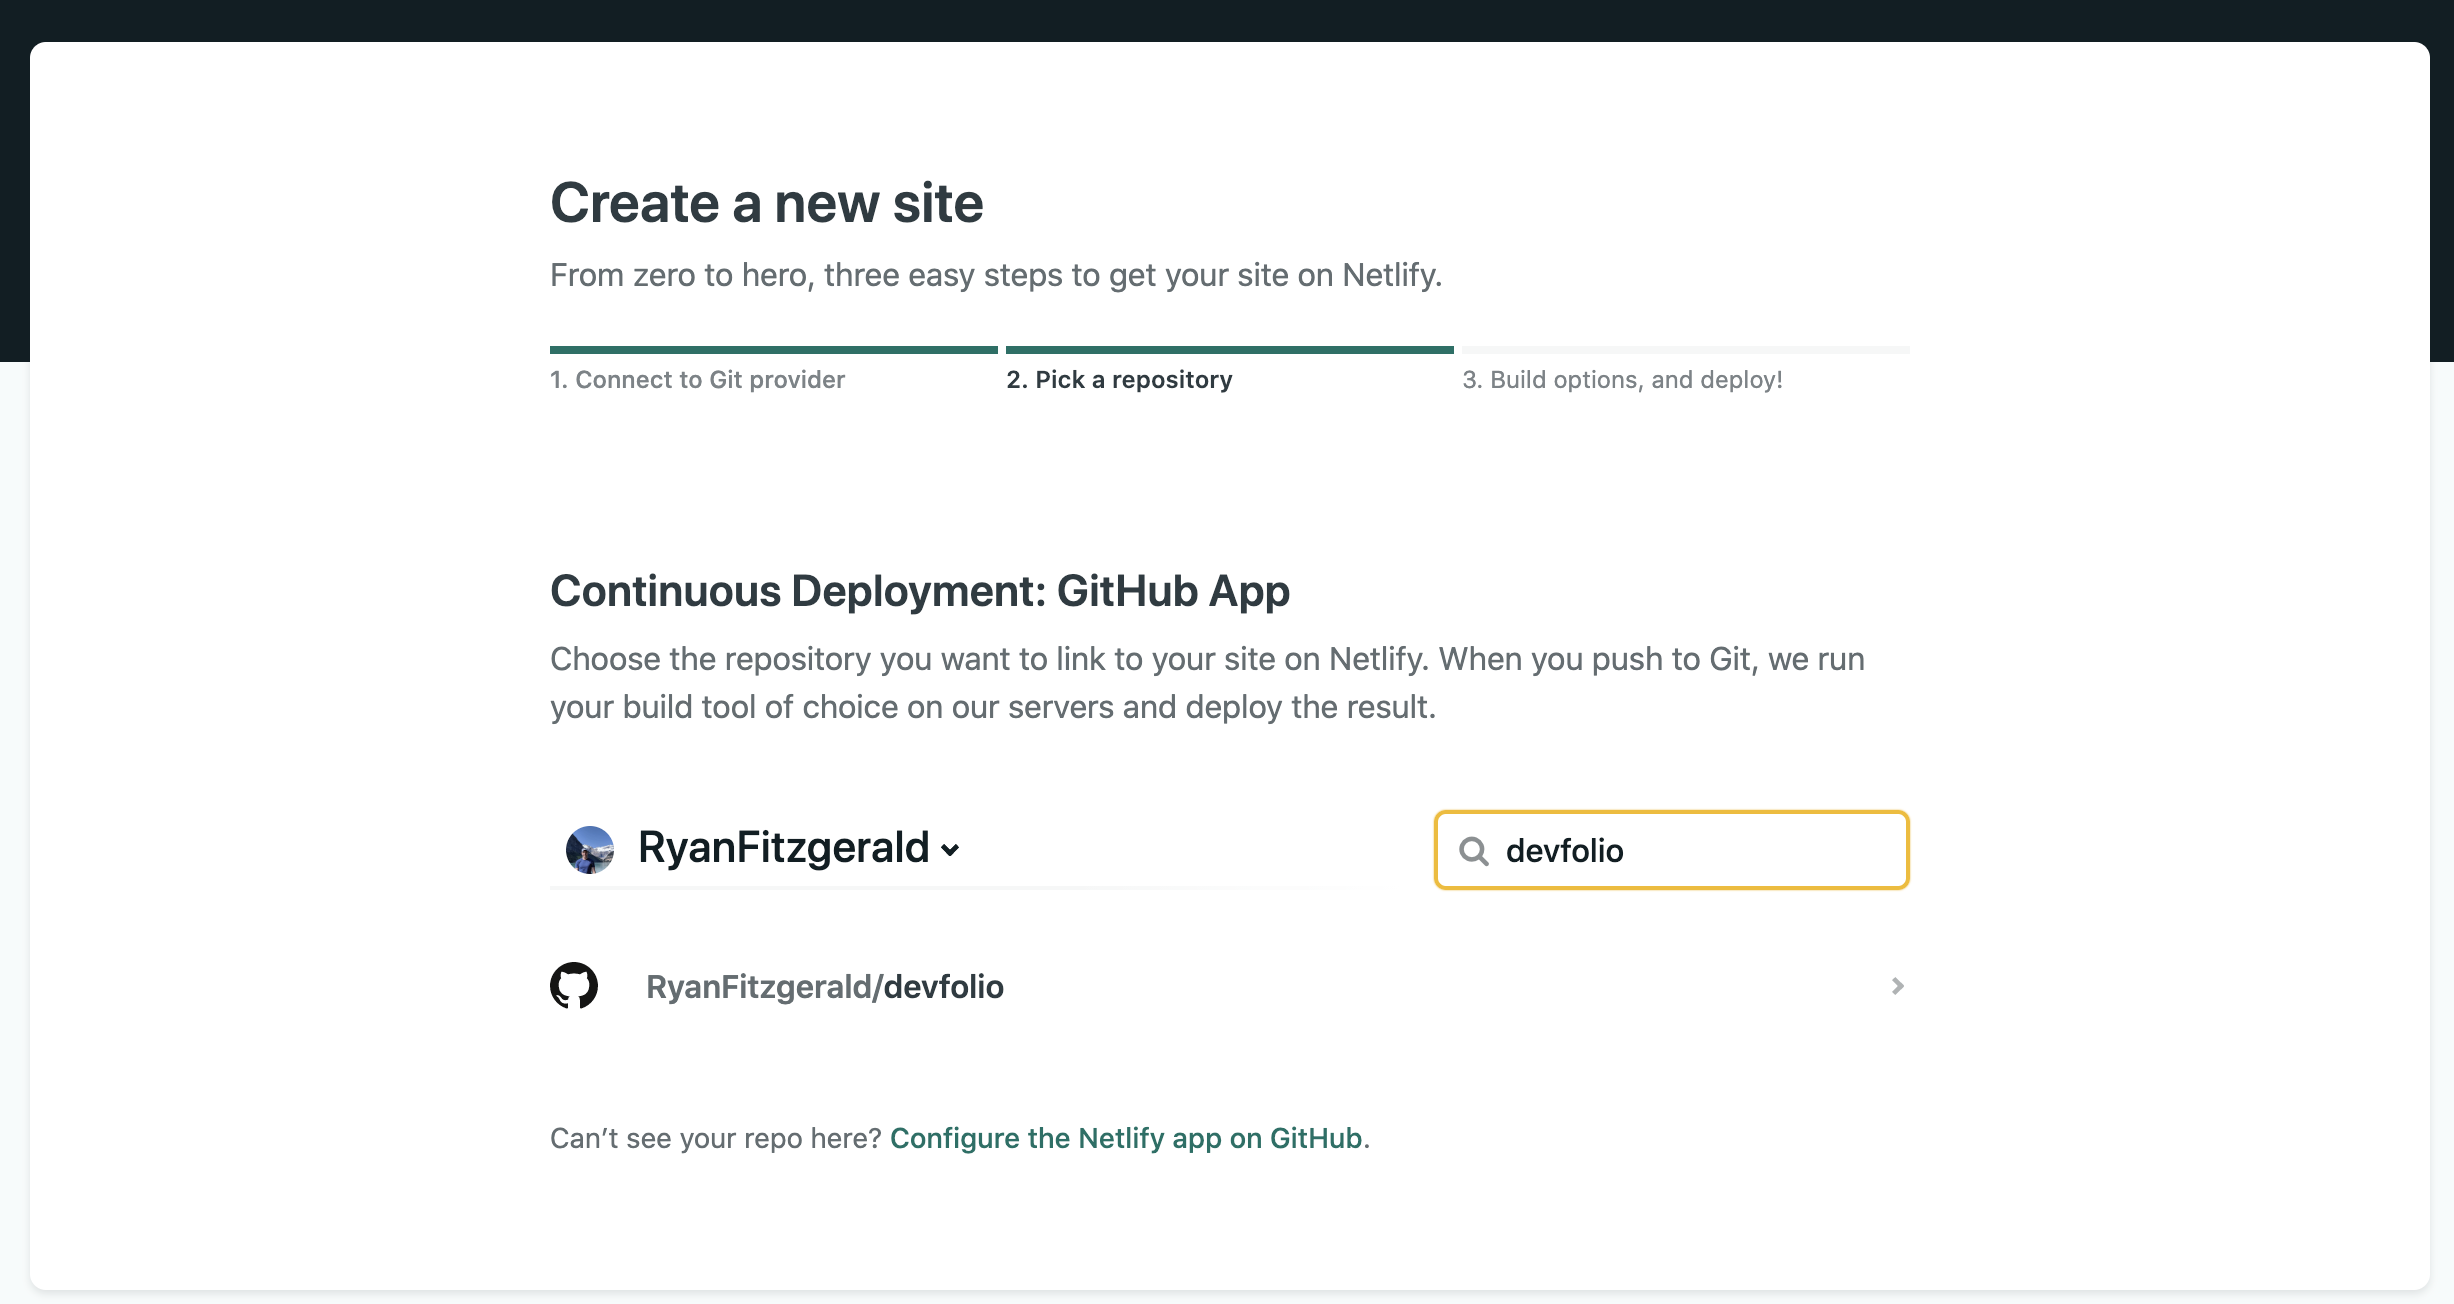
Finally, ensure that it set the _Basic Build Settings_ correctly. You want to ensure that the **Build Command** is set to `gatsby build` and the **Publish Directory** is set to `public/`. Once complete, click **Deploy Site** and you should be good to go!
### Vercel
Another straightforward way to deploy devfolio is to use [Vercel](https://vercel.com/). The platform also offers a Hobby plan that will allow you to host the project free-of-charge.
You can deploy devfolio with just a few clicks:

As with Netlify, the deployment can be also done manually following identical settings.
### GitHub Pages
If you'd like, you can setup a build pipeline fairly easily that allows you to use GitHub Pages. To find more information, [read this guide](https://www.gatsbyjs.com/docs/how-gatsby-works-with-github-pages/).
### Other
If you want to learn more about the many other options to deploy, take a look at the [Deploying & Hosting](https://www.gatsbyjs.com/docs/deploying-and-hosting/) section of the GatsbyJS docs where they go through examples on how to deploy on Gatsby Cloud, Azure, AWS Amplify, AWS S3, and many more.
## Customization
Although Devfolio is fully production-ready out of the box, it was also made with customization in mind.
### Gatsby Customization
Devfolio is built on GatsbyJS, so it comes with all the benefits of it. You can make use of the thousands of Gatsby Plugins, utilize the Gatsby APIs (SSR, Browser, etc), and much more. For more information, check out [their great docs](https://www.gatsbyjs.com/docs/).
### Adding or Updating Components
GatsbyJS is based on React, so the template uses a bunch of React components behind the scenes. These components can be found in `src/components` in case you wish to create more or edit the current ones. With the exception of a couple GatsbyJS-specific components being imported, everything else is traditional React.
One thing to note is that if you wish to query data in one of the components, you can do so with the `` component that comes with GatsbyJs. For more information, [click here](https://www.gatsbyjs.com/docs/static-query/#reach-skip-nav).
### Adding or Updating Pages
The pages for the template exist in `src/pages` and are simply React components that get treated as pages by GatsbyJS. By default, the following pages exist in the template:
- `src/pages/index.jsx` - the main homepage
- `src/pages/blog.jsx` - the main `/blog` homepage
- `src/pages/404.jsx` - the default 404 page
You can easily modify those pages and create new ones. Gatsby core automatically takes any React component in `src/pages/*` and turns it into a separate page (they must export a component as a default export). For example, if you make a new component as `src/pages/page1.jsx`, it will automatically create a new page that can be visited via `mysite.com/page1`. For more information on pages as well as other ways they can be created, [click here](https://www.gatsbyjs.com/docs/creating-and-modifying-pages/).
### Adding or Updating Styles
Devfolio is fully styled with [TailwindCSS](https://tailwindcss.com/) with the exception of a couple minor additional styles, as found in `src/css/index.css`.
When the GatsbyJS development server is running, you'll have access to all of the Tailwind styles, however once you deploy (i.e. build the static assets), PurgeCSS runs against them and only leaves the Tailwind styles that were actually used. This is beneficial because it keeps the build size considerably smaller, however there are some important considerations to keep in mind in order to keep the HTML purgeable. For example, if you use string concatenation to create a class name, PurgeCSS won't be able to figure out what that is. For more information on writing purgeable HTML + other methods to control file size, [click here](https://tailwindcss.com/docs/controlling-file-size).
The pattern current used in the template when it comes to writing React components with Tailwind CSS is as follows:
```jsx
const classes = {
wrapper: 'm-12 p-12',
text: 'text-lg text-gray-600 font-light',
};
const MyComponent = () => {
return (
Some text here.
);
};
```
All the possible classes are defined above and just referenced in the `className` attribute of each element. This comes with a couple benefits:
1. It keeps the overall component definition slightly cleaner (i.e. there isn't a huge class string)
2. You can reuse styles a little easier
3. This still qualifies as purgeable HTML (assuming the class is actually used)
This is however just a recommendation, the template allows you to write the components in any way you wish.
## License
Licensed under the [MIT License](https://github.com/RyanFitzgerald/devfolio/blob/master/LICENSE.md).