https://github.com/TheCodeTraveler/TextMood_TwilioBlog
Source code for Twilio Blog Post
https://github.com/TheCodeTraveler/TextMood_TwilioBlog
Last synced: 10 months ago
JSON representation
Source code for Twilio Blog Post
- Host: GitHub
- URL: https://github.com/TheCodeTraveler/TextMood_TwilioBlog
- Owner: TheCodeTraveler
- License: mit
- Created: 2018-07-18T00:57:53.000Z (almost 8 years ago)
- Default Branch: master
- Last Pushed: 2020-10-22T22:22:34.000Z (over 5 years ago)
- Last Synced: 2025-09-07T04:39:12.927Z (10 months ago)
- Language: C#
- Size: 43 KB
- Stars: 1
- Watchers: 2
- Forks: 1
- Open Issues: 0
-
Metadata Files:
- Readme: README.md
- License: LICENSE
Awesome Lists containing this project
README
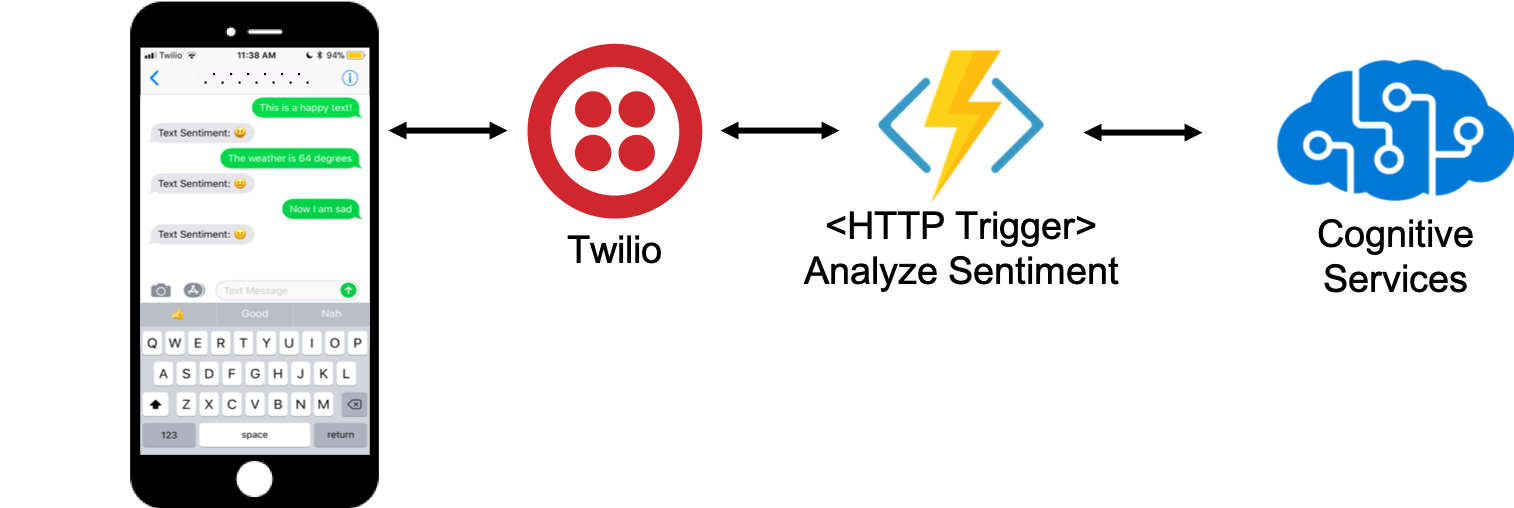
# TextMood
## Automatic Text Sentiment Analysis
With the power of [Twilio Webhooks](https://www.twilio.com/docs/glossary/what-is-a-webhook), we can forward all received text messages to an [Azure Function](https://azure.microsoft.com/services/functions?WT.mc_id=mobile-0000-bramin) to leverage the power of the [Sentiment Analysis API](https://azure.microsoft.com/services/cognitive-services/text-analytics?WT.mc_id=mobile-0000-bramin).
The completed solution can be found here: https://github.com/brminnick/TextMood
### POST Request
```json
{
"documents": [
{
"language": "en",
"id": "251c99d7-1f89-426a-a3ad-c6fa1b34f020",
"text": "I hope you find time to actually get your reports done today."
}
]
}
```
### Response
```json
{
"sentiment": {
"documents": [
{
"id": "251c99d7-1f89-426a-a3ad-c6fa1b34f020",
"score": 0.776355504989624
}
]
}
```
### 1. Create a Sentiment Analysis API Key
To use the Sentiment Analysis API, we'll need to first create an API Key using the Azure Portal.
1. Navigate to the [Azure Portal](https://portal.azure.com/?WT.mc_id=mobile-0000-bramin)
- If you are new to Azure, use [this sign-up link](https://azure.microsoft.com/free/ai?WT.mc_id=mobile-0000-bramin) to receive a free $200 credit
2. On the Azure Portal, select **+ Create a Resource**
3. In the **New** window, select **AI + Machine Learning**
4. In the **Featured** frame, select **Text Analytics**
5. In the **Create** window, make the following selections
- **Name**: TextMood
- **Subscription**: [Select your Azure subscription]
- **Location**: [Select the location closest to you]
- **Pricing Tier**: F0 (5K Transactions per 30 days)
- This is a free tier
- **Resource Group**: TextMood
6. In the **Create** window, select **Create**
7. On the Azure Portal, select the bell-shaped notification icon
8. Stand by while the **Notifications** window says **Deployment in progress...**
9. Once the deployment has finished, on the **Notifications** window, select **Go to resource**
10. In the TextMood Resource page, select **Keys** and locate **KEY 1**
- We will use this API Key when we create our Azure Function
11. In the TextMood Resource page, select **Overview** and locate the **Endpoint**
- We will use this Url when we create our Azure Function
### 2. Create an Azure Function
[Azure Functions](https://azure.microsoft.com/services/functions?WT.mc_id=mobile-0000-bramin) are a serverless offering in Azure. In these steps, we will use Azure Functions to create a POST API.
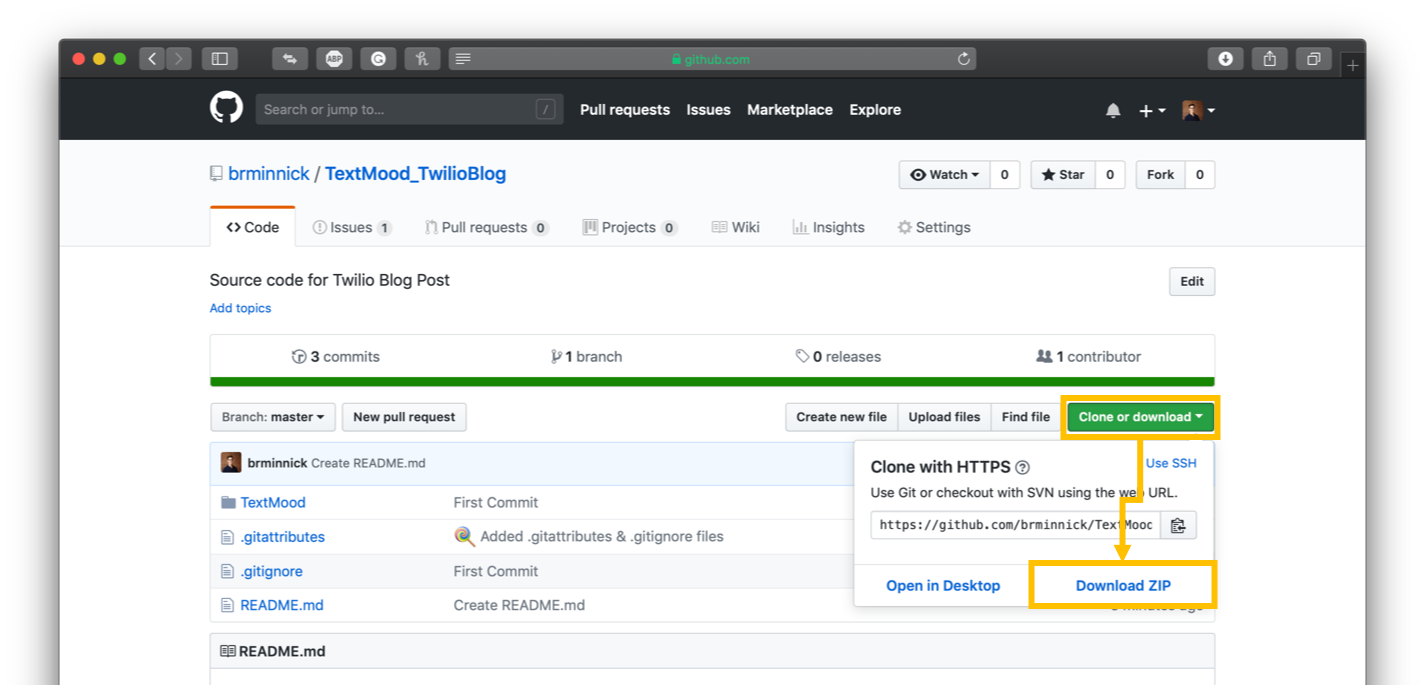
1. Clone or download the [TextMood_TwilioBlog](https://github.com/brminnick/TextMood_TwilioBlog)
- To clone the repo using git, open a cmd prompt and enter the following command:
- `git clone https://github.com/brminnick/TextMood_TwilioBlog.git`
- To download the repo use the following steps:
- Click the link above to navigate to the GitHub repo in your browser
- Click Clone or Download
- Click Download Zip
2. After downloading/cloning the repo, locate `TextMood.sln`
3. Launch `TextMood.sln` in Visual Studio
4. In **CognitiveServicesConstants.cs**, for `TextSentimentAPIKey`, replace `Your API Key` with the Key from the TextAnalytics Cognitive Service resource created earlier
5. In **CognitiveServicesConstants.cs**, for `_cognitiveServicesEndpoint`, replace `Your Cognitive Services Endpoint` with the Endpoint from the TextAnalytics Cognitive Service resource created earlier
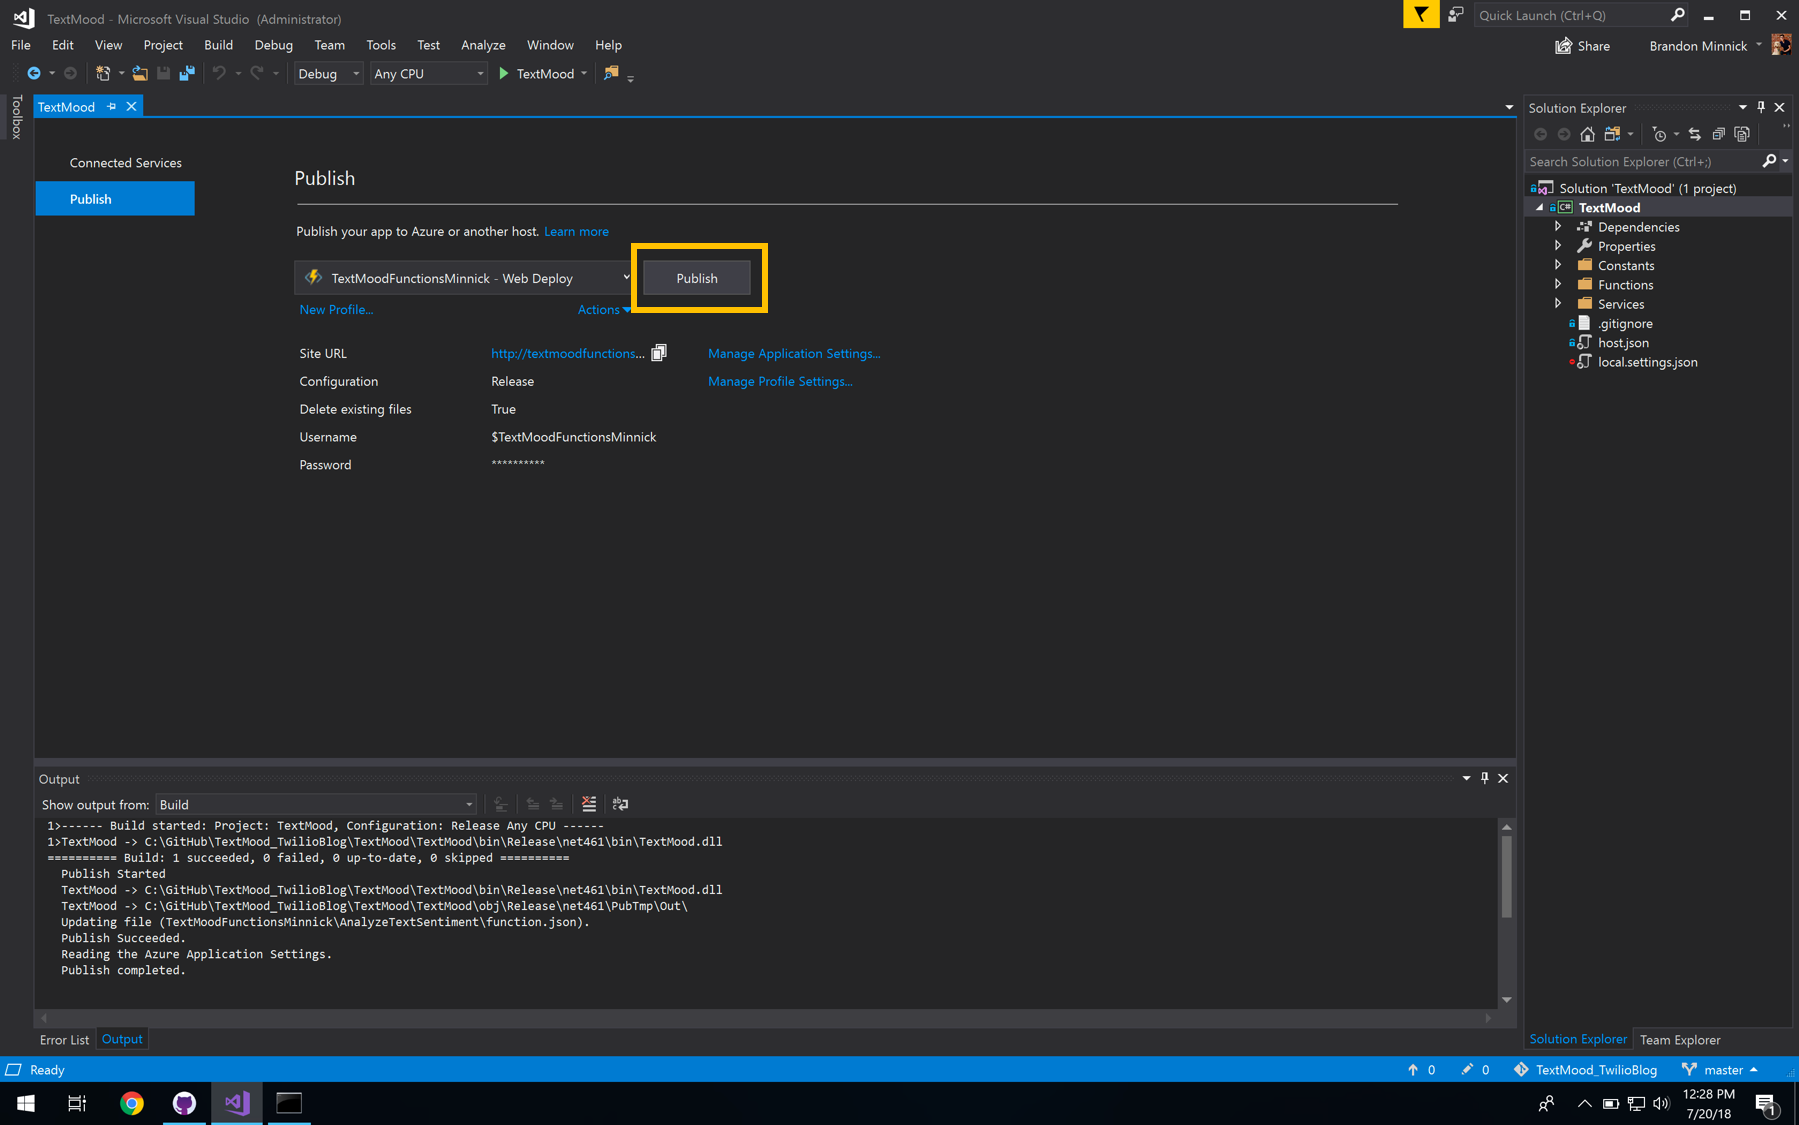
6. In the Visual Studio Solution Explorer, right-click the TextMood project
7. In the right-click menu, select **Publish**

8. In the Publish window, select **Function App**
9. In the Publish window, select **Create New**
10. In the Public window, select **Publish**

11. In the **Create App Service** window, enter an App Name
- **Note**: The app name needs to be unique because it will be used for the Function's url
- I recommend using TextMood[LastName]
- In this example, I am using TextMoodMinnick
12. In the **Create App Service** window, select your subscription
13. In the **Create App Service** window, next to **Resource Group** select **New...**

14. In the **New resource group name** window, enter TextMood
15. In the **New resource group name**, select **OK**

16. In the **Create App Service** window, next to **Hosting Plan**, select **New...**
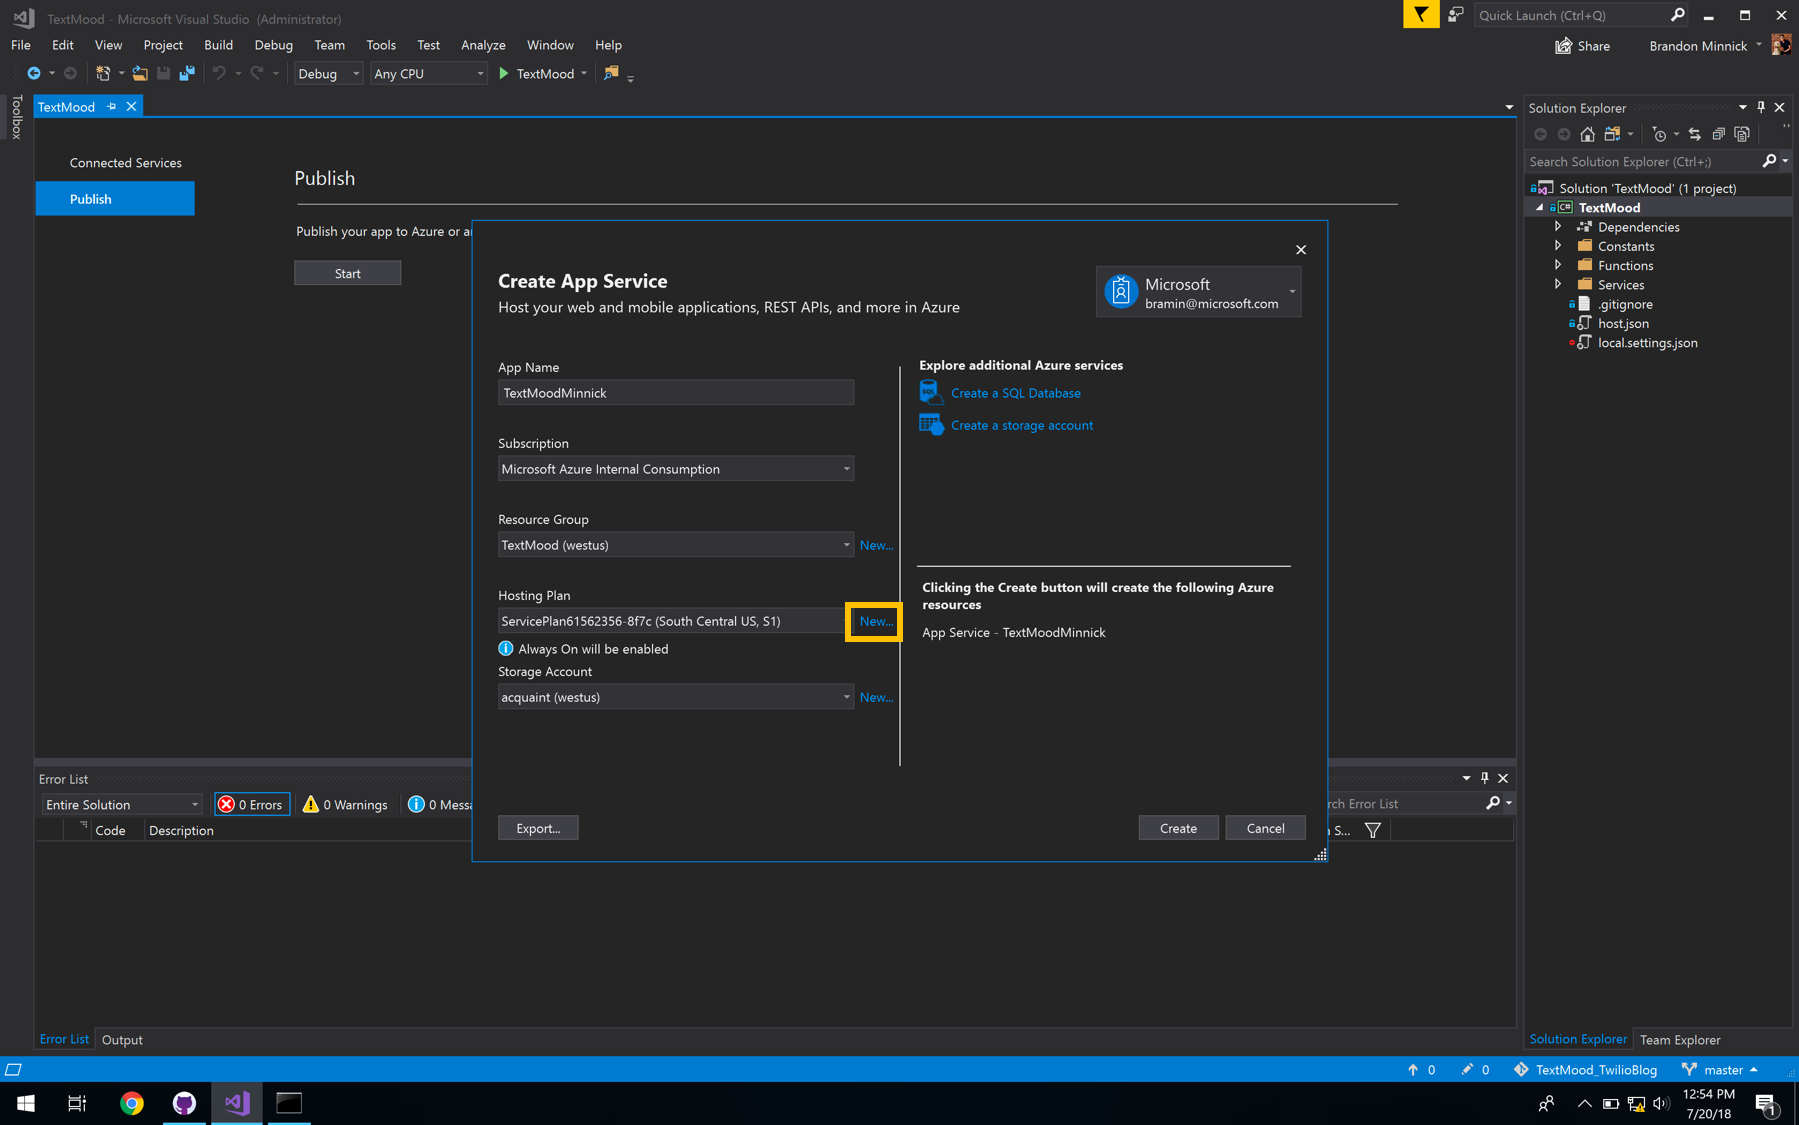
17. In the **Configure Hosting Plan** window, enter a name for **App Service Plan**
- I recommend using TextMood[LastName]Plan
- In this example, I am using TextMoodMinnickPlan
18. In the **Configure Hosting Plan** window, select a **Location**
- I recommend selecting the location closest to you
19. In the **Configure Hosting Plan** window, for the **Size**, select **Consumption**
20. In the **Configure Hosting Plan** window, select **OK**

21. In the **Create App Service** window, next to **Storage Account**, select **New...**

22. In the **Storage Account** window, enter an **Account Name**
- I recommend using textmood[LastName]
- In this example, I am using textmoodminnick
23. In the **Storage Account** window, for the **Account Type**, select **Standard - Locally Redundant**
24. In the **Storage Account** window, select **OK**

25. In the **Create App Service** window, select **Create**
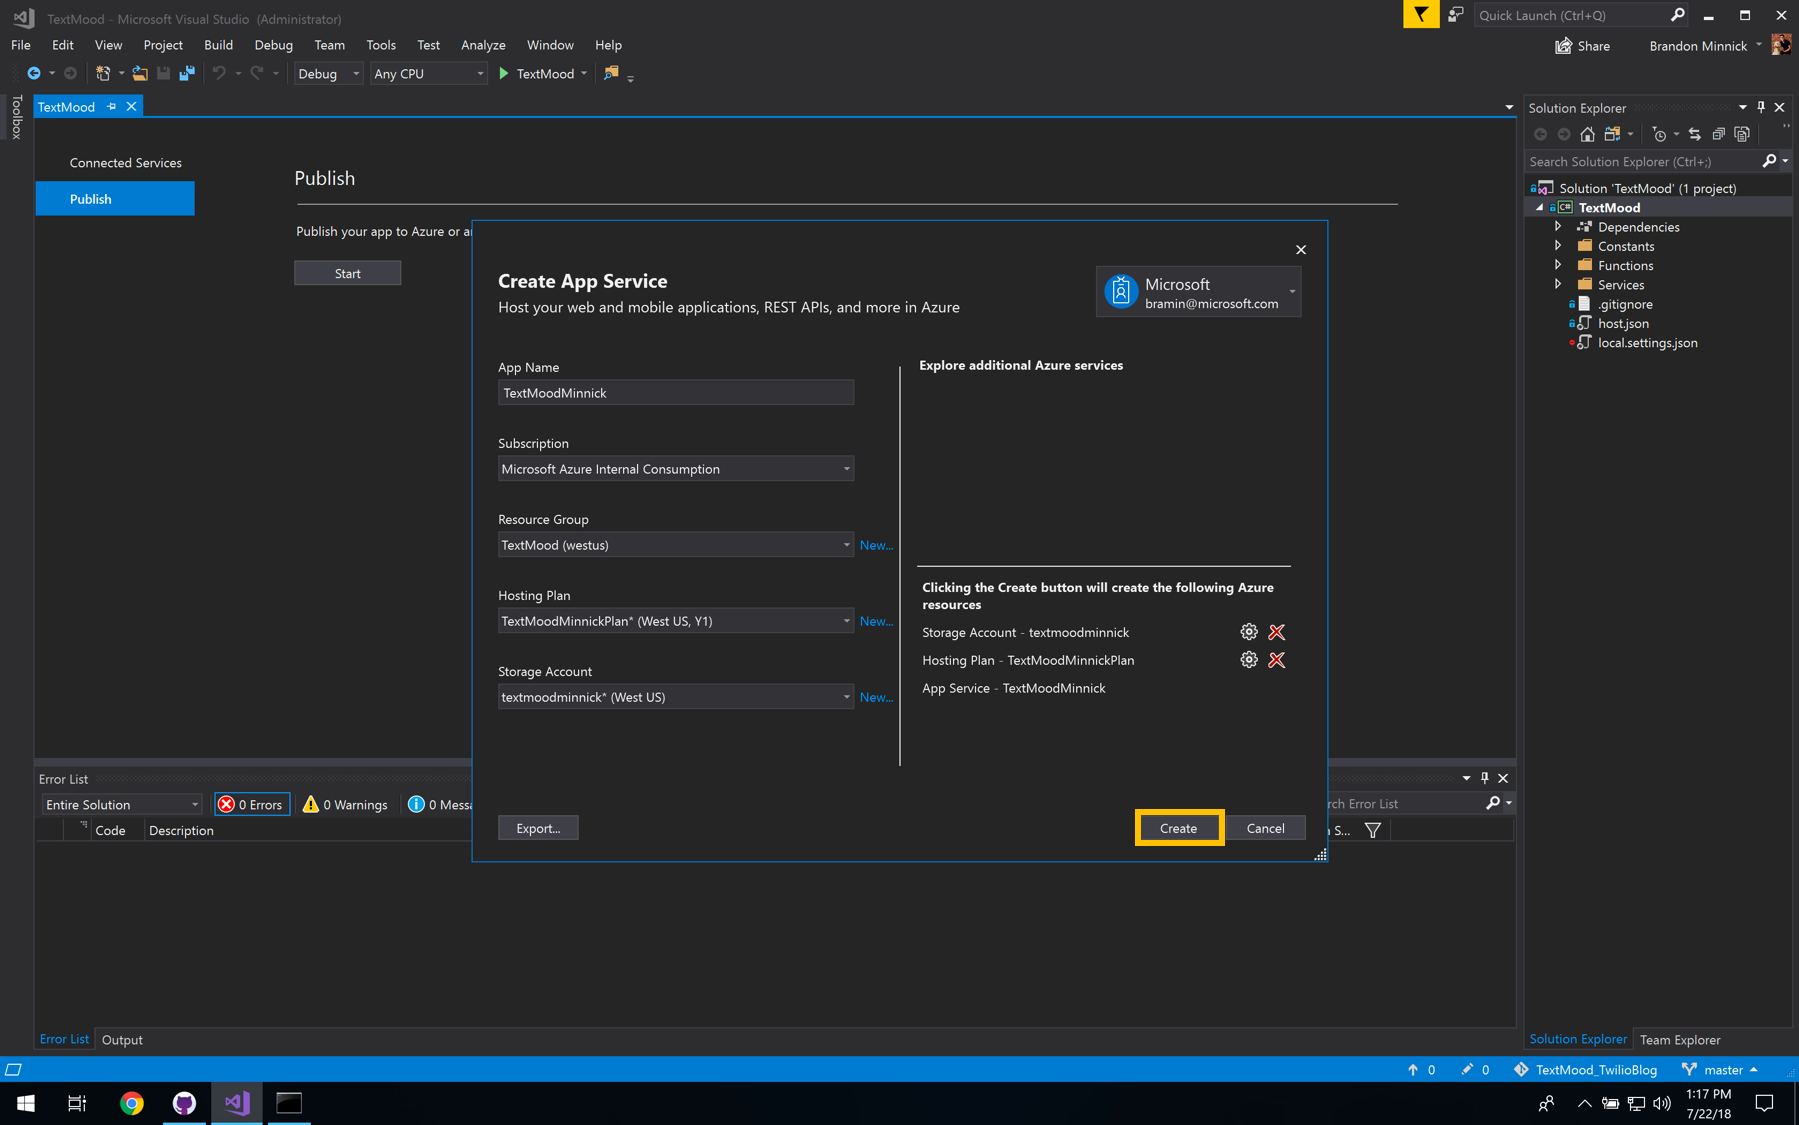
26. Stand by while the Azure Function is created

27. In the Visual Studio Solution Explorer, right-click the TextMood project
28. In the right-click menu, select **Publish**

29. In the **Publish** window, select **Publish**
### 4. Copy Azure Functions Url
1. Navigate to the [Azure Portal](https://portal.azure.com/?WT.mc_id=mobile-0000-bramin)
2. On the Azure Portal, select **Resource Groups**
3. In the **Resource Group** window, select **TextMood**

4. In the TextMood Resource Group window, select **Overview**
5. In the TextMood Overview window, select the Azure Function resource, **TextMood[LastName]**

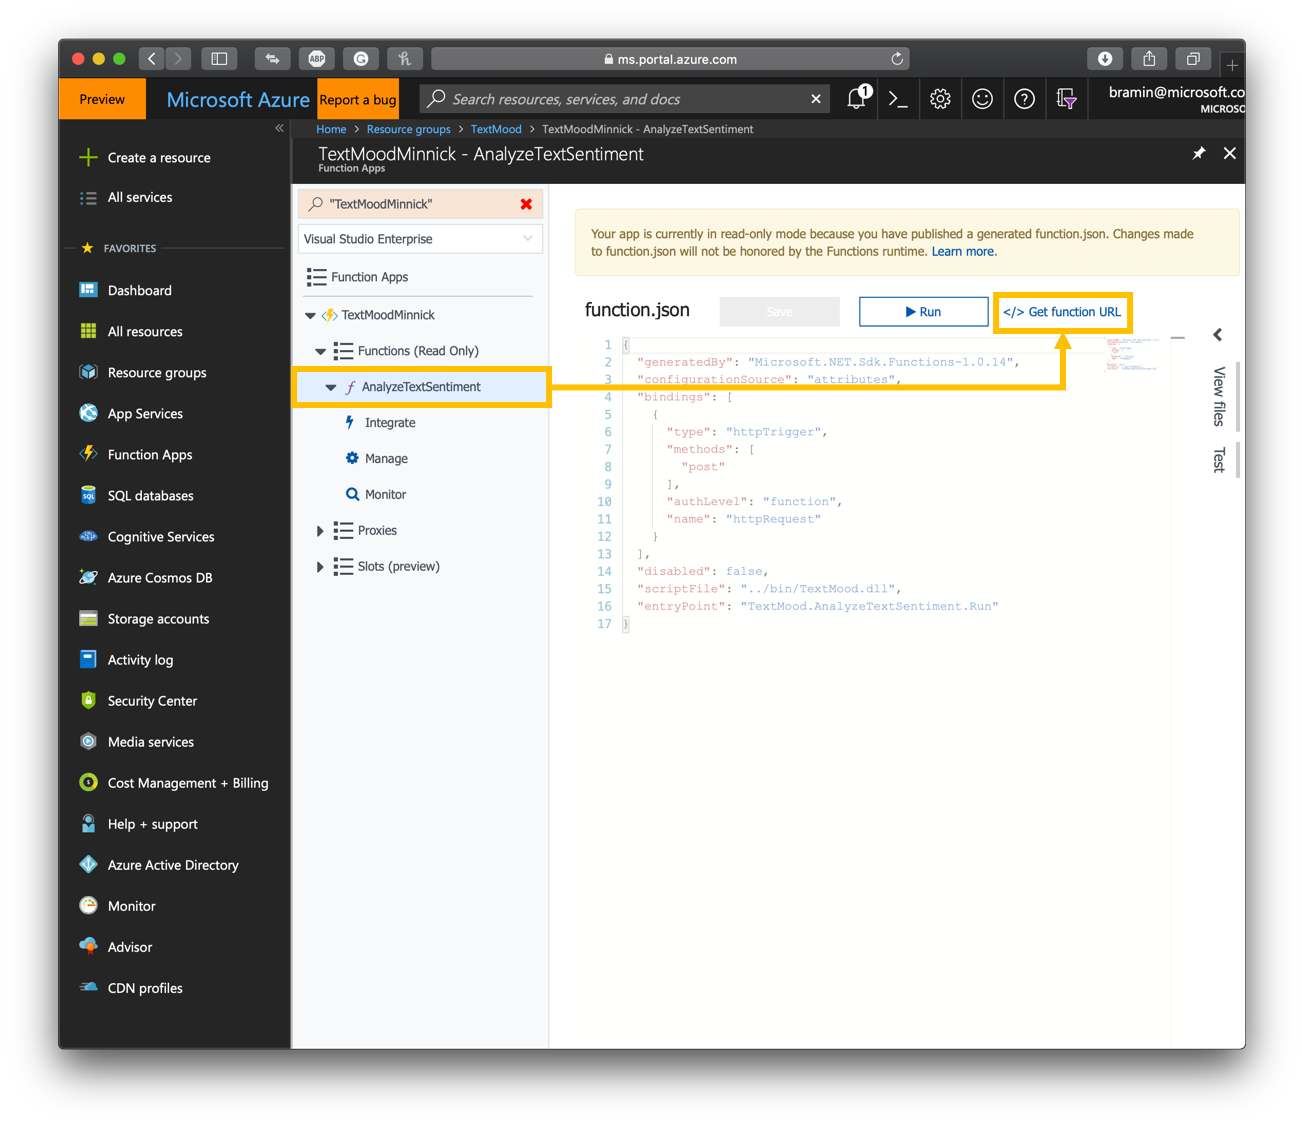
6. In the **Azure Functions** window, select **AnalyzeTextSentiment**
7. In the **AnalyzeSentiment** window, select **Get Function Url**
- We will use this Url when we create our Twilio phone number
### 5. Create Twilio Phone Number
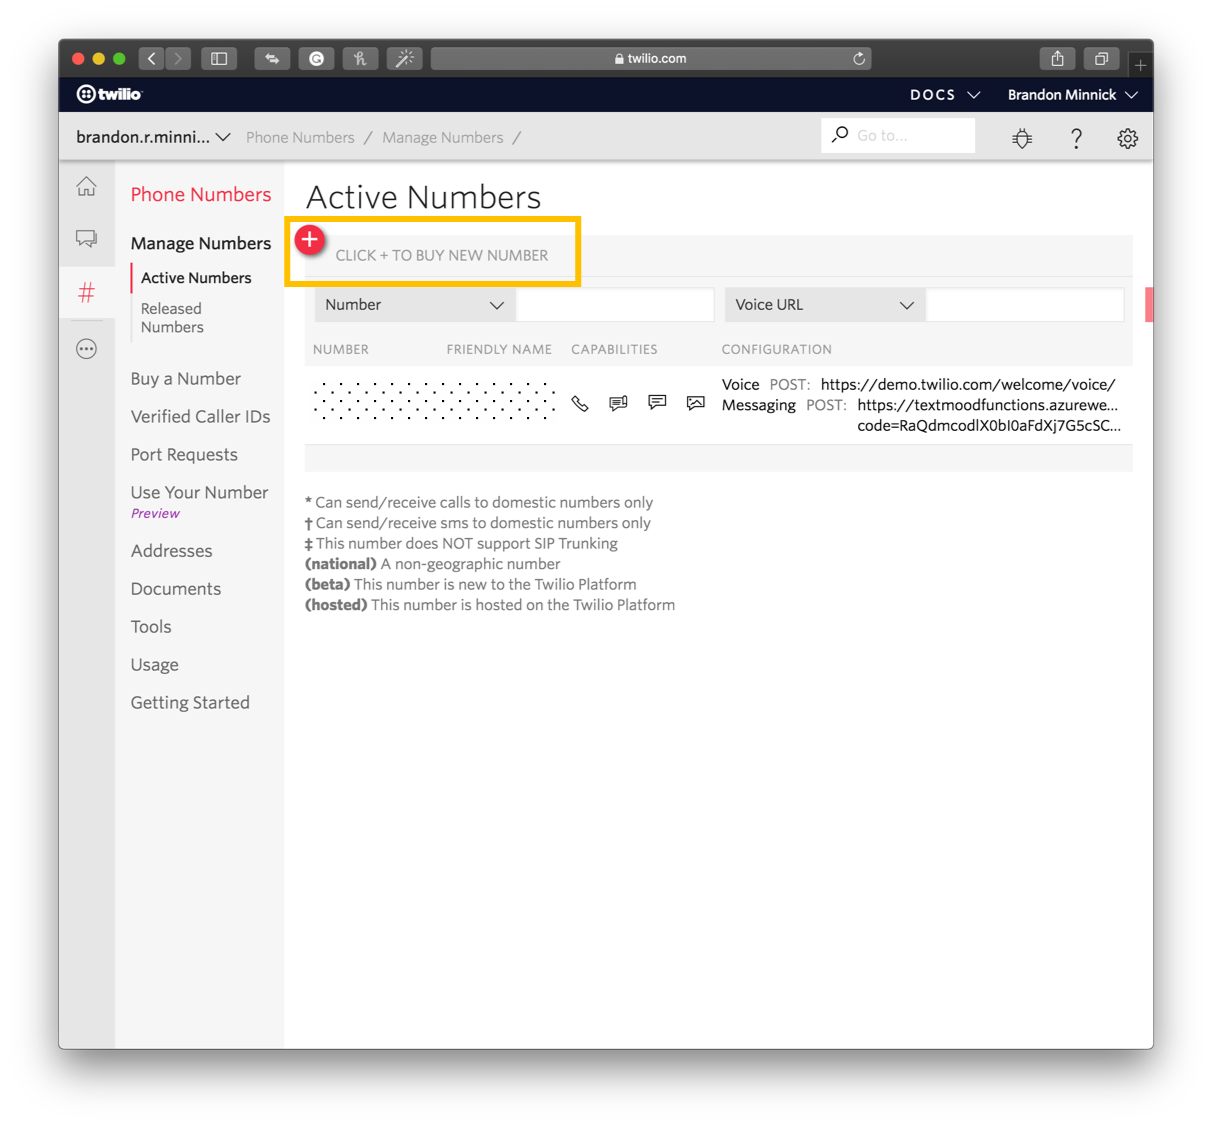
1. Log into your Twilio account and navigate to the [Manage Numbers](https://www.twilio.com/console/phone-numbers/incoming) page.
2. Click the **+** sign to buy a new number
- Note you may skip this step if you have an existing Twilio Phone Number
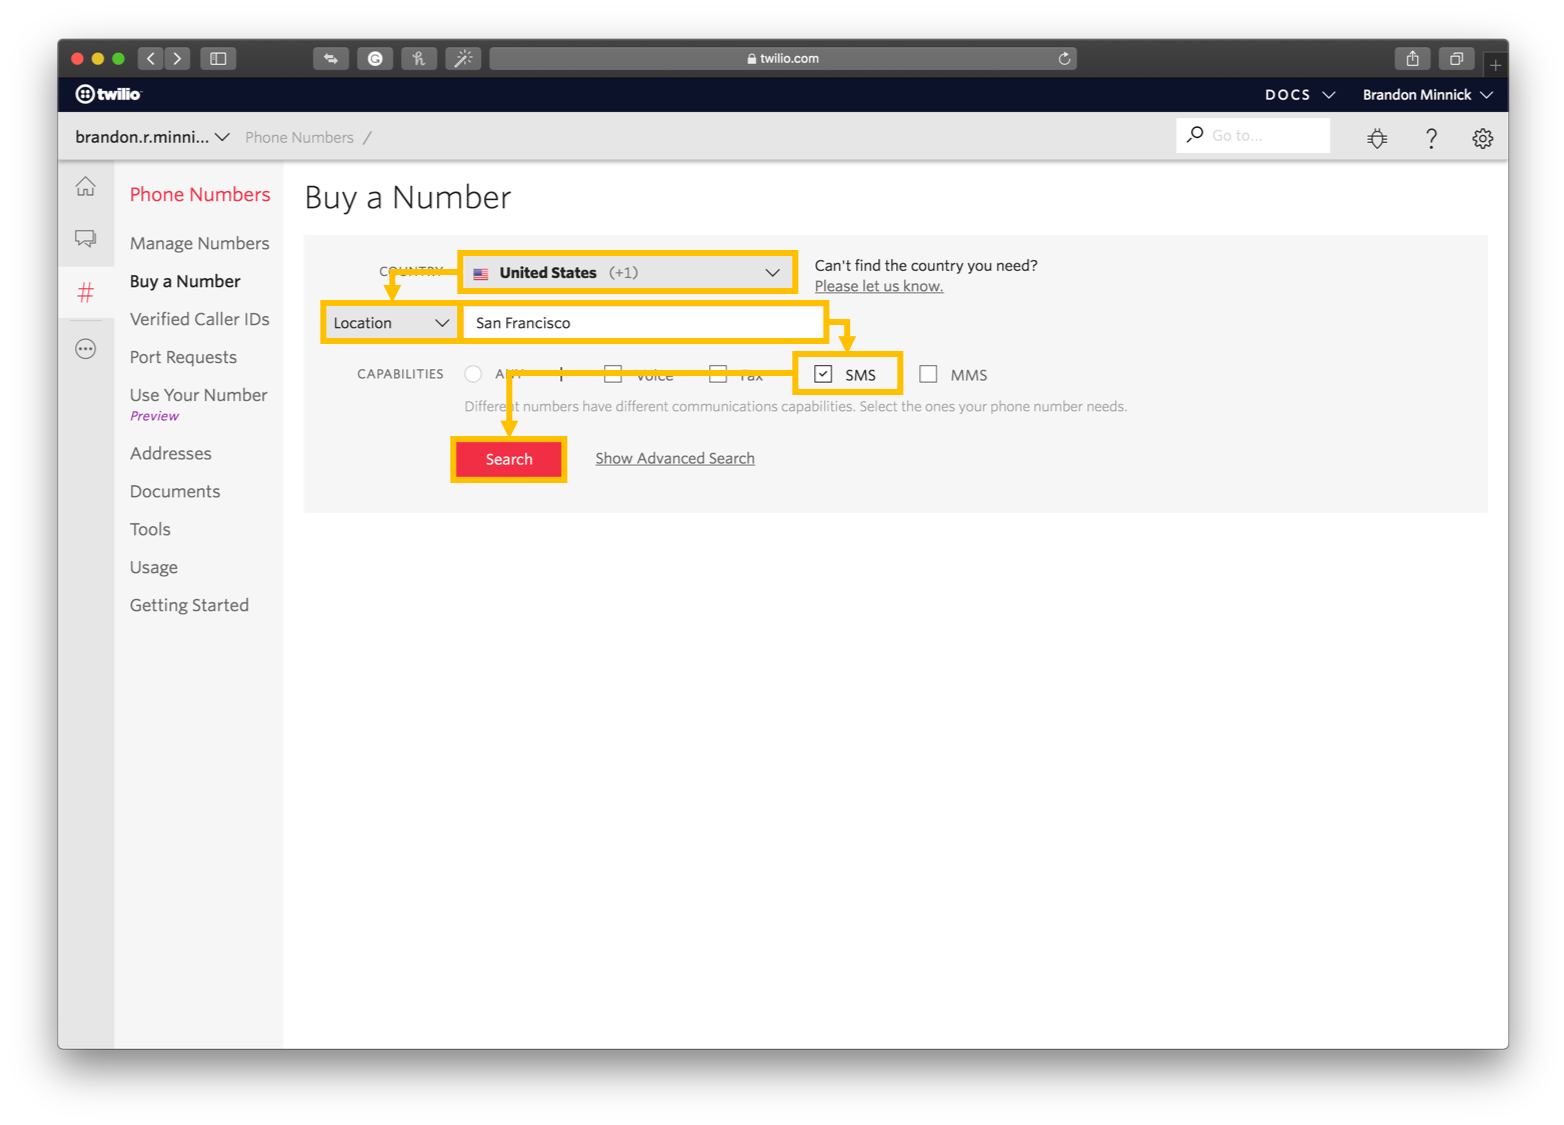
3. On the **Buy a Number** page, select a **Country**
- For this example, I am using United States
4. On the **Buy a Number** page, tap the **Number** drop down and change it to **Location**
5. On the **Buy a Number** page, enter a location name
- For this example, I am using San Francisco
6. On the **Buy a Number** page, check **SMS**
7. On the **Buy a Number** page, click **Search**
8. On the search results page, locate the number you'd like to purchase and select **Buy**

9. In the confirmation window, select **Buy This Number**

10. In the purchase confirmation window, select **Setup Number**

11. In the **Messaging** section, next to **A Message Comes In**, select **Webhook**
12. In the **Messaging** section, next to **A Message Comes In**, enter the Azure Function Url that we created in the previous section
13. In the **Messaging** section, next to **A Message Comes In**, select **HTTP POST**
14. In the **Manage Numbers** window, select **Save**

### 6. Send a Text
1. Open a text messaging app and send a text message to your Twilio phone number

# Resources
- [Azure Sentiment Analysis](https://azure.microsoft.com/services/cognitive-services/text-analytics?WT.mc_id=mobile-0000-bramin)
- [Azure Functions](https://azure.microsoft.com/services/functions?WT.mc_id=mobile-0000-bramin)
- [Twilio Webhooks](https://www.twilio.com/docs/glossary/what-is-a-webhook)
- [Cognitive Services](https://azure.microsoft.com/services/cognitive-services?WT.mc_id=mobile-0000-bramin)