https://github.com/abisxir/alasgar
3D game engine for nim
https://github.com/abisxir/alasgar
Last synced: 5 months ago
JSON representation
3D game engine for nim
- Host: GitHub
- URL: https://github.com/abisxir/alasgar
- Owner: abisxir
- License: mit
- Created: 2021-09-10T15:28:57.000Z (over 3 years ago)
- Default Branch: main
- Last Pushed: 2025-01-04T10:24:50.000Z (5 months ago)
- Last Synced: 2025-01-04T10:34:25.288Z (5 months ago)
- Language: Nim
- Size: 39.4 MB
- Stars: 91
- Watchers: 6
- Forks: 2
- Open Issues: 0
-
Metadata Files:
- Readme: README.md
- License: LICENSE
Awesome Lists containing this project
- awesome-nim - alasgar - Pure nim 3D game engine based on OpenGL. (Game Development / Game Engines)
README

# alasgar
alasgar is a pure nim game engine based on OpenGL. The main reason to start developing a new game engine, was to learn graphics programming (first challenge) using nim programming language (second challenge). You can write the whole game logic and also shaders in nim. It supports a few platforms including mobile, web, and desktop. It performs well in the performance tests. It is the journey of a backend/system developer through graphics/game programming.
# Platforms
- FreeBSD (tested on 14.0, probably works also on NetBSD and OpenBSD also)
- Linux (tested on various distros like void and arch)
- Windows (tested on Windows 11)
- Android (tested on some old samsung devices)
- WebAssembly (tested on firefox and chrome)
- macOS (tested on macOS Ventura)
- iOS (not supoorted)
## Experimental game engine
alasgar is a basic game engine, and it is limited, so it is not ready for production use.
## Installation
```bash
nimble install alasgar
```
or simply the latest version:
```bash
nimble install https://github.com/abisxir/alasgar
```
## Quick start
```bash
git clone https://github.com/abisxir/alasgar.git
cd alasgar/examples
nim c -r hello.nim
```
Table of Contents
=================
* [Window and scene creation](#window-and-scene-creation)
* [Screen size](#screen-size)
* [First mesh](#first-mesh)
* [Point light](#point-light)
* [Scripts](#scripts)
* [Material](#material)
* [Texture](#texture)
* [More lights](#more-lights)
* [Access components](#access-components)
* [Interactive objects](#interactive-objects)
* [Effects](#effects)
* [Shadows](#shadows)
* [Dependencies](#deps)
Window and scene creation
=========================
```nim
import alasgar
# Creates a window named Step1
window("Step1", 830, 415)
let
# Creates a new scene
scene = newScene()
# Creates camera entity
cameraEntity = newEntity(scene, "Camera")
# Sets camera position
cameraEntity.transform.position = vec3(5, 5, 5)
# Adds a perspective camera component to entity
add(
cameraEntity,
newPerspectiveCamera(
75,
runtime.ratio,
0.1,
100.0,
vec3(0) - cameraEntity.transform.position
)
)
# Makes the camera entity child of the scene
add(scene, cameraEntity)
```
As you see, we instantiate a scene, add a camera to that, and render the created scene. If everything goes right, you will see an empty window with the given size. Run it using the nim compiler:
```bash
nim c -r main.nim
```
Check the [example](https://abisxir.github.io/alasgar/step1/build) here.
When you create a window by default it runs in window mode, you can easily enable fullscreen mode:
```nim
# Creates a window named Hello and enables fullscreen mode.
window("Hello", 960, 540, fullscreen=true)
```
Screen size
===========
By default the screen size is equal with window size, but maybe you like to have a lower resolution:
```nim
import alasgar
# Creates a window named Hello, and sets screen size to (160, 90)
screen(160, 90)
window("Hello", 640, 360)
...
```
*You need to specify it before creating window, after window creation there is no effect when setting the screen size.*
Let us add a cube to our scene, but to see the cube, it is better if we give a brighter background to our window, it will make it easier to see our meshes before we add lights. So what we do we change scene background and add a cube mesh to our scene:
First mesh
==========
```nim
...
let
# Creates a new scene
scene = newScene()
# Sets background color
scene.background = parseHex("d7d1bf")
...
# Creates cube entity, by default position is 0, 0, 0
let cubeEntity = newEntity(scene, "Cube")
# Add a cube mesh component to entity
add(cubeEntity, newCubeMesh())
# Makes the cube enity child of the scene
add(scene, cubeEntity)
# Scale it up
cubeEntity.transform.scale = vec3(2)
...
```
That was all you need to do. If you compile and execute it, you will see an ugly black cube in a window with a slightly better [color](https://abisxir.github.io/alasgar/step2/build). As you guess we need to have a light in our scene to shade our cube. Let us add a point light to our scene:
Point light
===========
```nim
...
# Creates the light entity
let lightEntity = newEntity(scene, "Light")
# Sets the light position
lightEntity.transform.position = vec3(4, 5, 4)
# Adds athe point light component to entity
add(
lightEntity,
newPointLightComponent()
)
# Makes the light entity child of the scene
add(scene, lightEntity)
...
```
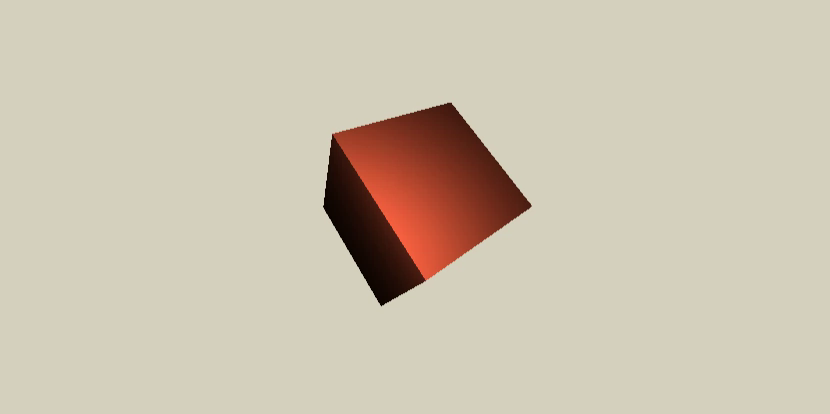
That is all we needed, now our cube maybe is [less ugly](https://abisxir.github.io/alasgar/step3/build) now. Lights have some properties, like color, luminance, etc. You change it and you will shade the cube differently.
Scripts
=======
To program an entity, we need to add a ScriptComponent to it. Each component has an access to its entity, the entity's transform and other components added to the entity. We can add a script to any entity using the "program" function or directly by instantiating a ScriptComponent using the "newScriptComponent" function.
```nim
...
# Adds a script component to the cube entity
program(cubeEntity, proc(script: ScriptComponent) =
let t = 2 * runtime.age
# Rotates the cube using euler angles
script.transform.euler = vec3(
sin(t),
cos(t),
sin(t) * cos(t),
)
)
# Makes the cube enity child of the scene
add(scene, cubeEntity)
...
```
[See](https://abisxir.github.io/alasgar/step4/build) now our cube rotates. As you see in the source code, we used an anonymous function to program the entity. You can define a function and use that here. Feel free to play with nim features. As you notice, we directly access transform component from script component. Each entity has a reference to the transform component, and all the components have a reference to their entity. We used Euler angles to change rotation. But also 'rotation' as a quat is available in TransformComponent and you can use it if you are looking for troubles:
```nim
type
TransformComponent = ref object of RootObj
position: Vec3 # position in local space
scale: Vec3 # scale in local space
rotation: Quat # rotation in local space
euler: Vec3 # write only euler angles in local space
globalPosition: Vec3 # position in global space
globalScale: Vec3 # scale in global space
globalRotation: Quat # rotation in global space
parent: TransformComponent # parent transform, read only
proc lookAt*(t: TransformComponent, target: Vec3)
proc lookAt*(t: TransformComponent, target: TransformComponent)
```
In the script we used runtime variable, it is a readonly property that gives us some good information about engine, also has a reference to the running engine's instance:
```nim
type
Runtime = object
engine: Engine # engine instance
age: float32 # total seconds engine is running
frames: int # total frames rendered
fps: float32 # current fps
delta: float32 # delta between last two frames
input: Input # last input state
ratio: float32 # screen ratio
windowSize: Vec2 # window size
screenSize: Vec2 # screen size
```
Material
========
We can change the cube color using material components. So what we need is to add a material component to define the cube's material. There is a sugar member in entity that can automatically define a material for entity when it is called, thanks to nim's templates and powerful property functions.
I used the chroma library to manipulate colors, it is a great library, [here](https://abisxir.github.io/alasgar/step5/build) you can see how to use it.
```nim
...
# Adds a material if it is not already added and sets the diffuse color
cubeEntity.material.diffuseColor = parseHtmlName("Tomato")
# Also is possible to directly instantiate a component and add it to the cube
# In the case that you prefer to write more code :)
# addComponent(cubeEntity, newMaterialComponent(diffuseColor=parseHtmlName("Tomato")))
...
```
Material component contains the following properties:
```nim
type
MaterialComponent = ref object of Component
diffuseColor: Color
specularColor: Color
emissiveColor: Color
metallic: float32
roughness: float32
reflectance: float32
ao: float32
albedoMap: Texture
normalMap: Texture
metallicMap: Texture
roughnessMap: Texture
aoMap: Texture
emissiveMap: Texture
vframes: int
hframes: int
frame: int
castShadow: bool
# Instantiate a material component
func newMaterialComponent(diffuseColor: Color=COLOR_WHITE,
specularColor: Color=COLOR_WHITE,
emissiveColor: Color=COLOR_BLACK,
albedoMap: Texture = nil,
normalMap: Texture = nil,
metallicMap: Texture = nil,
roughnessMap: Texture = nil,
aoMap: Texture = nil,
emissiveMap: Texture = nil,
metallic: float32 = 0.0,
roughness: float32 = 0.0,
reflectance: float32 = 0.0,
shininess: float32 = 128.0,
ao: float32 = 1.0,
frame: int=0,
vframes: int=1,
hframes: int=1,
castShadow: bool=false)
```
If roughness and metallic factors are zero also there is no metallic map and roughness map provided then the shader will use shininess and shades with phong model otherwise will be PBR. vfames, hframes, and frame is used to offset texture, very helpful for sprites or animations, will discuss it later in the sprites section.
Texture
=======
It is time to give texture to our cube. To make it multi-platform you need to make "res" folder in your project root and copy all of your assets inside that folder with the desired heirarchy. Then the assets will be accessible using a relative path by res like "res://texture.png". It applies to all other assets like obj files, audio files or text files.
```nim
...
# Sets the diffuse color
cubeEntity.material.diffuseColor = parseHtmlName("White")
# Sets albedo map
cubeEntity.material.albedoMap = newTexture("res://brickwall-albedo.jpg")
...
```
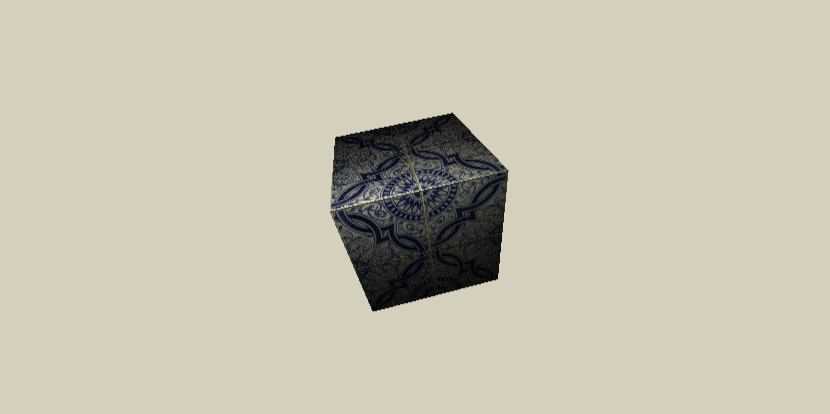
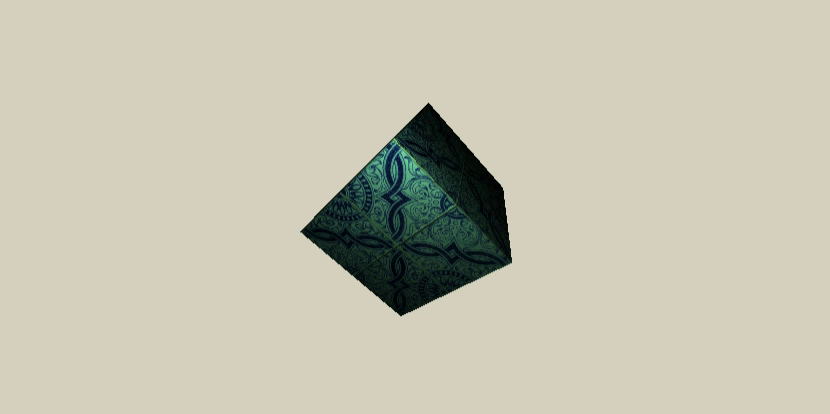
If you run the sample, you will see a [textured](https://abisxir.github.io/alasgar/step6/build) cube which is not that much ugly this time but still there are a lot to improve.
The texture used here, grabbed from: https://publicdomaintextures.com/elementor-112/tiles08
More lights
===========
As you see our scene has just one point light but there are other types of lights:
- Direct lights
- Spot lights
```nim
## Creates point lights
proc newPointLightComponent*(color: Color=COLOR_MILK, luminance=100.0): PointLightComponent
## Creates direct lights
proc newDirectLightComponent*(direction: Vec3,
color: Color=COLOR_MILK,
luminance: float32=100.0,
shadow: bool=false,
shadowBias: float32=0.001): DirectLightComponent
## Creates spot point lights
proc newSpotPointLightComponent*(direction: Vec3,
color: Color=COLOR_MILK,
luminance: float32=50.0,
innerCutoff: float32=30,
outerCutoff: float32=45,
shadow: bool=false,
shadowBias: float32=0.001): SpotPointLightComponent
```
For now shadowing is just implemented for direct lights and spot point lights. Point lights are resource hungary and much heavy compared to direct lights, needs 6 times rendering the scene. Some tricks can applied but still heavy specially for webgl but will be implemented soon.
Access components
=================
Let us program the point light's entity and access to the its component and just for fun change the light color and luminance. To access a component we can call get[T] on an entity or a component. Also, it is possible to access it using the index operator on any entity or component:
```nim
let c = get[MyComponent](e)
```
Or simply using an index operator:
```nim
let c = e[MyComponent]
```
If there is no such a component, it will return nil. Let us try it by adding a script component to our point light to program it:
```nim
...
# Adds a script component to the point light entity
program(lightEntity, proc(script: ScriptComponent) =
let
t = runtime.age
# Access to the point light component.
light = script[PointLightComponent]
# Or you can access it by calling getComponent function:
# let light = get[PointLightComponent](script)
# Changes light color
light.color = color(
abs(sin(t)),
1,
abs(cos(t))
)
)
...
```
If you [execute](https://abisxir.github.io/alasgar/step7/build) the last example, you will notice that the color is changing.
Interactive objects
===================
There is a very simple implementation for interacting with objects in alasgar. As it always works with components, to interact with a game object we need to add an InteractiveComponent to our entity:
```nim
type
InteractionHandleProc* = proc(component: InteractiveComponent, collision: Collision)
OutHandleProc* = proc(component: InteractiveComponent)
InteractiveComponent* = ref object of Component
hover*: bool
pressed*: bool
pressStartTime*: float
pressEndTime*: float
input: Input
onHover: InteractionHandleProc
onOut: OutHandleProc
onMotion: InteractionHandleProc
onPress: InteractionHandleProc
onRelease: InteractionHandleProc
```
So we can instantiate the component and with the hooks are available we can react to user interaction with objects. There is also some sugar functions to make our life easier:
```nim
proc `onHover=`*(e: Entity, f: InteractionHandleProc)
proc `onOut=`*(e: Entity, f: OutHandleProc)
proc `onMotion=`*(e: Entity, f: InteractionHandleProc)
proc `onPress=`*(e: Entity, f: InteractionHandleProc)
proc `onRelease=`*(e: Entity, f: InteractionHandleProc)
```
Let us define two functions and when user hovers on our cube change the emissive color:
```nim
...
# Handles mouse hover in
cubeEntity.onHover = proc(ic: InteractiveComponent, co: Collision) =
ic[MaterialComponent].emissiveColor = color(0.6, 0.6, 0.0)
# Handles mouse hover out
cubeEntity.onOut = proc(ic: InteractiveComponent)=
ic[MaterialComponent].emissiveColor = parseHtmlName("black")
# Adds a bounding box component to the cube entity, uses mesh bounds
addBoundingSphere(cubeEntity)
...
```

That is all, as you [see](https://abisxir.github.io/alasgar/step8/build), we have two functions to handle mouse's in and out events. To make interactive components working, you need to add a collision component. Alsgar supports just two types, AABB and sphere. Here we used helper functions to code less but like everywhere else you can add components using the core functions to have more control over it.
```nim
## Instantiate a collision component with bounding sphere using radius
proc newCollisionComponent*(radius: float32, offset: Vec3=VEC3_ZERO): CollisionComponent
## Instantiate a collision component with box bounding using min and max
proc newCollisionComponent*(vMin, vMax: Vec3, offset: Vec3=VEC3_ZERO): CollisionComponent
## Adds a collision component with bounding box to entity uses mesh information when available
proc addBoundingBox*(e: Entity)
## Adds a collision component with bounding sphere to entity uses mesh information when available
proc addBoundingSphere*(e: Entity)
```
Effects
=======
Effects can be attached to a camera and are nim functions which will be translated to GLSL functions on compile time so you can fix errors before running the application, thanks to [shady](https://github.com/treeform/shady). Let us add a snow effect to our camera. First we create a nim module named snow.nim:
```nim
# snow.nim
import alasgar
# Direct translation of https://www.shadertoy.com/view/4sX3z2 to nim
proc snowEffect*(CAMERA: Uniform[Camera],
FRAME: Uniform[Frame],
COLOR_CHANNEL: Layout[0, Uniform[Sampler2D]],
NORMAL_CHANNEL: Layout[1, Uniform[Sampler2D]],
DEPTH_CHANNEL: Layout[2, Uniform[Sampler2D]],
UV: Vec2,
COLOR: var Vec4) =
var
fragCoord = UV * FRAME.RESOLUTION.xy
snow = 0.0
gradient = (1.0 - float(fragCoord.y / FRAME.RESOLUTION.x)) * 0.4
random = fract(sin(dot(fragCoord.xy, vec2(12.9898,78.233))) * 43758.5453)
for k in 0..5:
for i in 0..11:
var
cellSize = 2.0 + (float(i) * 3.0)
downSpeed = 0.3 + (sin(FRAME.TIME * 0.4 + float(k + i * 20)) + 1.0) * 0.00008
uv = (fragCoord.xy / FRAME.RESOLUTION.x) + vec2(0.01 * sin((FRAME.TIME + float(k * 6185)) * 0.6 + float(i)) * (5.0 / float(i)), downSpeed * (FRAME.TIME + float(k*1352)) * (1.0 / float(i)))
uvStep = (ceil((uv) * cellSize - vec2(0.5,0.5)) / cellSize)
x = fract(sin(dot(uvStep, vec2(12.9898 + float(k) * 12.0, 78.233 + float(k) * 315.156))) * 43758.5453 + float(k) * 12.0) - 0.5
y = fract(sin(dot(uvStep, vec2(62.2364 + float(k) * 23.0, 94.674 + float(k) * 95.0))) * 62159.8432 + float(k) * 12.0) - 0.5
randomMagnitude1 = sin(FRAME.TIME * 2.5) * 0.7 / cellSize
randomMagnitude2 = cos(FRAME.TIME * 2.5) * 0.7 / cellSize
d = 5.0 * distance((uvStep.xy + vec2(x * sin(y), y) * randomMagnitude1 + vec2(y,x) * randomMagnitude2), uv.xy)
omiVal = fract(sin(dot(uvStep.xy, vec2(32.4691,94.615))) * 31572.1684)
if omiVal < 0.08:
let newd = (x+1.0)*0.4*clamp(1.9-d*(15.0+(x*6.3))*(cellSize/1.4),0.0,1.0)
snow += newd
COLOR = texture(COLOR_CHANNEL, UV) + vec4(snow) + gradient * vec4(0.4, 0.8, 1.0, 0.0) + random * 0.01
```
Now in main.nim, we import "snowEffect" and add it to our camera as an effect.
```nim
import alasgar
from snow import snowEffect
...
addEffect(cameraEntity[CameraComponent], "snowEffect", newCanvasShader(snowEffect))
...
```

That was all you need to do, if you [run](https://abisxir.github.io/alasgar/step9/build) the code you will see our beautiful snow. As you see in function signature, there are some unused variables:
```nim
proc snowEffect*(CAMERA: Uniform[Camera],
FRAME: Uniform[Frame],
COLOR_CHANNEL: Layout[0, Uniform[Sampler2D]],
NORMAL_CHANNEL: Layout[1, Uniform[Sampler2D]],
DEPTH_CHANNEL: Layout[2, Uniform[Sampler2D]],
UV: Vec2,
COLOR: var Vec4)
```
These variables will be provided by engine and you can use them when it is required:
```nim
type
Camera* = object
POSITION*: Vec3
VIEW_MATRIX*: Mat4
INV_VIEW_MATRIX*: Mat4
PROJECTION_MATRIX*: Mat4
INV_PROJECTION_MATRIX*: Mat4
EXPOSURE*: float
GAMMA*: float
NEAR*: float
FAR*: float
Frame* = object
RESOLUTION*: Vec3
TIME*: float
TIME_DELTA*: float
COUNT*: float
MOUSE*: Vec4
DATE*: Vec4
```
It is possible to provide uniform variables and textures if the shader's logic needs it. That is fairly easy, let us add a speed variable and control it from outside:
```nim
...
proc snowEffect*(FRAME: Uniform[Frame],
COLOR_CHANNEL: Layout[0, Uniform[Sampler2D]],
SPEED: Uniform[float],
UV: Vec2,
COLOR: var Vec4) =
var
fragCoord = UV * FRAME.RESOLUTION.xy
snow = 0.0
gradient = (1.0 - float(fragCoord.y / FRAME.RESOLUTION.x)) * 0.4
random = fract(sin(dot(fragCoord.xy, vec2(12.9898,78.233))) * 43758.5453)
for k in 0..5:
for i in 0..11:
var
cellSize = 2.0 + (float(i) * 3.0)
downSpeed = SPEED + (sin(FRAME.TIME * 0.4 + float(k + i * 20)) + 1.0) * 0.00008
...
```
As you see, I removed the unused variables. Now we program our camera and change speed by time:
```nim
...
addEffect(cameraEntity[CameraComponent], "snowEffect", newCanvasShader(snowEffect))
program(cameraEntity, proc(script: ScriptComponent) =
let
# Gets camera component
camera = script[CameraComponent]
# Gets effect shader
effect = getEffect(camera, "snowEffect")
# Updates new value in shader
set(effect, "SPEED", 2.0)
)
```
That's it, now we have a shader param which we can update it based on our needs and alasgar will pass it to the shader when it is required. It was just the fragment shader that we programmed here, but also is possible to pass a function as vertex shader for some effects like camera shaking:
```nim
proc effectVertex*(CAMERA: Uniform[Camera],
FRAME: Uniform[Frame],
gl_VertexID: int,
UV: var Vec2,
gl_Position: var Vec4) =
let v1: int = gl_VertexID and 1
let v2: int = gl_VertexID and 2
let x: float = float(v1 shl 2)
let y: float = float(v2 shl 1)
UV.x = x * 0.5
UV.y = y * 0.5
gl_Position = vec4(x - 1.0, y - 1.0, 0.0, 1.0)
```
This is the current implementation, depends on shader requirements you can change it and like the fragment shader, it accepts custom parameters. Then create a canvas shader with both vertex and fragmend shader code and add it as a new effect to the camera component:
```nim
addEffect(cameraEntity[CameraComponent], "myEffect", newCanvasShader(vertex, fragment))
```
There are also some predefined effects that you can use them:
```nim
# Creates bloom effect shader
proc newBloomEffect*(intersity: float32=1.0): Shader
# Creates FXAA effect shader
proc newFxaaEffect*(spanMax=8'f32,
reduceMul=1'f32 / 8'f32,
reduceMin=1'f32 / 128'f32,
split=0'f32): Shader
# Creates SSAO effect shader
proc newSSAOEffect*(samples=32'i32,
sampleRadius=0.02'f32,
intensity=1.0'f32,
scale=2.5'f32,
bias=0.05'f32,
maxDistance=0.07'f32,
noiseTexture: Texture)
```
There are also some functions to manipulate effects:
```nim
proc addEffect*(camera: CameraComponent, name: string, shader: Shader)
proc getEffect*(camera: CameraComponent, name: string): Shader
proc hasEffect*(camera: CameraComponent, name: string): bool
proc disableEffect*(camera: CameraComponent, name: string)
proc enableEffect*(camera: CameraComponent, name: string)
proc removeEffect*(camera: CameraComponent, name: string) =
```
Shadows
=======
Shadows are implemented only for spot and direct lights. Let us reset our example to a simpler scene to see how shadow works:
```nim
import alasgar
# Creates a window named Step10
window("Step10", 830, 415)
let
# Creates a new scene
scene = newScene()
# Creates the camera entity
cameraEntity = newEntity(scene, "Camera")
# Sets the background color
scene.background = parseHex("d7d1bf")
# Sets fog desnity to enable fog, fancy effect :)
scene.fogDensity = 0.05
# Sets the camera position
cameraEntity.transform.position = 7.5 * vec3(1)
# Adds a perspective camera component to entity
add(
cameraEntity,
newPerspectiveCamera(
75,
runtime.ratio,
0.1,
100.0,
vec3(0) - cameraEntity.transform.position
)
)
# Makes the camera entity child of the scene
add(scene, cameraEntity)
# Creates the cube entity, by default position is 0, 0, 0
let cubeEntity = newEntity(scene, "Cube")
# Add a cube mesh component to entity
add(cubeEntity, newCubeMesh())
# Adds a script component to the cube entity
program(cubeEntity, proc(script: ScriptComponent) =
let t = 2 * runtime.age
# Rotates the cube using euler angles
script.transform.euler = vec3(
sin(t),
cos(t),
sin(t) * cos(t),
)
)
# Makes the cube enity child of the scene
add(scene, cubeEntity)
# Scale it up
cubeEntity.transform.scale = vec3(2)
# Enables shadows for the cube
cubeEntity.material.castShadow = true
# Creates the plane entity
let planeEntity = newEntity(scene, "Ground")
# Adds a plane mesh component to entity
add(planeEntity, newPlaneMesh(1, 1))
# Makes the plane entity child of the scene
add(scene, planeEntity)
# Sets the plane position and scale
planeEntity.transform.position = vec3(0, -3, 0)
planeEntity.transform.scale = vec3(200, 1, 200)
# Marks the plane to not cast shadows
planeEntity.material.castShadow = false
# Creates the light entity
let lightEntity = newEntity(scene, "Light")
# Adds a point light component to entity, with enabled shadow
add(
lightEntity,
newDirectLightComponent(
direction=vec3(0) - vec3(-4, 5, 4),
shadow=true,
)
)
# Makes the light entity child of the scene
add(scene, lightEntity)
# Renders an empty scene
render(scene)
# Runs game main loop
loop()
```
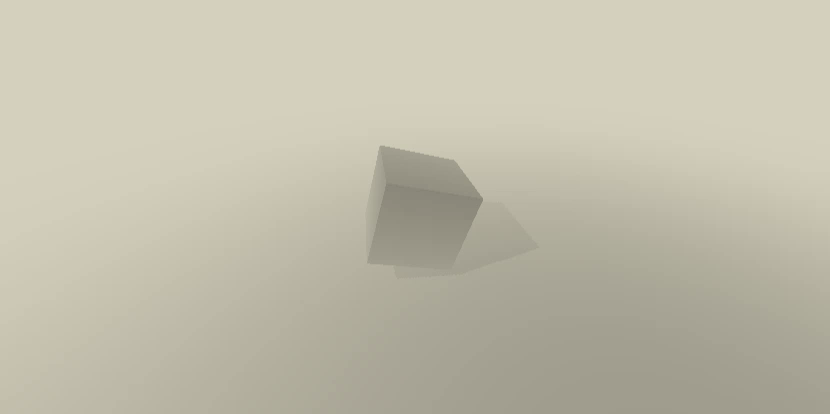
As you [see](https://abisxir.github.io/alasgar/step10/build), we enabled shadow casting for our cube using its material:
```nim
# Marks the plane to not cast shadows
cubeEntity.material.castShadow = true
```
And then, on the light we set the shadow flag to true:
```nim
# Adds a point light component to entity, with enabled shadow
add(
lightEntity,
newDirectLightComponent(
direction=vec3(0) - vec3(-4, 5, 4),
shadow=true,
)
)
```
That was everything needed to enable shadow for direct lights. The same apporach should happen to the spot lights:
```nim
## Creates a direct light component
proc newDirectLightComponent*(direction: Vec3,
color: Color=COLOR_MILK,
luminance: float32=100.0,
shadow: bool=false,
shadowBias: float32=0.001): DirectLightComponent
## Creates a spot light component
proc newSpotPointLightComponent*(direction: Vec3,
color: Color=COLOR_MILK,
luminance: float32=50.0,
innerCutoff: float32=30,
outerCutoff: float32=45,
shadow: bool=false,
shadowBias: float32=0.001): SpotPointLightComponent
```
One extra line was also enabling fog on our scene:
```nim
# Sets the background color
scene.background = parseHex("d7d1bf")
# Sets fog desnity to enable fog, fancy effect :)
scene.fogDensity = 0.05
```
Fog automatically fades the scene to our background color. The scene object includes some other properties to change the environment effects:
```nim
type
Scene* = ref object
## Background color, default is black
background*: Color
## Ambient color which will affect all objects in the scene when lighting, default is black that means no effect
ambient*: Color
## Fog density, default is 0
fogDensity*: float32
## Minimum fog distance to apply fog effect, default is 0
fogMinDistance*: float32
environmentMap*: Texture
environmentIntensity*: float32
environmentBlurrity*: float32
```
Dependencies
============
## vmath, chroma, and nimx
In the newer version of nim I had issue with compiling nim to GLSL because of vmath dependency, I removed it and provided a minimal implementation. Chroma is still a dependency. I also removed most of the dependencies and also all remaining build scripts that I borrow it from nimx. Some configs and sample projects will be provided to show how to import the application to android and webassembly.