https://github.com/adamff-dev/ESP8266-Captive-Portal
:key: WiFi captive portal for ESP8266 for phishing WiFi passwords
https://github.com/adamff-dev/ESP8266-Captive-Portal
captive captive-portal esp-12 esp8266 hack nodemcu nodemcu-arduino password phishing portal wifi wifi-hacking wifi-password
Last synced: 11 months ago
JSON representation
:key: WiFi captive portal for ESP8266 for phishing WiFi passwords
- Host: GitHub
- URL: https://github.com/adamff-dev/ESP8266-Captive-Portal
- Owner: adamff-dev
- License: mit
- Archived: true
- Created: 2017-09-30T15:12:25.000Z (over 8 years ago)
- Default Branch: master
- Last Pushed: 2022-05-19T15:51:16.000Z (about 4 years ago)
- Last Synced: 2024-08-04T09:06:03.562Z (almost 2 years ago)
- Topics: captive, captive-portal, esp-12, esp8266, hack, nodemcu, nodemcu-arduino, password, phishing, portal, wifi, wifi-hacking, wifi-password
- Language: C++
- Homepage:
- Size: 4.48 MB
- Stars: 717
- Watchers: 42
- Forks: 150
- Open Issues: 13
-
Metadata Files:
- Readme: README.md
- License: LICENSE
Awesome Lists containing this project
README
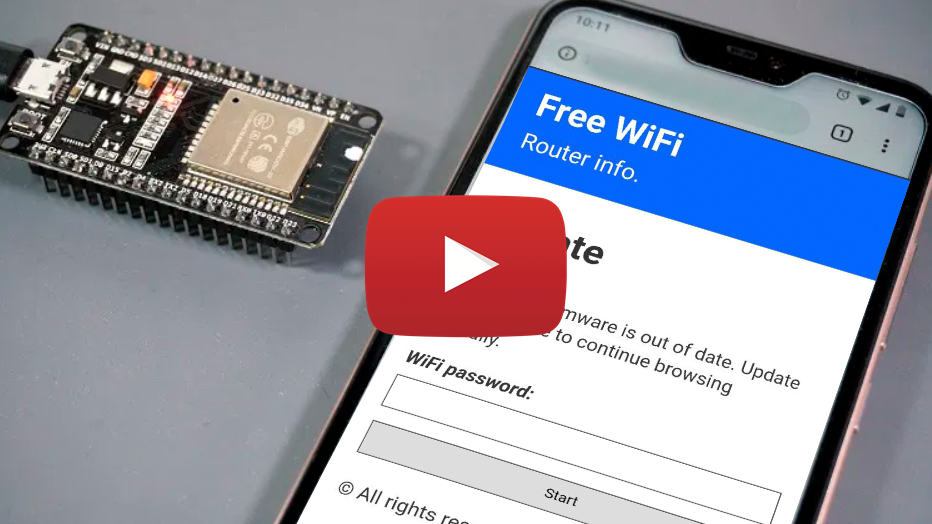
# ESP8266 WiFi Captive Portal
## Disclaimer
This project is for testing and educational purposes. Use it only against your own networks and devices. I don't take any responsibility for what you do with this program.
## About this project
WiFi captive portal for the NodeMCU (ESP8266 Module) with DNS spoofing.
The built-in LED will blink 5 times when a password is posted.
Warning! Your saved passwords will **not** disappear when you restart/power off the ESP8266.
Note: If you want to see the stored passwords go to "**172.0.0.1**/pass". For changing the SSID, go to "**172.0.0.1**/ssid"
V. 2.0 (Fake sign in): https://github.com/125K/ESP8266_WiFi_Captive_Portal_2.0
# Showcase
# Screenshots
172.0.0.1/index
172.0.0.1/post
172.0.0.1/pass
172.0.0.1/ssid
This is the main page. Here the user will write his password and send it.
This is the post page. The user will be redirected here after posting the password.
This is where the attacker can retrieve all the passwords that has been posted.
Here the attacker can change the SSID name of the Access Point on the go.


Here you can donate if you liked my project and you want to support me:

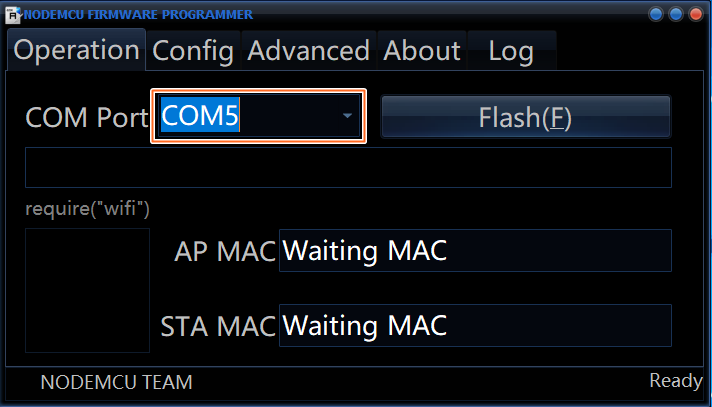
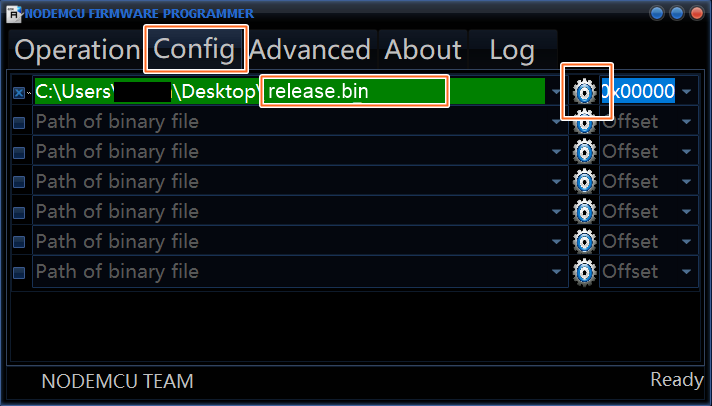
# Installation (ESP8266 Flasher - Easy way)
1. Download ESP8266 Flasher.
2. Download the release.bin file.
3. Open the ESP8266 Flasher and select the Node MCU port
4. Then, go to the config tab and select the .bin file you've just downloaded.
5. Finally, go back to the first tab and press "Flash"
6. Your Node MCU is ready!
# Installation (Arduino IDE)
1. Open your Arduino IDE and go to "File -> Preferences -> Boards Manager URLs" and paste the following link:
``http://arduino.esp8266.com/stable/package_esp8266com_index.json``
2. Go to "Tools -> Board -> Boards Manager", search "esp8266" and install esp8266
3. Go to "Tools -> Board" and select you board"
4. Download and open the sketch "WiFi_Captive_Portal.ino"
5. You can optionally change some parameters like the SSID name and texts of the page like title, subtitle, text body...
6. Upload the code into your board.
7. You are done!
## Check out my other projects
- **WiFi-Spam**: :email::satellite: Spam thousands of WiFi access points with custom SSIDs.
- https://github.com/125K/WiFi-Spam
- **PwrDeauther**: :zap: Deauth a specific WiFi access point or an entire channel.
- https://github.com/125K/PwrDeauther