https://github.com/aidenstickney/modern-record-player
This application integrates RFID technology with Spotify's playback features. Users can associate RFID tags with Spotify albums, playlists, or tracks. Scanning an RFID tag initiates playback of the linked Spotify content.
https://github.com/aidenstickney/modern-record-player
flask python raspberry-pi spotify spotify-api sqlite
Last synced: 3 months ago
JSON representation
This application integrates RFID technology with Spotify's playback features. Users can associate RFID tags with Spotify albums, playlists, or tracks. Scanning an RFID tag initiates playback of the linked Spotify content.
- Host: GitHub
- URL: https://github.com/aidenstickney/modern-record-player
- Owner: AidenStickney
- Created: 2023-11-21T04:05:42.000Z (over 2 years ago)
- Default Branch: master
- Last Pushed: 2023-11-24T05:46:58.000Z (over 2 years ago)
- Last Synced: 2025-07-24T07:41:45.216Z (12 months ago)
- Topics: flask, python, raspberry-pi, spotify, spotify-api, sqlite
- Language: Python
- Homepage:
- Size: 1.29 MB
- Stars: 0
- Watchers: 1
- Forks: 0
- Open Issues: 0
-
Metadata Files:
- Readme: README.md
Awesome Lists containing this project
README

## Introduction
This application integrates RFID technology with Spotify's playback features. Users can associate RFID tags with Spotify albums, playlists, or tracks. Scanning an RFID tag initiates playback of the linked Spotify content. It's designed to run on a Raspberry Pi and uses Flask, SQLAlchemy, and the Spotipy library, with dependencies managed via Pipenv.
## Features
- **RFID-Spotify Linking**: Map RFID tags to Spotify URIs.
- **Spotify Playback Control**: Start playing music on Spotify by scanning an RFID tag.
- **Web Interface**: Register and manage RFID-Spotify mappings through a web interface.
- **Authentication**: OAuth-based Spotify authentication.
- **Database Integration**: Uses SQLAlchemy for storing RFID-Spotify mappings.
## Installation
1. Clone the repository:
```bash
git clone https://github.com/AidenStickney/modern-record-player.git
```
2. Navigate to the project directory:
```bash
cd modern-record-player
```
3. Install Pipenv, if not already installed:
```bash
pip install pipenv
```
4. Install dependencies using Pipenv:
```bash
pipenv install
```
## Configuration
### Hardware Setup
1. Connect the RFID-RC522 module to your Raspberry Pi's GPIO pins:
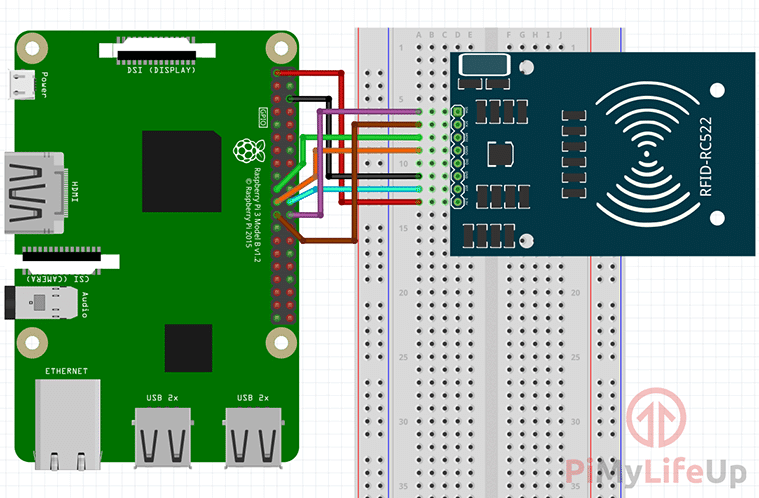
2. Ensure that SPI is enabled on your Raspberry Pi:
```bash
sudo raspi-config
```
- Select `Interfacing Options` and enable SPI.
3. Install Python 3 SPI library:
```bash
sudo apt-get install python3-spidev
```
4. Reboot your Raspberry Pi:
```bash
sudo reboot
```
If the SPI module is not activated, you may need to enable it in the kernel:
1. Enable SPI in the kernel:
```bash
sudo nano /boot/config.txt
```
2. Add the following line:
```bash
dtparam=spi=on
```
3. Save the file and reboot.
For a more detailed guide, see [this tutorial](https://pimylifeup.com/raspberry-pi-rfid-rc522/).
### Environment Setup
Set up environment variables in a `.env` file:
- `SECRET_KEY`: Flask secret key.
- `DB_LOCATION`: Database URI for SQLAlchemy.
- `FLASK_DEBUG`: Enable/disable Flask debug mode.
- `FLASK_PORT`: Port for the Flask application.
See `.env.example` for an example.
### Spotify API Credentials
To use the Spotify features in this application, you need to set up Spotify API credentials:
1. **Create a Spotify Developer Account**: Sign up or log in at [Spotify](https://www.spotify.com/) and visit the [Spotify Developer Dashboard](https://developer.spotify.com/dashboard/).
2. **Register Your Application**: Click `Create an App` on the dashboard. Fill in the details and accept the terms.
3. **Get Your Client ID and Client Secret**: After creating your app, you'll see your `Client ID` and `Client Secret` on the dashboard.
4. **Set the Redirect URI**:
- Use your Raspberry Pi's IP address in the Redirect URI (e.g., http://[Your-Raspberry-Pi-IP]:5000/callback).
- This is important as the authentication will be done from another device connecting to your Pi's web server.
- Add this URI in your application settings on the Spotify Developer Dashboard.
5. **Add Credentials to Your Project**:
- In the `.env` file, add the following lines:
```env
CLIENT_ID='your-spotify-client-id'
CLIENT_SECRET='your-spotify-client-secret'
REDIRECT_URI='http://[Your-Raspberry-Pi-IP]:5000/callback'
```
- Replace [Your-Raspberry-Pi-IP] with the actual IP address of your Raspberry Pi.
- Ensure that this `.env` file is included in your `gitignore`.
6. Run `load_dotenv()` to load these settings.
## Usage
1. Activate the Pipenv shell:
```bash
pipenv shell
```
2. Start the Flask app:
```bash
python app.py
```
3. Navigate to the IP address of your Raspberry Pi in a web browser.
4. You will then be redirected to the Spotify authentication page.
5. After authenticating, you will be redirected back to the application, indicating that the authentication was successful.
6. With the new tag on the RFID reader, click `Register Tag` to navigate to the registration page.
7. Enter a link to a Spotify album, playlist, or track and click `Register Tag`.
8. Once the tag is registered, you can scan it to start playback of the linked Spotify content.
9. To update the Spotify URI associated with a tag, simply scan the tag and register a new album, playlist, or track.
## Running as a Background Service
To ensure the application runs continuously, even after a reboot, you can set it up as a background service on your Raspberry Pi. Follow these steps to create a systemd service:
### Creating a Systemd Service
1. **Create a Service File**:
Create a new systemd service file using your preferred text editor, such as nano:
```bash
sudo nano /etc/systemd/system/modernrecordplayer.service
```
2. **Add the Following Content to the File**:
Replace `/path/to/your/app` with the actual path to your application and replace `/path/to/your/app/Pipfile` with the actual path to your Pipfile.
```
[Unit]
Description=Modern Record Player Service
After=network.target
[Service]
User=pi
WorkingDirectory=/path/to/your/app
ExecStart=/bin/bash -c 'PIPENV_PIPFILE=/path/to/your/app/Pipfile pipenv run python /path/to/your/app/app.py'
Restart=always
[Install]
WantedBy=multi-user.target
```
This configuration sets up a service that uses pipenv run to start your application within the pipenv environment after the network is available. It will also restart the application automatically if it crashes.
3. **Enable and Start the Service**:
Enable the service so that it starts on boot, and then start the service:
```bash
sudo systemctl enable modernrecordplayer.service
sudo systemctl start modernrecordplayer.service
```
4. **Checking the Service Status**:
You can check the status of your service to ensure it's running correctly:
```bash
sudo systemctl status modernrecordplayer.service
```
### Managing the Service
- To **stop** the service:
```bash
sudo systemctl stop modernrecordplayer.service
```
- To **restart** the service:
```bash
sudo systemctl restart modernrecordplayer.service
```
- To **disable** the service from starting on boot:
```bash
sudo systemctl disable modernrecordplayer.service
```
By setting up your application as a systemd service, you ensure that it's always running in the background and starts automatically when your Raspberry Pi boots up.\n\n
## Endpoints
- `/`: Start the authentication process.
- `/callback`: Handle Spotify authentication callbacks.
- `/register`: Register or update RFID-Spotify mappings.
## RFID Reading
RFID tags are read in non-blocking mode. When a tag is scanned, its ID is used to look up the associated Spotify URI and start playback.
## Spotify Playback
The application supports different Spotify URI types such as albums, playlists, and tracks. The playback is managed through the Spotipy client.
Note that the Spotify API keys will expire after an hour. To refresh the keys, simply return to the home page and reauthenticate.
## Database Model
`RfidSpotifyMapping` table stores RFID tags and corresponding Spotify URIs.
## Security
Ensure that `SECRET_KEY` is set to a secure, random value to protect session data.
## Dependencies
- Flask
- Flask-SQLAlchemy
- Spotipy
- RPi.GPIO
- mfrc522
- python-dotenv
## Thanks
- [Talaexe's Spotify-RFID-Record-Player](https://github.com/talaexe/Spotify-RFID-Record-Player) for the original idea.
- [Pimylifeup](https://pimylifeup.com/raspberry-pi-rfid-rc522/) for the RFID-RC522 tutorial.
- All the other open-source projects that made this project possible.
## Contributing
Contributions are welcome. Please submit pull requests for any enhancements.