https://github.com/ajaxbarcelonacruyff/server-side-gtm-webcontainer
Google Tag Manager's server-side tagging was released in 2020. Initially, data was sent from the browser to the Google Analytics server via a server. Later, a new "Web Container" was added to the server-side client.
https://github.com/ajaxbarcelonacruyff/server-side-gtm-webcontainer
Last synced: 9 months ago
JSON representation
Google Tag Manager's server-side tagging was released in 2020. Initially, data was sent from the browser to the Google Analytics server via a server. Later, a new "Web Container" was added to the server-side client.
- Host: GitHub
- URL: https://github.com/ajaxbarcelonacruyff/server-side-gtm-webcontainer
- Owner: ajaxbarcelonacruyff
- Created: 2024-12-23T02:20:06.000Z (12 months ago)
- Default Branch: main
- Last Pushed: 2024-12-23T02:21:02.000Z (12 months ago)
- Last Synced: 2025-01-02T18:36:27.302Z (11 months ago)
- Size: 2.93 KB
- Stars: 0
- Watchers: 1
- Forks: 0
- Open Issues: 0
-
Metadata Files:
- Readme: README.md
Awesome Lists containing this project
README
> [!NOTE]
> This article is based on information available as of January 2021. Please check the official website for the latest updates.
Google Tag Manager's server-side tagging was released in 2020. Initially, data was sent from the browser to the Google Analytics server via a server. Later, a new "Web Container" was added to the server-side client.
This allows the container (gtm.js) to be issued from your own domain (1st Party), rather than from the traditional domain `www.googletagmanager.com`.
## Creating a Web Container
First, create a new "Web Container." Open the GTM server-side container, go to "Clients," and click "New."
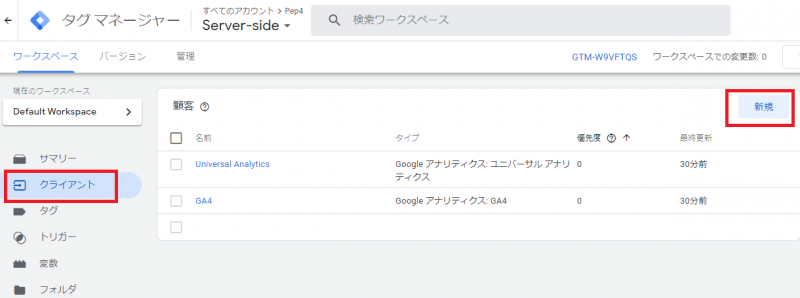
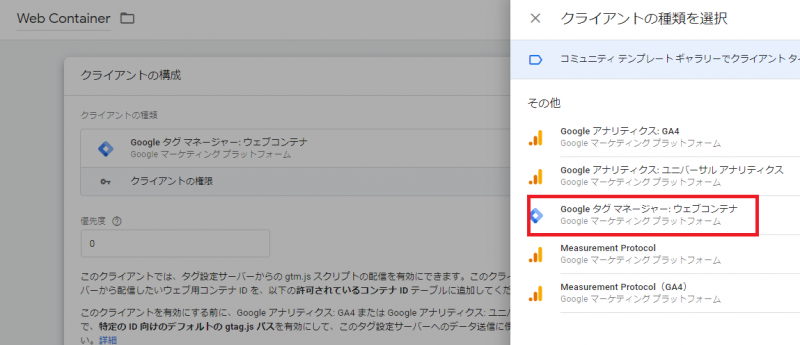
Name it "Web Container" and select "Google Tag Manager: Web Container" as the client type.
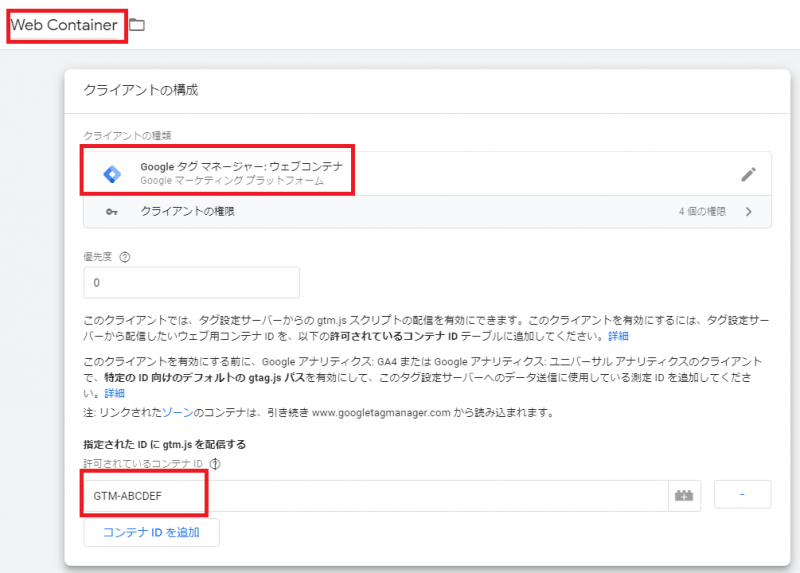
Scroll down to the "Serve gtm.js for specific IDs" section and add the container ID. The "container ID" refers to the GTM-XXXXXX string already added to your website.
Click the "Add Container ID" button, enter the registered ID (e.g., GTM-ABCDEF), and save it.
## Testing Tag Deployment
Once you've confirmed that the "Web Container" has been added, test its functionality. Click the "Preview" button.
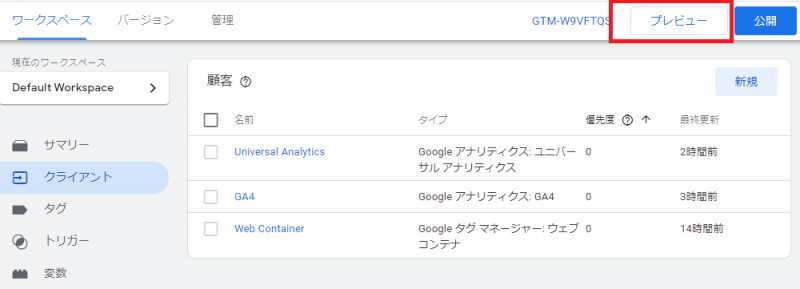
If a debug screen like the one below appears, you're good to go.
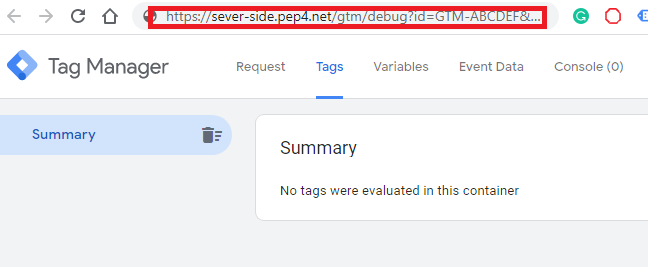
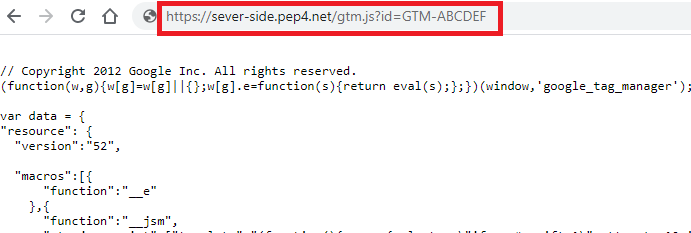
Next, open a new browser tab or window and enter `https://server-side.pep4.net/gtm.js?id=GTM-ABCDEF` (replace the domain and GTM container with your own). If the script below appears, the web container setup is successful.
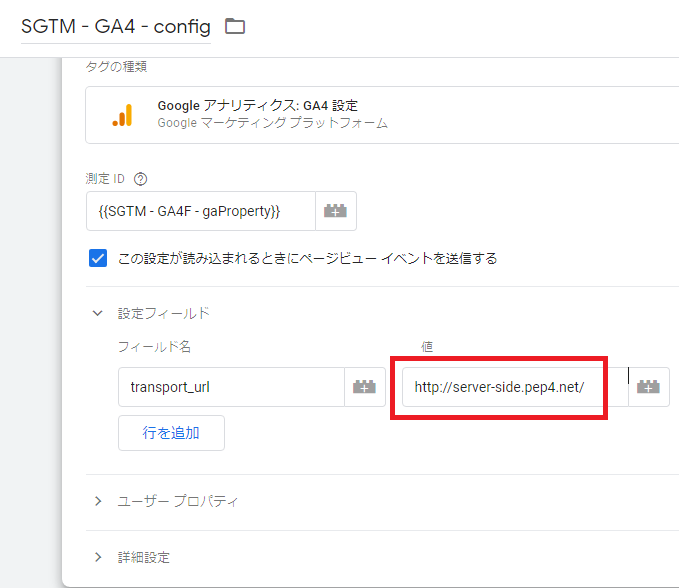
## Configuring the GA4 Client
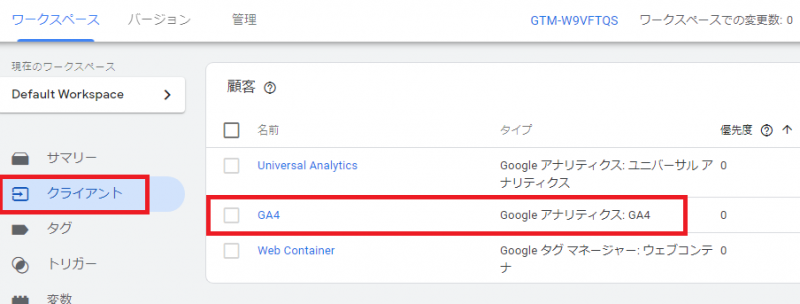
Next, configure the GA4 client tag. If you've previously created a server-side container, a GA4 client should already exist. Modify it as needed.
In GTM, go to "Clients," select "GA4" (or the GA4 client you created earlier).
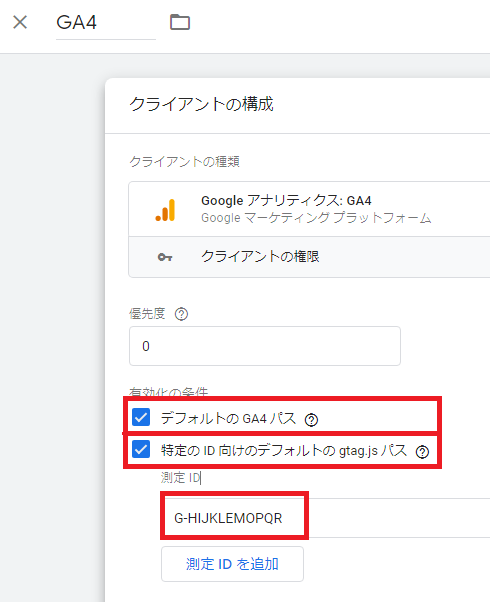
- Default GA4 path: Check
- Default gtag.js path for specific IDs: Check
- Measurement ID: Enter your GA4 Measurement ID (a string starting with "G-").
Apply similar changes to the Universal Analytics client, if necessary.
## Updating GTM Code Snippets
Finally, modify the GTM tags embedded in your website. The code currently looks something like this:
In line 5:
`https://www.googletagmanager.com/gtm.js?id=`
Replace it with the domain you created for the server-side tag (the value of the "transport_url" field in the GA4 configuration tag).
**Before:**
```html
(function(w,d,s,l,i){w[l]=w[l]||[];w[l].push({'gtm.start':
new Date().getTime(),event:'gtm.js'});var f=d.getElementsByTagName(s)[0],
j=d.createElement(s),dl=l!='dataLayer'?'&l='+l:'';j.async=true;j.src=
'https://www.googletagmanager.com/gtm.js?id='+i+dl;f.parentNode.insertBefore(j,f);
})(window,document,'script','dataLayer','GTM-PZ7GMV9');
```
**After:**
```
(function(w,d,s,l,i){w[l]=w[l]||[];w[l].push({'gtm.start':
new Date().getTime(),event:'gtm.js'});var f=d.getElementsByTagName(s)[0],
j=d.createElement(s),dl=l!='dataLayer'?'&l='+l:'';j.async=true;j.src=
'https://server-side.pep4.net/gtm.js?id='+i+dl;f.parentNode.insertBefore(j,f);
})(window,document,'script','dataLayer','GTM-PZ7GMV9');
```
That's it! Publish the changes, and if page views are tracked in GA4's real-time reports, the setup is successful.