https://github.com/alexdelprete/ha-neopool-mqtt
Home Assistant MQTT integration for Tasmota NeoPool module
https://github.com/alexdelprete/ha-neopool-mqtt
hass hayward home-assistant neopool sugarvalley tasmota
Last synced: 6 months ago
JSON representation
Home Assistant MQTT integration for Tasmota NeoPool module
- Host: GitHub
- URL: https://github.com/alexdelprete/ha-neopool-mqtt
- Owner: alexdelprete
- License: gpl-2.0
- Created: 2023-10-27T21:07:13.000Z (almost 2 years ago)
- Default Branch: main
- Last Pushed: 2025-02-19T10:03:53.000Z (8 months ago)
- Last Synced: 2025-03-22T06:31:39.431Z (7 months ago)
- Topics: hass, hayward, home-assistant, neopool, sugarvalley, tasmota
- Language: C
- Homepage: https://github.com/arendst/Tasmota/discussions/19811
- Size: 56.6 MB
- Stars: 15
- Watchers: 5
- Forks: 4
- Open Issues: 1
-
Metadata Files:
- Readme: README.md
- Funding: .github/FUNDING.yml
- License: LICENSE
Awesome Lists containing this project
README
# HA-NeoPool-MQTT
[![GitHub Repository][repo-shield]][repo]
[![BuyMeCoffee][buymecoffee-shield]][buymecoffee]
[![Community Forum][forum-shield]][forum]
Home Assistant MQTT integration for Tasmota NeoPool module (ESP32 and ESP8266 devices).
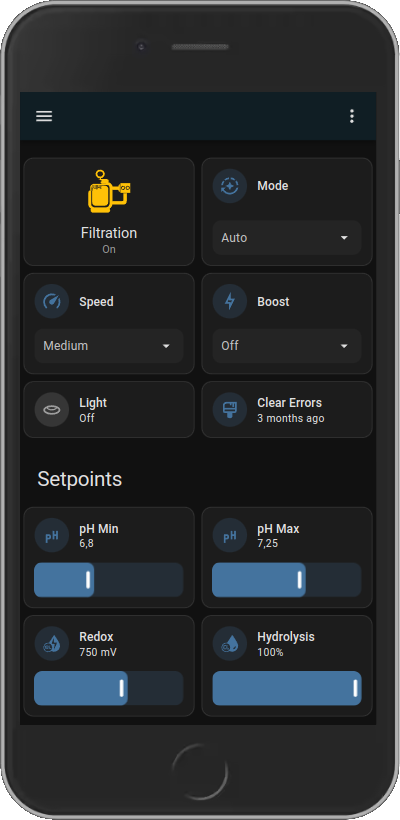
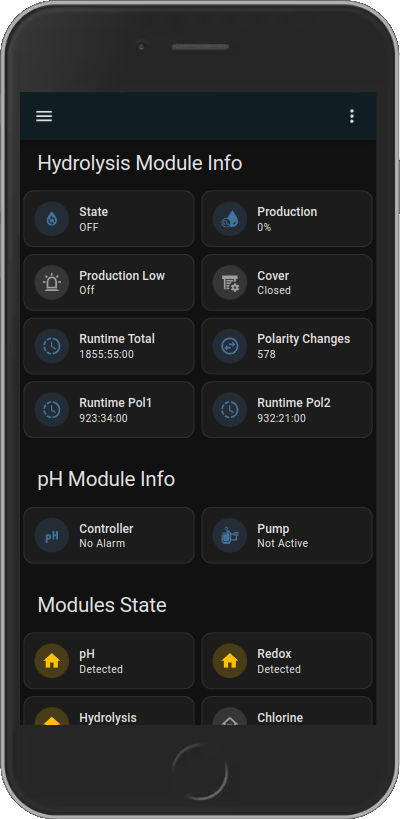
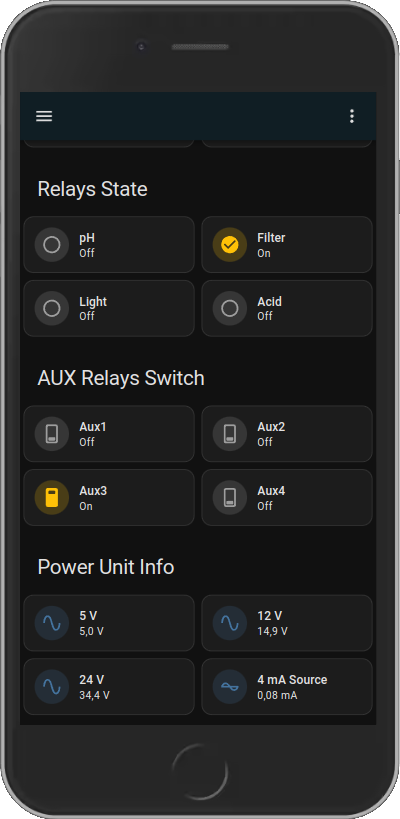
Notebook/PC Layout `ha_neopool_mqtt_lovelace.yaml`:

Reponsive Layout `ha_neopool_mqtt_lovelace_responsive.yaml`:

Since the native Tasmota integration only supports standard entities to HA ([switches, selects, numbers, etc.](https://tasmota.github.io/docs/Home-Assistant/#supported-ies)), I opened a [discussion](https://github.com/arendst/Tasmota/discussions/19811) on Tasmota's repo with NeoPool dev, and decided for now to integrate all possible entities using purely HA's MQTT integration entities.
All NeoPool entities are created by the provided package `ha_neopool_mqtt_package.yaml` via the native MQTT entities of HA (Note: It does not created a new device, it creates entities only).
This integration needs at minimum [Tasmota](https://tasmota.github.io/docs/) v13.3.0 with compiled [NeoPool driver](https://tasmota.github.io/docs/NeoPool/).
Since the NeoPool driver is not contained in Tasmota precompiled binaries, you need to compile your own build or use one of the precompiled binary from the [firmware](https://github.com/alexdelprete/HA-NeoPool-MQTT/tree/main/firmware) folder. If you initial flash your ESP with one of the precompiled binaries, you can skip the points "_Custom pre-configured Tasmota build_" and "_Configuration steps 1._" below.
For flashing ESP32/ESP8266 I highly recommend using [ESP_Flasher](https://github.com/Jason2866/ESP_Flasher) by @Jason2866, in v2.0.1 he kindly implemented by [my request](https://github.com/Jason2866/ESP_Flasher/issues/29) support for ESP32 high-speed baud rates (1.5Mb/s) for very quick and reliable flashing and he also added support for factory images.
## Custom pre-configured Tasmota build
NOTE for beginners: If you have no idea about how to custom compile Tasmota, you can use the precompiled files in the [firmware](https://github.com/alexdelprete/HA-NeoPool-MQTT/tree/main/firmware) folder.
When you custom compile your version, make sure to choose the dev branch and verify after flashing that version is at least `v13.2.0.2`. I will update notes to specify the stable min. version once known. When you custom compile your build, you'll need to use the `user_config_override.h` provided in the `compiler` folder of this repository; this will automatically enable NeoPool and also configure all settings automatically without requiring to manually follow the manual steps of next section.
The only thing you'll have to check is if the activated template is correct, you do this from Tasmota console executing command `Module`:
```console
13:41:13.489 CMD: Module
13:41:13.491 RSL: RESULT = {"Module":{"0":"NeoPool Atom Lite + Tail485"}}
```
If the result is not the one you see above, you need to issue the command `Module 0` to activate the preconfigured template:
```console
13:43:35.087 CMD: module 0
13:43:35.090 RSL: RESULT = {"Module":{"0":"NeoPool Atom Lite + Tail485"}}
```
In case you don't use the provided `user_config_override.h` file, you'll need to follow the Manual Configuration Steps section below.
## Configuration steps
1. **Tasmota**
From Tasmota console, run these commands to optimize the device configuration:
_This sets Retain flag for telemetry topic so that HA entities are immediately available_
```console
SensorRetain 1
```
_This ensures that Tasmota %topic% is set to `SmartPool` so you don't have to change all the topics in the package file_
_It also sets device name, friendly name and mqtt client name (for easier identification in the broker)_
```console
Backlog Topic SmartPool; DeviceName SmartPool; FriendlyName SmartPool; MqttClient SmartPool;
```
_Define a rule to keep the Sugar Valley device clock in sync with Tasmota's device clock and also sets NeoPool SENSOR topic to update every 60s for often changed (measurements) values_
_This also disables the device from being discovered by HA so it won't create unnecessary and duplicate entities for NeoPool_
```console
Rule1 ON Time#Initialized DO NPTime 0 ENDON ON Time#Set DO NPTime 0 ENDON ON System#Boot DO Backlog Discover 0; NPTeleperiod 60; ENDON
```
_Configure user template for GPIO definition based on device type_
Atom Lite + Tail485 (GPIO26: NeoPool TX / GPIO32: NeoPool RX)
```console
Template {"NAME":"NeoPool Atom Lite + Tail485","GPIO":[0,0,0,0,0,0,0,0,0,0,0,0,0,0,0,1,0,1,1,1,0,0,6976,0,0,0,0,0,7008,1,0,0,0,0,0,0],"FLAG":0,"BASE":1}
```
Atom Lite + Atomic RS485 Base (GPIO19: NeoPool TX / GPIO22: NeoPool RX)
```console
Template {"NAME":"NeoPool Atom Lite + Atomic RS485 Base","GPIO":[0,0,0,0,0,0,0,0,0,0,0,0,0,0,0,6976,0,0,7008,0,0,0,0,0,0,0,0,0,0,0,0,0,0,0,0,0],"FLAG":0,"BASE":1}
```
AtomS3 Lite + Atomic RS485 Base (GPIO19: NeoPool TX - GPIO22: NeoPool RX)
```console
Template {"NAME":"NeoPool AtomS3 Lite + Atomic RS485 Base","GPIO":[0,0,0,0,0,0,0,0,0,0,0,0,0,0,0,6976,0,0,7008,0,0,0,0,0,0,0,0,0,0,0,0,0,0,0,0,0],"FLAG":0,"BASE":1}
```
Other ESP32/ESP8266 devices (GPIO3: NeoPool TX - GPIO1: NeoPool RX):
```console
Template {"NAME":"NeoPool ESP32/ESP8266","GPIO":[1,6528,1,6496,1,1,0,0,1,1,1,1,1,1],"FLAG":0,"BASE":18}
```
_Activate Rule1 and User GPIO Template_
```console
Backlog Rule1 4;Rule1 1; Module 0;
```
2. **Home Assistant**
Add the [Home Assistant MQTT integration](https://www.home-assistant.io/integrations/mqtt/) properly configured and working.
3. **Home Assistant**
Add `ha_neopool_mqtt_package.yaml` as [Home Assistant package](https://www.home-assistant.io/docs/configuration/packages/). Check [HA docs]((https://www.home-assistant.io/docs/configuration/packages/)) on how to configure HA for package usage.
This integration will not create a device, only entities. To check if the `ha_neopool_mqtt_package.yaml` is working, go to HA "Settings", "Devices & services", "Entities" and search for the entities "neopool_mqtt".
4. **Home Assistant**
Add the [HACS (Home Assistant Community Store)](https://hacs.xyz/), if not already done.
5. **Home Assistant**
The user interface uses the following cards, which are available via HACS and which you must first install:
- [layout-card](https://github.com/thomasloven/lovelace-layout-card)
- [mini-graph-card](https://github.com/kalkih/mini-graph-card)
- [custom-brand-icons](https://github.com/elax46/custom-brand-icons)
- [mushroom](https://github.com/piitaya/lovelace-mushroom) (for the pc/notebook layout only)
- [stack-in-card](https://github.com/custom-cards/stack-in-card) (for the pc/notebook layout only)
- [text-divider-row](https://github.com/iantrich/text-divider-row) (for the pc/notebook layout only)
6. **Home Assistant**
Add one of the two provided lovelace UI `ha_neopool_mqtt_lovelace*.yaml`.
The lovelace UI yaml files here are extracted from the raw lovelace file. To use it edit the raw lovelace config within your HA Dashboard and paste the contents of one of the yaml file below the top word `views:`. Select one of the two possible lovelace files:
- `ha_neopool_mqtt_lovelace.yaml` for pc/notebook display resolutions
- `ha_neopool_mqtt_lovelace_responsive.yaml` using standard HA cards without resolution limitations
# Changelog
- May 27, 2024:
- Change pH tank level default device class as 'problem'
- Change hydrolysis low production device class as 'problem'
- Update lovelace responsive UI:
- Add hydrolysis water flow sensor
- Move ph water flow alarm to pH info
- May 19, 2024:
- Created new Water Flow binary sensor based on hydrolysis_fl1 binary sensor
- Updated lovelace UI to accomodate Water Flow sensor
# Credits
Big thanks to @fdebrus for inspiring me and @curzon01 for the great support.
# Issues/Discussion
Please open an issue in this repo if you're sure there's a bug. For discussions/general requests, please refer to [this](https://community.home-assistant.io/t/ha-neopool-mqtt-integration-of-tasmota-neopool-for-sugar-valley-hayward-aquarite-bayrol-devices/632517?u=alexdelprete) thread in HA community.
# Coffee
_If you like this integration, I'll gladly accept some quality coffee, but please don't feel obliged._ :)
[![BuyMeCoffee][buymecoffee-shield]][buymecoffee]
---
[buymecoffee]: https://www.buymeacoffee.com/alexdelprete
[buymecoffee-shield]: https://img.shields.io/badge/buy%20me%20a%20coffee-donate-white?style=for-the-badge
[forum-shield]: https://img.shields.io/badge/community-forum-darkred?style=for-the-badge
[forum]: https://community.home-assistant.io/t/ha-neopool-mqtt-integration-of-tasmota-neopool-for-sugar-valley-hayward-aquarite-bayrol-devices/632517?u=alexdelprete
[repo-shield]: https://img.shields.io/badge/GitHub-Repo-darkgreen?style=for-the-badge&logo=github&link=https%3A%2F%2Fgithub.com%2Falexdelprete%2FHA-NeoPool-MQTT
[repo]: https://github.com/alexdelprete/HA-NeoPool-MQTT