Ecosyste.ms: Awesome
An open API service indexing awesome lists of open source software.
https://github.com/amazon-science/causal-validation
Validate your causal models!
https://github.com/amazon-science/causal-validation
causal-inference economics machine-learning statistics
Last synced: 3 months ago
JSON representation
Validate your causal models!
- Host: GitHub
- URL: https://github.com/amazon-science/causal-validation
- Owner: amazon-science
- License: apache-2.0
- Created: 2024-08-22T17:50:12.000Z (5 months ago)
- Default Branch: main
- Last Pushed: 2024-10-24T19:57:06.000Z (3 months ago)
- Last Synced: 2024-10-26T06:43:42.865Z (3 months ago)
- Topics: causal-inference, economics, machine-learning, statistics
- Language: Python
- Homepage: https://amazon-science.github.io/causal-validation/
- Size: 2.35 MB
- Stars: 4
- Watchers: 2
- Forks: 2
- Open Issues: 3
-
Metadata Files:
- Readme: README.md
- Contributing: CONTRIBUTING.md
- License: LICENSE
- Code of conduct: CODE_OF_CONDUCT.md
Awesome Lists containing this project
README
# Causal Validation
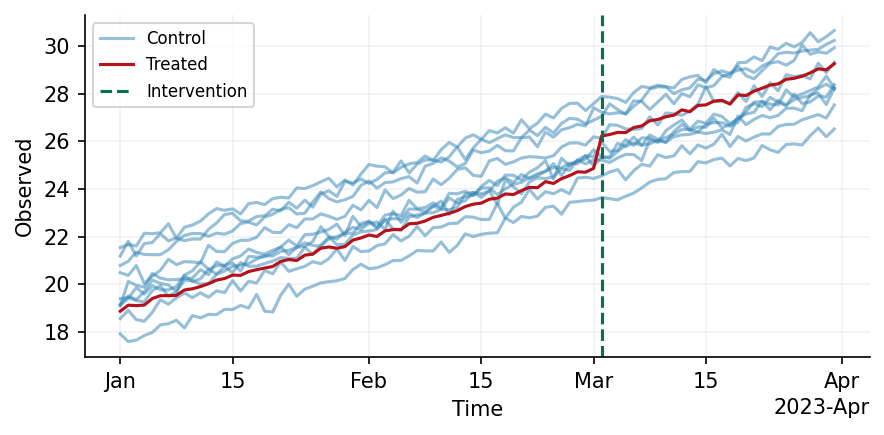
This package provides functionality to define your own causal data generation process
and then simulate data from the process. Within the package, there is functionality to
include complex components to your process, such as periodic and temporal trends, and
all of these operations are fully composable with one another.
A short example is given below
```python
from causal_validation import Config, simulate
from causal_validation.effects import StaticEffect
from causal_validation.plotters import plot
from causal_validation.transforms import Trend, Periodic
from causal_validation.transforms.parameter import UnitVaryingParameter
from scipy.stats import norm
cfg = Config(
n_control_units=10,
n_pre_intervention_timepoints=60,
n_post_intervention_timepoints=30,
)
# Simulate the base observation
base_data = simulate(cfg)
# Apply a linear trend with unit-varying intercept
intercept = UnitVaryingParameter(sampling_dist = norm(0, 1))
trend_component = Trend(degree=1, coefficient=0.1, intercept=intercept)
trended_data = trend_component(base_data)
# Simulate a 5% lift in the treated unit's post-intervention data
effect = StaticEffect(0.05)
inflated_data = effect(trended_data)
# Plot your data
plot(inflated_data)
```

## Examples
To supplement the above example, we have two more detailed notebooks which exhaustively
present and explain the functionalty in this package, along with how the generated data
may be integrated with [AZCausal](https://github.com/amazon-science/azcausal).
1. [Data Synthesis](https://amazon-science.github.io/causal-validation/examples/basic/): We here show the full range of available functions for data generation.
2. [Placebo testing](https://amazon-science.github.io/causal-validation/examples/placebo_test/): Validate your model(s) using placebo tests.
3. [AZCausal notebook](https://amazon-science.github.io/causal-validation/examples/azcausal/): We here show how the generated data may be used within an AZCausal model.
## Installation
In this section we guide the user through the installation of this package. We
distinguish here between _users_ of the package who seek to define their own data
generating processes, and _developers_ who wish to extend the existing functionality of
the package.
### Prerequisites
- Python 3.10 or higher
- [Hatch](https://hatch.pypa.io/latest/) (optional, but recommended for developers)
To install the latest stable version, run
`pip install causal-validation`
in your terminal.
### For Users
1. It's strongly recommended to use a virtual environment. Create and activate one using your preferred method before proceeding with the installation.
2. Clone the package `git clone [email protected]:amazon-science/causal-validation.git`
3. Enter the package's root directory `cd causal-validation`
4. Install the package `pip install -e .`
### For Developers
1. Follow steps 1-3 from `For Users`
2. Create a hatch environment `hatch env create`
3. Open a hatch shell `hatch shell`
4. Validate your installation by running `hatch run dev:test`