https://github.com/amid68/arduino-memory-game
Arduino version of an Atari arcade memory game called Touch Me, using four LEDs, four pushbutton switches, and a piezo buzzer.
https://github.com/amid68/arduino-memory-game
Last synced: about 2 months ago
JSON representation
Arduino version of an Atari arcade memory game called Touch Me, using four LEDs, four pushbutton switches, and a piezo buzzer.
- Host: GitHub
- URL: https://github.com/amid68/arduino-memory-game
- Owner: Amid68
- License: mit
- Created: 2024-10-17T12:02:43.000Z (almost 2 years ago)
- Default Branch: main
- Last Pushed: 2024-10-18T18:47:47.000Z (almost 2 years ago)
- Last Synced: 2024-10-19T16:14:47.134Z (almost 2 years ago)
- Language: C
- Size: 12.7 KB
- Stars: 0
- Watchers: 1
- Forks: 0
- Open Issues: 0
-
Metadata Files:
- Readme: README.md
- License: LICENSE
Awesome Lists containing this project
README
# Arduino Memory Game
## Table of Contents
- [Description](#description)
- [Features](#features)
- [Project Structure](#project-structure)
- [Hardware Setup](#hardware-setup)
- [Software Setup](#software-setup)
- [Arduino Version](#arduino-version)
- [Embedded C Version](#embedded-c-version)
- [Usage](#usage)
- [Demo](#demo)
- [License](#license)
- [Contributing](#contributing)
- [Contact](#contact)
## Description
Memory Game is an interactive game inspired by Simon Says, designed to test and improve your memory skills. It features two distinct versions: an **Arduino (.ino) version** and an **Embedded C version**. Players are challenged to replicate increasingly complex sequences of button presses and LED flashes, with auditory feedback provided through a piezo buzzer.
## Features
- **Dual Implementations**: Available in both Arduino (.ino) and Embedded C versions.
- **Responsive Gameplay**: Quick and accurate button press detection.
- **Dynamic LED Feedback**: LEDs flash in synchronization with game sequences and user inputs.
- **Auditory Feedback**: Unique melodies and tones enhance the gaming experience.
- **Milestone Celebrations**: Special tunes and LED patterns celebrate every five correct sequences.
- **Failure Handling**: Distinct failure tones and LED patterns indicate incorrect inputs and reset the game.
## Project Structure
```plaintext
.
├── LICENSE
├── Makefile
├── README.md
├── ino_version
│ └── ino_version.ino
└── src
├── config
│ └── config.h
├── game
│ ├── game_logic.c
│ └── game_logic.h
├── hal
│ ├── hal_adc.c
│ ├── hal_adc.h
│ ├── hal_delay.c
│ ├── hal_delay.h
│ ├── hal_gpio.c
│ ├── hal_gpio.h
│ ├── hal_pwm.c
│ ├── hal_pwm.h
│ ├── pin_mapping.c
│ └── pin_mapping.h
├── input
│ ├── input.c
│ └── input.h
├── main.c
├── main.o
├── output
│ ├── output.c
│ └── output.h
└── sound
├── melody.c
├── melody.h
├── notes.h
├── speaker.c
└── speaker.h
9 directories, 28 files
```
## Hardware Setup

**Components Needed:**
- Arduino Uno
- 4 Pushbuttons
- 4 LEDs
- 4 Current-limiting resistors (220Ω recommended)
- Piezo Buzzer
- Breadboard and Jumper Wires
**Wiring Overview:**
1. **Buttons**: Connect each pushbutton between digital pins 2-5 and GND, with internal pull-up resistors enabled.
2. **LEDs**: Connect each LED's anode to digital pins 8-11 through a resistor and the cathode to GND.
3. **Speaker**: Connect the piezo buzzer to digital pin 12 and GND.
## Software Setup
### Arduino Version
1. **Requirements:**
- [Arduino IDE](https://www.arduino.cc/en/software) installed on your computer.
2. **Setup Steps:**
- Open the `ino_version.ino` file located in the `ino_version` directory using Arduino IDE.
- Select the appropriate board and port from the `Tools` menu.
- Click the **Upload** button to compile and upload the sketch to your Arduino Uno.
### Embedded C Version
1. **Requirements:**
- [AVR GCC Toolchain](https://www.nongnu.org/avr-libc/user-manual/install_tools.html) installed.
- `make` utility installed.
- [AVRDUDE](http://www.nongnu.org/avrdude/) for uploading firmware.
2. **Setup Steps:**
- Navigate to the project root directory in your terminal.
- Run `make` to compile the Embedded C version.
- Connect your Arduino Uno to the computer via USB.
- Use `make upload` to upload the compiled firmware to the Arduino.
**Note:** Ensure that the Makefile is configured correctly with your programmer settings.
## Usage
1. **Start the Game:**
- Upon powering the device, the intro melody will play with corresponding LED blinks.
- The game will display the first sequence.
2. **Gameplay:**
- Repeat the sequence by pressing the corresponding buttons.
- Each correct input will extend the sequence by one step.
- Reach milestones every five correct sequences to hear celebratory melodies and LED patterns.
3. **Failure:**
- Making an incorrect input will trigger a failure melody and reset the game.
## Demo
Watch the project in action!
[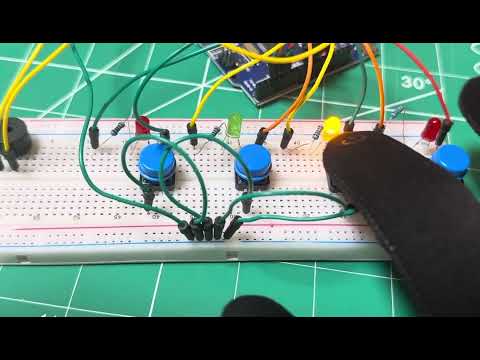](https://www.youtube.com/watch?v=yrkbXQtZy78)
*Click the image above to view the demo video.*
## License
This project is licensed under the [MIT License](LICENSE).
## Contributing
Contributions are welcome! Please fork the repository and submit a pull request with your enhancements.
## Contact
For any questions or feedback, please contact:
**Ameed Othman**
Email: othman.ameed@gmail.com