https://github.com/anthonyjdella/summarize-text
📖 A Python app that uses text recognition on photos, then texts you a summary.
https://github.com/anthonyjdella/summarize-text
openai python text-recognition twilio vision-api
Last synced: about 1 year ago
JSON representation
📖 A Python app that uses text recognition on photos, then texts you a summary.
- Host: GitHub
- URL: https://github.com/anthonyjdella/summarize-text
- Owner: anthonyjdella
- Created: 2022-08-27T03:56:57.000Z (almost 4 years ago)
- Default Branch: main
- Last Pushed: 2023-03-13T22:44:51.000Z (over 3 years ago)
- Last Synced: 2025-03-25T09:21:28.546Z (about 1 year ago)
- Topics: openai, python, text-recognition, twilio, vision-api
- Language: Python
- Homepage: https://www.twilio.com/blog/summarize-text-from-images-using-ai-and-twilio
- Size: 8.99 MB
- Stars: 7
- Watchers: 1
- Forks: 0
- Open Issues: 5
-
Metadata Files:
- Readme: README.md
Awesome Lists containing this project
README
# Summarize Text from Photos Using AI and Twilio

Content, content, content! Are you overwhelmed by the amount of content you’re asked to read on a daily basis? Don’t you wish you could quickly summarize large chunks of text? It’d be a huge timesaver, especially for college students who read a lot of content!
In this blog post, I will teach you how to build an app in Python that performs text recognition on photos, summarizes that text, and then sends you a summary via SMS.

Here’s a typical use case: you see a large wall of text that you don’t want to read, so you pull out your phone to take a picture of that text, then you receive a SMS with a nice summarization. Boom, time saved!

## Prerequisites
Before getting started, it’s important to have the following before moving on:
- [Python 3.7](https://www.python.org/downloads/) or higher installed on your machine.
- A Twilio account. If you haven’t yet, [sign up for a free Twilio trial](https://www.twilio.com/try-twilio).
- A Google Cloud account, [get started for free](https://console.cloud.google.com/freetrial).
- An OpenAI account, [sign up for a free account](https://openai.com/join/).
- ngrok installed on your machine. ngrok is a useful tool for connecting your local server to a public URL. You can [sign up for a free account](https://ngrok.com/) and [learn how to install ngrok](https://ngrok.com/download).
- A phone with a [US or Canada](https://www.twilio.com/docs/sms/tutorials/sending-international-sms-guide#international-mms-messages) phone number.
## Access the Code
If blog posts aren’t your thing and you’d prefer to just look at the code, it’s available in this [GitHub repository](https://github.com/anthonyjdella/summarize-text).
## Table of Contents
For context, this blog post is structured as follows:
1. **Setup Google Cloud Vision:** Set up our Google Cloud account and enable the Vision API
2. **Setup OpenAI:** Set up our OpenAI account
3. **Setup Local Environment:** Set up our local development environment
4. **Cloud Vision API:** Using ML, detect words from images using the Google Cloud Vision API
5. **OpenAI API: **Using AI, generate a summary of text from the OpenAI API
6. **Twilio SMS API:** Send a text message (containing the summary) when the application is triggered
## Setup Google Cloud Vision
To use the Google Cloud Vision API, we need to set it up by following the [quickstart guide](https://cloud.google.com/vision/docs/setup). This process does take some time, but don’t get discouraged. Just follow the quickstart guide step-by-step, or continue along here (if you don’t want to tab out).
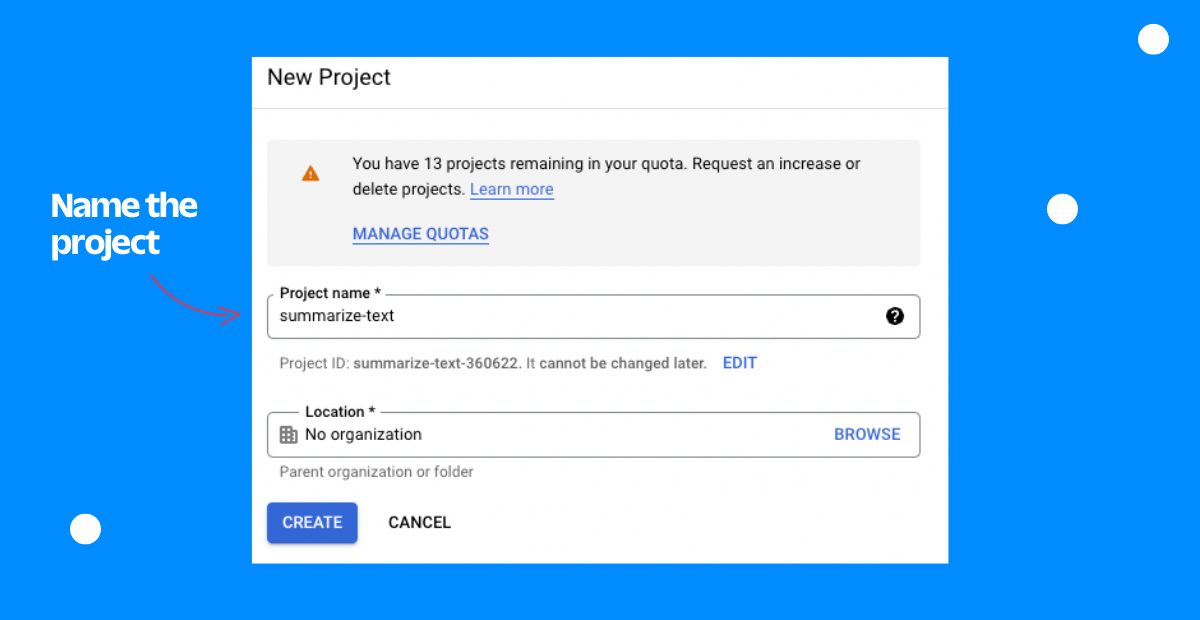
Assuming you already have a [Google Cloud account](https://console.cloud.google.com/freetrial), you’ll need to [create a new project](https://console.cloud.google.com/projectselector2/home/dashboard) within Google Cloud. Give it a Project name of **summarize-text** and click Create.
Next, enable billing for the project we just created. But don’t worry, you won’t be charged unless you exceed the [Cloud Vision monthly limits](https://cloud.google.com/vision/pricing). Learn how to [check if billing is enabled on a project](https://cloud.google.com/billing/docs/how-to/verify-billing-enabled).

[Enable the Vision API](https://console.cloud.google.com/flows/enableapi?apiid=vision.googleapis.com) for the project we created earlier, called **summarize-text**.

Next, set up authentication with a service account. Go to [Create a service account](https://console.cloud.google.com/projectselector/iam-admin/serviceaccounts/create?supportedpurview=project), select our project (**summarize-text)**, in the **Service account name** field, enter a name of **summarize-text**, in the **Service account description** field, enter a description of **Service account for summarize-text**. Continue and then grant the role of Project > **Owner** to your service account.
After creating a service account, create a service account key by clicking on the email address of service account: **summarize-text**. Click **Keys**, then **Create new key**. After doing this, a JSON key file will be downloaded to your computer. You’ll need to store this file in a location of your choice and then set an environment variable pointing to the path of this JSON file.
For example, on Linux or MacOS, in .zshrc:
```bash
export GOOGLE_APPLICATION_CREDENTIALS="/home/user/Downloads/service-account-file.json"
```
For example, on Windows with PowerShell:
```bash
$env:GOOGLE_APPLICATION_CREDENTIALS="C:\\Users\\username\\Downloads\\service-account-file.json"
```
Next, install the Google Cloud CLI. Since this is different for each operating system, follow the steps outlined in Google’s [gcloud CLI installation guide](https://cloud.google.com/sdk/docs/install#installation_instructions).
Finally, install the Python client library with the following command:
```bash
pip install --upgrade google-cloud-vision
```
## Setup OpenAI
Assuming you already registered for an [account with OpenAI](https://openai.com/join/), you’ll need to create an API key in your user account settings, which will allow you to authenticate your application with OpenAI. Copy this key and don’t share it with anyone!

We will securely store this API key in the following section.
## Setup Local Environment
Create an empty project directory:
```bash
mkdir summarize_text
```
Then change into that directory as that’s where our code will be.
```bash
cd summarize_text
```
Create a [virtual environment](https://www.twilio.com/docs/usage/tutorials/how-to-set-up-your-python-and-flask-development-environment#start-a-new-project-with-virtualenv):
```bash
python -m venv summarize
```
Activate our virtual environment:
```bash
source summarize/bin/activate
```
Install dependencies to our virtual environment:
```bash
pip install python-dotenv twilio Flask requests google-cloud-vision openai
```
Let’s create a file called \`.env\` in the project’s root directory to store our API keys in [environment variables](https://www.twilio.com/blog/2017/01/how-to-set-environment-variables.html).
Within that file, we’ll create an environment variable called \`OPENAI_API_KEY\`.
(Replace \`PASTE_YOUR_API_KEY_HERE\` with the API key that you copied earlier.)
```bash
OPENAI_API_KEY=PASTE_YOUR_API_KEY_HERE
```
For example:
```bash
OPENAI_API_KEY=sk-1234567890abcdefg
```
Since we’ll also be working with our Twilio account, we’ll need to modify this file even more. Log into your [Twilio console](https://console.twilio.com/), then scroll down to find your Account SID and Auth Token. Add two additional lines to the \`.env\` file, but change the values to equal your unique Account SID and Auth Token.
```bash
TWILIO_ACCOUNT_SID=PASTE_YOUR_ACCOUNT_SID_HERETWILIO_AUTH_TOKEN=PASTE_YOUR_AUTH_TOKEN_HERE
```
For example:
```bash
TWILIO_ACCOUNT_SID=ACxxxxxxxxxxxxTWILIO_AUTH_TOKEN=321321321321321
```
If you’re pushing these to a Git repository, please make sure to add the \`.env\` file to your \`.gitignore\` so that these credentials are secured.
We’ll be working with local images, so in your project’s root directory, create a new directory called \`resources\`. For now, it will be an empty directory, but later this is where images will be stored.
## Cloud Vision API
Since we set it up already, you may be wondering what the Vision API is. It’s a Google API that offers powerful pre-trained machine learning models through REST. With the API, you can do things like [detect faces](https://cloud.google.com/vision/docs/face-tutorial), identify places, [recognize celebrities](https://cloud.google.com/vision/docs/celebrity-recognition), and much more. For this app, we will be using Optical Character Recognition (OCR) to [recognize text in images](https://cloud.google.com/vision/docs/ocr).
Create a file called \`detect.py\` in the project’s root directory and copy and paste the following code into the file:
```python
import io
import os
from google.cloud import vision
def detect_text():
client = vision.ImageAnnotatorClient()
file_name = os.path.abspath('resources/image.jpg')
with io.open(file_name, 'rb') as image_file:
content = image_file.read()
image = vision.Image(content=content)
response = client.text_detection(image=image)
texts = response.text_annotations
return(texts[0].description)
```
The \`detect_text\` function will look at a local file from your computer–in this case an image from the \`resources/\` directory called \`image.jpg\`. Then, we will read the content from that image and use the \`text_detection\` function from the Vision API to detect text. Finally, we’ll return that text.
If you were to run the \`detect_text\` function as is, it wouldn’t work since we are reading an image called \`image.jpg\` from the \`resources/\` directory that doesn’t currently exist. But we’ll come back to this later.
Create a new file called \`utilities.py\` in the project’s root directory and paste the following code into the file:
```python
import requests
def save_image(image_url):
img_data = requests.get(image_url).content
with open('resources/image.jpg', 'wb') as handler:
handler.write(img_data)
```
The \`save_image\` function will take an image url and save it as a file called \`image.jpg\` within the \`resources/\` directory.
## OpenAI API
Now that we’ve written the code for interacting with the Cloud Vision API that allows us to perform text recognition on photos, we can use the OpenAI API to summarize that text. OpenAI is an AI company (surprise, surprise) that applies models on natural language for various tasks. You give the API a prompt, which is natural language that you input, and the AI will generate a response. For example, if you input a prompt “write a tagline for an ice cream shop” you may see a response like “we serve up smiles with every scoop!”
In the project’s root directory create a file called \`summarize.py\` and paste the following code into the file:
```python
import os
import openai
from dotenv import load_dotenv
from detect import detect_text
from utilities import save_image
load_dotenv()
openai.api_key = os.getenv("OPENAI_API_KEY")
def get_text_from_image(url):
save_image(url)
return detect_text()
def generate_prompt(url):
return f"In one-sentence, summarize the following text: \n {get_text_from_image(url)} \n"
def summarize_prompt(url):
response = openai.Completion.create(
model="text-davinci-002",
prompt=generate_prompt(url),
temperature=0.8,
max_tokens=100,
top_p=1.0,
frequency_penalty=0.0,
presence_penalty=0.0
)
print(response.choices[0].text)
return(response.choices[0].text)
```
The \`summarize_prompt\` function uses the OpenAI API \`create\` function to respond to a prompt that we give it (\`generate_prompt\`). The model we are specifying (_text-davinci-002_) is OpenAI’s most capable [GPT-3 model](https://en.wikipedia.org/wiki/GPT-3). The max_tokens parameter sets an upper bound on how many [tokens](https://beta.openai.com/tokenizer) the API will return, or how long our response will be. \`generate_prompt\` will create a prompt that summarizes text in one sentence. \`get_text_from_image\` will call our previously created functions from the previous section.
## Twilio SMS API
Now, we’ll create the code in our application that will all us to text our Twilio phone number and get back a response. This is called sending an Inbound SMS. Think of inbound as an inbound SMS to a Twilio phone number triggering your application. In this case, we will be sending a text to a Twilio phone number (our trigger), then having it respond by sending a reply containing a summary.
Create a new file (in the same directory) called \`app.py\`. Using [Flask](https://flask.palletsprojects.com/en/2.1.x/), a Python web framework, we will create an app that runs on a local server. Paste the following code into \`app.py\`:
```python
from flask import Flask, request
from twilio.twiml.messaging_response import MessagingResponse
from summarize import summarize_prompt
app = Flask(__name__)
def respond(message):
response = MessagingResponse()
response.message(message)
return str(response)
@app.route("/summary", methods=['GET', 'POST'])
def incoming_sms():
user_input = request.form.get('NumMedia')
if user_input == '1':
pic_url = request.form.get('MediaUrl0')
summary = summarize_prompt(pic_url)
return respond(f"{summary}")
else:
return respond("Please send a picture containing text!")
if __name__ == "__main__":
app.run(host='localhost', debug=True, port=8080)
```
Run the application on your local server with this command in your console (from the root directory):
```bash
python app.py
```
Your application should be running on . Output will look similar to this:
```bash
* Serving Flask app 'app' (lazy loading)
* Environment: production
WARNING: This is a development server. Do not use it in a production deployment.
Use a production WSGI server instead.
* Debug mode: on
* Running on http://localhost:8080 (Press CTRL+C to quit)
* Restarting with stat
* Debugger is active!
* Debugger PIN: 199-776-319
```
As of now, our application is only running on a server within your computer. But we need a public-facing URL (not ) to configure a [Webhook](https://www.twilio.com/docs/usage/webhooks/getting-started-twilio-webhooks) so Twilio can find it. By using a tool, called ngrok, we will [“put localhost on the Internet”](https://ngrok.com/product) so we can configure our webhook.
In another console tab run the command:
```bash
ngrok http 8080
```
This will create a “tunnel” from the public Internet into port 8080 in our local machine, where the Flask app is listening for requests. You should see output similar to this:

Take note of the line that says “Forwarding”. In the image above, it shows:
```bash
https//5bad813c2718.ngrok.io -> http//localhost:8080
```
This means that our local application is running publicly on
```bash
https//5bad813c2718.ngrok.io/summary
```
Within the [Console](https://console.twilio.com), enter in the ngrok URL as a Webhook when “A Message Comes In”.
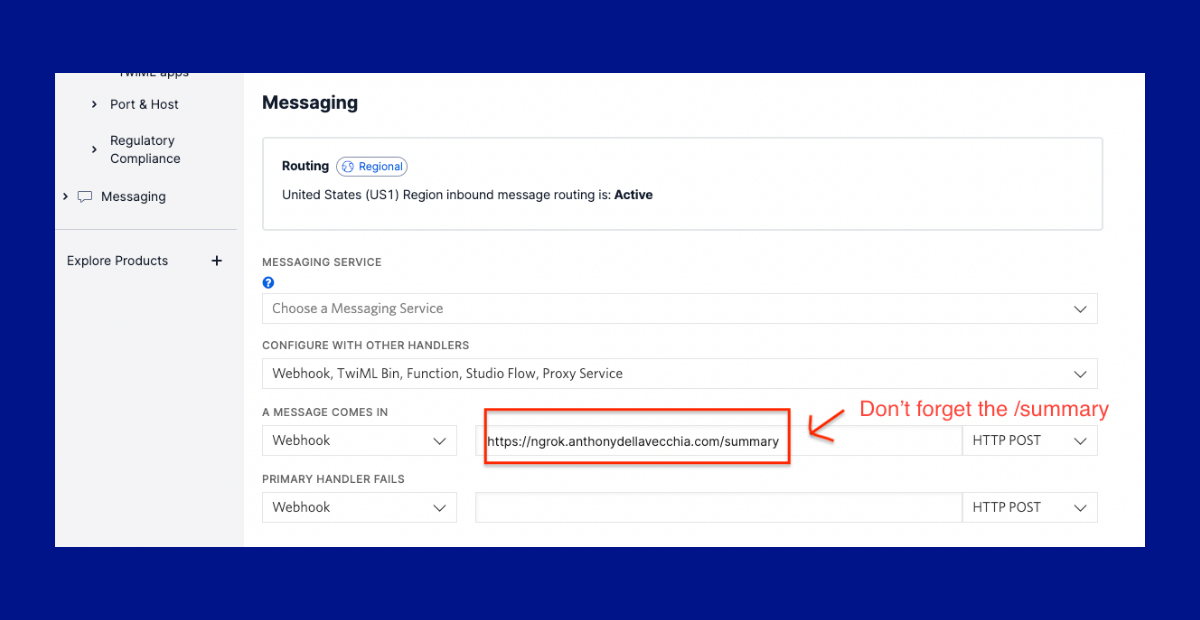
Please be aware that unless you have a paid ngrok account, each time you run the ngrok command a new URL will be generated, so be sure to make the changes within the Twilio console.
Since our application and ngrok are running, we can send a text message to our Twilio phone number and it will respond back with a summary of text!

## Show Me What You Build
Now if there’s a big wall of text that you don’t want to read, pull out your phone, take a picture, and then text it to your Twilio number. You’ll get a response back with a short summary!
Thanks so much for reading! If you found this tutorial helpful, have any questions, or want to show me what you’ve built, let me know online. And if you want to learn more about me, check out [my intro blog post](https://www.twilio.com/blog/introducing-twilio-developer-evangelist-anthony-dellavecchia).

> _Anthony Dellavecchia is a Developer Evangelist at Twilio who writes code on stage in front of a crowd. He is an experienced software developer who teaches thousands of people how to change the world with code. His goal is to help you build deep experiences and connections with technology so that they stick with you forever._
> _Check him out online @anthonyjdella -- _[_Twitter_](https://twitter.com/anthonyjdella)_ • _[_Linkedin_](https://www.linkedin.com/in/anthonydellavecchia/)_ • _[_GitHub_](https://github.com/anthonyjdella)_ • _[_TikTok_](https://tiktok.com/@anthonyjdella)_ • _[_Medium_](https://medium.com/@anthonyjdella)_ • _[_Dev.to_](https://dev.to/anthonyjdella)_ • Email • _[_anthonydellavecchia.com_](https://anthonydellavecchia.com/)_ 👈_