https://github.com/api7/api7-gateway-performance-benchmark
https://github.com/api7/api7-gateway-performance-benchmark
Last synced: 2 months ago
JSON representation
- Host: GitHub
- URL: https://github.com/api7/api7-gateway-performance-benchmark
- Owner: api7
- Created: 2024-05-13T08:05:37.000Z (almost 2 years ago)
- Default Branch: main
- Last Pushed: 2025-06-10T05:32:11.000Z (10 months ago)
- Last Synced: 2025-06-10T06:23:42.133Z (10 months ago)
- Size: 28.3 KB
- Stars: 1
- Watchers: 2
- Forks: 0
- Open Issues: 0
-
Metadata Files:
- Readme: README.md
Awesome Lists containing this project
README
# API7 Gateway Performance Benchmark
## Prerequisite(s)
- K8s cluster
- Install API7 Gateway (CP and DP) or APISIX
- A test upstream ([NGINX Upstream](./k8s-resources/upstream-nginx.yaml))
- Install [ADC](https://docs.api7.ai/enterprise/best-practices/devops-adc#adc-introduction) (A CLI tool to connect gateway instances and publish configurations)
## Steps
### Configure K8s Cluster Node Label
1. Verify cluster is running:
```
$ kubectl get nodes
NAME STATUS ROLES AGE VERSION
ip-172-31-22-219.ec2.internal Ready 54m v1.29.3-eks-ae9a62a
ip-172-31-24-73.ec2.internal Ready 54m v1.29.3-eks-ae9a62a
ip-172-31-32-45.ec2.internal Ready 61m v1.29.3-eks-ae9a62a
```
2. Label the nodes:
```
$ kubectl label nodes ip-172-31-22-219.ec2.internal nodeName=upstream
$ kubectl label nodes ip-172-31-24-73.ec2.internal nodeName=wrk2
$ kubectl label nodes ip-172-31-32-45.ec2.internal nodeName=api7ee
node/ip-172-31-22-219.ec2.internal labeled
node/ip-172-31-24-73.ec2.internal labeled
node/ip-172-31-32-45.ec2.internal labeled
```
3. Create a new namespace:
We install all resources in the same namespace "api7".
```
$ kubectl create namespace api7
namespace/api7 created
```
### Install API7 Enterprise or APISIX
#### Install APISIX
1. Install APISIX:
```
$ helm repo add apisix https://charts.apiseven.com
$ helm repo update
$ helm install apisix apisix/apisix --create-namespace --namespace apisix --set nodeSelector."nodeName"=apisix
```
By default etcd enable persistent storage and you may receive some errors if you do not configure [StorageClass](https://kubernetes.io/docs/concepts/storage/persistent-volumes/#dynamic) for your cluster.
You can also temporarily disable persistent storage with the command below, but be careful **not to disable it during a production environment** or the data will be lost after the Pod restarts.
```
$ helm install apisix apisix/apisix --create-namespace --namespace apisix --set nodeSelector."nodeName"=apisix --set etcd.persistence.enabled=false
```
2. Check deployment status:
```
$ kubectl get svc -owide -l app.kubernetes.io/name=apisix -n apisix
apisix-admin ClusterIP 10.100.132.48 9180/TCP 110s app.kubernetes.io/instance=apisix,app.kubernetes.io/name=apisix
apisix-gateway NodePort 10.100.119.191 80:30180/TCP 110s app.kubernetes.io/instance=apisix,app.kubernetes.io/name=apisix
```
3. Forward the Admin API port and gateway port:
```
$ kubectl -n apisix port-forward svc/apisix-admin 9180:9180
$ kubectl -n apisix port-forward svc/apisix-gateway 9080:80
```
#### Install API7 EE Control Plane
1. Install API7 Control Plane:
```
$ helm repo add api7 https://charts.api7.ai
$ helm repo add apisix https://charts.apiseven.com
$ helm repo update
# Specify the Node for the api7ee installation (the label we set for the Node earlier).
$ helm install api7ee3 api7/api7ee3 --set nodeSelector."nodeName"=api7ee --set postgresql.primary.nodeSelector."nodeName"=api7ee --set prometheus.server.nodeSelector."nodeName"=api7ee -n api7
```
By default PostgreSQL and Prometheus enable persistent storage and you may receive some errors if you do not configure [StorageClass](https://kubernetes.io/docs/concepts/storage/persistent-volumes/#dynamic) for your cluster.
You can also temporarily disable persistent storage with the command below, but be careful **not to disable it in a production environment** or the data will be lost after the Pod restarts.
```
$ helm install api7ee3 api7/api7ee3 --set nodeSelector."nodeName"=api7ee --set postgresql.primary.nodeSelector."nodeName"=api7ee --set prometheus.server.nodeSelector."nodeName"=api7ee --set postgresql.primary.persistence.enabled=false --set prometheus.server.persistence.enabled=false -n api7
```
2. Check deployment status:
```
$ kubectl get svc -owide -l app.kubernetes.io/name=api7ee3 -n api7
NAME TYPE CLUSTER-IP EXTERNAL-IP PORT(S) AGE SELECTOR
api7ee3-dashboard ClusterIP 10.100.89.120 7080/TCP,7443/TCP 2m3s app.kubernetes.io/component=dashboard,app.kubernetes.io/instance=api7ee3,app.kubernetes.io/name=api7ee3
api7ee3-dp-manager ClusterIP 10.100.3.182 7900/TCP,7943/TCP 2m3s app.kubernetes.io/component=dp-manager,app.kubernetes.io/instance=api7ee3,app.kubernetes.io/name=api7ee3
```
3. Forward the dashboard port to the local machine, log in to the console and upload the licence:
[License Free Trial](https://api7.ai/try?product=enterprise)
```
$ kubectl -n api7 port-forward svc/api7ee3-dashboard 7443:7443
```
#### Install API7 Gateway (Data Plane)
1. Log in to the dashboard and configure the "Control Plane Address" in the **Gateway Settings**: `https://api7ee3-dp-manager:7943`

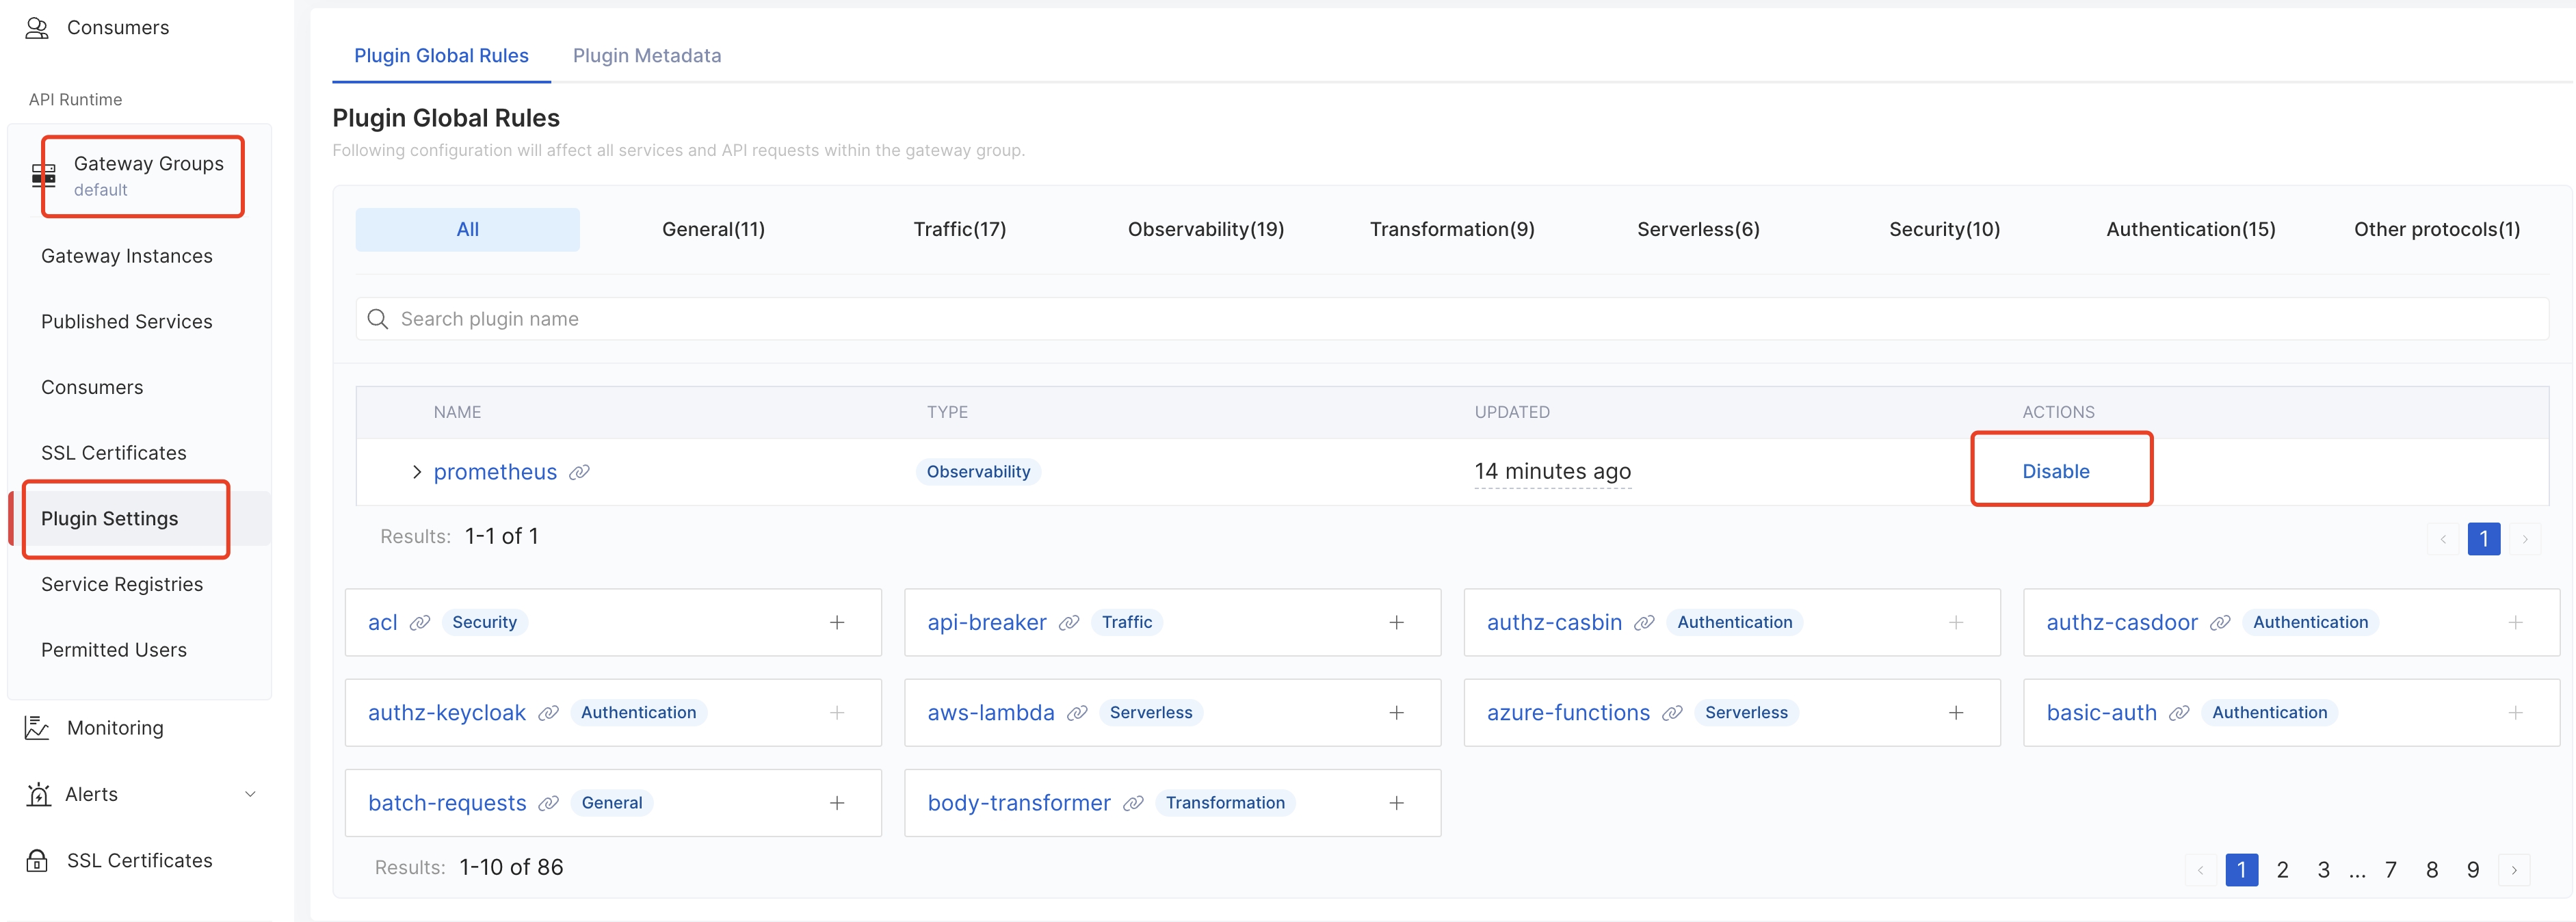
2. Disable global plugin `prometheus`:
3. Add Gateway Instance:
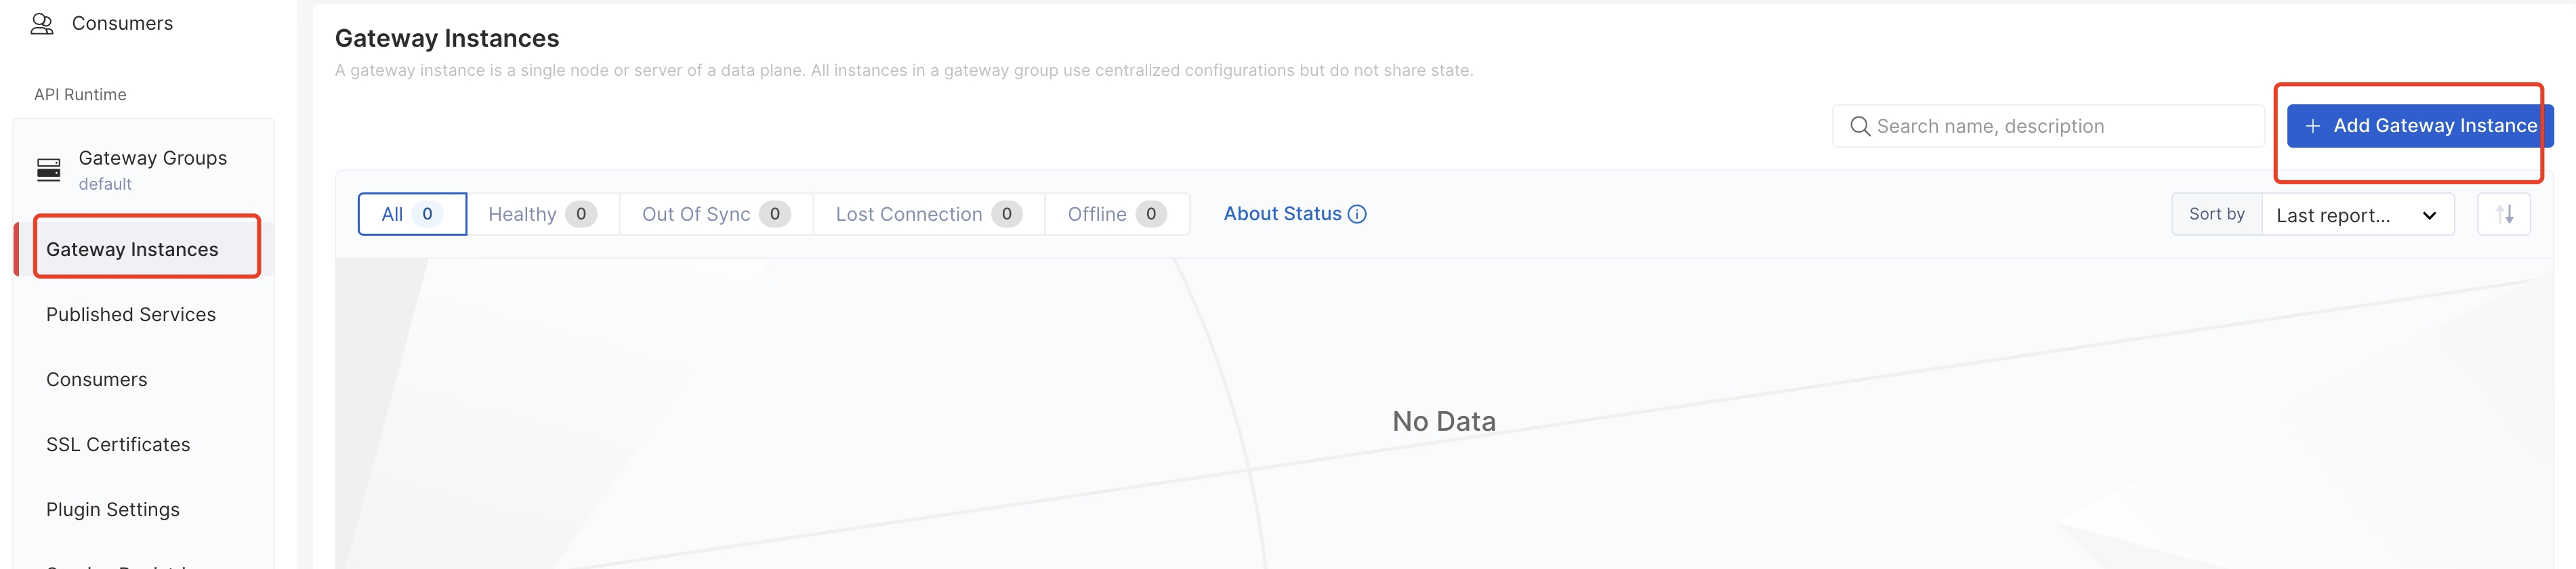
Select the **Kubernetes** method and configure the "namespace" to generate an install script and run it. This step will get a token to connect the CP to the DP. For example:
```
$ helm repo add api7 https://charts.api7.ai
$ helm repo update
$ cat > /tmp/tls.crt < /tmp/tls.key < /tmp/ca.crt < Organization -> Tokens -> Generate New Token
2. Configure ADC Credentials
Create a `.env` file in the same directory as the ADC binary.
```
# API7 Enterprise Example
ADC_BACKEND=api7ee
ADC_SERVER=https://127.0.0.1:7443
ADC_TOKEN=a7ee-6baF8488i8wJ5aj7mEo3BT705573eC8GH905qGrdn889zUWcR37df66a34e9954b61918c5dfd13abce3e
ADC_GATEWAY_GROUP=default
```
```
# APISIX Example
ADC_ENABLE_APISIX_FORCE=1
ADC_BACKEND=apisix
ADC_SERVER=http://127.0.0.1:9180
ADC_TOKEN=edd1c9f034335f136f87ad84b625c8f1
```
3. Verify ADC Status
```
$ ./adc ping
Connected to the backend successfully!
```
## Starting Performance Testing
We have provided adc configurations for each of the 9 scenarios, which you can use directly:
1. [One route without plugins](./adc_conf/1-one-route-without-plugin.yaml)
2. [One route with limit-count plugin](./adc_conf/2-one-route-with-limit-count.yaml)
3. [One route with key-auth and limit-count plugin](./adc_conf/3-one-route-with-key-auth-and-limit-count.yaml)
4. [One route and one consumer with key-auth plugin](./adc_conf/4-one-route-with-key-auth.yaml)
5. [100 routes without plugins](./adc_conf/5-100-route-without-plugin.yaml)
6. [100 routes with limit-count plugin](./adc_conf/6-100-route-with-limit-count.yaml)
7. [100 routes and 100 consumers with key-auth and limit-count plugin](./adc_conf/7-100-route-and-consumer-with-key-auth-limit-count.yaml)
8. [100 routes and 100 consumers with key-auth plugin](./adc_conf/8-100-route-and-consumer-with-key-auth.yaml)
9. [One route with mocking plugin](./adc_conf/9-one-route-with-mocking.yaml)
## Example
```shell
# adc command
$ ./adc ping
Connected to backend successfully!
$ ./adc sync -f adc_conf/.yaml
# wrk command
# test upstream
$ wrk -c100 -t4 -d120 -R50000 -U http://172.31.6.98:1980/hello
# test gateway
# 1 work_process
$ wrk -c100 -t4 -d120 -R50000 -U http://172.31.10.203:9080/hello
$ wrk -c100 -t4 -d120 -R50000 -U http://172.31.10.203:9080/hello -H 'apikey: jack-key'
# 4 work_process
$ wrk -c200 -t4 -d120 -R200000 -U http://172.31.6.58:9080/hello
$ wrk -c200 -t4 -d120 -R200000 -U http://172.31.6.58:9080/hello -H 'apikey: jack-key'
```