https://github.com/arunbandari/mongo-gui
A web-based MongoDB graphical user interface
https://github.com/arunbandari/mongo-gui
angular gui mongodb nodejs npm-package user-interface
Last synced: about 1 year ago
JSON representation
A web-based MongoDB graphical user interface
- Host: GitHub
- URL: https://github.com/arunbandari/mongo-gui
- Owner: arunbandari
- License: mit
- Created: 2019-11-30T17:45:24.000Z (over 6 years ago)
- Default Branch: master
- Last Pushed: 2024-04-24T01:29:40.000Z (about 2 years ago)
- Last Synced: 2025-05-13T13:50:28.889Z (about 1 year ago)
- Topics: angular, gui, mongodb, nodejs, npm-package, user-interface
- Language: TypeScript
- Homepage: http://20.106.238.56:4321/
- Size: 29.6 MB
- Stars: 304
- Watchers: 14
- Forks: 91
- Open Issues: 59
-
Metadata Files:
- Readme: README.md
- License: LICENSE
Awesome Lists containing this project
README
[](https://www.npmjs.com/package/mongo-gui)


# Mongo GUI
A web-based MongoDB graphical user interface.
## Demo
Read-only demo: http://20.106.238.56:4321/
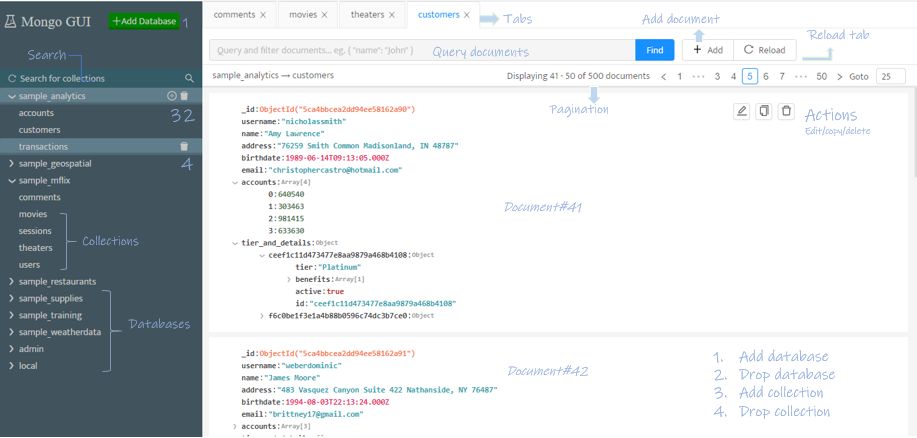
## Mongo GUI Features
- Connect to local/remote mongodb instances
- View/add/delete databases
- View/add/delete collections
- View/add/update/delete/copy documents
- Multi tab support
- Query documents
- Advanced pagination
- Supports all BSON types in documents
- Rich user interface
- Import CSV or JSON files
- Export collection to CSV or JSON files
- Authentication
- **"Natural Language Querying" or "AI-Powered Querying".**
## How to install and run MongoDB GUI
The following are the different ways to install **mongo-gui**.
### From npm:
- Install the module globally using the command ```npm install -g mongo-gui```
- Then use the command ```mongo-gui``` to run the application
### From github:
- First of all, clone the **mongo-gui** repository using the command ```git clone https://github.com/arunbandari/mongo-gui``` or download the zip file from [here](https://github.com/arunbandari/mongo-gui/archive/master.zip).
- Change the directory to mongo-gui ```cd mongo-gui```
- Install all the dependencies ```npm install```
- Start the application using either ```npm start``` or ```node server.js``` command
Note: *Node.js must be installed on your machine to run this application*
### From Docker Hub:
Docker compose
```yaml
version: '3'
services:
mongo-gui:
container_name: "mongo-gui"
image: ugleiton/mongo-gui
restart: always
ports:
- "4321:4321"
environment:
- MONGO_URL=mongodb://localhost:27017
```
## Mongo GUI Usage
The commands ```mongo-gui``` and ```npm start or node server.js``` start the application with the following configuaration:
- URL (-u): ```mongodb://localhost:27017```
- PORT (-p): ```4321```
and the application will be accesible at ```http://localhost:4321```
To connect to any other mongodb instance, pass mongo connection string as an argument, eg:
- Installed via npm: ```mongo-gui -u mongodb+srv://:@host/?retryWrites=true&w=majority'```
- Installed via github: ```(npm start --/node server.js) -u mongodb+srv://:@host/?retryWrites=true&w=majority'```
Available options:
- -u: url, **mongo-gui** tries to connect to this mongodb instance
- -p: port, mongo-gui listens on this port
## Authentication in Mongo GUI
When you want to use the interface on a remote server, you need to protect your data. Mongo-gui provides you with a simple authentication facility for this. This is completely optional, if you don't want authorization you don't use it. To use authorization, follow these steps:
- Create a ```.env ``` file in the main directory.
- In this file, create ```USERNAME=``` variable for your username and ```PASSWORD=""``` variable for your password.
- Restart your server.
That's it. If you are working on your own computer, or if you do not need security, you can turn off the variables you have defined in the ```.env ``` file by putting a comment before them, e.g.
- ```#USERNAME=```
Or you can delete your ```.env ``` file.
So mongo-gui will now continue to run without asking for authorization. Don't forget to restart your server after these actions!
## Setting Up the OpenAI Prompt Query
To enable the OpenAI-powered prompt querying in Mongo GUI, you'll need to obtain an API key from OpenAI and add it to your project. Here's a step-by-step guide:
1. **Obtain an OpenAI API Key**:
- Visit [OpenAI's platform](https://platform.openai.com/)
- Sign up or log in, and navigate to the API section to generate your unique API key.
2. **Add the API Key to Your Project**:
- In the root directory of your project, look for a `.env` file (or create one if it doesn't exist).
- Add the following line to the `.env` file:
```
OPENAI_API_KEY=YOUR_API_KEY_HERE
```
Replace `YOUR_API_KEY_HERE` with the API key you obtained from OpenAI.
3. Save the `.env` file and restart Mongo GUI if it's currently running. With this, the AI-powered prompt querying should be activated!
🔐 **Security Note**: Remember to keep your `.env` file confidential. Never push it to public repositories or share it. It contains sensitive information.
---
This setup guide should provide your users with all they need to integrate the OpenAI prompt query into the tool. Adjust as needed to fit your specific application and user needs.
## Screenshots
### Controls:
## License
[MIT](https://github.com/arunbandari/mongo-gui/blob/master/LICENSE)