https://github.com/asciidoctor/asciidoctor-kroki
Asciidoctor.js extension to convert diagrams to images using Kroki!
https://github.com/asciidoctor/asciidoctor-kroki
asciidoctor asciidoctor-extension asciidoctor-kroki diagram ditaa extension graphviz hacktoberfest javascript kroki mermaid plantuml uml
Last synced: 6 months ago
JSON representation
Asciidoctor.js extension to convert diagrams to images using Kroki!
- Host: GitHub
- URL: https://github.com/asciidoctor/asciidoctor-kroki
- Owner: asciidoctor
- License: mit
- Created: 2019-04-22T12:52:19.000Z (over 6 years ago)
- Default Branch: master
- Last Pushed: 2024-10-09T07:21:07.000Z (12 months ago)
- Last Synced: 2025-04-13T00:48:45.814Z (6 months ago)
- Topics: asciidoctor, asciidoctor-extension, asciidoctor-kroki, diagram, ditaa, extension, graphviz, hacktoberfest, javascript, kroki, mermaid, plantuml, uml
- Language: JavaScript
- Homepage: https://kroki.io/
- Size: 2.09 MB
- Stars: 162
- Watchers: 7
- Forks: 53
- Open Issues: 38
-
Metadata Files:
- Readme: README.md
- Funding: .github/FUNDING.yml
- License: LICENSE
Awesome Lists containing this project
- awesome-starred - asciidoctor/asciidoctor-kroki - Asciidoctor.js extension to convert diagrams to images using Kroki! (javascript)
README
# 🖍 Asciidoctor Kroki Extension
[](https://github.com/ggrossetie/asciidoctor-kroki/actions/workflows/build-js.yml)
[](https://github.com/ggrossetie/asciidoctor-kroki/actions/workflows/build-ruby.yml)
[](https://www.npmjs.com/package/asciidoctor-kroki)
[](https://rubygems.org/gems/asciidoctor-kroki)
[](https://kroki.zulipchat.com/)
An extension for [Asciidoctor.js](https://github.com/asciidoctor/asciidoctor.js) to convert diagrams to images using [Kroki](https://kroki.io)!
* [Install](#install)
+ [Node.js](#nodejs)
+ [Browser](#browser)
+ [Ruby](#ruby)
+ [Antora Integration](#antora-integration)
* [Usage](#usage)
+ [Supported diagram types](#supported-diagram-types)
* [Configuration](#configuration)
* [Using Your Own Kroki](#using-your-own-kroki)
* [Contributing](#contributing)
+ [Setup](#setup)
+ [Building](#building)
## Install
### Node.js
Install the dependencies:
$ npm i asciidoctor asciidoctor-kroki
Create a file named `kroki.js` with following content and run it:
```javascript
const asciidoctor = require('@asciidoctor/core')()
const kroki = require('asciidoctor-kroki')
const input = 'plantuml::hello.puml[svg,role=sequence]'
kroki.register(asciidoctor.Extensions) // <1>
console.log(asciidoctor.convert(input, { safe: 'safe' }))
const registry = asciidoctor.Extensions.create()
kroki.register(registry) // <2>
console.log(asciidoctor.convert(input, { safe: 'safe', extension_registry: registry }))
```
**<1>** Register the extension in the global registry
**<2>** Register the extension in a dedicated registry
### Browser
Install the dependencies:
$ npm i asciidoctor asciidoctor-kroki
Create a file named `kroki.html` with the following content and open it in your browser:
```html
Asciidoctor x Kroki
const input = `Let's take an example with a _GraphViz_ "Hello World":
[graphviz]
....
digraph G {
Hello->World
}
....`
const asciidoctor = Asciidoctor()
const registry = asciidoctor.Extensions.create()
AsciidoctorKroki.register(registry) // <1>
const result = asciidoctor.convert(input, { safe: 'safe', extension_registry: registry })
document.getElementById('content').innerHTML = result
```
**<1>** Register the extension in a dedicated registry
**❗ IMPORTANT:**
If you want to reference a diagram file in a browser environment you will need to define the base directory using the `base_dir` option.
In addition, you will also need to provide an implementation to read a binary file **synchronously** for a given path.
You can find an implementation based on `XMLHttpRequest` in the source code: https://github.com/ggrossetie/asciidoctor-kroki/blob/9585b969014a1894d0c9fb76df10e1e8c66ce2b2/test/browser/test.js#L2-L34.
Once `httpGet` is defined, here's how we should configure the extension:
```js
const registry = asciidoctor.Extensions.create()
AsciidoctorKroki.register(registry, {
vfs: {
read: (path, encoding = 'utf8') => httpGet(path, encoding),
exists: (_) => false,
add: (_) => { /* no-op */ }
}
})
const input = 'plantuml::hello.puml[svg,role=sequence]'
asciidoctor.convert(input, { safe: 'safe', base_dir: window.location.origin, extension_registry: registry })
```
### Ruby
Install the dependency:
$ gem install asciidoctor-kroki
Require the library using the `--require` (or `-r`) option from the Asciidoctor CLI:
$ asciidoctor -r asciidoctor-kroki doc.adoc
### Antora Integration
If you are using [Antora](https://antora.org/), you can integrate Kroki in your documentation site.
1. Install the extension in your playbook project:
$ npm i asciidoctor-kroki
2. Register the extension in your playbook file:
```yaml
asciidoc:
extensions:
- asciidoctor-kroki
```
https://docs.antora.org/antora/2.3/playbook/configure-asciidoc/#extensions
3. Enjoy!
**💡 TIP**:
You can use the `kroki-fetch-diagram` option to download the images from Kroki at build time.
In other words, while viewing pages you won't rely on Kroki anymore.
However, in Antora, this is not currently compatible with inline SVG images.
```yaml
asciidoc:
attributes:
kroki-fetch-diagram: true
```
## Usage
In your AsciiDoc document, you can either write your diagram inline or, alternatively, you can make a reference to the diagram file using macro form or with the `include` directive.
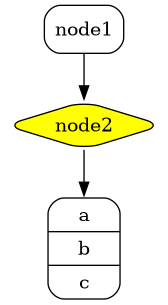
Here's an example where we declare a GraphViz diagram directly in our AsciiDoc document using the block syntax:
```adoc
[graphviz]
....
digraph foo {
node [style=rounded]
node1 [shape=box]
node2 [fillcolor=yellow, style="rounded,filled", shape=diamond]
node3 [shape=record, label="{ a | b | c }"]
node1 -> node2 -> node3
}
....
```
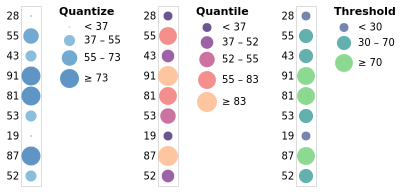
In the example below, we are using the `vegalite` macro to reference a file named *chart.vlite*:
```
vegalite::chart.vlite[svg,role=chart,opts=interactive]
```
Finally, we can use the `include` directive to reference a diagram file:
```
[plantuml,alice-bob,svg,role=sequence]
....
include::alice-bob.puml[]
....
```
### References and includes with Antora
If you use this Asciidoctor Kroki Extension in combination with Antora, all references and includes MUST use [Antora Resource IDs](https://docs.antora.org/antora/latest/page/resource-id/). The `.puml`-files are best placed in the [_partials_-directory](https://docs.antora.org/antora/latest/page/partials/) of the modules.
#### Block macros
```adoc
vegalite::partial$chart.vlite[svg,role=chart,opts=interactive]
```
#### Includes
```adoc
[plantuml,alice-bob,svg,role=sequence]
....
include::partial$alice-bob.puml[]
....
```
### Syntax
You can declare positional and named attributes when using the block or the macro form.
**Positional attributes**
When using the block form:
1. The first positional attribute specifies the diagram type (see below for a complete list).
2. The second optional positional attribute assigns a file name (i.e. target) to the generated diagram. *Currently, the value of this attribute is ignored, and an auto-generated hash will be used as file name for caching purposes (see #48)*.
3. The third optional positional attribute specifies the image format.
Example:
```
[mermaid,abcd-flowchart,svg]
....
graph TD;
A-->B;
A-->C;
B-->D;
C-->D;
....
```
In the above example,
the diagram type is `mermaid`,
the file name (i.e. target) is `abcd-flowchart`,
and the image format is `svg`.
When using the macro form:
1. The first optional positional attribute specifies the image format.
Example:
```
vegalite::chart.vlite[svg]
```
In the above example,
the diagram type is `vegalite`,
the target is `chart.vlite`,
and the image format is `svg`.
**Named attributes**
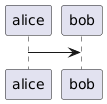
You can also use both positional and named attributes. Here's an example:
```adoc
.PlantUML example
[plantuml#diagAliceBob,alice-and-bob,svg,role=sequence]
....
alice -> bob
....
```
As you can see, we specified an id using the syntax `#diagAliceBob` just after the diagram type, and we are also using a named attribute to assign a role using `role=sequence`.
Here's another example using the macro form:
```
vegalite::chart.vlite[svg,role=chart,opts=interactive]
```
We are using a positional attribute to declare the image format and two named attributes to define the `role` and `options`.
**Attributes**
It's important to note that not all attributes are used in all converters.
Here's a list of all attributes used in the built-in HTML 5 converter:
- `target`
- `width`
- `height`
- `format` (default `svg`)
- `fallback`
- `link`
- `float`
- `align`
- `role`
- `title` (used to define an alternative text description of the diagram)
**Options**
In addition, the following options are available when using the SVG format:
- `inline`
- `interactive`
- `none` (used for cancelling defaults)
Options can be defined using `options` attribute (or `opts` for short):
```adoc
[blockdiag,opts=inline]
....
blockdiag {
Kroki -> generates -> "Block diagrams";
Kroki [color = "greenyellow"];
"Block diagrams" [color = "pink"];
}
....
```
### Supported diagram types
Kroki currently supports the following diagram libraries:
* [ActDiag](https://github.com/blockdiag/actdiag): `actdiag`
* [BlockDiag](https://github.com/blockdiag/blockdiag): `blockdiag`
* [BPMN](https://github.com/bpmn-io/bpmn-js): `bpmn`
* [Bytefield](https://github.com/Deep-Symmetry/bytefield-svg/): `bytefield`
* [C4 (PlantUML)](https://github.com/RicardoNiepel/C4-PlantUML): `c4plantuml`
* [D2](https://d2lang.com/tour/intro/): `d2`
* [DBML](https://www.dbml.org/home/): `dbml`
* [Ditaa](http://ditaa.sourceforge.net): `ditaa`
* [ERD](https://github.com/BurntSushi/erd): `erd`
* [Excalidraw](https://github.com/excalidraw/excalidraw): `excalidraw`
* [GraphViz](https://www.graphviz.org/): `graphviz`
* [Mermaid](https://github.com/knsv/mermaid): `mermaid`
* [Nomnoml](https://github.com/skanaar/nomnoml): `nomnoml`
* [NwDiag](https://github.com/blockdiag/nwdiag): `nwdiag`
* [PacketDiag](https://github.com/blockdiag/nwdiag): `packetdiag`
* [Pikchr](https://github.com/drhsqlite/pikchr): `pikchr`
* [PlantUML](https://github.com/plantuml/plantuml): `plantuml`
* [RackDiag](https://github.com/blockdiag/nwdiag): `rackdiag`
* [SeqDiag](https://github.com/blockdiag/seqdiag): `seqdiag`
* [SVGBob](https://github.com/ivanceras/svgbob): `svgbob`
* [Symbolator](https://github.com/zebreus/symbolator): `symbolator`
* [UMLet](https://github.com/umlet/umlet): `umlet`
* [Vega](https://github.com/vega/vega): `vega`
* [Vega-Lite](https://github.com/vega/vega-lite): `vegalite`
* [WaveDrom](https://github.com/wavedrom/wavedrom): `wavedrom`
* [Structurizr](https://github.com/structurizr/dsl): `structurizr`
* [Diagrams.net](https://github.com/jgraph/drawio): `diagramsnet` _(only available via [Using Your Own Kroki](#using-your-own-kroki "Using Your Own Kroki"))_
Each diagram libraries support one or more output formats.
Consult the [Kroki documentation](https://kroki.io/#support) to find out which formats are supported.
## Configuration
| Attribute name | Description | Default value |
|--------------------------------|-----------------------------------------------------------------------------------------------------------------------------------------------------------------------------------------------------------------------------------------------------------------------------------------------------------------------------------------------------------------|--------------------|
| `kroki-server-url` | The URL of the Kroki server (see "Using Your Own Kroki") | `https://kroki.io` |
| `kroki-data-uri` | Embed images as data-uri elements in HTML elements so file is completely self-contained. | `false` |
| `kroki-fetch-diagram` | Define if we should download (and save on the disk) the images from the Kroki server.
This feature is not available when running in the browser. | `false` |
| `kroki-http-method` | Define how we should get the image from the Kroki server. Possible values:
- `get`: always use GET requests
- `post`: always use POST requests
- `adaptive`: use a POST request if the URI length is longer than `kroki-max-uri-length` (default 4000) characters, otherwise use a GET request
| `kroki-plantuml-include` | A file that will be included at the top of all PlantUML diagrams as if `!include file` was used. This can be useful when you want to define a common skin for all your diagrams. The value can be a path or a URL. | |
| `kroki-plantuml-include-paths` | Search path(s) that will be used to resolve `!include file` additionally to current diagram directory, similar to PlantUML property [plantuml.include.path](https://plantuml.com/de/preprocessing). Please use directory delimiter `;` (Windows) or `:` (Unix) for multiple paths, e.g.: `"c:/docu/styles;c:/docu/library"` or `"~/docu/styles:~/docu/library"` | |
| `kroki-max-uri-length` | Define the max URI length before using a POST request when using `adaptive` HTTP method (`kroki-http-method`) | `4000` |
**❗ IMPORTANT:**
`kroki-fetch-diagram` and `kroki-plantuml-include` are only available when safe mode is `server` or lower.
If you want to learn more about Asciidoctor safe modes: https://docs.asciidoctor.org/asciidoctor/latest/safe-modes/
### Default configuration
By default, images are generated as SVG when possible.
To alter this, set the `kroki-default-format` attribute:
```adoc
:kroki-default-format: png
```
You can unset this with `:kroki-default-format!:` or `:kroki-default-format: svg`.
**ℹ️ NOTE:**
An AsciiDoc attribute can be defined through the CLI or API, in the document’s header or in the document’s body.
In addition, if you are using Antora, you can define AsciiDoc attributes in your playbook and/or in your component descriptor.
References:
- https://asciidoctor.org/docs/user-manual/#setting-attributes-on-a-document
- https://docs.antora.org/antora/2.3/page/attributes/#custom-attributes
For instance, in an Antora playbook or component descriptor:
```yaml
asciidoc:
attributes:
kroki-default-format: png@
```
(the `@` allows the attribute value to be reset in documents)
By default, Asciidoctor Kroki generates a link, to a Kroki server or a local file.
To change the default for SVG diagrams, set the `kroki-default-options` attribute.
```adoc
:kroki-default-options: inline
```
You can unset this with `:kroki-default-options: none` or `:kroki-default-options!:` or specify `opts=none` in a block or macro.
## Preprocessing
Some diagram libraries allow referencing external entities by URL or accessing resources from the filesystem.
For example PlantUML allows the `!import` directive to pull fragments from the filesystem or a remote URL or the standard library.
Similarly, Vega-Lite can load data from a URL using the `url` property.
By default, the Kroki server is running in `SECURE` mode which restrict access to files on the file system and on the network.
For ease of use and convenience, Asciidoctor Kroki will try to resolve and load external resources before sending a request to the Kroki server.
This feature is only available when Asciidoctor safe mode is `server` or lower.
## Using Your Own Kroki
By default, this extension sends information and receives diagrams back from https://kroki.io.
You may choose to use your own server due to:
* Network restrictions - if Kroki is not available behind your corporate firewall
* Network latency - you are far from the European public instance
* Privacy - you don't want to send your diagrams to a remote server on the internet
This is done using the `kroki-server-url` attribute.
Typically, this is at the top of the document (under the title):
```adoc
:kroki-server-url: http://my-server-url:port
```
For instance, if you have followed [the instructions](https://docs.kroki.io/kroki/setup/install/#_using_docker) to set up a self-managed server using Docker you can use the following:
```adoc
:kroki-server-url: http://localhost:8080
```
Note that either the `http://` or `https://` prefix _is_ required (the default Docker image only uses `http`).
You can also set this attribute using the Javascript API, for instance:
```js
asciidoctor.convertFile('file.adoc', { safe: 'safe', attributes: { 'kroki-server-url': 'http://my-server-url:port' } })
```
## Contributing
### Setup
To build this project, you will need the latest active LTS of Node.js and npm (we recommend `nvm` to manage multiple active Node.js versions).
The current latest Node LTS version is: `v14.15.x`
Please use latest npm version `v7.x` to generate lockfile using v2 format (i.e., `"lockfileVersion": 2`), see [lockfileversion](https://docs.npmjs.com/cli/v7/configuring-npm/package-lock-json#lockfileversion)
#### Update NPM @ Linux
npm i -g npm
#### Update NPM @ Windows
1. Open PowerShell as Administrator selecting `Run as Administrator`
2. Install `npm-windows-upgrade`
Set-ExecutionPolicy Unrestricted -Scope CurrentUser -Force
npm install --global --production npm-windows-upgrade
3. Upgrade npm
npm-windows-upgrade
Reference: [npm-windows-upgrade](https://github.com/felixrieseberg/npm-windows-upgrade)
### Building
1. Install the dependencies:
$ npm i
2. Generate a distribution:
$ npm run dist
When working on a new feature or when fixing a bug, make sure to run the linter and the tests suite:
$ npm run lint
$ npm run test