Ecosyste.ms: Awesome
An open API service indexing awesome lists of open source software.
https://github.com/athemeart/athemeart-sample-data
https://github.com/athemeart/athemeart-sample-data
demo dummy dummy-data free woocommerce wordpress
Last synced: about 1 month ago
JSON representation
- Host: GitHub
- URL: https://github.com/athemeart/athemeart-sample-data
- Owner: athemeart
- License: mit
- Created: 2021-01-31T13:54:39.000Z (almost 4 years ago)
- Default Branch: main
- Last Pushed: 2021-02-10T13:27:03.000Z (almost 4 years ago)
- Last Synced: 2024-12-05T19:08:45.150Z (about 1 month ago)
- Topics: demo, dummy, dummy-data, free, woocommerce, wordpress
- Homepage: https://athemeart.com/blog/best-free-woocommerce-themes/
- Size: 146 KB
- Stars: 1
- Watchers: 2
- Forks: 10
- Open Issues: 0
-
Metadata Files:
- Readme: README.md
- License: LICENSE
Awesome Lists containing this project
README
        aThemeArt WordPress Theme's Sample/Demo Data

========================================

You can find AThemeart's  all sample content only from this site. For the difficulty of releasing demo content elsewhere, you can find AThemeart's recent and previous releasing themes like a folder showing above here. And every folder has each specific .file, like widgets.wie, sample-data.xml, form.json, and many more.

But to use our theme, you must've to download it. After that, extract the zip file and choose the file you want to import only.

== How to Import One-Click Demo Content: ==

========================================


To clarify, One-Click Demo Content is for paid service only. But here is a manual configuration to import your .xml file to WordPress, given below:

1. Go to your site Dashboard.

2. Take the theme you demand to import the .xml file activated.

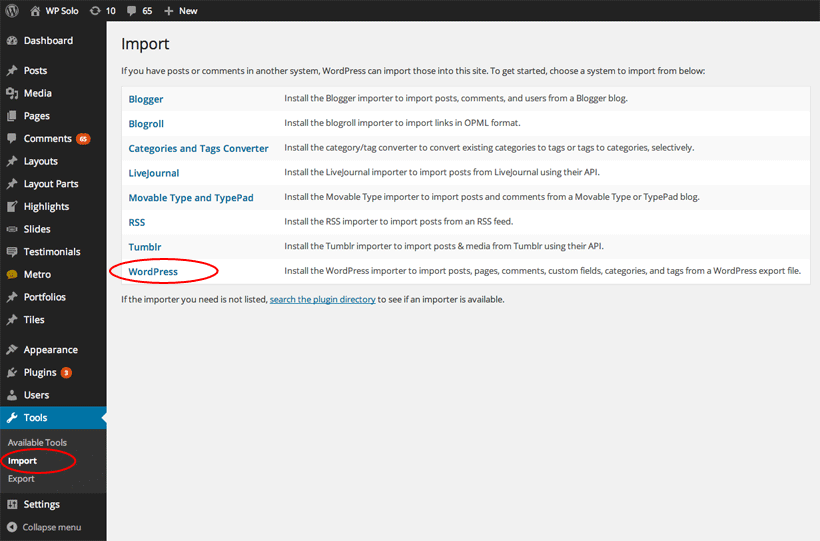
3. Navigate to Tools → Import.

4. Select “WordPress” from the list.

5. Upload the .xml demo content using the form provided.

6. You'll be requested to map the authors in this export file to users on the blog. For every individual author, you may select to map to an existing user on the blog or to create a new user.

7. Then you'll have the option to import attachments. So, click the “Download and import file attachments” box.

8. Now your Posts, Pages, Projects, and Menus are imported.

9. After that, you'll need to assign the menu a theme location and configure the widgets also.