https://github.com/atomjoy/2fa-gui
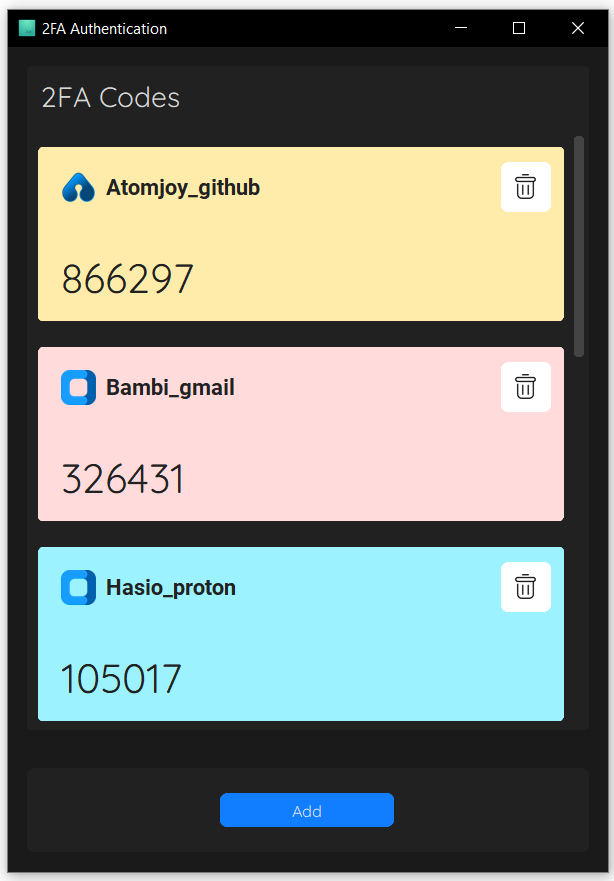
Aplikacja generuje kody uwierzytelniania dwuskładnikowego co 30 sekund dla kluczy z pliku json (2FA). (Desktop Two-factor authentication application).
https://github.com/atomjoy/2fa-gui
2fa 2fa-client 2fa-client-python 2fa-codes 2fa-desktop 2fa-gui 2fa-python 2fa-security 2fa-windows customtkinter desktop-2fa python two-factor-authentication windows-2fa
Last synced: 29 days ago
JSON representation
Aplikacja generuje kody uwierzytelniania dwuskładnikowego co 30 sekund dla kluczy z pliku json (2FA). (Desktop Two-factor authentication application).
- Host: GitHub
- URL: https://github.com/atomjoy/2fa-gui
- Owner: atomjoy
- Created: 2024-03-01T09:46:39.000Z (over 2 years ago)
- Default Branch: main
- Last Pushed: 2024-03-03T13:56:43.000Z (over 2 years ago)
- Last Synced: 2025-02-25T04:32:23.483Z (over 1 year ago)
- Topics: 2fa, 2fa-client, 2fa-client-python, 2fa-codes, 2fa-desktop, 2fa-gui, 2fa-python, 2fa-security, 2fa-windows, customtkinter, desktop-2fa, python, two-factor-authentication, windows-2fa
- Language: Python
- Homepage: https://github.com/atomjoy/2fa-gui
- Size: 3.39 MB
- Stars: 0
- Watchers: 1
- Forks: 0
- Open Issues: 0
-
Metadata Files:
- Readme: README.md
Awesome Lists containing this project
README
          # 2FA Authenticator GUI

Aplikacja generuje kody uwierzytelniania dwuskładnikowego co 30 sekund dla kluczy z pliku json. (Two-factor authentication).

## Instalacja

Zainstaluj pyton 3.12

```sh

# Install modules

phyton3 -m pip install tk, pyotp

phyton3 -m pip install customtkinter

phyton3 -m pip install Pillow

```

## Uruchom z Windows

```sh

# With console

main.py

# No console

main.pyw

```

## Gui


## Tests

Customtkinter nie zmienia koloru tektu i anchora CTkScrollableFrame z json, trzeba zmienić przy tworzeniu objektu klasy.

### Json

```json

{

    "CTkScrollableFrame": {

        "label_fg_color": ["#55cc55", "gray23"],

        "label_text_color": ["#fff", "gray23"],

        "label_anchor": "w"

    },

}

```

### Python class

```python

self.scrollable_label_button_frame = ScrollableLabelButtonFrame(

    master=self, width=300, command=self.label_button_frame_event,

    corner_radius=5,

    label_text="Scrollable List Frame",

    label_text_color=("#fff", "gray23"),

    label_anchor="w",

)

```

### Update

```sh

# Upgrade

python3 -m pip install --upgrade SomePackage

python3 -m pip install --upgrade pip

```

## Debian 12 Install CustomTkinter

Debian 12 dodaj środowisko wirtualne w katalogu projektu.

-

### Instalacja .venv i pakietów

```sh

# Install

sudo apt install python3-full python3-venv python3-pip

# Create .venv

sudo python3 -m venv .venv

# Run venv in vscode select main.py file window

# Press Ctrl + Shift + p  Or F1 button then enter (or from vscode bottom bar):

Python: Select Interpreter

# Install project packages

pip install customtkinter

pip install Pillow

pip install pyotp

pip install tk

# Then run script from vscode integrated terminal

python3 main.py

```

### Lub uruchom z terminala

```sh

# Run virtual env from terminal

source .venv/bin/activate

# Install project packages

pip install customtkinter

pip install Pillow

pip install pyotp

pip install tk

# Run script

python3 main.py

# Deactivate venv if no more needed

deactivate

```

### Bash script run.sh

```sh

#!/bin/bash

# Run script in virtual env

source .venv/bin/activate

python3 main.py

deactivate

```