https://github.com/auth0-developer-hub/api_actix-web_rust_hello-world
https://github.com/auth0-developer-hub/api_actix-web_rust_hello-world
Last synced: 11 months ago
JSON representation
- Host: GitHub
- URL: https://github.com/auth0-developer-hub/api_actix-web_rust_hello-world
- Owner: auth0-developer-hub
- Created: 2021-10-12T15:05:48.000Z (over 4 years ago)
- Default Branch: main
- Last Pushed: 2023-07-27T13:13:43.000Z (almost 3 years ago)
- Last Synced: 2024-04-23T21:56:31.813Z (about 2 years ago)
- Language: Rust
- Homepage:
- Size: 42 KB
- Stars: 25
- Watchers: 1
- Forks: 6
- Open Issues: 2
-
Metadata Files:
- Readme: README.md
Awesome Lists containing this project
README
# Hello World API: Actix Web + Rust Sample
This sample uses [actix-web-httpauth][actix-web-httpauth] and [jsonwebtoken][jsonwebtoken] to implement the following security tasks:
The `add-rbac` branch offers a working API server that exposes a public endpoint along with two protected endpoints. Each endpoint returns a different type of message: public, protected, and admin.
The `GET /api/messages/protected` and `GET /api/messages/admin` endpoints are protected against unauthorized access. Any requests that contain a valid access token in their authorization header can access the protected and admin data.
Additionally, the `GET /api/messages/admin` endpoint requires the access tokens to contain a `read:admin-messages` permission in order to access the admin data, which is referred to as [Role-Based Access Control (RBAC)](https://auth0.com/docs/authorization/rbac/).
## Quick Auth0 Set Up
### Set up the project
The recommended way to install Rust is via [Rustup](https://rust-lang.github.io/rustup), follow the instructions [here](https://www.rust-lang.org/tools/install).
Install the [toolchain](https://rust-lang.github.io/rustup/concepts/toolchains.html):
```bash
rustup toolchain install 1.56
```
Install the project dependencies:
```bash
cargo build
```
Create `.env` file under the project directory:
```bash
touch .env
```
Populate `.env` as follows:
```bash
PORT=6060
CLIENT_ORIGIN_URL=http://localhost:4040
AUTH0_AUDIENCE=
AUTH0_DOMAIN=
```
### Register a(n) Actix Web API with Auth0
- Open the [APIs](https://manage.auth0.com/#/apis) section of the Auth0 Dashboard.
- Click on the **Create API** button.
- Provide a **Name** value such as _Hello World API Server_.
- Set its **Identifier** to `https://api.example.com` or any other value of your liking.
- Leave the signing algorithm as `RS256` as it's the best option from a security standpoint.
- Click on the **Create** button.
> View ["Register APIs" document](https://auth0.com/docs/get-started/set-up-apis) for more details.
### Connect Actix Web with Auth0
Get the values for `AUTH0_AUDIENCE` and `AUTH0_DOMAIN` in `.env` from your Auth0 API in the Dashboard.
Head back to your Auth0 API page, and **follow these steps to get the Auth0 Audience**:
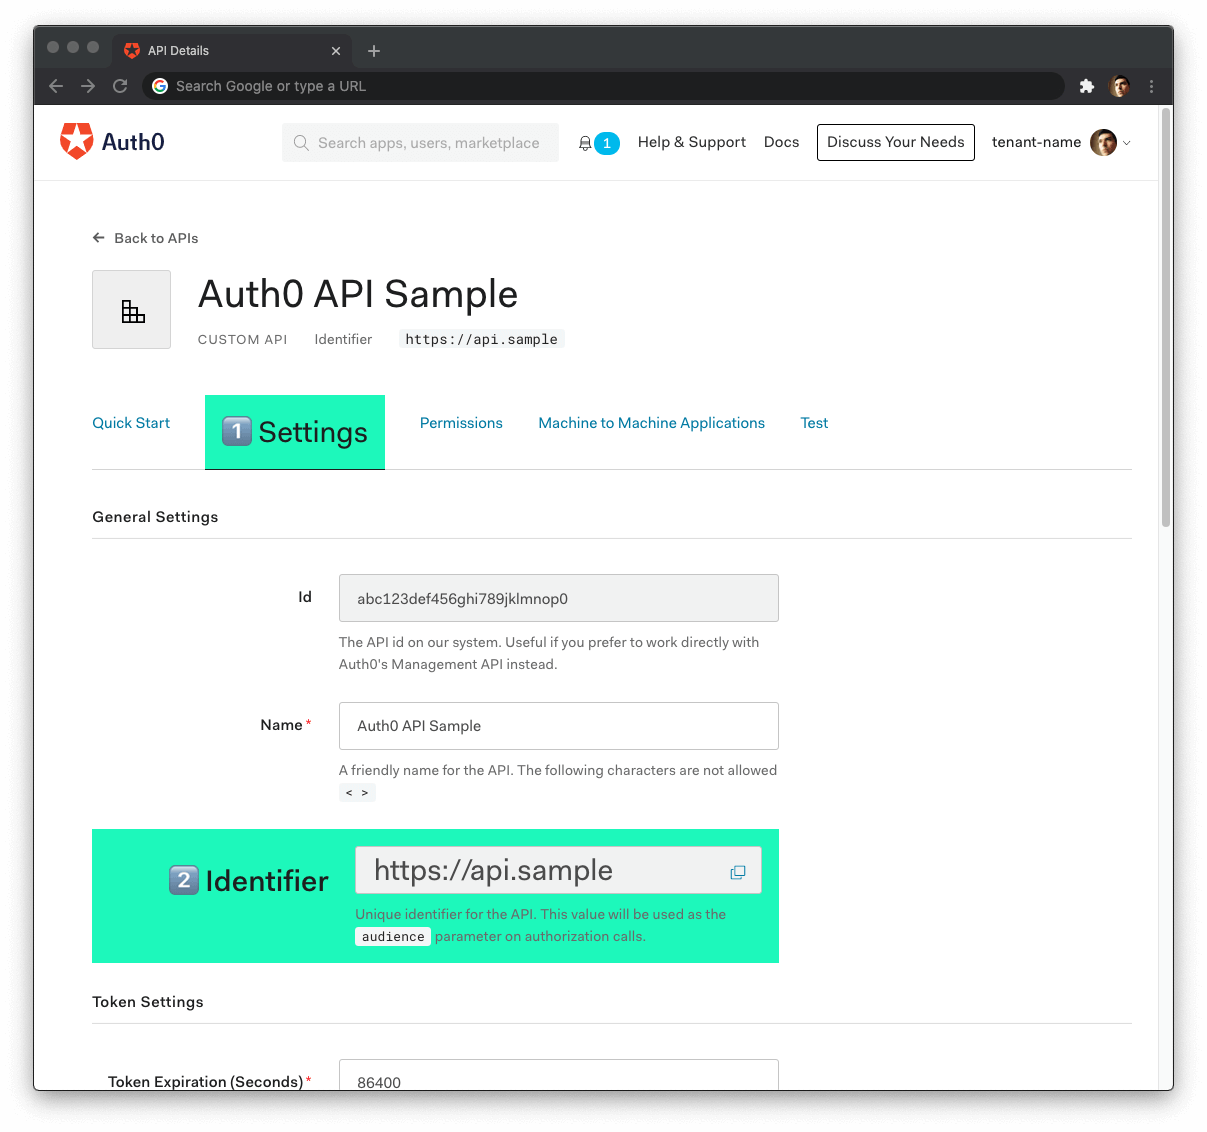
1. Click on the **"Settings"** tab.
2. Locate the **"Identifier"** field and copy its value.
3. Paste the "Identifier" value as the value of `AUTH0_AUDIENCE` in `.env`.
Now, **follow these steps to get the Auth0 Domain value**:
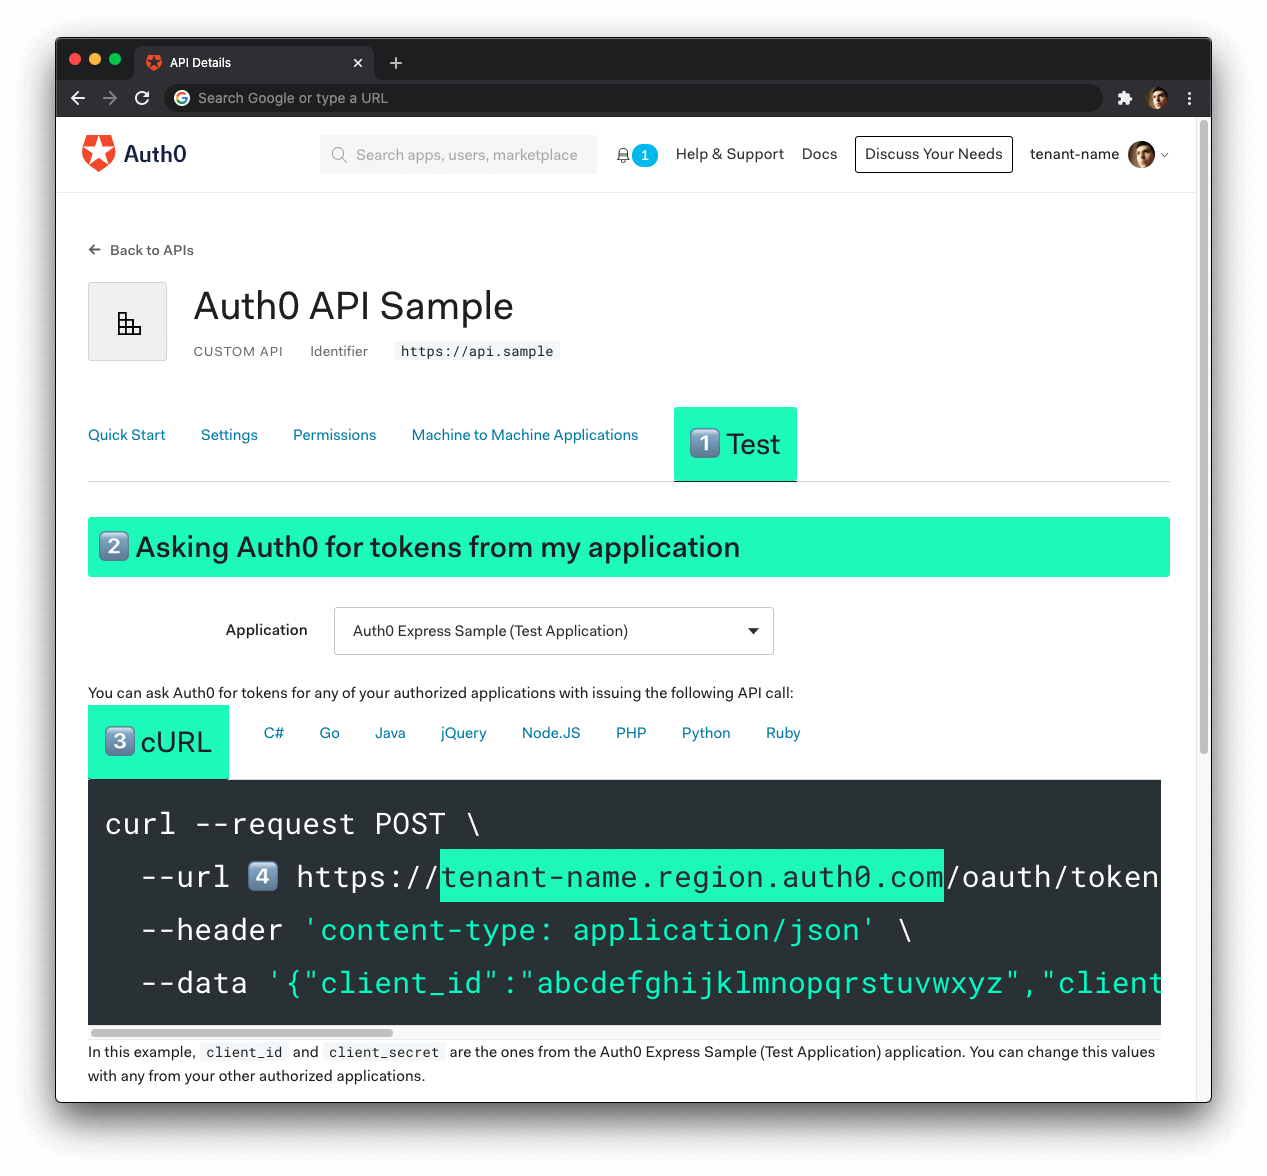
1. Click on the **"Test"** tab.
2. Locate the section called **"Asking Auth0 for tokens from my application"**.
3. Click on the **cURL** tab to show a mock `POST` request.
4. Copy your Auth0 domain, which is _part_ of the `--url` parameter value: `tenant-name.region.auth0.com`.
5. Paste the Auth0 domain value as the value of `AUTH0_DOMAIN` in `.env`.
**Tips to get the Auth0 Domain**
- The Auth0 Domain is the substring between the protocol, `https://` and the path `/oauth/token`.
- The Auth0 Domain follows this pattern: `tenant-name.region.auth0.com`.
- The `region` subdomain (`au`, `us`, or `eu`) is optional. Some Auth0 Domains don't have it.
### Run the project
With the `.env` configuration values set, run the API server by issuing the following command:
```bash
cargo run
```
## Test the Protected Endpoints
You can get an access token from the Auth0 Dashboard to test making a secure call to your protected API endpoints.
Head back to your Auth0 API page and click on the "Test" tab.
Locate the section called "Sending the token to the API".
Click on the cURL tab of the code box.
Copy the sample cURL command:
```bash
curl --request GET \
--url http://path_to_your_api/ \
--header 'authorization: Bearer really-long-string-which-is-test-your-access-token'
```
Replace the value of `http://path_to_your_api/` with your protected API endpoint path (you can find all the available API endpoints in the next section) and execute the command. You should receive back a successful response from the server.
You can try out any of our full stack demos to see the client-server Auth0 workflow in action using your preferred front-end and back-end technologies.
## Test the Admin Endpoint
The `GET /api/messages/admin` endpoint requires the access token to contain the `read:admin-messages` permission. The best way to simulate that client-server secured request is to use any of the Hello World client demo apps to log in as a user that has that permission.
You can use the Auth0 Dashboard to create an `admin` role and assign it the`read:admin-messages` permission. Then, you can assign the `admin` role to any user that you want to access the `/admin` endpoint.
If you need help doing so, check out the following resources:
- [Create roles](https://auth0.com/docs/authorization/rbac/roles/create-roles)
- [Create permissions](https://auth0.com/docs/get-started/dashboard/add-api-permissions)
- [Add permissions to roles](https://auth0.com/docs/authorization/rbac/roles/add-permissions-to-roles)
- [Assign roles to users](https://auth0.com/docs/users/assign-roles-to-users)
## API Endpoints
### 🔓 Get public message
```bash
GET /api/messages/public
```
#### Response
```bash
Status: 200 OK
```
```json
{
"api": "api_actix-web_rust_hello-world",
"branch": "basic-role-based-access-control",
"text": "The secured API doesn't require an access token to share this public message."
}
```
> 🔐 Protected Endpoints: These endpoints require the request to include an access token issued by Auth0 in the authorization header.
### 🔐 Get protected message
```bash
GET /api/messages/protected
```
#### Response
```bash
Status: 200 OK
```
```json
{
"api": "api_actix-web_rust_hello-world",
"branch": "basic-role-based-access-control",
"text": "The secured API requires a valid access token to share this protected message."
}
```
### 🔐 Get admin message
> Requires the user to have the `read:admin-messages` permission.
```bash
GET /api/messages/admin
```
#### Response
```bash
Status: 200 OK
```
```json
{
"api": "api_actix-web_rust_hello-world",
"branch": "basic-role-based-access-control",
"text": "The secured API requires a valid access token and the read:admin-messages permission to share this admin message."
}
```
## Error Handling
### 400s errors
#### Response
```bash
Status: Corresponding 400 status code
```
```json
{
"message": "Message that describes the error that took place."
}
```
### 500s errors
#### Response
```bash
Status: 500 Internal Server Error
```
```json
{
"message": "Message that describes the error that took place."
}
```
[actix-web-httpauth]: https://crates.io/crates/actix-web-httpauth
[jsonwebtoken]: https://crates.io/crates/jsonwebtoken