https://github.com/auth0-developer-hub/api_aspnet-core_csharp_hello-world___legacy
ASP.NET API server sample (C#), secured with Auth0.
https://github.com/auth0-developer-hub/api_aspnet-core_csharp_hello-world___legacy
Last synced: 4 months ago
JSON representation
ASP.NET API server sample (C#), secured with Auth0.
- Host: GitHub
- URL: https://github.com/auth0-developer-hub/api_aspnet-core_csharp_hello-world___legacy
- Owner: auth0-developer-hub
- Created: 2021-05-11T15:24:35.000Z (about 5 years ago)
- Default Branch: main
- Last Pushed: 2023-01-24T22:06:13.000Z (over 3 years ago)
- Last Synced: 2025-07-26T07:36:36.874Z (11 months ago)
- Language: C#
- Size: 21.5 KB
- Stars: 0
- Watchers: 0
- Forks: 4
- Open Issues: 2
-
Metadata Files:
- Readme: README.md
Awesome Lists containing this project
README
# Hello World API: .NET + C# Sample
This repository contains a .NET project that defines an ASP.NET API. You'll secure this API with Auth0 to practice making secure API calls from a client application.
## Quick Auth0 Set Up
### Set up the project
Open the `appsettings.json` file in the `HelloworldApplication` folder. Its content should look like the following:
```json
{
"Logging": {
"LogLevel": {
"Default": "Information",
"Microsoft": "Warning",
"Microsoft.Hosting.Lifetime": "Information"
}
},
"AllowedHosts": "*",
"Auth0": {
"Domain": "{DOMAIN}",
"Audience": "{API_IDENTIFIER}"
}
}
```
### Register an ASP.NET Web API with Auth0
- Open the [APIs](https://manage.auth0.com/#/apis) section of the Auth0 Dashboard.
- Click on the **Create API** button.
- Provide a **Name** value such as _Hello World API Server_.
- Set its **Identifier** to `https://api.example.com` or any other value of your liking.
- Leave the signing algorithm as `RS256` as it's the best option from a security standpoint.
- Click on the **Create** button.
> View ["Register APIs" document](https://auth0.com/docs/get-started/set-up-apis) for more details.
### Connect the ASP.NET Web API with Auth0
Head back to your Auth0 API page, and follow these steps to get the Auth0 Audience:
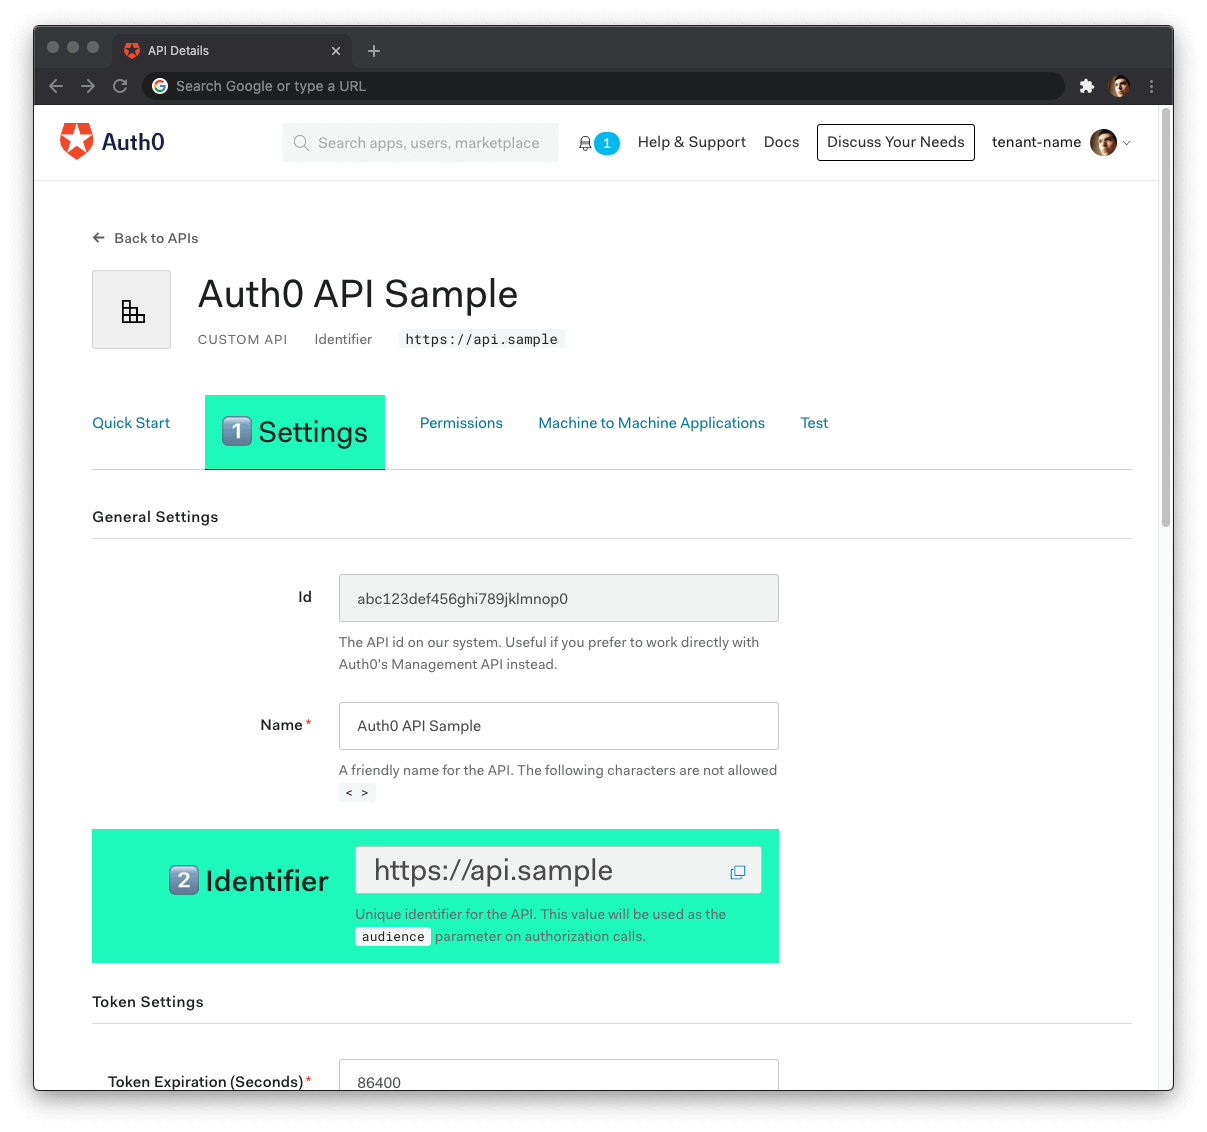
- Click on the **"Settings"** tab.
- Locate the **"Identifier"** field and copy its value.
- Paste the "Identifier" value as the value of `Audience` in `appsettings.json`.
Now, **follow these steps to get the Auth0 Domain value**:
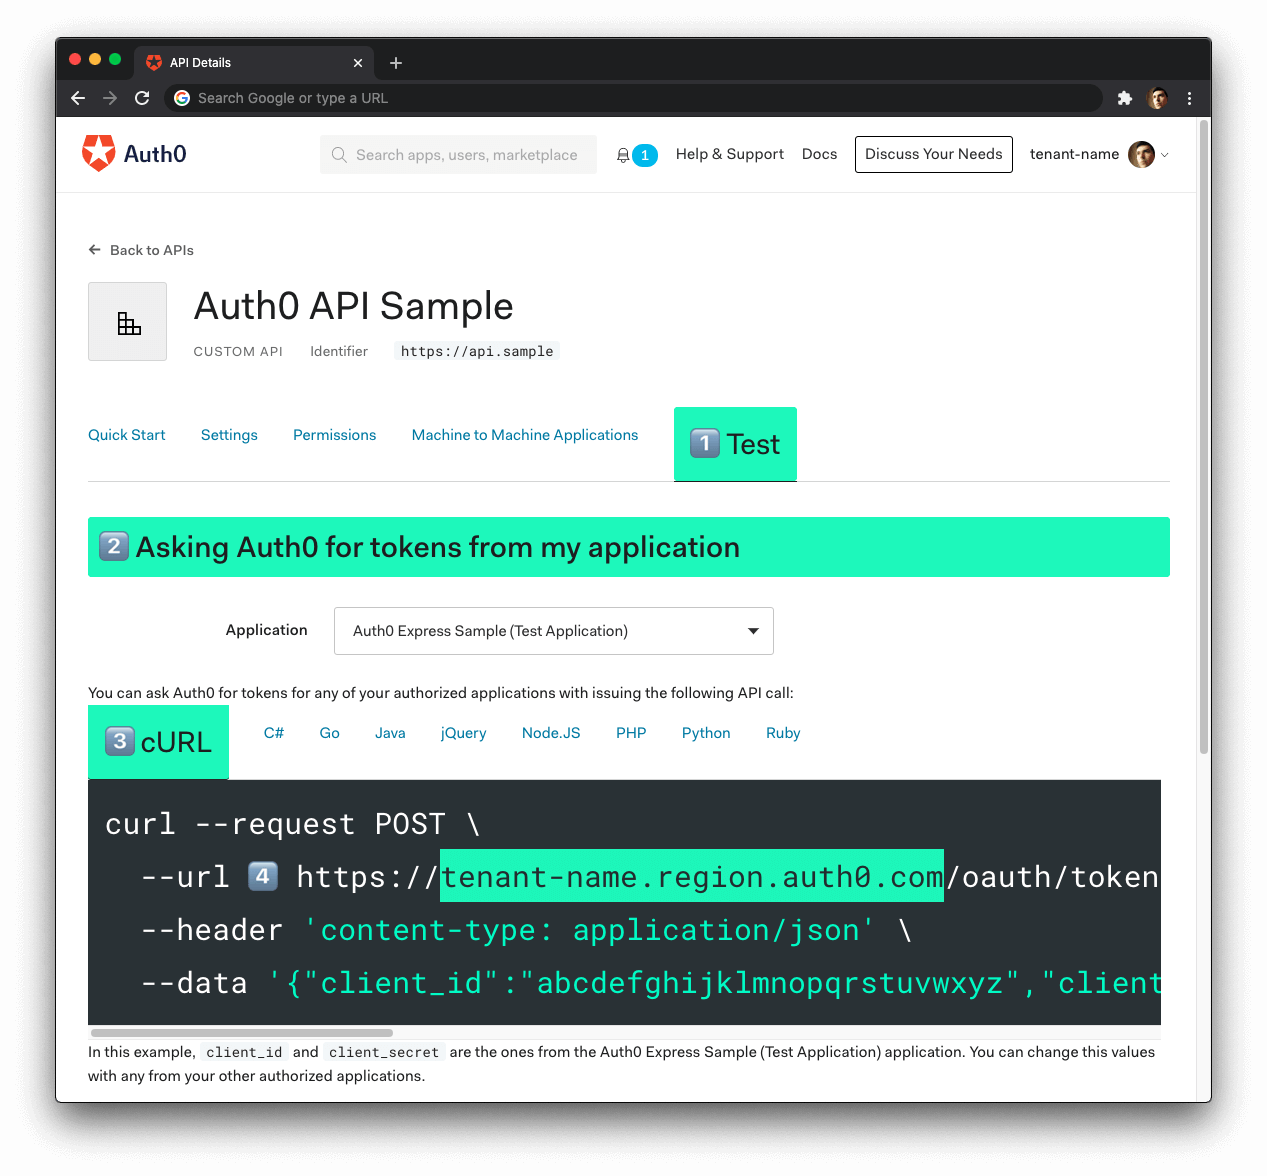
- Click on the **"Test"** tab.
- Locate the section called **"Asking Auth0 for tokens from my application"**.
- Click on the **cURL** tab to show a mock `POST` request.
- Copy your Auth0 domain, which is part of the `--url` parameter value: `tenant-name.region.auth0.com`.
- Paste the Auth0 domain value as the value of `Domain` in `appsettings.json`.
**Tips to get the Auth0 Domain**
- The Auth0 Domain is the substring between the protocol, `https://` and the path `/oauth/token`.
- The Auth0 Domain follows this pattern: `tenant-name.region.auth0.com`.
- The `region` subdomain (`au`, `us`, or `eu`) is optional. Some Auth0 Domains don't have it.
### Run the project
With the `appsettings.json` configuration values set, run the API server by issuing the following command:
```bash
dotnet run --project ./HelloworldApplication
```
## Test the Protected Endpoints
You can get an access token from the Auth0 Dashboard to test making a secure call to your protected API endpoints.
Head back to your Auth0 API page and click on the **"Test"** tab.
Locate the section called **"Sending the token to the API"**.
Click on the cURL tab of the code box.
Copy the sample cURL command:
```bash
curl --request GET \
--url http://path_to_your_api/ \
--header 'authorization: Bearer really-long-string-which-is-test-your-access-token'
```
Replace the value of `http://path_to_your_api/` with your protected API endpoint path (you can find all the available API endpoints in the next section) and execute the command. You should receive back a successful response from the server.
You can try out any of our full stack demos to see the client-server Auth0 workflow in action using your preferred front-end and back-end technologies.
## Test the Admin Endpoint
The `/admin` endpoint requires the access token to contain the `read:admin-messages` permission. The best way to simulate that client-server secured request is to use any of the Hello World client demo apps to log in as a user that has that permission.
You can use the Auth0 Dashboard to create an `admin` role and assign it the`read:admin-messages` permission. Then, you can assign the `admin` role to any user that you want to access the `/admin` endpoint.
## API Endpoints
### 🔓 Get public message
```bash
GET /api/messages/public
```
#### Response
```bash
Status: 200 OK
```
```json
{
"message": "The API doesn't require an access token to share this message."
}
```
> 🔐 Protected Endpoints: These endpoints require the request to include an access token issued by Auth0 in the authorization header.
### 🔐 Get protected message
```bash
GET /api/messages/protected
```
#### Response
```bash
Status: 200 OK
```
```json
{
"message": "The API successfully validated your access token."
}
```
### 🔐 Get admin message
> Requires the user to have the `read:admin-messages` permission.
```bash
GET /api/messages/admin
```
#### Response
```bash
Status: 200 OK
```
```json
{
"message": "The API successfully recognized you as an admin."
}
```