https://github.com/authorizerdev/authorizer
Your data, your control. Fully open source, authentication and authorization. No lock-ins. Deployment in Railway in 120 seconds || Spin a docker image as a micro-service in your infra. Built in login page and Admin panel out of the box.
https://github.com/authorizerdev/authorizer
2fa auth authentication authorization docker golang graphdb graphql hacktoberfest magic-link microservice nosql oauth2 role-based-access-control security social-logins sql typescript user-privileges
Last synced: about 1 year ago
JSON representation
Your data, your control. Fully open source, authentication and authorization. No lock-ins. Deployment in Railway in 120 seconds || Spin a docker image as a micro-service in your infra. Built in login page and Admin panel out of the box.
- Host: GitHub
- URL: https://github.com/authorizerdev/authorizer
- Owner: authorizerdev
- License: mit
- Created: 2021-06-02T12:42:07.000Z (about 5 years ago)
- Default Branch: main
- Last Pushed: 2025-04-18T06:02:34.000Z (over 1 year ago)
- Last Synced: 2025-04-18T18:37:11.764Z (over 1 year ago)
- Topics: 2fa, auth, authentication, authorization, docker, golang, graphdb, graphql, hacktoberfest, magic-link, microservice, nosql, oauth2, role-based-access-control, security, social-logins, sql, typescript, user-privileges
- Language: Go
- Homepage: https://authorizer.dev
- Size: 55.8 MB
- Stars: 1,788
- Watchers: 18
- Forks: 184
- Open Issues: 84
-
Metadata Files:
- Readme: README.md
- Contributing: .github/CONTRIBUTING.md
- Funding: .github/FUNDING.yml
- License: LICENSE
- Code of conduct: .github/CODE_OF_CONDUCT.md
- Roadmap: ROADMAP.md
Awesome Lists containing this project
- my-awesome - authorizerdev/authorizer - link,microservice,nosql,oauth2,role-based-access-control,security,social-logins,sql,typescript,user-privileges pushed_at:2026-07 star:2.0k fork:0.2k Your data, your control. Fully open source, authentication and authorization. No lock-ins. Deployment in Railway in 120 seconds || Spin a docker image as a micro-service in your infra. Built in login page and Admin panel out of the box. (Go)
README

Authorizer
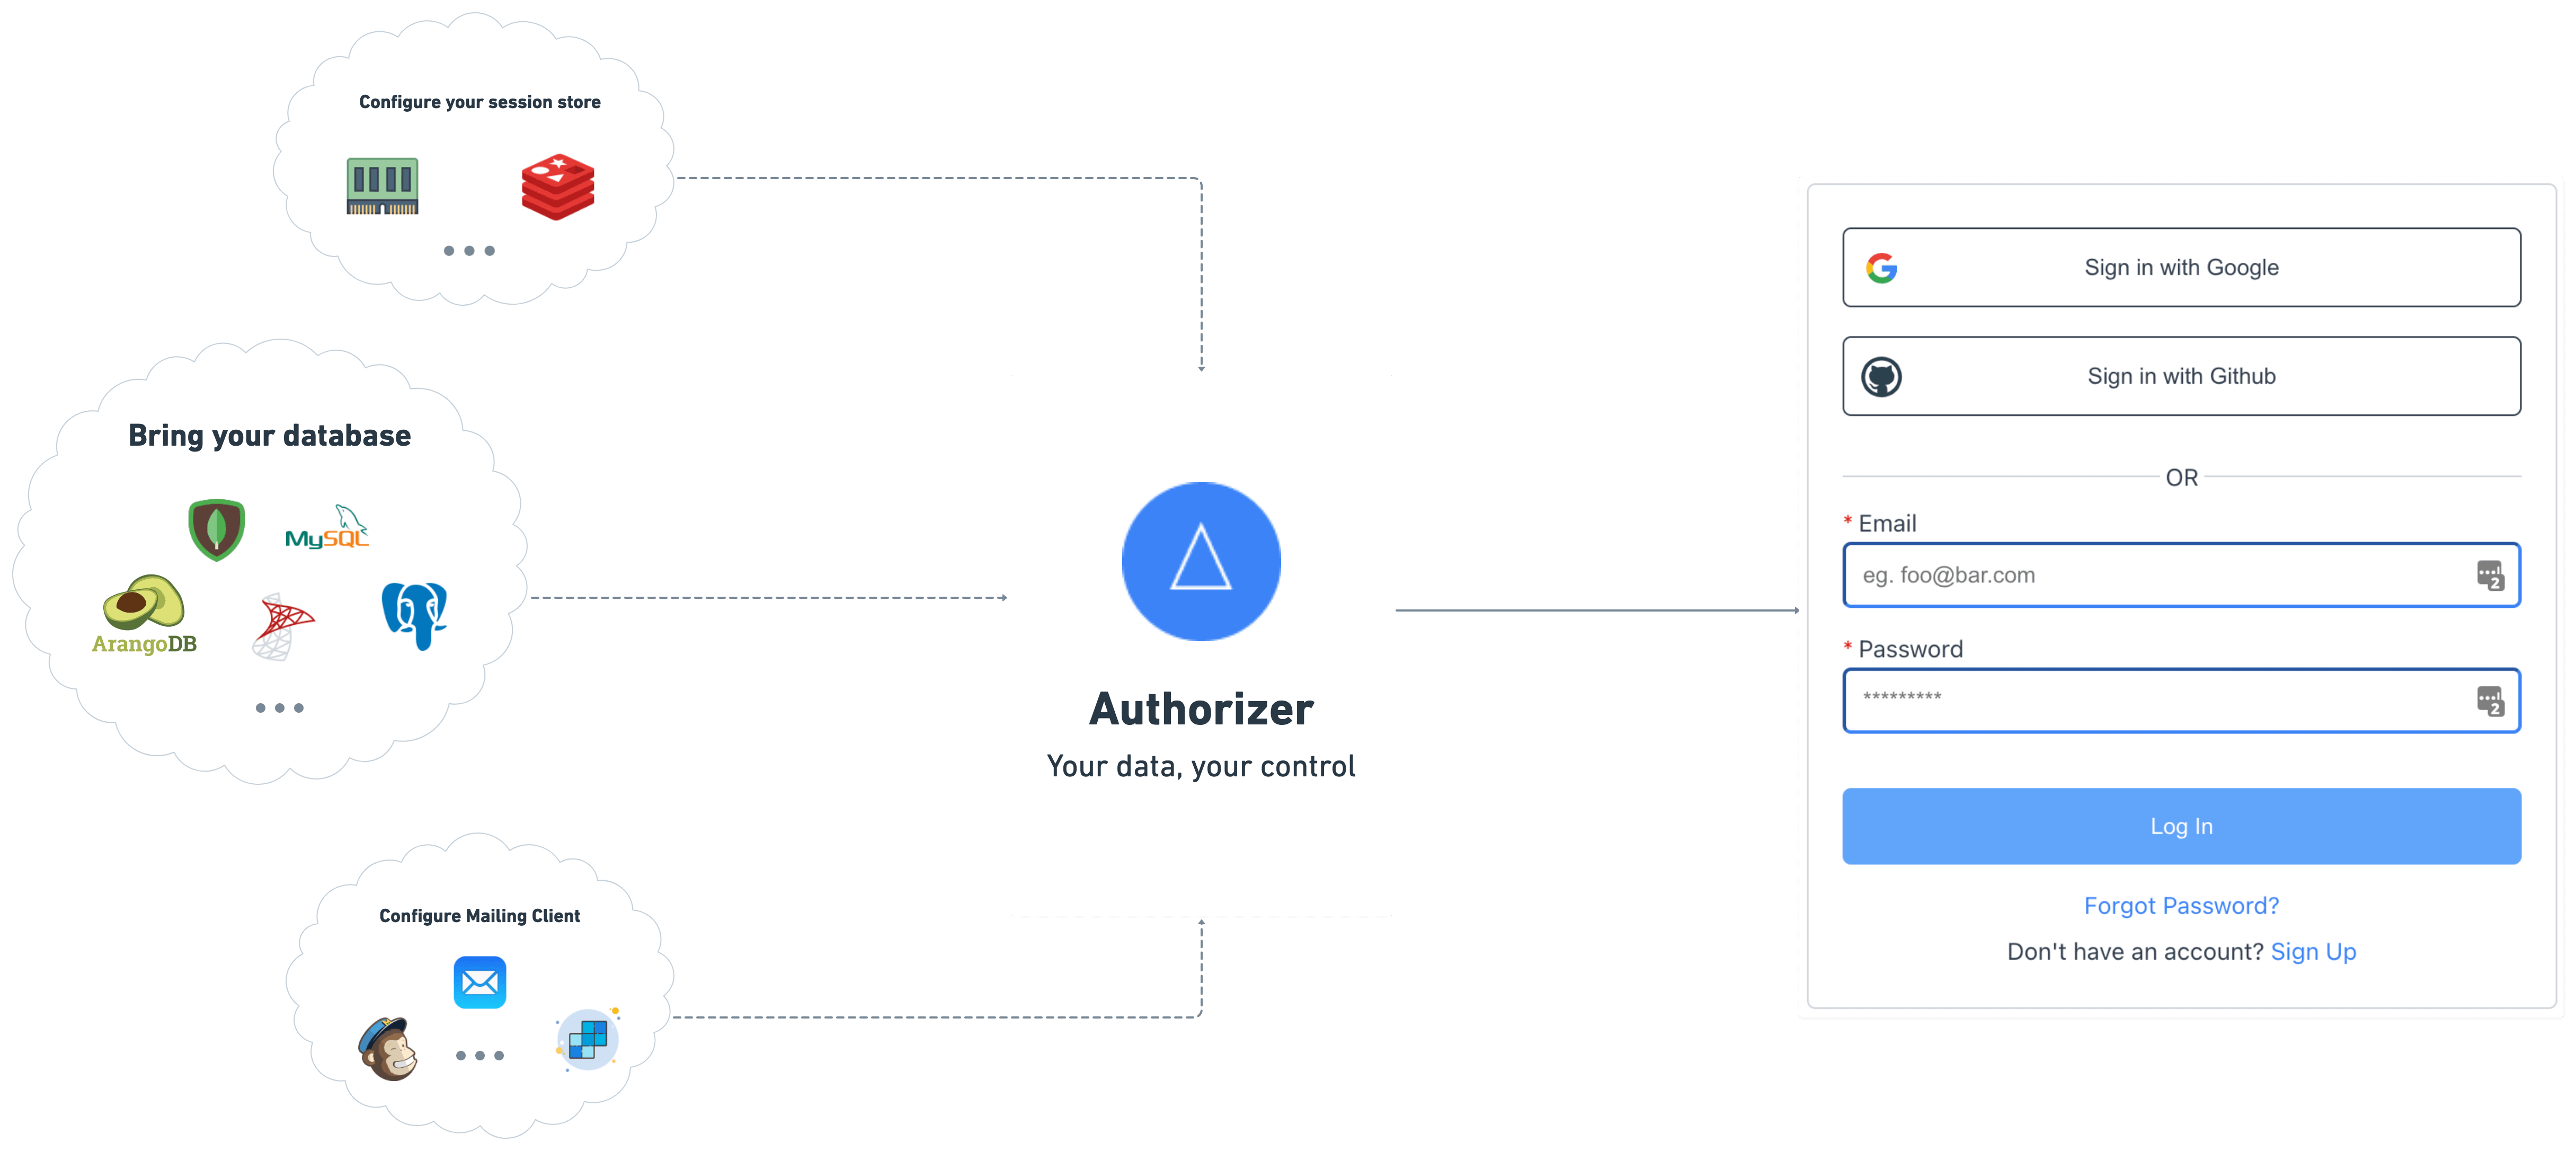
**Authorizer** is an open-source authentication and authorization solution for your applications. Bring your database and have complete control over the user information. You can self-host authorizer instances and connect to any database (Currently supports 11+ databases including [Postgres](https://www.postgresql.org/), [MySQL](https://www.mysql.com/), [SQLite](https://www.sqlite.org/index.html), [SQLServer](https://www.microsoft.com/en-us/sql-server/), [YugaByte](https://www.yugabyte.com/), [MariaDB](https://mariadb.org/), [PlanetScale](https://planetscale.com/), [CassandraDB](https://cassandra.apache.org/_/index.html), [ScyllaDB](https://www.scylladb.com/), [MongoDB](https://mongodb.com/), [ArangoDB](https://www.arangodb.com/)).
For more information check:
- [Docs](http://docs.authorizer.dev/)
- [Discord Community](https://discord.gg/Zv2D5h6kkK)
- [Contributing Guide](https://github.com/authorizerdev/authorizer/blob/main/.github/CONTRIBUTING.md)
# Introduction
#### We offer the following functionality
- ✅ Sign-in / Sign-up with email ID and password
- ✅ Secure session management
- ✅ Email verification
- ✅ OAuth2 and OpenID compatible APIs
- ✅ APIs to update profile securely
- ✅ Forgot password flow using email
- ✅ Social logins (Google, Github, Facebook, LinkedIn, Apple more coming soon)
- ✅ Role-based access management
- ✅ Password-less login with magic link login
- ✅ Multi factor authentication
- ✅ Email templating
- ✅ Webhooks
## Roadmap
- [VueJS SDK](https://github.com/authorizerdev/authorizer-vue)
- [Svelte SDK](https://github.com/authorizerdev/authorizer-svelte)
- [Golang SDK](https://github.com/authorizerdev/authorizer-go)
- React Native SDK
- Flutter SDK
- Android Native SDK
- iOS native SDK
- Python SDK
- PHP SDK
- WordPress plugin
- Kubernetes Helm Chart
- [Local Stack](https://github.com/localstack/localstack)
- AMI
- Digital Ocean Droplet
- Azure
- Render
- Edge Deployment using Fly.io
- Password-less login with mobile number and OTP SMS
# Getting Started
## Step 1: Get Authorizer Instance
### Deploy Production Ready Instance
Deploy production ready Authorizer instance using one click deployment options available below
| **Infra provider** | **One-click link** | **Additional information** |
| :----------------: | :------------------------------------------------------------------------------------------------------------------------------------------------------------------------------------------------------: | :----------------------------------------------------: |
| Railway.app |  | [docs](https://docs.authorizer.dev/deployment/railway) |
| Heroku |  | [docs](https://docs.authorizer.dev/deployment/heroku) |
| Render | [](https://render.com/deploy?repo=https://github.com/authorizerdev/authorizer-render) | [docs](https://docs.authorizer.dev/deployment/render) |
| Koyeb |  | [docs](https://docs.authorizer.dev/deployment/koyeb) |
| RepoCloud |  | [docs](https://repocloud.io/details/?app_id=174) |
| Alibaba Cloud|  | [docs](https://docs.authorizer.dev/deployment/alibaba-cloud) |
### Deploy Authorizer Using Source Code
This guide helps you practice using Authorizer to evaluate it before you use it in a production environment. It includes instructions for installing the Authorizer server in local or standalone mode.
#### Install using source code
#### Prerequisites
- OS: Linux or macOS or windows
- Go: (Golang)(https://golang.org/dl/) >= v1.15
#### Project Setup
1. Fork the [authorizer](https://github.com/authorizerdev/authorizer) repository (**Skip this step if you have access to repo**)
2. Clone repo: `git clone https://github.com/authorizerdev/authorizer.git` or use the forked url from step 1
3. Change directory to authorizer: `cd authorizer`
4. Create Env file `cp .env.sample .env`. Check all the supported env [here](https://docs.authorizer.dev/core/env/)
5. Build Dashboard `make build-dashboard`
6. Build App `make build-app`
7. Build Server `make clean && make`
> Note: if you don't have [`make`](https://www.ibm.com/docs/en/aix/7.2?topic=concepts-make-command), you can `cd` into `server` dir and build using the `go build` command. In that case you will have to build `dashboard` & `app` manually using `npm run build` on both dirs.
8. Run binary `./build/server`
### Deploy Authorizer using binaries
Deploy / Try Authorizer using binaries. With each [Authorizer Release](https://github.com/authorizerdev/authorizer/releases)
binaries are baked with required deployment files and bundled. You can download a specific version of it for the following operating systems:
- Mac OSX
- Linux
#### Download and unzip bundle
- Download the Bundle for the specific OS from the [release page](https://github.com/authorizerdev/authorizer/releases)
> Note: For windows, we recommend running using docker image to run authorizer.
- Unzip using following command
- Mac / Linux
```sh
tar -zxf AUTHORIZER_VERSION -c authorizer
```
- Change directory to `authorizer`
```sh
cd authorizer
```
#### Step 3: Start Authorizer
- Run following command to start authorizer
- For Mac / Linux users
```sh
./build/server
```
> Note: For mac users, you might have to give binary the permission to execute. Here is the command you can use to grant permission `xattr -d com.apple.quarantine build/server`
## Step 2: Setup Instance
- Open authorizer instance endpoint in browser
- Sign up as an admin with a secure password
- Configure environment variables from authorizer dashboard. Check env [docs](/core/env) for more information
> Note: `DATABASE_URL`, `DATABASE_TYPE` and `DATABASE_NAME` are only configurable via platform envs
### Things to consider
- For social logins, you will need respective social platform key and secret
- For having verified users, you will need an SMTP server with an email address and password using which system can send emails. The system will send a verification link to an email address. Once an email is verified then, only able to access it.
> Note: One can always disable the email verification to allow open sign up, which is not recommended for production as anyone can use anyone's email address 😅
- For persisting user sessions, you will need Redis URL (not in case of railway app). If you do not configure a Redis server, sessions will be persisted until the instance is up or not restarted. For better response time on authorization requests/middleware, we recommend deploying Redis on the same infra/network as your authorizer server.
## Testing
- Check the testing instructions [here](https://github.com/authorizerdev/authorizer/blob/main/.github/CONTRIBUTING.md#testing)
## Integrating into your website
This example demonstrates how you can use [`@authorizerdev/authorizer-js`](/authorizer-js/getting-started) CDN version and have login ready for your site in few seconds. You can also use the ES module version of [`@authorizerdev/authorizer-js`](/authorizer-js/getting-started) or framework-specific versions like [`@authorizerdev/authorizer-react`](/authorizer-react/getting-started)
### Copy the following code in `html` file
> **Note:** Change AUTHORIZER_URL in the below code with your authorizer URL. Also, you can change the logout button component
```html
const authorizerRef = new authorizerdev.Authorizer({
authorizerURL: `YOUR_AUTHORIZER_INSTANCE_URL`,
redirectURL: window.location.origin,
clientID: 'YOUR_CLIENT_ID', // obtain your client id from authorizer dashboard
});
// use the button selector as per your application
const logoutBtn = document.getElementById('logout');
logoutBtn.addEventListener('click', async function () {
await authorizerRef.logout();
window.location.href = '/';
});
async function onLoad() {
const res = await authorizerRef.authorize({
response_type: 'code',
use_refresh_token: false,
});
if (res && res.access_token) {
// you can use user information here, eg:
const user = await authorizerRef.getProfile({
Authorization: `Bearer ${res.access_token}`,
});
const userSection = document.getElementById('user');
const logoutSection = document.getElementById('logout-section');
logoutSection.classList.toggle('hide');
userSection.innerHTML = `Welcome, ${user.email}`;
}
}
onLoad();
```
---
### Support my work
