https://github.com/ballerina-platform/module-ballerinax-docusign.dsadmin
The Ballerina DocuSign Admin module efficiently manages DocuSign users and permissions across all your accounts.
https://github.com/ballerina-platform/module-ballerinax-docusign.dsadmin
ballerina docusign integration wso2
Last synced: 6 months ago
JSON representation
The Ballerina DocuSign Admin module efficiently manages DocuSign users and permissions across all your accounts.
- Host: GitHub
- URL: https://github.com/ballerina-platform/module-ballerinax-docusign.dsadmin
- Owner: ballerina-platform
- License: apache-2.0
- Created: 2024-01-30T04:55:14.000Z (over 2 years ago)
- Default Branch: main
- Last Pushed: 2025-05-23T04:37:39.000Z (about 1 year ago)
- Last Synced: 2025-07-27T03:51:07.786Z (12 months ago)
- Topics: ballerina, docusign, integration, wso2
- Language: Ballerina
- Homepage: https://developers.docusign.com/docs/admin-api
- Size: 4.26 MB
- Stars: 2
- Watchers: 50
- Forks: 2
- Open Issues: 0
-
Metadata Files:
- Readme: README.md
- License: LICENSE
- Codeowners: .github/CODEOWNERS
Awesome Lists containing this project
README
# Ballerina Docusign Admin Connector
[](https://github.com/ballerina-platform/module-ballerinax-docusign.dsadmin/actions/workflows/ci.yml)
[](https://github.com/ballerina-platform/module-ballerinax-docusign.dsadmin/commits/main)
[](https://github.com/ballerina-platform/ballerina-library/labels/module%2Fdocusign.dsadmin)
[](https://opensource.org/licenses/Apache-2.0)
[DocuSign](https://www.docusign.com) is a digital transaction management platform that enables users to securely sign, send, and manage documents electronically.
The Ballerina DocuSign Admin connector integrates with the DocuSign platform, provides APIs to efficiently manages DocuSign users and permissions across all the accounts and domains within Ballerina applications. It supports [DocuSign Admin API V2](https://github.com/docusign/OpenAPI-Specifications/blob/master/admin.rest.swagger-v2.1.json).
## Setup guide
To utilize the DocuSign Admin connector, you must have access to the DocuSign REST API through a DocuSign account.
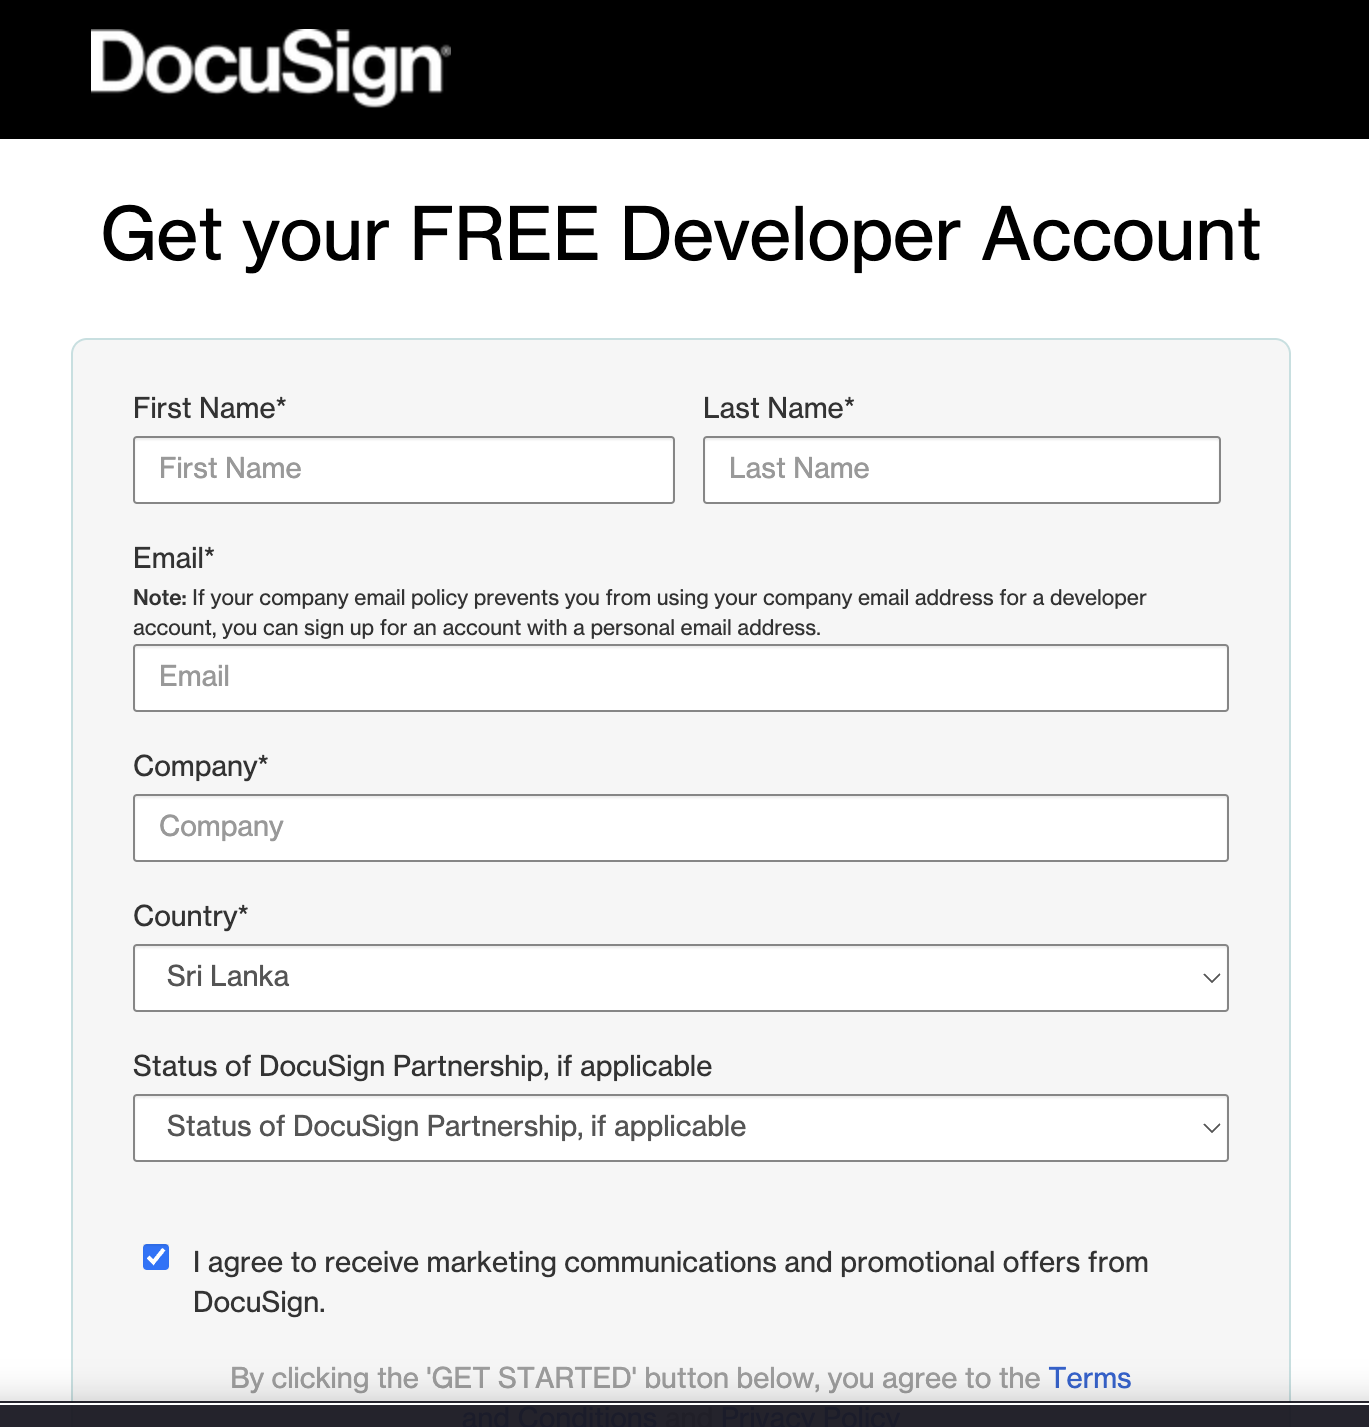
### Step 1: Create a DocuSign account
In order to use the DocuSign Admin connector, you need to first create the DocuSign credentials for the connector to interact with DocuSign.
- You can [create an account](https://go.docusign.com/o/sandbox/) for free at the [Developer Center](https://developers.docusign.com/).
### Step 2: Create integration key and secret key
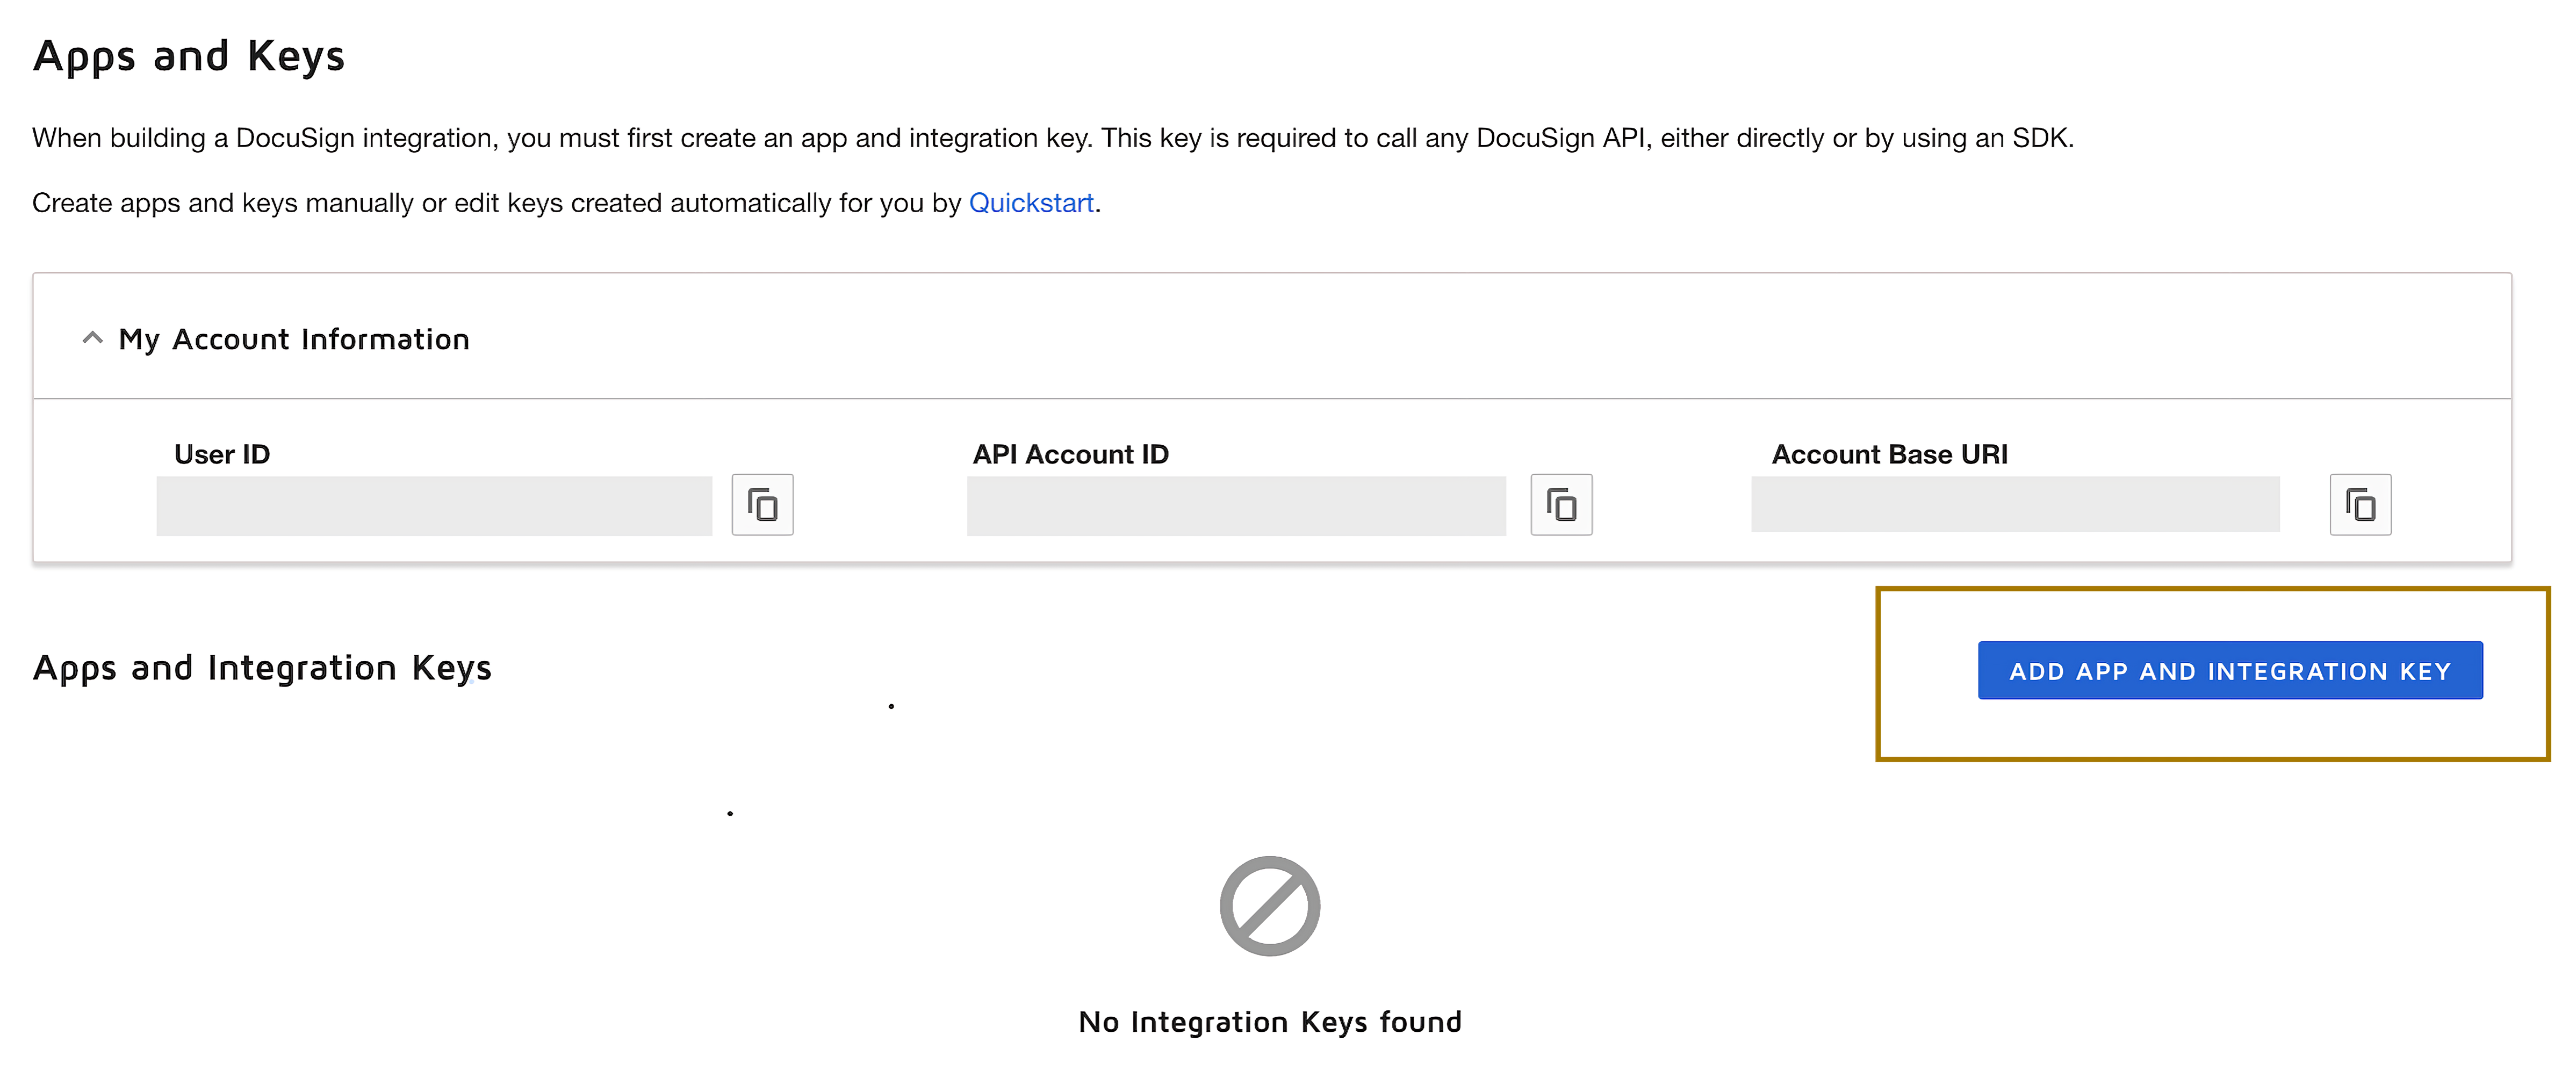
1. **Create an integration key**: Visit the [Apps and Keys](https://admindemo.docusign.com/apps-and-keys) page on DocuSign. Click on `Add App and Integration Key,` provide a name for the app, and click `Create App`. This will generate an `Integration Key`.
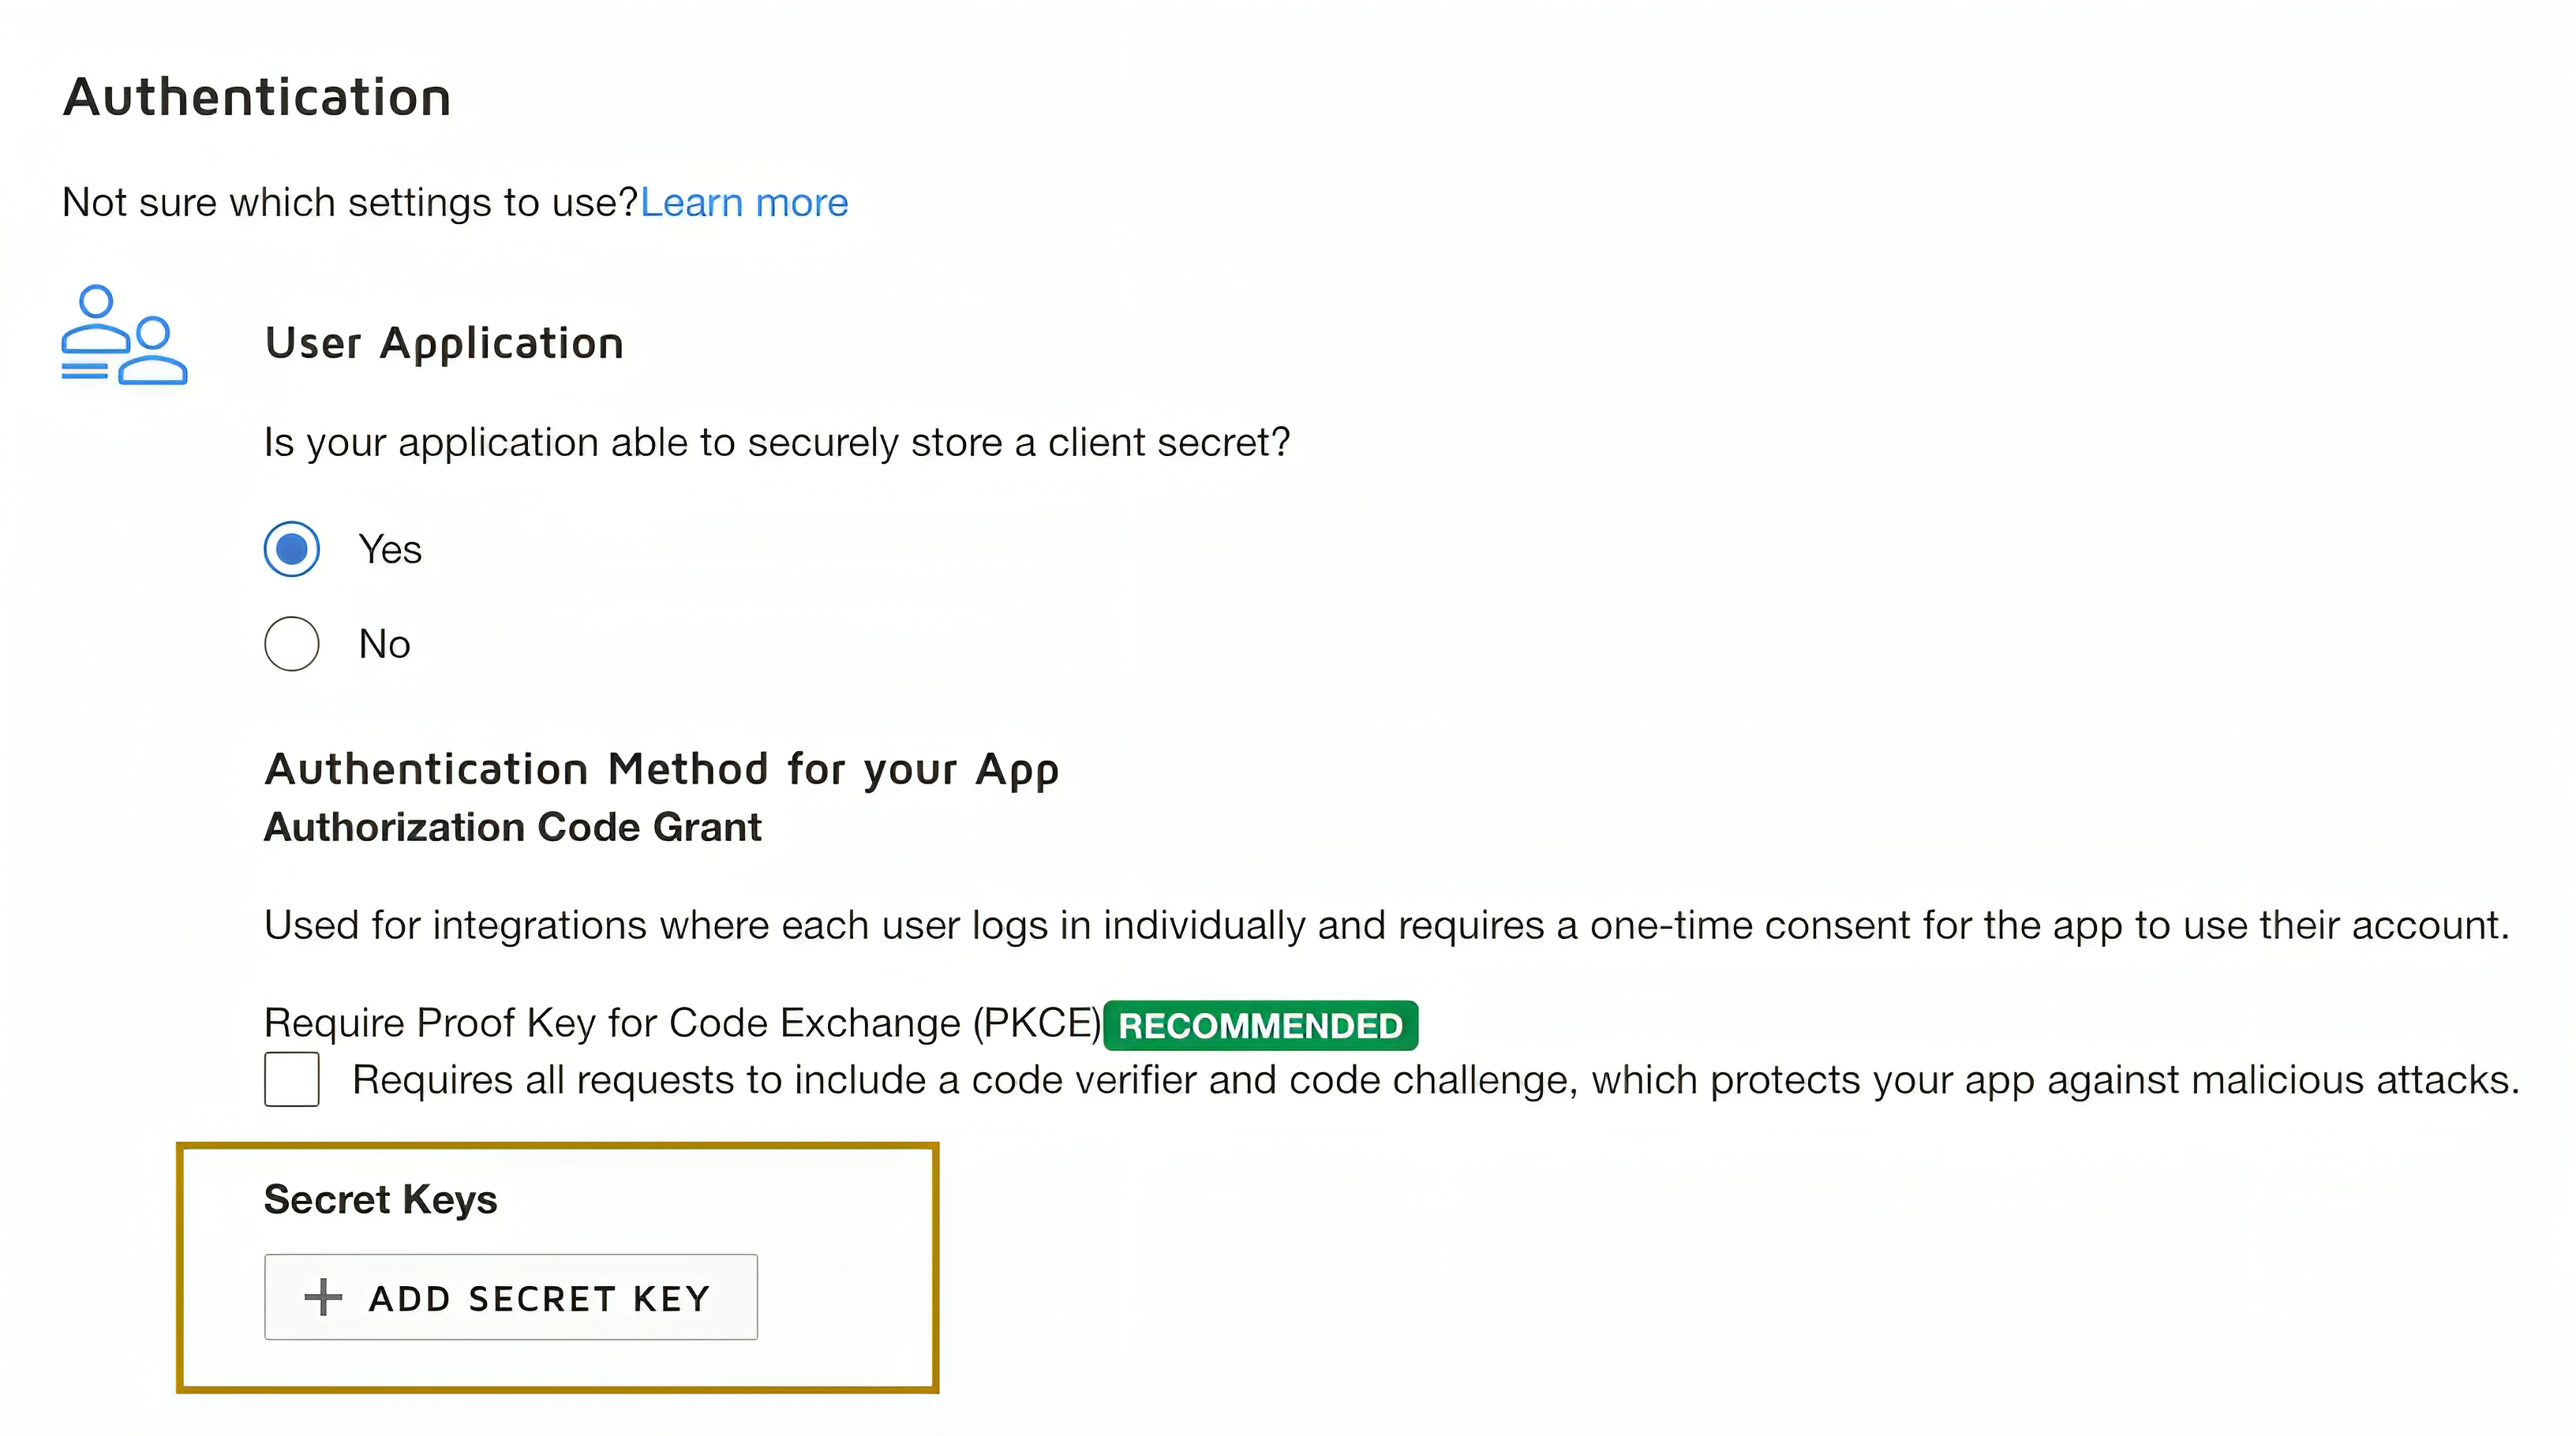
2. **Generate a secret key**: Under the `Authentication` section, click on `Add Secret Key`. This will generate a secret Key. Make sure to copy and save both the `Integration Key` and `Secret Key`.
### Step 3: Generate refresh token
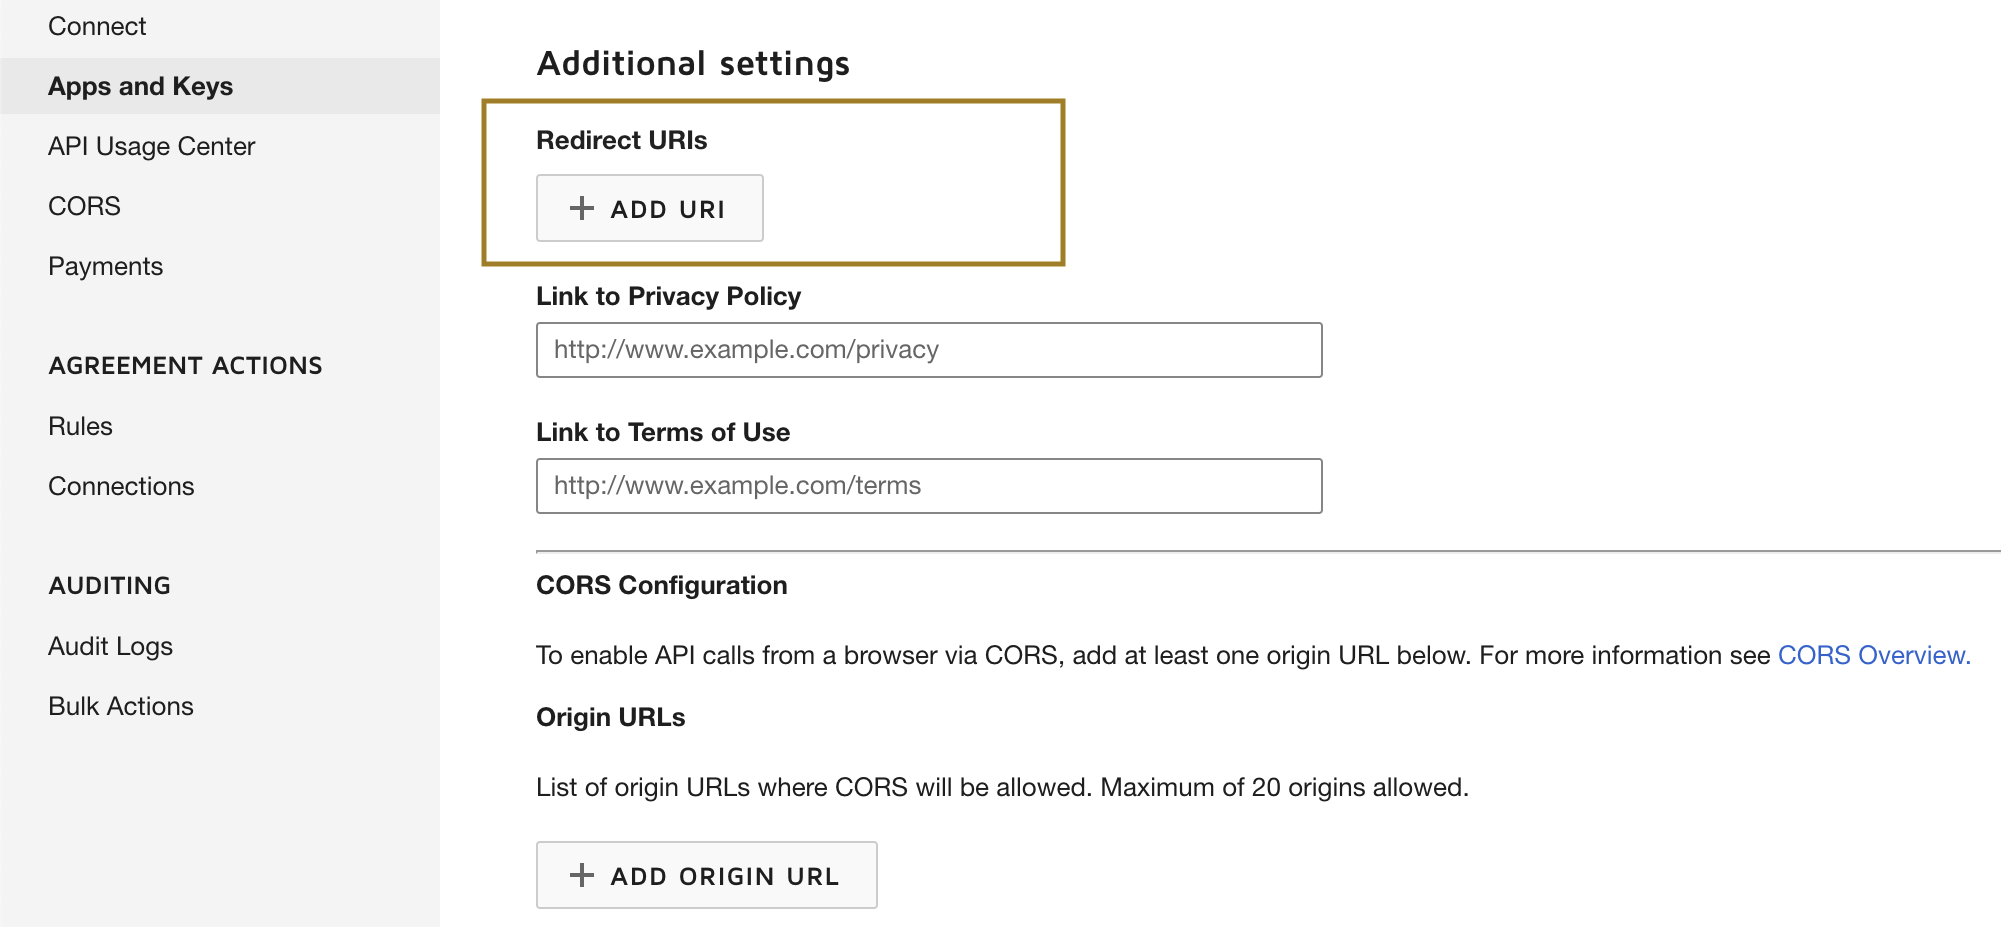
1. **Add a redirect URI**: Click on `Add URI` and enter your redirect URI (e.g., ).
2. **Generate the encoded key**: The `Encoded Key` is a base64 encoded string of your `Integration key` and `Secret Key` in the format `{IntegrationKey:SecretKey}`. You can generate this in your web browser's console using the `btoa()` function: `btoa('IntegrationKey:SecretKey')`. You can either generate the encoded key from an online base64 encoder.
3. **Get the authorization code**: Visit the following URL in your web browser, replacing `{iKey}` with your Integration Key and `{redirectUri}` with your redirect URI.
```url
https://account-d.docusign.com/oauth/auth?response_type=code&scope=signature%20organization_read%20group_read%20account_read%20permission_read%20user_read%20user_write&client_id={iKey}&redirect_uri={redirectUri}
```
This will redirect you to your Redirect URI with a `code` query parameter. This is your `authorization code`.
4. **Get the refresh token**: Use the following `curl` command to get the refresh token, replacing `{encodedKey}` with your Encoded Key and `{codeFromUrl}` with your `authorization code`.
```bash
curl --location 'https://account-d.docusign.com/oauth/token' \
--header 'Authorization: Basic {encodedKey}' \
--header 'Content-Type: application/x-www-form-urlencoded' \
--data-urlencode 'code={codeFromUrl}' \
--data-urlencode 'grant_type=authorization_code'
```
The response will contain your refresh token. Use `https://account-d.docusign.com/oauth/token` as the refresh URL.
Remember to replace `{IntegrationKey:SecretKey}`, `{iKey}`, `{redirectUri}`, `{encodedKey}`, and `{codeFromUrl}` with your actual values.
Above is about using the DocuSign Admin API in the developer mode. If your app is ready to go live, you need to follow the guidelines given [here](https://developers.docusign.com/docs/admin-api/go-live/) to make it work.
## Quickstart
To use the DocuSign Admin connector in your Ballerina project, modify the `.bal` file as follows.
### Step 1: Import the module
Import the `ballerinax/docusign.dsadmin` module into your Ballerina project.
```ballerina
import ballerinax/docusign.dsadmin;
```
### Step 2: Instantiate a new connector
Create a `dsadmin:ConnectionConfig` with the obtained OAuth2.0 tokens and initialize the connector with it.
```ballerina
configurable string clientId = ?;
configurable string clientSecret = ?;
configurable string refreshToken = ?;
configurable string refreshUrl = ?;
dsadmin:Client docuSignClient = check new({
auth: {
clientId,
clientSecret,
refreshToken,
refreshUrl
}
});
```
### Step 3: Invoke the connector operation
You can now utilize the operations available within the connector.
```ballerina
public function main() returns error? {
dsadmin:OrganizationsResponse orgResponse = check docuSignClient->/v2/organizations();
dsadmin:OrganizationResponse[]? organizations = orgResponse.organizations;
dsadmin:OrganizationResponse organization = organizations[0];
dsadmin:NewUserResponse newUserResponse = check docuSignClient->/v2/organizations/[organization.id]/users.post(
{
user_name: "user1",
first_name: "name1",
email: "user1@docusignmail.com",
accounts: [
{
id: accountId,
company_name: "Company"
}
]
}
);
}
```
### Step 4: Run the Ballerina application
Use the following command to compile and run the Ballerina program.
```bash
bal run
```
## Examples
The DocuSign Admin connector provides practical examples illustrating usage in various scenarios. Explore these [examples](https://github.com/ballerina-platform/module-ballerinax-docusign.dsadmin/tree/main/examples).
1. [Manage user information with DocuSign Admin](https://github.com/ballerina-platform/module-ballerinax-docusign.dsadmin/tree/main/examples/manage-user-information)
This example shows how to use DocuSign Admin API to to create users and retrieve user informations related to eSignature tasks.
2. [Access permissions in user accounts](https://github.com/ballerina-platform/module-ballerinax-docusign.dsadmin/tree/main/examples/permissions-in-organizations)
This example shows how to use DocuSign Admin API to to view permission details of the user accounts.
## Issues and projects
The **Issues** and **Projects** tabs are disabled for this repository as this is part of the Ballerina library. To report bugs, request new features, start new discussions, view project boards, etc., visit the Ballerina library [parent repository](https://github.com/ballerina-platform/ballerina-library).
This repository only contains the source code for the package.
## Building from the source
### Prerequisites
1. Download and install Java SE Development Kit (JDK) version 17. You can download it from either of the following sources:
- [Oracle JDK](https://www.oracle.com/java/technologies/downloads/)
- [OpenJDK](https://adoptium.net/)
> **Note:** After installation, remember to set the `JAVA_HOME` environment variable to the directory where JDK was installed.
2. Download and install [Ballerina Swan Lake](https://ballerina.io/).
3. Download and install [Docker](https://www.docker.com/get-started).
> **Note**: Ensure that the Docker daemon is running before executing any tests.
4. Generate a Github access token with read package permissions, then set the following `env` variables:
```bash
export packageUser=
export packagePAT=
```
### Build options
Execute the commands below to build from the source.
1. To build the package:
```bash
./gradlew clean build
```
2. To run the tests:
```bash
./gradlew clean test
```
3. To build the without the tests:
```bash
./gradlew clean build -x test
```
4. To debug package with a remote debugger:
```bash
./gradlew clean build -Pdebug=
```
5. To debug with Ballerina language:
```bash
./gradlew clean build -PbalJavaDebug=
```
6. Publish the generated artifacts to the local Ballerina central repository:
```bash
./gradlew clean build -PpublishToLocalCentral=true
```
7. Publish the generated artifacts to the Ballerina central repository:
```bash
./gradlew clean build -PpublishToCentral=true
```
## Contributing to Ballerina
As an open source project, Ballerina welcomes contributions from the community.
For more information, go to the [contribution guidelines](https://github.com/ballerina-platform/ballerina-lang/blob/master/CONTRIBUTING.md).
## Code of conduct
All contributors are encouraged to read the [Ballerina Code of Conduct](https://ballerina.io/code-of-conduct).
## Useful links
- Discuss code changes of the Ballerina project in [ballerina-dev@googlegroups.com](mailto:ballerina-dev@googlegroups.com).
- Chat live with us via our [Discord server](https://discord.gg/ballerinalang).
- Post all technical questions on Stack Overflow with the [#ballerina](https://stackoverflow.com/questions/tagged/ballerina) tag.