https://github.com/basokant/git-intro-workshop
A repository for the Git(Hub) Intro workshop run for the members of Western Game Design Society.
https://github.com/basokant/git-intro-workshop
Last synced: about 1 year ago
JSON representation
A repository for the Git(Hub) Intro workshop run for the members of Western Game Design Society.
- Host: GitHub
- URL: https://github.com/basokant/git-intro-workshop
- Owner: basokant
- License: mit
- Created: 2023-02-09T06:24:23.000Z (over 3 years ago)
- Default Branch: main
- Last Pushed: 2023-02-10T01:57:19.000Z (over 3 years ago)
- Last Synced: 2025-05-09T01:37:27.569Z (about 1 year ago)
- Size: 15.6 KB
- Stars: 1
- Watchers: 1
- Forks: 5
- Open Issues: 0
-
Metadata Files:
- Readme: README.md
- License: LICENSE
Awesome Lists containing this project
README
# Git(Hub) Intro Workshop
A repository for the Git(Hub) Intro workshop run for the members of Western Game Design Society.
## Resources
- https://git-scm.com/downloads
- https://rogerdudler.github.io/git-guide/
- https://www.atlassian.com/git/tutorials/
- https://www.atlassian.com/git/tutorials/atlassian-git-cheatsheet
- https://github.com/skills/introduction-to-github
## Outline
### What is Git?
- The **de facto** distributed version control system.
- Git is like a **big album of _snapshots_** that helps you **keep track of changes** in your projects, and it's especially helpful when you're **working with others**.
- Imagine you're making a big Lego creation and you want to remember all the steps you took to build it.
- You could take a picture of your progress after each step, and then you would have a whole album of pictures showing how your Lego creation was built step by step.
- **Git does the same thing, but instead of pictures, it takes snapshots of your code.**
- This way, you can always go back to an earlier version if you need to make changes or fix a mistake.
- And if you're working on a project with friends, you can use Git to share your changes with each other and see who made what changes.
- Developed in 2005 by Linus Torvalds (creator of Linux)
### Install
https://git-scm.com/downloads
**Windows**: Use the installer, which comes with Git Bash (emulator for bash and git)
** I recommend using [WSL](https://learn.microsoft.com/en-us/windows/wsl/install) instead for various reasons.
**Linux:** use your package manager of choice.
**MacOS:** use homebrew/macports package manager, or the installer (recommend homebrew)
### Pre-Requisites
1. Have a text editor
1. VSCode (recommended)
2. NotePad++
3. (Neo)Vim
4. Emacs, etc.
2. Know basic Bash commands
1. `cd`
2. `ls`
3. `rm`
4. `mkdir`
5. `touch`, etc.
3. Have a GitHub account (create one here: https://github.com/join)
### The Mental Model
_Every committed change_ in Git is **stored as a snapshot** and referenced by a **unique hash**.
- A **snapshot is not a diff**,
- a **snapshot** is _an entire copy of the entire state of a system at a certain time._
**All files go through three possible states.**
1. **Untracked** ~ changes that are not recorded yet.
2. **Staged** ~ ready to be snapshotted.
3. **Committed** ~ snapshotted.
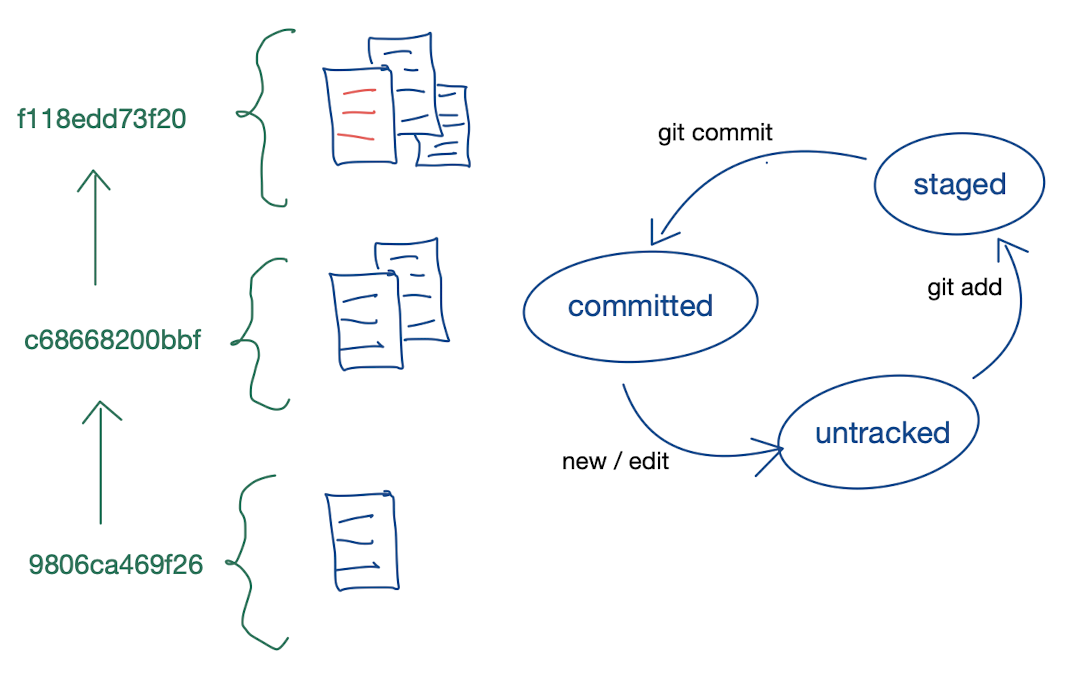
Source: Bernhard Wenzel
A **commit** is _a copied collection of files in the repository representing their state at a certain time, along with a message, time, and unique hash._
ie. a "safe", recoverable, and uniquely identifiable version of the project.
### Setting Up a Repository
A **Git repository** is a special directory which allows you to save and access versions of your files.
#### `git init`
- `cd` into the project's directory, and run `git init` to initialize it as a repo.
#### `git clone`
- run `git clone ` to create a local clone of a remote repository.
In either case, you should see a `.git/` sub-directory in your project after initializing it as a repository.
- [ ] Create a fork of this repository (here's how: https://docs.github.com/en/get-started/quickstart/fork-a-repo)
- [ ] Clone that repository (https://docs.github.com/en/repositories/creating-and-managing-repositories/cloning-a-repository)
- [ ] Create a new branch for yourself using `git switch -c `. Don't worry if this is confusing, we'll go through branching in more depth later!
- [ ] Create a new directory, with a name of the form ``
- [ ] Inside this directory, create a new file called `about-me.md`
### Configuration
It's time to configure your Git name and email to be used by the system.
```bash
git config --global user.name
git config --global user.email
```
### The Git Workflow
Were finally ready to make commits (or save changes) to our repository. This is the essence of the Git workflow, and what 95% of your Git usage will look like.
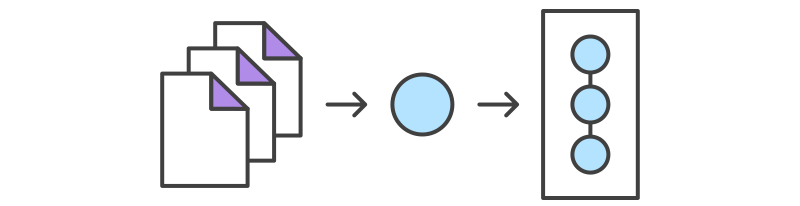
1. _**Add**_ files that you want to commit to the **staging area**.
1. `git add ` adds a specific file to the staging area.
2. `git add ` adds all files in the directory to the staging area.
2. _**Commit**_ everything in the staging area. `git commit -m `
The most common set of these 2 commands looks like this:
```bash
git add .
git commit -m "hopefully it works this time 🙏"
```
Source: Atlassian Git Tutorials
We can see the past commits with:
```bash
git log
```
We can check the current status that we're in (changes in the staging area and untracked changes).
```bash
git status
```
** Writing good commit messages is DIFFICULT! I'd recommend following some of the rules found here: https://cbea.ms/git-commit/
- [ ] Open the `about-me.md` file that you created in a text editor.
- [ ] Answer the following question inside this file: What's a popular game everyone seems to love but you don't like? Why don't you like it?
- [ ] Check the current status.
- [ ] Commit this change.
- [ ] Now answer the following question in the same file, below your answer to the previous one: What are your three favourite video games of all time?
- [ ] Commit this change.
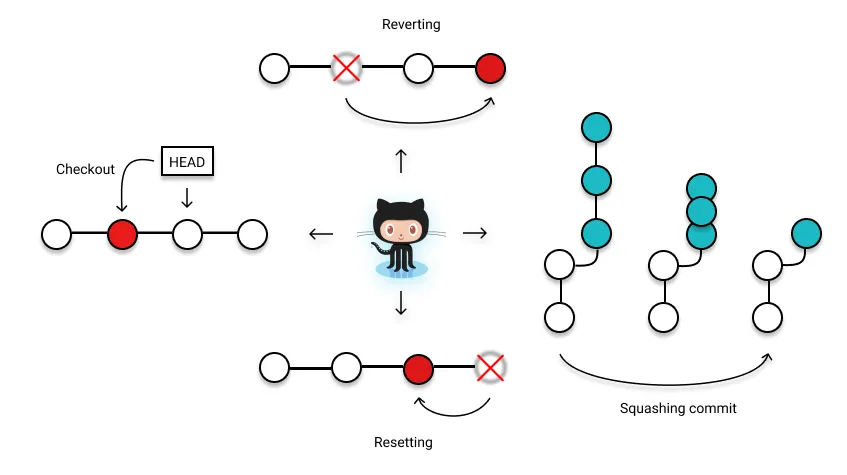
You can use `git checkout` to visit a past commit. (Move the HEAD pointer to another commit)
```bash
git checkout
```
** Whenever git asks for a commit-sha, we can use `HEAD` to access the most recent commit (on the current branch), and `HEAD~1` to access 1 commit before the HEAD.
** This can put you in a detached HEAD state, so be careful when making more commits.
- [ ] Log the commit history.
- [ ] Visit a previous commit with `git checkout`, and then go back to the most recent commit.
- [ ] Now delete everything in the file!
- [ ] Commit this change.
### Undoing and Rewriting History
We can undo a commit in two ways:
1. `git revert ` creates a new commit with the inverse of the last commit.
- use this for public shared repositories, not ideal for minimal Git history.
2. `git reset --hard `
- reset the commit history to that specified commit.
- `--hard` nukes all untracked changes after reseting.
- Without `--hard`, the changes will be untracked.
We can amend the most recent commit with
```bash
git commit --amend
```
- opens an editor to edit the commit/commit message.
- [ ] Revert the last commit (the delete).
- [ ] Add your favourite food to the `about-me.md` file in a new line.
- [ ] Hard reset to the last commit.
- [ ] Hard reset to the commit before the delete.
### Branches
**Mental Model**
- Every repository has at least one **branch**. Think of a branch as a specific timeline in the history.
- A **branch** is a series of snapshots that represents a timeline of changes. Branches can start from any snapshot in the history.
- Branches are key for collaboration with GitHub.
We've already been using a branch that we created!
`git branch` ~ list all branches, and show current branch.
- `-a` flag lists all, including remote/non-local branches.
- `-d ` flag deletes a branch
`git checkout ` ~ Check out a branch.
- `-b` flag creates a new branch and checks it out.
** Alternative is to use `git switch ` (and `-c` flag to create a new branch).
- [ ] List all (including remote) branches.
- [ ] Checkout the main branch. Notice how your directory and `about-me.md` file has disappeared.
- [ ] Create a new branch called `temp` and switch to it.
- [ ] Switch back to your branch.
- [ ] Delete the `temp` branch.
There are two important branch operations in Git:
**Rebase** ~ rebase the current branch onto a base branch/commit/tag.
`git rebase `
**Merge** ~ merge a branch into the current branch.
`git merge `
We're going to use a common technique called "feature branching", where we create a new branch for a feature and merge it in later.
- [ ] List all (including remote) branches.
- [ ] Create and switch to a new branch called `new-feature`
- [ ] Inside your directory, create a new file called `new-file.txt`
- [ ] Type "hello world" in the file.
- [ ] Commit all changes.
- [ ] Switch to your original branch and merge the `new-feature` branch into it.
### Set-Up GitHub
- [ ] Make an account (should be done)
- [ ] Create a local SSH key.
- [ ] Copy the SSH key to GitHub. (this is how authentication works)
### Using GitHub
GitHub is a hosting service for remote repository, a collaborative development platform, and weird social media platform all in one.
Our local repository is a clone of the remote repository, where the remote is our source of truth. To push our changes, we simply must use:
```bash
git push
```
`-u ` specifies the remote name, which is required for the first push.
**GitHub Flow**: how to collaborate on a public repository.
1. Create a fork.
2. Create a feature branch.
3. [Submit a pull request](https://docs.github.com/en/pull-requests/collaborating-with-pull-requests/proposing-changes-to-your-work-with-pull-requests/creating-a-pull-request), and respond to any feedback with changes/comments.
Let's submit a pull request!
- [ ] Push your changes and new branch to your fork.
- [ ] In GitHub, you should see an option to submit a pull request with this branch. Click the button, fill out the form, and submit!
- [ ] Wait for me to merge it in.
🎉 CONGRATS! Hopefully you know more Git than you did before! You'll never cry about losing your files again (unless you `rm -rf *` by accident 💀)
___
## Notes
Notes for Ben's 👀 only
- Focus on the **mental model** of Git/GitHub.
- Only introduce git **fundamentals**, nothing fancy
- Start from the **local workflow**, then move to the **remote workflow**
- **USE VISUALS, DON’T JUST SAY “Run this command”.** Memorizing commands comes with time (not the focus of the workshop), **understanding the mental model** is vital in the beginning
- Leave room for **questions**, **examples**, and **practice exercises**