https://github.com/betterwayelectronics/sce-syscon-writer-guide
Guide to writing and dumping the original PS4 Syscon (Renesas R78) - Improved methodology, requires no desoldering of Syscon. Proprietary.
https://github.com/betterwayelectronics/sce-syscon-writer-guide
arduino bwe glitching ps4 ps4-downgrade ps4-exploit ps4-jailbreak ps4exploit ps4xploit rl78 shellcode syscon
Last synced: 8 months ago
JSON representation
Guide to writing and dumping the original PS4 Syscon (Renesas R78) - Improved methodology, requires no desoldering of Syscon. Proprietary.
- Host: GitHub
- URL: https://github.com/betterwayelectronics/sce-syscon-writer-guide
- Owner: BetterWayElectronics
- Created: 2022-12-13T02:25:21.000Z (about 3 years ago)
- Default Branch: main
- Last Pushed: 2023-08-29T05:43:47.000Z (over 2 years ago)
- Last Synced: 2025-04-09T21:47:29.699Z (10 months ago)
- Topics: arduino, bwe, glitching, ps4, ps4-downgrade, ps4-exploit, ps4-jailbreak, ps4exploit, ps4xploit, rl78, shellcode, syscon
- Homepage: https://betterwayelectronics.com.au/sce_syscon.html
- Size: 165 KB
- Stars: 24
- Watchers: 3
- Forks: 2
- Open Issues: 0
-
Metadata Files:
- Readme: README.md
Awesome Lists containing this project
README
Syscon Guide - SCE Syscon Method

Last Updated 26/6/23
What is this? This is a tool to read and write your PS4's Syscon on-board (and off-board) without the need to replace it with a blank (the now considered 'old way').
Why do I need this? Modifying the Syscon allows for downgrading (via CoreOS swap), repairing of loadBios -8 type errors and enables service mode.
Why isn't this free? This uses a proprietary and unreleased exploit on the R78 chip. It must be pre-flashed and locked on a fresh Arduino. The target market are repariers, hence the price.
Is there a cheaper way? Yes, it requires replacing Sony's Syscon with blank RL78 chips. If its cheap/free you get what you pay for!
Is this difficult to install? You have to solder 1 lifted wire to the Syscon whilst on-board and 3 others to alternative points. Once glitched you drop that pin and keep rest of the alternative points on the board.
Any discounts? If you buy in bulk, yes.
Do you need a backup of the previous version syscon? No you don't need a backup of anything to do this downgrade process, you are switching slots!
Can I go from 10.50 to 9.00? Only if 9.00 was your PREVIOUS firmware.
Can I go from 10.01 to 9.00? Only if 9.00 was your PREVIOUS firmware.
Can I go from 9.50 to 9.00? Only if 9.00 was your PREVIOUS firmware.
Can I go from 9.00 to 5.50? Only if 5.50 was your PREVIOUS firmware.
Which firmware will I go back to? Whichever was your PREVIOUS firmware.
Video Guides


Shopping List
BwE PS4 Syscon Writer
BwE PS4 Syscon Software (Reader & Writer) (Free w/ Writer)
BwE PS4 NOR Validator
Optional:
Multi LQFP (64-100) to DIP Board ($4AUD)
LQFP64 to DIP Board ($4AUD)
LQFP64 Socket Adapter ($45AUD)
LQFP100 Socket Adapter ($45AUD
Soldering, Whats That?:
Purchase Links:

Syscon Writer Black Edition (New Release!)
Voltage Switch, UART Mode, Faster Processor, Fully Integrated Design. Warranty!
$385AUD (233Euro, $252USD)
$300AUD (177Euro, $192USD, 1406RMB)
Note: All Syscon Writers Come With HWID Locked Syscon Writer & Reader Software For Free!
(Available with USB License for Multi-PC Use)
Compatibilitiy

Do you have the Syscon on the right? You're outta luck. The glitch only works on Renesas RL78 chips. The guide ends here.
The chip MUST have A0#-COL or A0#-COL2 where the # is a number.
Syscon Pinout

FAT Syscon

Slim/Pro Syscon

Connection Points
Dumping On-Board
Dumping Off-Board
Note: When reading/writing Syscon on-board (after patching) wire only pin 5, 6 and ground either directly to the chip or alternative points and have the console on standby.

Dumping on-board example
Best Practice

Solder the jumper wires flat against the legs.

The entire jumper wire must fill the entire pad.

The wire must be parallel to the component termination.
Reading Syscon (Currently ONLY works on A0#-COL/2 chips):

If the dumps do not match change resistors (100ohm, 510ohm, 1kohm).
If it does not even dump check your connections (seriously) or change your Optocoupler.
Patching Syscon Dump:

- Run BwE PS4 NOR Validator
- Select Option 2 - Scan & Patch PS4 Syscon
- Syscon will scan for a patchable slot, if there is one available it will say at the bottom in "Final Results".
- If it says "Active Slot Patchable" select Option 1 "Auto Patch"
- If it says "Unable to Auto-Patch" it will prompt you to Manually Patch - If so you must select an earlier 080B (Use Verbose Mode) to overwrite the last 080B.
- If it says "Syscon NOT Patchable" then call it quits, game over. Your PS4 has either had its initialisation overwritten or some other historical event is blocking the patch.
- Any other errors you can likely fix by rebuilding the Syscon
- Apply the patch!
- It will show you what you are overwriting (and potentially the data you are overwriting it with).
- File will be saved as "???_080B_patched.bin" - Keep this and the original, label it appropriately and store it!
Programming SCE Syscon:

- Connect from your Arduino to the Syscon Chip (lift pin 15 and 16 (Pro) or pin 22 and 23 (Fat)if writing on board).
- Launch BwE_PS4_Syscon_Writer.exe it will auto detect your COM port or prompt you for one.
- Select OCD mode for your first write only (option 3), this will disable the need to lift pins ever again!
- Write the patched dump (or original if you only want to enable OCD mode)
- If you selected confirm it will check the dump was written correctly - If there was an error, restart the Arduino and run full and OCD mode (regardless if you have done it before or not).
-
Do NOT boot the console with patched syscon until you have ALSO patched the NOR. Doing so is only useful for seeing what the previous version is - only do this with NOR backup also.
Notes:
You now only need to connect Pins 5, 6 and GND to the Syscon directly or to the alternative points for all future reads and writes!
You can only write with the supplied Arduino, TTL will not function nor will Renesas Software.
All future writes do not require full or OCD commands (this will make it only write to 0x60000+), but I highly suggest adding confirm to validate the write.
Reading & Writing NOR:

XGECU

CH341A (Modified for 2.8v)

Teensy (SPIWay)
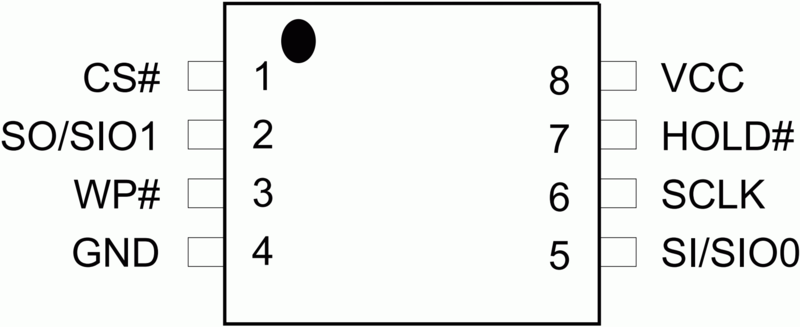
8-Pin
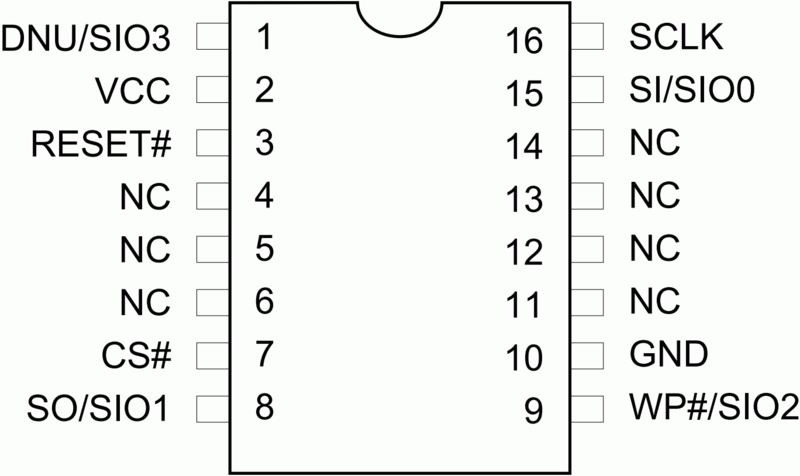
16-pin
Usage
Teensy++ 2.0
SPIway
Description
-
1
SIO3
B5
8pin: Not Available - not used / 16pin: Serial Data Input & Output (for 4xI/O read mode)
8
2
VCC
+5V pad
+3V DC Power Supply
7
3
HOLD#/RESET#
B6
8pin: Hold, to pause the device without deselecting the device / 16pin: Hardware Reset Pin Active low
-
4
NC
NC
No Connection
-
5
NC
NC
No Connection
-
6
NC
NC
No Connection
1
7
CS#
B0
Chip Select
2
8
SO/SIO1
B3
Serial Data Output (for 1 x I/O) or Serial Data Input & Output (for 2x I/O or 4x I/O read mode)
3
9
WP#/SIO2
B4
Write Protection: connect to GND or Serial Data Input & Output (for 4x I/O read mode)
4
10
GND
GND
Ground
-
11
NC
NC
No Connection
-
12
NC
NC
No Connection
-
13
NC
NC
No Connection
-
14
NC
NC
No Connection
5
15
SI/SIO0
B2
Serial Data Input (for 1 x I/O) or Serial Data Input & Output (for 2x I/O or 4x I/O read mode)
6
16
SCLK
B1
Clock Input

8 Pin WSON8 - Pro & Slim

16 Pin SOP16 - Fat

Hardwiring Example

Non-Invasive Method

2.8v CH341A Mod

2.8v CH341A Mod
Patching NOR Dump:

- Run BwE PS4 NOR Validator
- Select Option 1 "Validate or Patch PS4 NOR"
- Select your NOR file
- Select Option 10 or 11 "Validate" and patch for UART when prompted
- If your NOR is valid go back and select Option 5 "Patch CoreOS & Southbridge (LoadBios Repair & Downgrading)"
- Read the warnings!
- Select Option 1 "Auto Generate CoreOS Header & UART Patches"
- NOR will be saved as "?_coreos-uart-patched_*.bin" 14 times!
- Apply each patch in sequence (without patching Syscon) and read the UART logs (See Final Step).
- When the correct patch has been found, then you can patch the syscon! Downgrade will be complete (See Final Step).
Final Step - LoadBios Repair / Downgrade:
There are three methods, pick whichever suits you! The third is the quickest, but not as tested as the others
Official Method:
Lazy Method (No UART Needed)
New Method (Legitimate CoreOS Patch)
Troubleshooting:
How Does It Look From UART?
Patch 1
secure loader build: May 10 2022 05:23:21 (r10568:release_branches/release_09.600) [711MHz]
Boots Normally (Fail)
Patch 2
secure loader build: May 10 2022 05:23:21 (r10568:release_branches/release_09.600) [711MHz]
Boots Normally (Fail)
Patch 3
secure loader build: May 10 2022 05:23:21 (r10568:release_branches/release_09.600) [711MHz]
Boots Normally (Fail)
Patch 4
secure loader build: May 10 2022 05:23:21 (r10568:release_branches/release_09.600) [711MHz]
ERROR: main(4122) loadBios -8
BLOD (Fail)
Patch 5
secure loader build: May 10 2022 05:23:21 (r10568:release_branches/release_09.600) [711MHz]
Boots Normally (Fail)
Patch 6
secure loader build: May 10 2022 05:23:21 (r10568:release_branches/release_09.600) [711MHz]
Boots Normally (Fail)
Patch 7
secure loader build: May 10 2022 05:23:21 (r10568:release_branches/release_09.600) [711MHz]
ERROR: main(3738) checkUpdVersion 0xffffffff != 0x9600000
Slot Switched To Current Slot (Fail)
Patch 8
secure loader build: Sep 1 2021 05:19:44 (r10468:release_branches/release_09.000) [711MHz]
ERROR: main(3738) checkUpdVersion 0xffffffff != 0x9008000
Secure Loader & CheckUpdVersion Lower = Success!! Patch Syscon Now!
After Syscon Patch
secure loader build: Sep 1 2021 05:19:44 (r10468:release_branches/release_09.000) [711MHz]
standby 09600000
9.00 Secure Loader and 9.60 Standby. Slots successfully switched! Booting into 9.00!
Getting Support
If you want support from BwE, you must provide a UART log for each NOR patch (without flashing Syscon) then another with only the patched Syscon.
That means a total of 15 logs, they must be labelled to represent each patch number and in .txt format. Zip it and email it/message it to me.
If you do not do this, I will not provide support
Credits/Greetz:
DarkNESMonk
Wildcard
fail0verflow
JEFF
PDJ
Hoea
Donators & Suppliers of Dumps/Syscons