https://github.com/biplobsd/yst
Transfer/Move YouTube subscriptions from one account to another
https://github.com/biplobsd/yst
channel channel-mover channel-transfer chrome-extension hacktoberfest migrate-youtube-subscriptions subscription subscriptions-transfer svelte youtube youtube-subscriptions
Last synced: 12 months ago
JSON representation
Transfer/Move YouTube subscriptions from one account to another
- Host: GitHub
- URL: https://github.com/biplobsd/yst
- Owner: biplobsd
- License: gpl-3.0
- Created: 2023-03-14T07:50:01.000Z (over 3 years ago)
- Default Branch: main
- Last Pushed: 2025-06-27T11:29:13.000Z (about 1 year ago)
- Last Synced: 2025-06-27T12:34:42.574Z (about 1 year ago)
- Topics: channel, channel-mover, channel-transfer, chrome-extension, hacktoberfest, migrate-youtube-subscriptions, subscription, subscriptions-transfer, svelte, youtube, youtube-subscriptions
- Language: Svelte
- Homepage: https://biplobsd.github.io/apps/view/yst.md
- Size: 886 KB
- Stars: 97
- Watchers: 3
- Forks: 5
- Open Issues: 0
-
Metadata Files:
- Readme: README.md
- License: LICENSE.md
Awesome Lists containing this project
README
> [!CAUTION]
> Due to rapid or unexpected changes in the YouTube website, the YST extension may stop working after these changes. To ensure continued functionality, please use the API mode as a reliable method. [Read API mode docs](https://github.com/biplobsd/yst?tab=readme-ov-file#using-api-mode) or follow [Screen Recording Instructions](https://github.com/biplobsd/yst?tab=readme-ov-file#screen-recording-instructions)
# Youtube Subscriptions Transfer
| Chrome Web Store | Edge Add-ons | Opera Add-ons | Firefox Add-ons |
|--------------------------------------------------------------------------------------------------------------------------------------------------------------------------------------------------------------------------------------|---------------------------------------------------------------------------------------------------------------------------------------------------------------------------------------------------------------|------------------------------------------------------------------------------------------------------------------------------------------------------------------------------------------------------------------------------------------------------------------------------------|------------------------------------------------------------------------------------------------------------------------------------------------------------------------------------------------------------------------------------------------------------------|
|  |
|  |
|  |
|  |
|
YouTube Subscriptions Transfer is a browser extension that allows you to transfer or move subscriptions from one account to another using XPath or API. The extension collects a list of channels and enables you to subscribe or unsubscribe to each channel. It interacts with the DOM using xpath and YouTube Data API v3.
**_`Note: When using XPath mode, YST only works when the YouTube webpage language is set to English (US).`_**
**_`Issue: On Mac, popup close when changing webpage. Quick solution: Opening with inspect window when popup open and stay open inspect window.`_**
Read more: [#4](https://github.com/biplobsd/yst/issues/4)
## Quick tutorial 60 second with the XPath mode
[](https://youtu.be/EsouSNQOALQ)
## Long Tutorial (In French Language)
[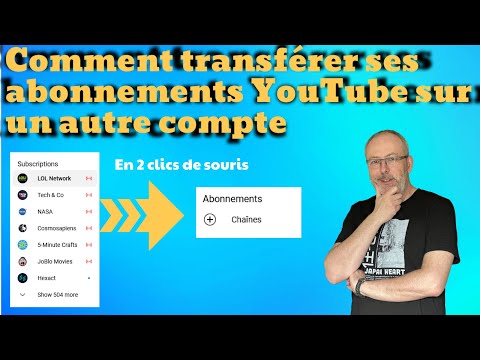](https://youtu.be/lLRLc2C7M8s)
Check out the article on [paradoxetemporel.fr](https://paradoxetemporel.fr/47853-comment-transferer-ses-abonnements-youtube-sur-un-autre-compte.html)
Thanks for the tutorial, [Zast](https://github.com/zast57)
## Usage scenario
### Case 1 - Sharing with your friend
Suppose you regularly watch YouTube videos, and you are subscribed to many of your favorite YouTube channels. Those channels are really good. Now your friend also wants to follow your subscriptions. Your friend requests you to share all of your YouTube subscriptions with their account. In this case, you can show your entire subscription list to your friend, and they can then subscribe to those channels one by one. In this case, the 'YouTube Subscription Transfer Extension' can help you transfer all of your subscriptions to their account automatically.
### Case 2 - Work account to new account
Suppose you are using your personal YouTube account, and you also use an ad blocker in your browser to skip YouTube video ads. Currently, you are posting your videos to your channel. However, in this case, YouTube might block you, possibly in a few days. Now that you are aware of this, you decide to create a new YouTube account to keep your personal and work accounts separate. You want to transfer your work account subscriptions to your new account. You have the option to do this manually, one by one, or you can use the "YouTube Subscription Transfer Extension" to automatically transfer or move them to your new account.
## Installation
[Chrome Web Store](https://chrome.google.com/webstore/detail/fanknehiohibiphenfaigbmefncbheaa) | [Microsoft Edge Add-ons](https://microsoftedge.microsoft.com/addons/detail/ojnekffpabpincdklmmmlnoanffkfahj) | [Opera Add-ons](https://addons.opera.com/en/extensions/details/youtube-subscriptions-transfer/) | [Firefox Add-ons](https://addons.mozilla.org/addon/youtube-subscriptions-transfer/)
Or get the built zip from the [release](https://github.com/biplobsd/yst/releases/latest) tab. Then follow the instructions in the [Load unpacked extensions](#load-unpacked-extensions) section. The **_/dist_** folder should be considered as the unpacked zip files.
## YST has two modes
Below is a comparison:a
| XPath | API |
| ----------- | ----------- |
| No need to connect an account | Need to connect an account |
| Only works on youtube.com | No need to go to any page |
| Slow on webpage loading | API requests, so this is fast |
### Important: API Quota Limitation
When using the API mode, please note that YouTube Data API v3 imposes a daily quota limit. New projects receive a default allocation of 10,000 quota units per day. For example, each subscription insertion or deletion costs 50 units, meaning you can transfer approximately 200 subscriptions per day. You can check the quota details in the official [Quota and Compliance Audits](https://developers.google.com/youtube/v3/guides/quota_and_compliance_audits) and [Quota Calculator](https://developers.google.com/youtube/v3/determine_quota_cost) documentation.
## Usages
### Using XPath mode (Default)
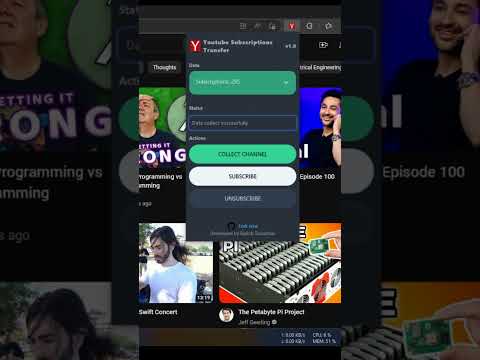
To use the extension, open the Y (yst) icon from the extension panel. If you are not on the https://www.youtube.com page, click the Open YouTube button.

Wait for the page to load completely and wait for the Ready for accept request signal from the content script. Once connected, the options will look like the screenshot below.

### Data section
In the Data section, you can see how many subscriptions the extension has collected. If you expand the subscriptions, you will see all the channel IDs. You can also add, remove, or update this list and take action from this list.

#### Google Takeout
YST now supports importing a Google Takeout ZIP file to import a `subscription.csv` file in XPath mode. The `subscription.csv` file contains channel IDs. During the import of the ZIP file, all `channel IDs` are converted to `custom URLs` for similarity checks with the YouTube page's subscription list. The conversion process utilizes the YouTube Data API.
##### Compatibility Table
| OS | Chrome/Edge | Firefox | Notes |
|---------------------------|-------------|---------|--------------------------------------------------|
| **Windows 10** | ✅ Yes | ❌ No | Fully working with Takeout import |
| **Windows 11 (24H2)** | ✅ Yes | ❌ No | Verified at 5K resolution |
| **macOS 15.4.1 (Sequoia)**| ✅ Yes | ❌ No | Verified at 5K resolution |
| **Linux (Pop!_OS 22.04)** | ❌ No | ❌ No | Basic features work, Takeout import fails |
These issues are tracked and will be addressed in a future update. Special thanks to [@mastazi](https://github.com/mastazi) for the detailed report in issue [#18](https://github.com/biplobsd/yst/issues/18)
##### Here are the steps to import a Takeout ZIP file:
1. Go to the [Google takeout manager](https://takeout.google.com/takeout/custom/youtube)
2. Click on `All YouTube data included`, then on `Deselect all`, then select only `subscriptions` and click `OK`.

3. Click on `Next step` and then on `Create export`.
4. Wait for the email. You will receive a Google Takeout email containing a link to the ZIP file. Download that ZIP file.
5. Return to `YST`, click on `Data`, and below that, you will find the `Takeout import` section. Click the `Click to choose a ZIP file` button here. Then select and choose your takeout.zip file.

Now, YST will automatically import all channels from the `subscription.csv`. Afterward, you can proceed with any actions.
### Actions
- Collect channel
> This button will collect all subscriptions from your current active tab on YouTube and save them to the Data section.
- Subscribe
> This button first collects all of your current subscriptions and compares them with the past data from the Data section. If any of the IDs are present in your current subscriptions, the ID is removed from the subscriptions list.
- Unsubscribe
> This button first collects your subscriptions and compares them with the past data. If any of the IDs are present in your current subscription list, the ID remains on the list.
- Stop
> This button will appear when any action is running. You can click it to stop the current task.
The Subscribe and Unsubscribe buttons will only appear when the Subscriptions list is not empty

## Using API mode
To use the API mode, you first need to switch to API mode. To do that, go to the `Settings` tab and you will see an option called `Select Mode.` By default, XPath will be active. Click on `API.`

### Connect your account
Now go to the `Home` tab and expand the `Account` section. You will see two connect buttons.

Connect your account for the two accounts you want to subscribe or unsubscribe from. On the left side, you will see a radio button. After connecting your channels, choose your primary channel by clicking on the radio button.
Now you will see the `Collect Channel` button enabled. Click to collect the channel.

After collecting the channel, choose your new account. Then click the `subscribe` button to transfer the subscription. Now wait and observe the success and failure count.
By default, there is a 500ms delay for every API request. You can adjust this value in the `Settings` tab.
## Configuration
### Disable auto XPath remote update
Add `REMOTE_DISABLE: true` to the Setting/XPath text box and save to disable auto-updating of XPath at the extension popup when opened.
### Update XPath value
If the YouTube website updates its site and any XPath value is broken, you can easily update that value by going to the "Settings" tab and selecting the "XPath" option. Now update the XPath values as json format. You need to add `REMOTE_DISABLE: true` for disabling auto update from project xpath value. Now click save.
### Select Mode
- XPath (Default)
> Manually visit the channel page and perform actions.
- API
> API mode will use the `YouTube Data API v3`.
### API Delay per request
By default, there is a 500 millisecond delay for every API request. This will not affect the XPath mode. You can change this value in the settings tab.
## Development
```bash
# install dependencies
npm i
# build files to `/dist` directory
# HMR for extension pages and content scripts
npm run dev
```
## Build
```bash
# build files to `/dist` directory
$ npm run build
```
## Load unpacked extensions
[Getting Started Tutorial](https://developer.chrome.com/docs/extensions/mv3/getstarted/)
1. Open the Extension Management page by navigating to `chrome://extensions`.
2. Enable Developer Mode by clicking the toggle switch next to `Developer mode`.
3. Click the `LOAD UNPACKED` button and select the `/dist` directory.

## Setting Up Your Own YouTube Data API
### Screen Recording Instructions
In this screen recording, I demonstrate how to set up the YouTube Data API in the Google Cloud Console. I followed the instructions written below to configure the YouTube API with the YST extension.
[Setting Up Your Own YouTube Data API Screenrecod.webm](https://github.com/user-attachments/assets/db48bef5-bd0c-48c6-9db6-6dc72827d938)
### Requirements
- Extension ID

You can find on `About page>ID:` or after building and importing it to the browser extensions tab.
First, you need to obtain a client ID and API key from the Google Console. Create a project in the Google Cloud Console by visiting https://console.cloud.google.com/projectcreate. Name the project as `YST extension` and then click `Create.` Next, enable the YouTube Data API v3 by going to https://console.cloud.google.com/apis/library/youtube.googleapis.com?project=yst-extension and click the `Enable` button.
Now, configure the consent screen by switching to the `OAuth consent screen` tab.
### OAuth consent screen

#### 1 - OAuth Consent Screen
Select "User Type" as "External."
Save and continue.
Now, input the following details:
- App name as "YST"
- User support email as your email.
- Authorized domains as "chromiumapp.org"
- Developer contact information as your email
Save and continue.
#### 2 - Scopes
Add the following scopes:
- `.../auth/userinfo.email`
- `.../auth/userinfo.profile`
- `.../auth/youtube.readonly`
- `.../auth/youtube.force-ssl`

Save and continue.
#### 3 - Test Users
Add the email addresses of your two YouTube accounts as test users. Save and continue.
Your OAuth consent screen is now set up.
### Credentials Tab
Go to the Credentials tab and create credentials.

First, select API key. A popup will display with your API key; note it down.
Now, click on the "CREATE CREDENTIALS" button again and select OAuth client ID.
> 
> **_NOTE:_** `` is your Extension ID, which you can find on `About page>ID:` or after building and importing it from the browser extensions tab.
Configure the following:
- Application type as `Web application`
- Name as `YST OAuth`
- Authorized JavaScript origins as `https://.chromiumapp.org`
- Authorized redirect URIs as `https://.chromiumapp.org/provider_cb`
Click `Create,` and a popup will appear with your OAuth client credentials. Note the `Client ID.`
### Setting Google API Credentials
Now we have the `API KEY` and `Client_ID`. Here we have two ways to set up these keys. Recommended and easy way is on the setting page.
#### On Setting page

Click on the settings tab and below you will find the `Google API Console Keys` section. Fill out your two keys carefully.
#### On build step

Now, create a `.env.local` file in the root directory and set your client ID and API key.
```env
## Google API Credentials
VITE_CLIENT_ID=
VITE_API_KEY=
```
Again, run `npm run build` and reload the extension from the browser extensions tab.
## Related information
- This project starts with using the [NekitCorp/chrome-extension-svelte-typescript-boilerplate](https://github.com/NekitCorp/chrome-extension-svelte-typescript-boilerplate) boilerplate project. So don't forget to check out their project.
## Donation
