https://github.com/bobbyiliev/syntropynet-minecraft
https://github.com/bobbyiliev/syntropynet-minecraft
Last synced: 8 months ago
JSON representation
- Host: GitHub
- URL: https://github.com/bobbyiliev/syntropynet-minecraft
- Owner: bobbyiliev
- License: mit
- Archived: true
- Created: 2021-06-10T10:53:35.000Z (over 4 years ago)
- Default Branch: main
- Last Pushed: 2023-10-10T08:11:40.000Z (about 2 years ago)
- Last Synced: 2025-01-23T10:13:12.661Z (9 months ago)
- Language: PHP
- Homepage:
- Size: 22.8 MB
- Stars: 3
- Watchers: 3
- Forks: 0
- Open Issues: 0
-
Metadata Files:
- Readme: README.md
- License: LICENSE.md
Awesome Lists containing this project
README

---
## 💻 Syntropy Hackathon Submittion
* Category: Gaming
* Name: **MC Panel**
* Creators:
* [Bobby Iliev](https://twitter.com/bobbyiliev_)
* [Denislav](https://twitter.com/asciiden)
## 💡 Introduction
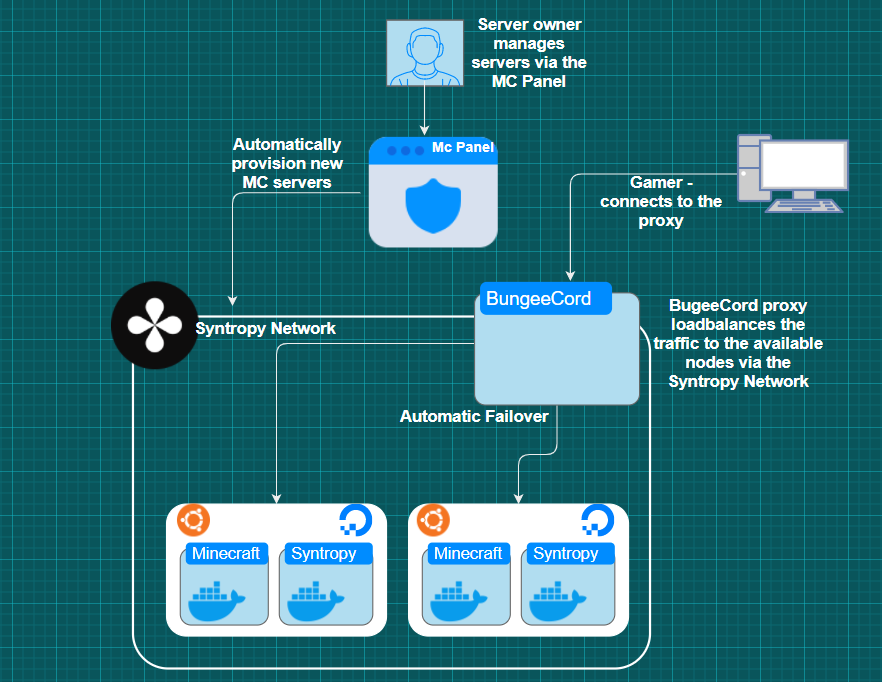
MC Panel is a Software as a Service that can help you manage and provision your Minecraft servers 💰.
MC Panel is built with [Syntropy](https://syntropystack.com), [Laravel Wave](https://wave.devdojo.com), [DigitalOcean](https://m.do.co/c/2a9bba940f39) and a few other awesome technologies.
Here are some of the awesome features ✨:
- Automated BugeeCord Proxy Server Provisioning
- Spin up a fallback lobby server
- Automated Minecraft server setup and management
- Web panel to manage your servers
- Out of the box Syntropy Network integration
- Users and User Profiles and Roles
- User Notifications and Announcements
- Fully Functional Blog
## 📹 Demo
https://www.youtube.com/watch?v=A5utq5wjtO4
## 📜 Installation
The installation is fully automated so you don't really have to do any server configuration.
However before you get started you will need the following things:
* A [Syntropy Account](https://syntropystack.com)
* Once you have the Account get an **Agent token** and set the expiry date somewhere in the future as per this [guide here](https://docs.syntropystack.com/docs/get-your-agent-token).
* Then get an **Access token** as well as per the instructions [here](https://docs.syntropystack.com/docs/access-tokens).
* [A DigitalOcean account](https://m.do.co/c/2a9bba940f39). If you use this link you will get free $100 credit to spin up your own servers:
[](https://www.digitalocean.com/?refcode=2a9bba940f39&utm_campaign=Referral_Invite&utm_medium=Referral_Program&utm_source=badge)
* Once you have your DigitalOcean account, create an API token as per the [steps here](https://docs.digitalocean.com/reference/api/create-personal-access-token/).
* [Create an Ubuntu 20.04 server](https://docs.digitalocean.com/products/droplets/how-to/create/) with at least 2GB RAM (4GB is better).
Finally once you have the tokens ready, [SSH to your new server](https://docs.digitalocean.com/products/droplets/how-to/connect-with-ssh/) and run the following commands:
> Note: update the tokes accordingly!
```
export SYNTROPY_AGENT_TOKEN=YOUR_SYNTROPY_AGENT_TOKEN_HERE
export SYNTROPY_ACCESS_TOKEN=YOUR_SYNTROPY_ACCESS_TOKEN_HERE
export DO_API_KEY=YOUR_DO_API_KEY_HERE
```
* Finally clone this repository and run the install script with this command:
```
git clone https://github.com/bobbyiliev/SyntropyNet-Minecraft /var/www/syntropynet ; cd /var/www/syntropynet ; time bash infrastructure/install
```
> Note: this process could take up to 5-10 minutes depending on the size of your server.
## Usage
Once the installation has been completed, add your first MC server by running these two commands:
> Note: It is important to create the first server via the command line with the bellow commands!
* Switch to the `syntropy` user:
```
su syntropy
```
* Create a new server:
```
bash /var/www/syntropynet/infrastructure/add.sh
```
Once the command has finished running you will see the following output:
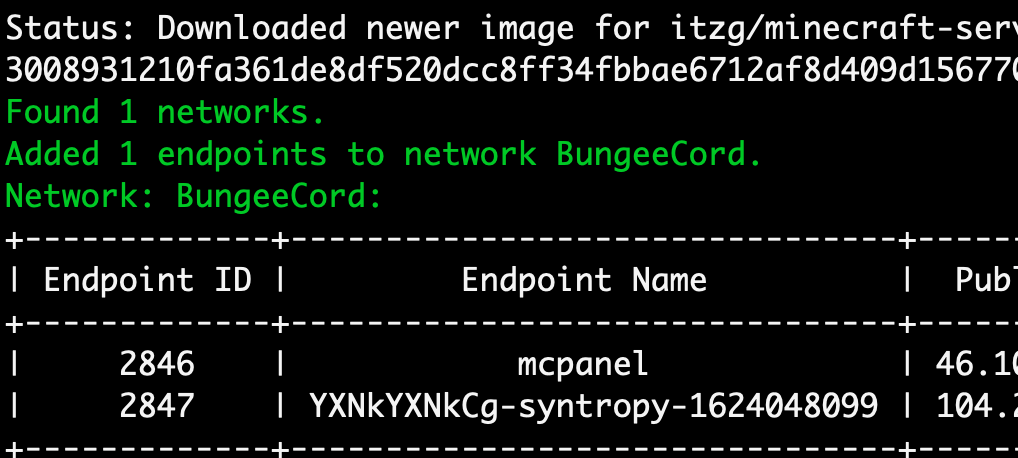
Then visit your server IP via your browser and you will be able to login with the following default login details:
```
user = admin@admin.com
pass = password
```
> Make sure to change the login details as soon as possible!
To create a new server visit the dashboard at `your_ip/dashboard` and in order to add a new server just hit the `Add server` button.
This will provision a new MC server and do all of the necessary configuration including:
* Create a new DigitalOcean Ubuntu server
* Install Docker
* Start the Syntropy Agent with the Syntropy Agent token from your `.env` file
* Start a new MC instance
* Update the BugneeCord proxy configuration to include the new server
### Shell Scripts
For anyone who prefers the CLI rather than the MC panel UI, you could run the following commands in order to add and remove servers:
First switch to the syntropy user:
```
su syntropy
```
* Adding a server:
```
bash /var/www/syntropynet/infrastructure/add.sh
```
* Removing a server:
```
bash /var/www/syntropynet/infrastructure/remove.sh SERVER_NAME_HERE
```
Usually this takes up to a couple of minutes for the whole process to finish.
## 🤲 Contributing
If you notice a problem please open an issue here on GitHub. Any PRs would also be appreciated!
## 🔐 Security Vulnerabilities
If you discover a security vulnerability within MC Panel, please send an e-mail to bobby@bobbyiliev[.]com. All security vulnerabilities will be promptly addressed.
## 🌊 Laravel Wave
If you want to learn more about Laravel Wave checkout the [official documentation here](https://wave.devdojo.com/docs).