https://github.com/bugsplat-git/bugsplat-ng
🐛💥🕵️ BugSplat error reporting for Angular
https://github.com/bugsplat-git/bugsplat-ng
angular apm bugsplat error error-reporting reporting sourcemap typescript
Last synced: over 1 year ago
JSON representation
🐛💥🕵️ BugSplat error reporting for Angular
- Host: GitHub
- URL: https://github.com/bugsplat-git/bugsplat-ng
- Owner: BugSplat-Git
- License: mit
- Created: 2017-09-08T16:20:05.000Z (almost 9 years ago)
- Default Branch: main
- Last Pushed: 2024-07-05T16:11:35.000Z (about 2 years ago)
- Last Synced: 2024-10-29T11:12:15.886Z (over 1 year ago)
- Topics: angular, apm, bugsplat, error, error-reporting, reporting, sourcemap, typescript
- Language: TypeScript
- Homepage: https://bugsplat-git.github.io/my-angular-crasher/
- Size: 7.13 MB
- Stars: 6
- Watchers: 4
- Forks: 2
- Open Issues: 12
-
Metadata Files:
- Readme: README.md
- Changelog: CHANGELOG.md
- License: LICENSE.md
Awesome Lists containing this project
README
[](https://bugsplat.com)
#
BugSplat
### **Crash and error reporting built for busy developers.**


## 👋 Introduction
BugSplat supports the collection of errors in Angular applications. The bugsplat-ng npm package implements Angular’s [ErrorHandler](https://angular.io/api/core/ErrorHandler) interface in order to post errors to BugSplat, where they can be tracked and managed. Adding BugSplat to your Angular application is extremely easy. Before getting started, please complete the following tasks:
* [Sign up](https://app.bugsplat.com/v2/sign-up) for BugSplat
* Complete the [welcome](https://app.bugsplat.com/v2/welcome) workflow and take note of your BugSplat database
* Check out the [live demo](https://www.bugsplat.com/platforms/angular/my-angular-crasher) of BugSplat’s Angular error reporting
## 🧑🏫 Sample
This repository includes a sample `my-angular-crasher` application that has been pre-configured with BugSplat. Get started by cloning the repository and navigating to the root of the project:
```sh
git clone https://github.com/BugSplat-Git/bugsplat-ng
cd bugsplat-ng
```
Before you can run the app, you'll need to create an OAuth2 Client ID & Client Secret pair that corresponds to your BugSplat database as shown [here](https://docs.bugsplat.com/introduction/development/web-services/oauth2). Please also take note of the BugSplat `database` that this OAuth2 Client ID & Client Secret pair corresponds to.
First, add a `database` property in your package.json that corresponds to your BugSplat database:
```json
{
"database": "your_bugsplat_database"
}
```
Next, create a [dotenv](https://github.com/motdotla/dotenv) file with the name `.env` at the root of the repository and populate it with the correct values substituted for `your-client-id` and `your-client-secret`:
```
SYMBOL_UPLOAD_CLIENT_ID=your-client-id
SYMBOL_UPLOAD_CLIENT_SECRET=your-client-secret
```
To start the sample app, run `npm start` in the root of the repository.
```sh
npm start
```
The `npm start` command will build the sample application and upload [source maps](https://docs.bugsplat.com/introduction/development/working-with-symbol-files/source-maps) to BugSplat so that the JavaScript call stack can be mapped back to TypeScript. Once the build has completed, the source maps will be uploaded and `http-server` will serve the app.
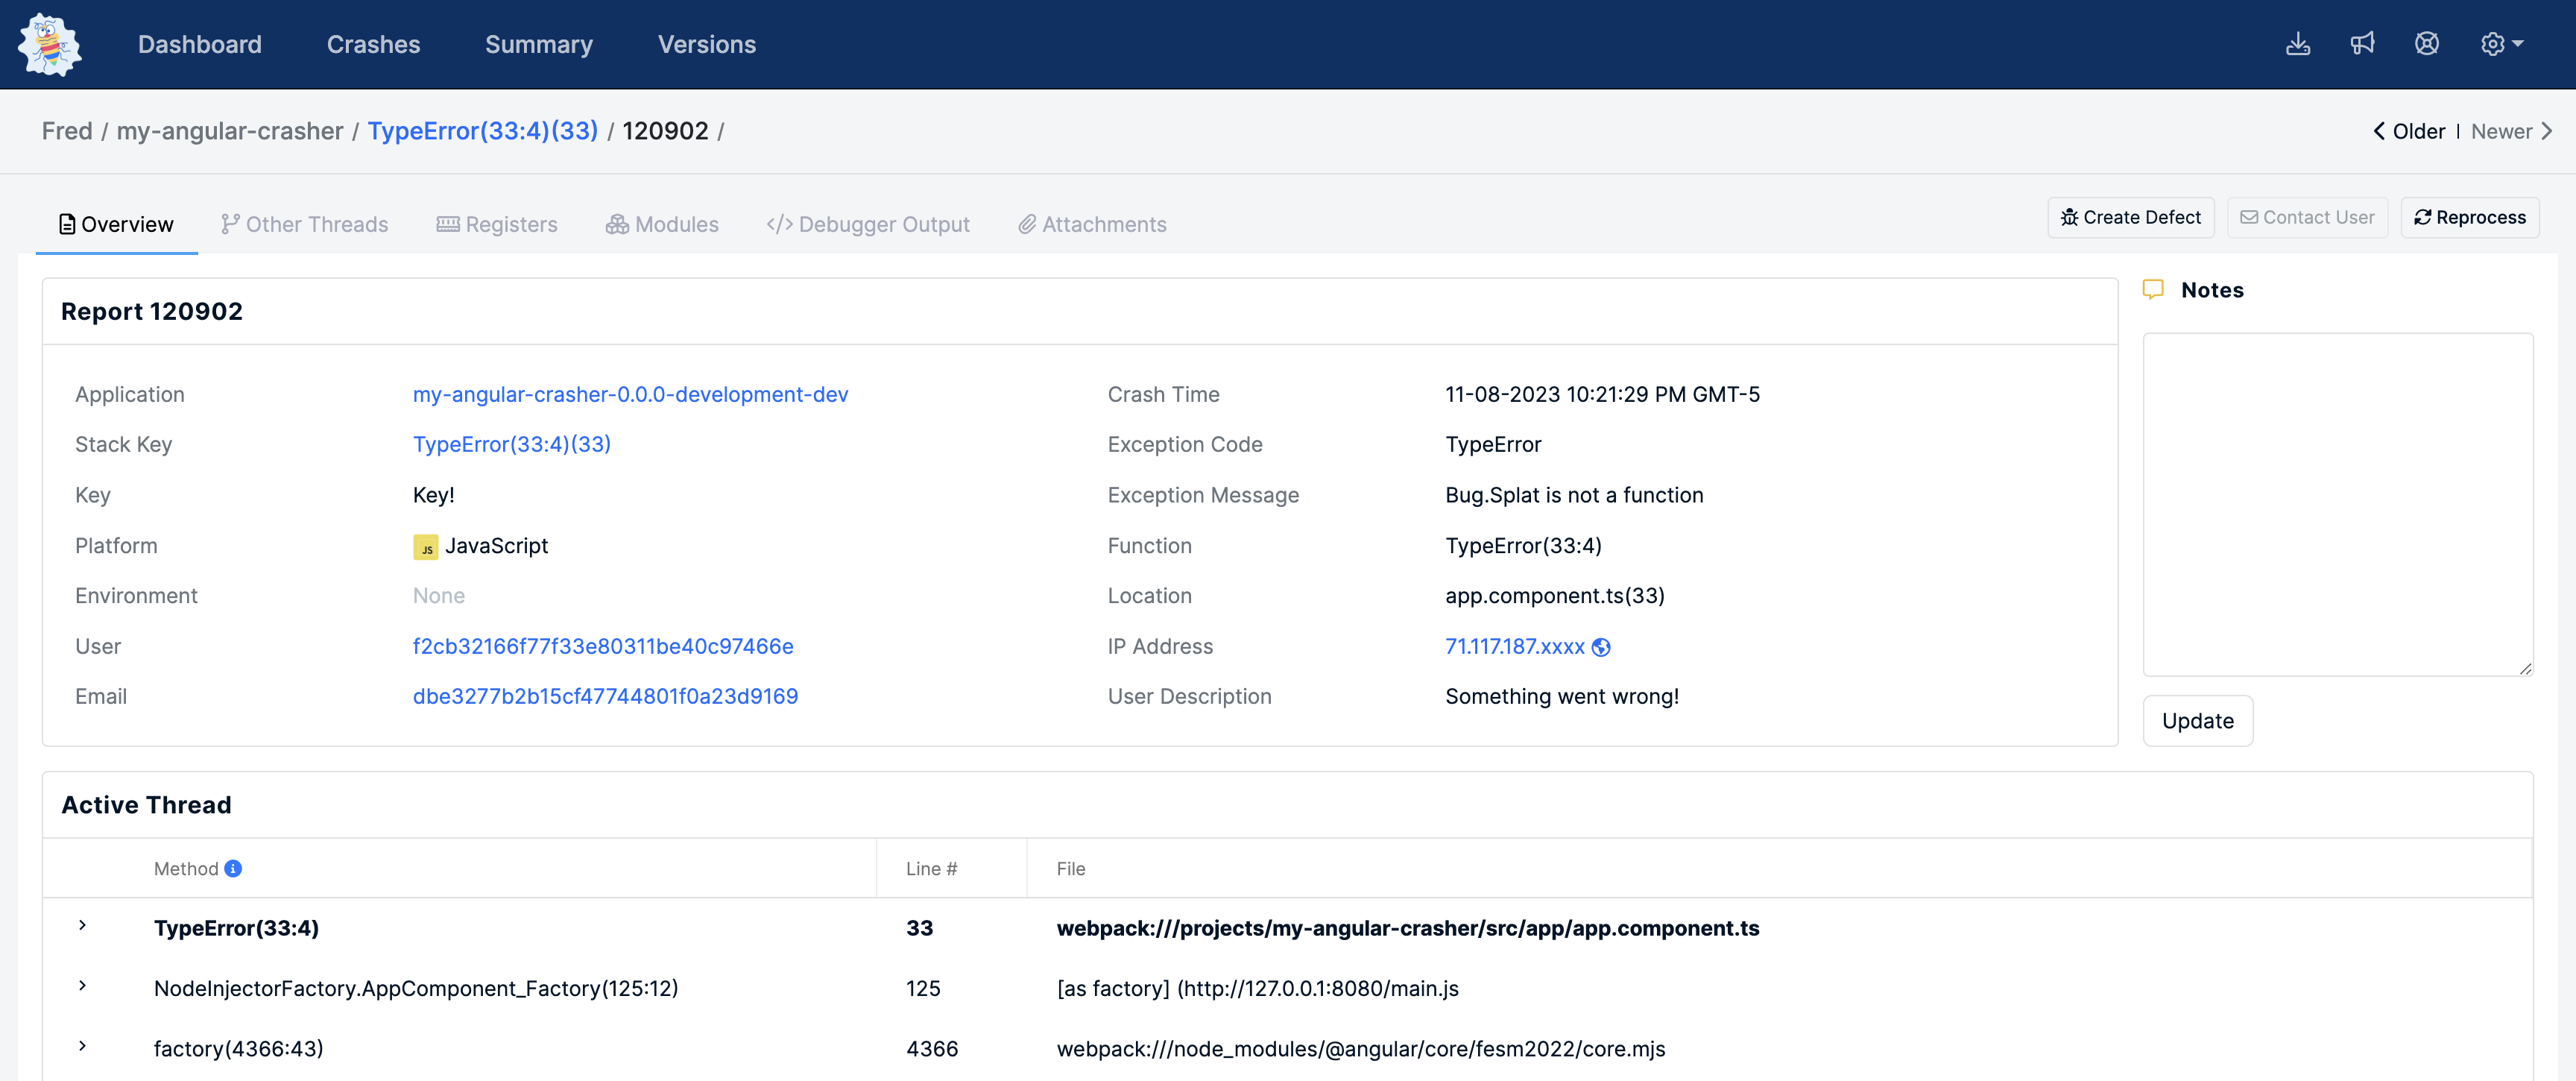
Navigate to the url displayed in the console by `http-server` (usually [localhost:8080](http://127.0.0.1:8080)). Click any button in the sample app to generate an error report. A link to the error report should display in the app shortly after clicking a button. Click the link to the error report and when prompted to log into BugSplat.
If everything worked correctly you should see information about your error as well as a TypeScript stack trace.
## ⚙️ Integration
To collect errors and crashes in your Angular application, run the following command in the terminal or cmd at the root of your project to install bugsplat-ng:
```shell
npm i bugsplat-ng --save
```
Add a `database` property in your package.json that corresponds to your BugSplat database:
```json
{
"database": "your_bugsplat_database"
}
```
Add values for your BugSplat `database`, `application`, and `version` to your application's environment files.
[environment.prod.ts](https://github.com/BugSplat-Git/bugsplat-ng/blob/8c12d9b3544f2b618491467e6c40d84b6139eb2a/src/environments/environment.prod.ts#L1)
```typescript
const packageJson = require('../../package.json');
export const environment = {
production: true,
bugsplat: {
database: packageJson.database,
application: packageJson.name,
version: packageJson.version
}
};
```
Add an import for `BugSplatModule` to your `AppModule`:
[app.module.ts](hhttps://github.com/BugSplat-Git/bugsplat-ng/blob/8c12d9b3544f2b618491467e6c40d84b6139eb2a/src/app/app.module.ts#L4)
```typescript
import { BugSplatModule } from 'bugsplat-ng';
```
Add a call `BugSplatModule.initializeApp` in your AppModule's imports array, passing it your database, application, and version:
[app.module.ts](https://github.com/BugSplat-Git/bugsplat-ng/blob/8c12d9b3544f2b618491467e6c40d84b6139eb2a/src/app/app.module.ts#L31)
```typescript
...
@NgModule({
imports: [
BugSplatModule.initializeApp(environment.bugsplat)
],
...
})
```
Throw a new error in your application to test the bugsplat-ng integration:
[app.component.ts](https://github.com/BugSplat-Git/bugsplat-ng/blob/8c12d9b3544f2b618491467e6c40d84b6139eb2a/src/app/app.component.ts#L37)
```typescript
throw new Error("foobar!");
```
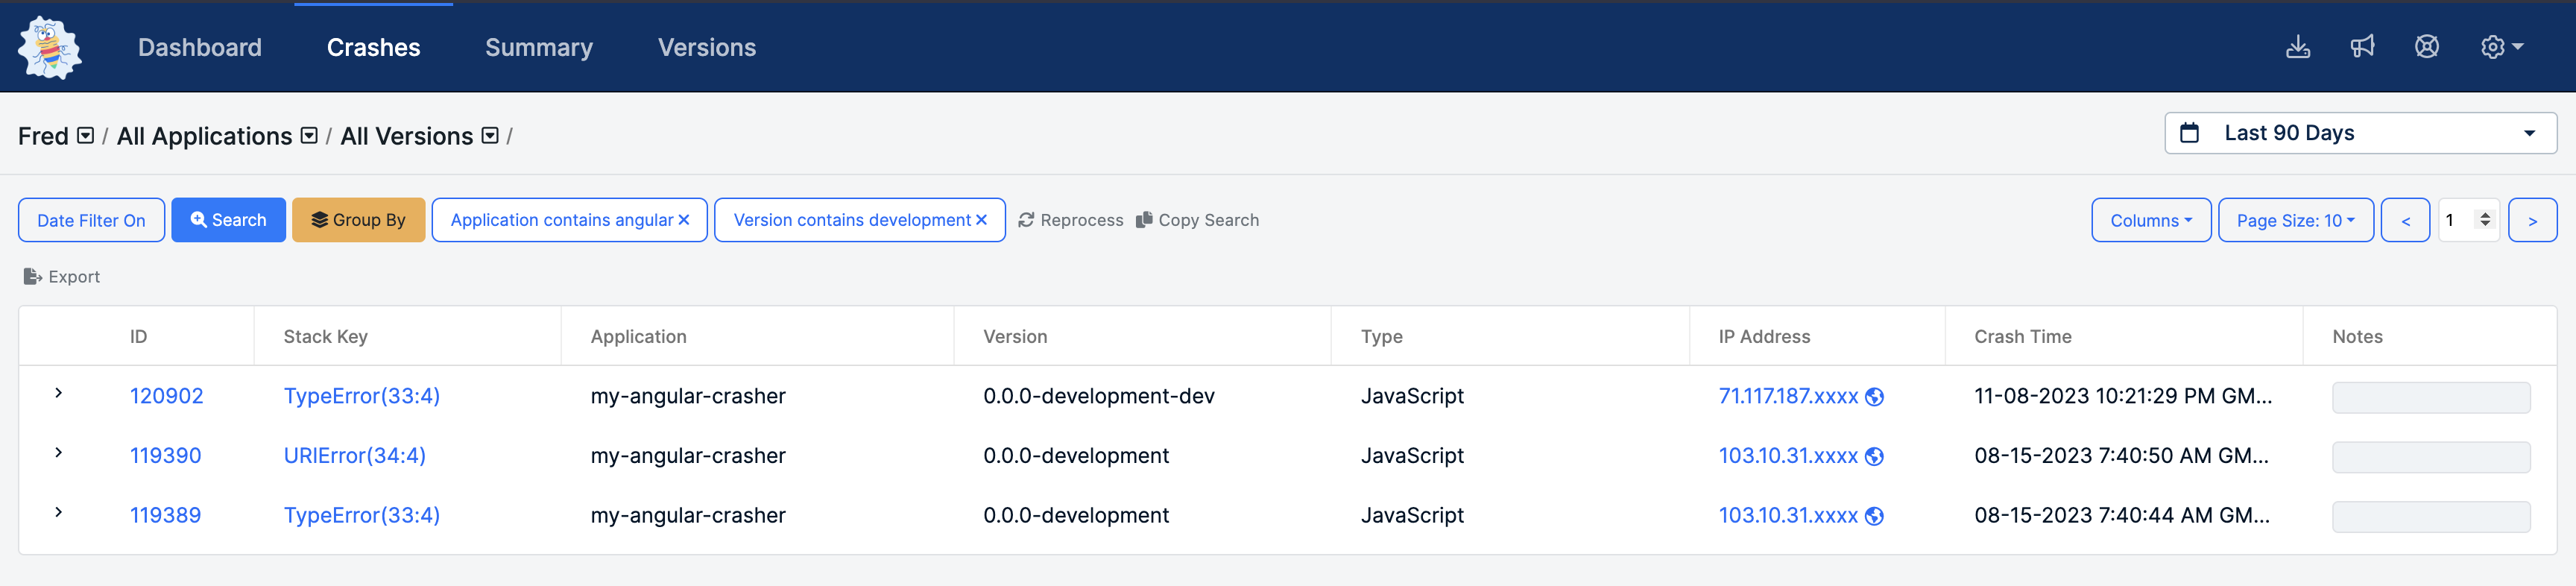
Navigate to the [Crashes](https://app.bugsplat.com/v2/crashes) page in BugSplat, and you should see a new crash report for the application you just configured. Click the link in the ID column to see details about your crash on the Crash page:
## 🧰 Extended Integration
You can post additional information by creating a service that implements ErrorHandler. In the `handlerError` method, make a call to `BugSplat.post` passing it the error and an optional options object:
[my-angular-error-handler.ts](https://github.com/BugSplat-Git/bugsplat-ng/blob/master/src/app/my-angular-error-handler.ts)
```typescript
import { ErrorHandler, Injectable } from '@angular/core';
import { BugSplat } from 'bugsplat-ng';
@Injectable()
export class MyAngularErrorHandler implements ErrorHandler {
constructor(public bugsplat: BugSplat) { }
async handleError(error: Error): Promise {
return this.bugsplat.post(error, {
description: 'New description from MyAngularErrorHandler.ts'
});
}
}
```
BugSplat provides the following properties and methods that allow you to customize its functionality:
[bugsplat.ts](https://github.com/BugSplat-Git/bugsplat-ng/blob/master/projects/bugsplat-ng/src/lib/bugsplat.ts)
```typescript
BugSplat.description: string; // Additional info about your crash that gets reset after every post
BugSplat.email: string; // The email of your user
BugSplat.key: string; // A unique identifier for your application
BugSplat.user: string; // The name or id of your user
BugSplat.files: Array; // A list of files to be uploaded at post time
BugSplat.getObservable(): Observable; // Observable that emits BugSplat crash post events results in your components.
async BugSplat.post(error): Promise; // Post an Error object to BugSplat manually from within a try/catch
```
In your AppModule's NgModule definition, add a provider for your new ErrorHandler:
[app.module.ts](https://github.com/BugSplat-Git/bugsplat-ng/blob/master/src/app/app.module.ts)
```typescript
import { ErrorHandler, NgModule } from '@angular/core';
@NgModule({
providers: [
{
provide: ErrorHandler,
useClass: MyAngularErrorHandler
}
]
...
})
```
You can also configure BugSplat's logging preferences and provide your own logging implementation. Create a provider for BugSplatLogger with useValue set to a new instance of BugSplatLogger. Pass one of the BugSplatLogLevel options as the first parameter to BugSplatLogger. You can provide an instance of your own custom logger as the second parameter granted it has an error, warn, info, and log methods. If no custom logger is provided, the console will be used:
[app.module.ts](https://github.com/BugSplat-Git/bugsplat-ng/blob/master/src/app/app.module.ts)
```typescript
import { ErrorHandler, NgModule } from '@angular/core';
import { BugSplatLogger, BugSplatLogLevel, BugSplatModule } from 'bugsplat-ng';
@NgModule({
providers: [
{
provide: ErrorHandler,
useClass: BugSplatErrorHandler
},
{
provide: BugSplatLogger,
useValue: new BugSplatLogger(BugSplatLogLevel.Log)
}
],
...
})
```
## 🗺 Source Maps
BugSplat supports unwinding uglified and minified JavaScript stack traces via source maps. To upload source maps to BugSplat during your build, install [@bugsplat/symbol-upload](https://www.npmjs.com/package/@bugsplat/symbol-upload).
```bash
npm i -D @bugsplat/symbol-upload
```
Configure your `angular.json` file to output source maps. We suggest enabling source maps for both your application code and any vendor chunks generated by Angular.
```js
{
"projects": {
"main": {
"architect": {
"build": {
"options": {
"sourceMap": {
"scripts": true,
"styles": true,
"vendor": true
},
},
}
}
}
}
}
```
Add `SYMBOL_UPLOAD_CLIENT_ID` and `SYMBOL_UPLOAD_CLIENT_SECRET` environment variables for the BugSplat user that you will use to upload symbols. You can create these values as system environment variables or use [dotenv](https://www.npmjs.com/package/dotenv).
```bash
SYMBOL_UPLOAD_CLIENT_ID=your-client-id
SYMBOL_UPLOAD_PASSWORD=your-client-secret
```
Add a script to `package.json` that reads a `.env` file and calls `symbol-upload` to upload source maps after your production build. Replace `my-angular-crasher` with the name of your Angular project.
```json
{
"scripts": {
"postbuild": "node -r dotenv/config ./node_modules/@bugsplat/symbol-upload/dist/bin/index.js -d ./dist/my-angular-crasher/browser"
}
}
For best results, please upload source maps for every released version of your application.
## 🧑💻 Contributing
BugSplat loves open-source software! If you have suggestions on how we can improve this integration, please reach out to support@bugsplat.com, create an [issue](https://github.com/BugSplat-Git/bugsplat-ng/issues) in our [GitHub repo](https://github.com/BugSplat-Git/bugsplat-ng) or send us a [pull request](https://github.com/BugSplat-Git/bugsplat-ng/pulls).
With ❤️,
The BugSplat Team