https://github.com/bytebit-org/roblox-touchscreenjoysticks
This project is an open-source tool for composing multiple, customized touch screen joysticks with the objective of improving the tooling available to Roblox developers for mobile games.
https://github.com/bytebit-org/roblox-touchscreenjoysticks
game-development joysticks lua mobile-games npm-package roblox roblox-developers roblox-ts
Last synced: about 2 months ago
JSON representation
This project is an open-source tool for composing multiple, customized touch screen joysticks with the objective of improving the tooling available to Roblox developers for mobile games.
- Host: GitHub
- URL: https://github.com/bytebit-org/roblox-touchscreenjoysticks
- Owner: Bytebit-Org
- License: mit
- Created: 2020-03-20T02:21:12.000Z (about 5 years ago)
- Default Branch: master
- Last Pushed: 2022-04-05T01:46:20.000Z (about 3 years ago)
- Last Synced: 2024-04-26T11:01:02.358Z (about 1 year ago)
- Topics: game-development, joysticks, lua, mobile-games, npm-package, roblox, roblox-developers, roblox-ts
- Language: Lua
- Homepage:
- Size: 384 KB
- Stars: 16
- Watchers: 2
- Forks: 5
- Open Issues: 0
-
Metadata Files:
- Readme: README.md
- Changelog: CHANGELOG.md
- License: LICENSE
Awesome Lists containing this project
README
# Touch Screen Joysticks
This project is an open-source tool for composing multiple, customized touch screen joysticks with the objective of improving the tooling available to Roblox developers for mobile games.
## Installation
### roblox-ts
Simply install to your [roblox-ts](https://roblox-ts.com/) project as follows:
```
npm i @rbxts/touch-screen-joysticks
```
### Wally
[Wally](https://github.com/UpliftGames/wally/) users can install this package by adding the following line to their `Wally.toml` under `[dependencies]`:
```
TouchScreenJoysticks = "bytebit/[email protected]"
```
Then just run `wally install`.
### From model file
Model files are uploaded to every release as `.rbxmx` files. You can download the file from the [Releases page](https://github.com/Bytebit-Org/roblox-TouchScreenJoysticks/releases) and load it into your project however you see fit.
### From model asset
New versions of the asset are uploaded with every release. The asset can be added to your Roblox Inventory and then inserted into your Place via Toolbox by getting it [here.](https://www.roblox.com/library/7872552904/Serve-Package)
# Links
- [API Documentation](DOCUMENTATION.md)
# Example
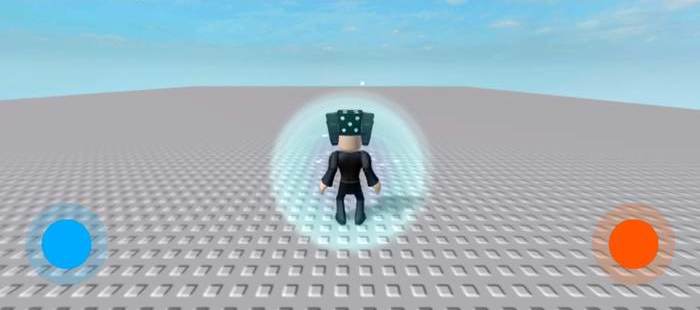
\
*[Click here to watch a video demonstration.](https://streamable.com/s8vph)*
It only takes one line of code to create a joystick! Below is an example of just a handful of lines of code that can be used to quickly generate two joysticks, one on each side of the screen, and print their inputs:
```TS
import { CompositeJoystickRenderer, JoysticksManager, RectangleGuiWindowRegion, SolidFilledCircle } from "@rbxts/touch-screen-joysticks";
import { Workspace, GuiService } from "@rbxts/services";
do { wait() } while (!Workspace.CurrentCamera)
wait(1); // To wait for screen to flip to appropriate orientation
const [ guiInsetTopLeft, guiInsetBottomRight ] = GuiService.GetGuiInset();
const realTopLeft = guiInsetTopLeft;
const realBottomRight = Workspace.CurrentCamera.ViewportSize.sub(guiInsetBottomRight);
const guiWindow = realBottomRight.sub(realTopLeft);
const joysticksManager = JoysticksManager.create()
const leftJoystick = joysticksManager.createJoystick({
activationRegion: new RectangleGuiWindowRegion(new Vector2(0, 0), new Vector2(guiWindow.X / 2, guiWindow.Y)),
gutterRadiusInPixels: 50,
inactiveCenterPoint: new Vector2(80, guiWindow.Y - 80),
initializedEnabled: true,
initializedVisible: true,
priorityLevel: 1,
relativeThumbRadius: 0.6,
renderer: new CompositeJoystickRenderer(new SolidFilledCircle(Color3.fromRGB(0, 170, 255), 0.8), new SolidFilledCircle(Color3.fromRGB(0, 170, 255), 0)),
});
leftJoystick.inputChanged.Connect(newInput => {
print("left input", newInput);
});
const rightJoystick = joysticksManager.createJoystick({
activationRegion: new RectangleGuiWindowRegion(new Vector2(guiWindow.X / 2, 0), new Vector2(guiWindow.X, guiWindow.Y)),
gutterRadiusInPixels: 50,
inactiveCenterPoint: new Vector2(guiWindow.X - 80, guiWindow.Y - 80),
initializedEnabled: true,
initializedVisible: true,
priorityLevel: 1,
relativeThumbRadius: 0.6,
renderer: new CompositeJoystickRenderer(new SolidFilledCircle(Color3.fromRGB(255, 85, 0), 0.8), new SolidFilledCircle(Color3.fromRGB(255, 85, 0), 0)),
});
rightJoystick.inputChanged.Connect(newInput => {
print("right input", newInput);
});
```


