https://github.com/caiyue1993/prefsmate
🐣 Elegant UITableView generator for Swift.
https://github.com/caiyue1993/prefsmate
codable ios swift4 uitableview
Last synced: 11 months ago
JSON representation
🐣 Elegant UITableView generator for Swift.
- Host: GitHub
- URL: https://github.com/caiyue1993/prefsmate
- Owner: caiyue1993
- License: mit
- Created: 2017-09-26T05:18:00.000Z (over 8 years ago)
- Default Branch: master
- Last Pushed: 2020-10-10T07:52:23.000Z (over 5 years ago)
- Last Synced: 2025-04-09T13:41:30.205Z (about 1 year ago)
- Topics: codable, ios, swift4, uitableview
- Language: Swift
- Homepage:
- Size: 83 KB
- Stars: 119
- Watchers: 4
- Forks: 5
- Open Issues: 1
-
Metadata Files:
- Readme: README.md
- License: LICENSE
Awesome Lists containing this project
README
# PrefsMate
[](https://travis-ci.org/caiyue1993/PrefsMate)

[](http://cocoapods.org/pods/PrefsMate)
[](http://cocoapods.org/pods/PrefsMate)
[](http://cocoapods.org/pods/PrefsMate)
PrefsMate provide an elegant way to generate UITableView using a property list file(plist file, in short). Also, you can configure actions with its support. Thanks to the **Codable** protocol, it makes the code perfect clean.
## Features
- [x] Data Persistence
- [x] Switch Accessory
- [x] Select Action
- [x] Muilty Sections
- [x] Section Header / Footer
- [x] Demo Project
- [x] World Ready
- [ ] More Custom Cells
## Background
In our app, we usually need a UITableView in PrefsViewController(or perhaps named SettingsViewController, whatever). And the interface may just looks like this:
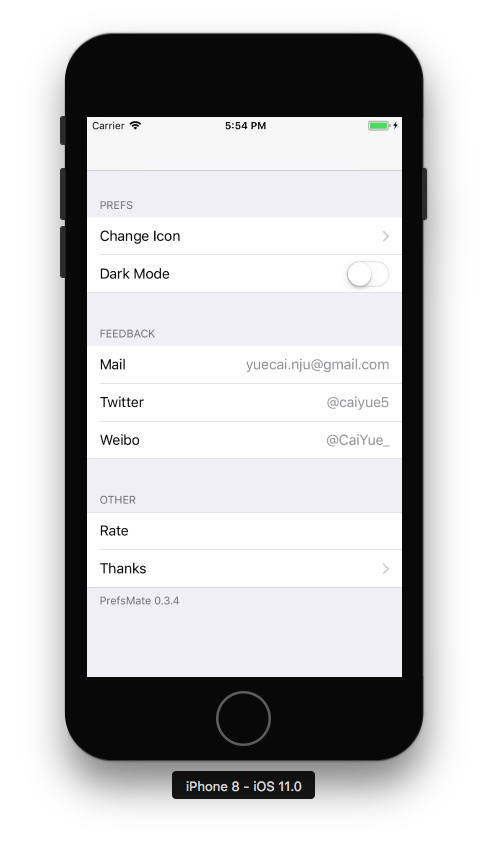
When implementing this kind of stuff, your inner voice must be this: "Writing this UI is fxxking tedious! Is there any help that I can ask for?"
And congrats! You have come to the right place :).
## Usage
## 1. Prepare a plist file containing formatted data
Taking example of the image above, the formatted plist file looks like this:
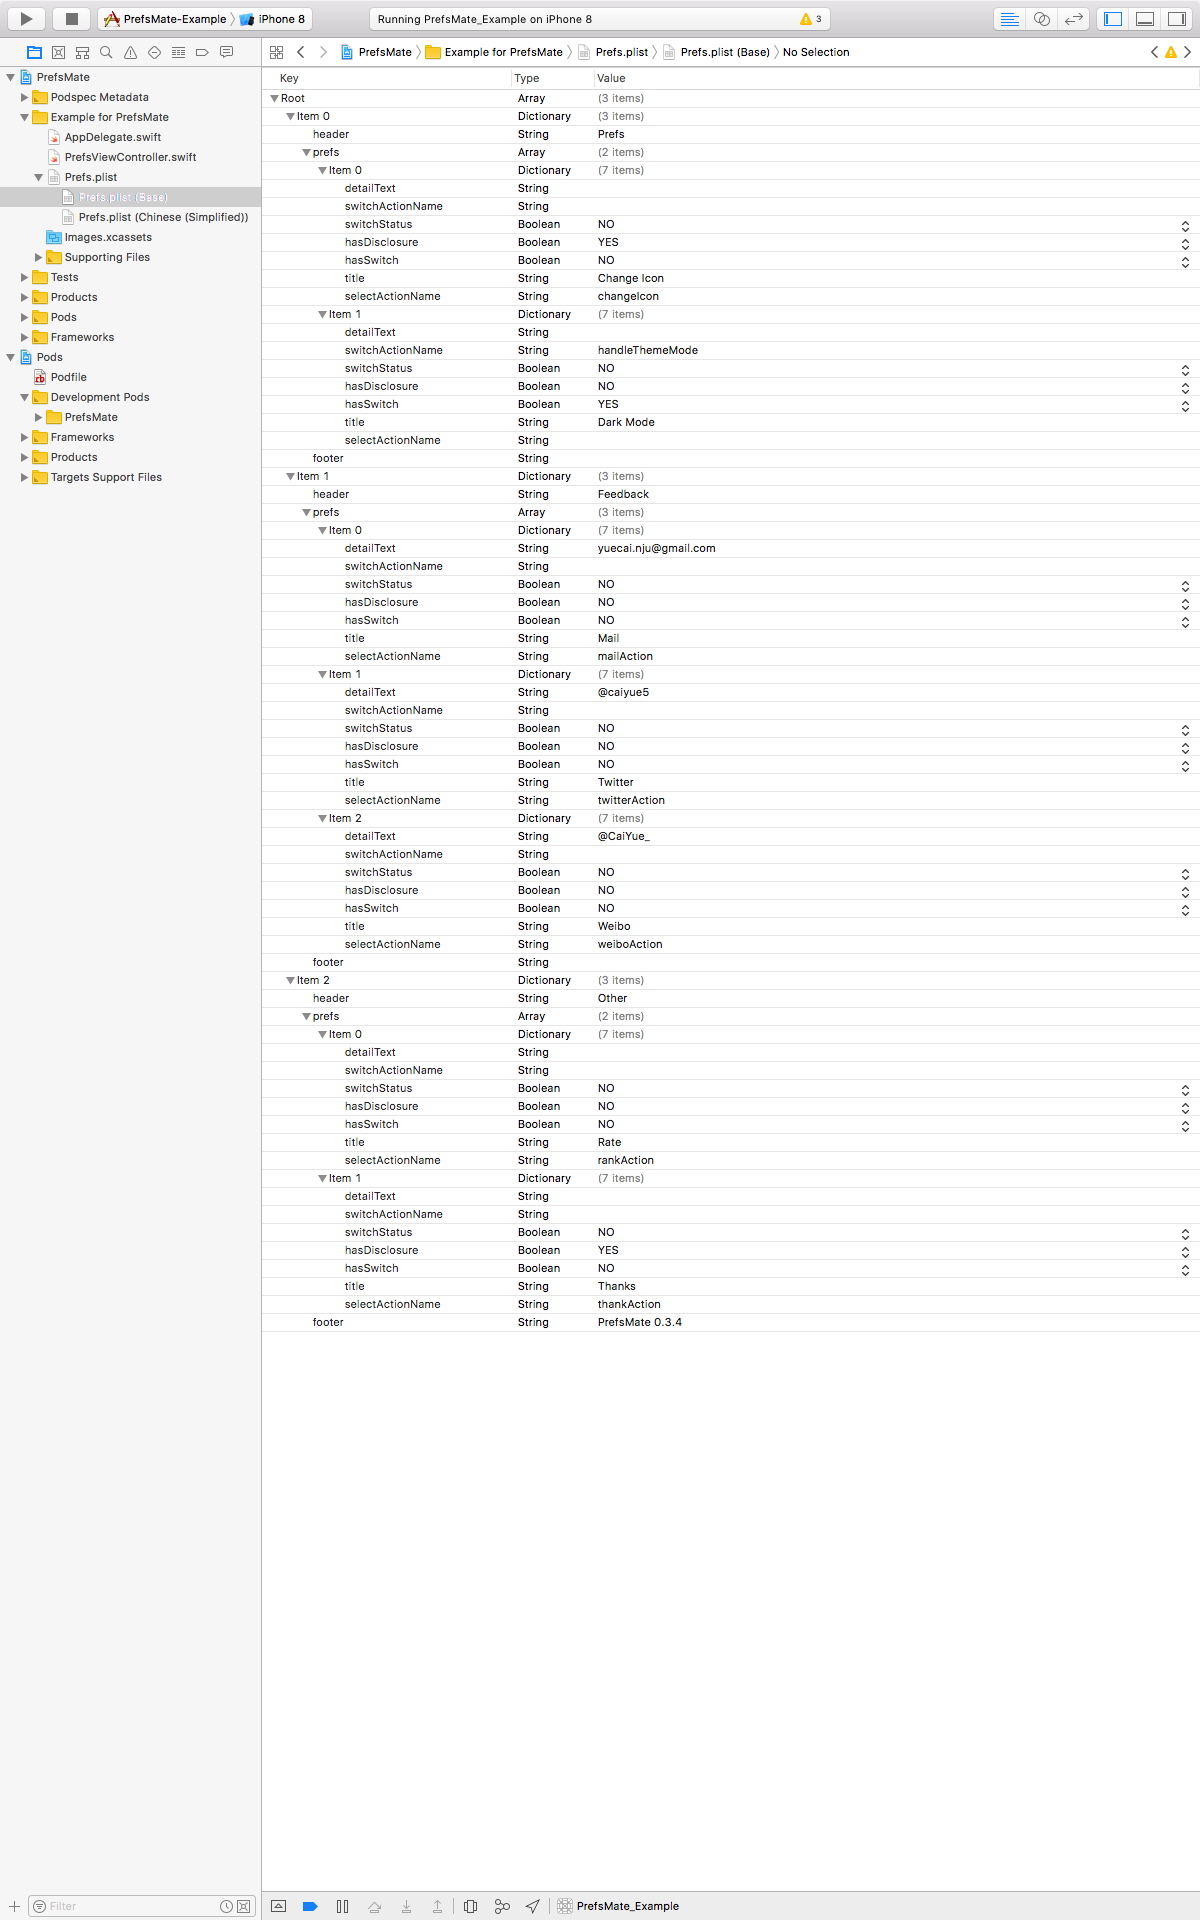
The meaning of each item property is as follows:
| Property | usage |
| :-----------: | :-----------: |
| `title` | the text on the left |
| `detailText` | the text on the right |
| `hasDisclosure` | whether the cell has a disclosure accessory view|
| `hasSwitch` | whether the cell has a switch |
| `switchStatus` | the status of the switch control |
| `selectActionName` | the name of select action(optional) |
| `switchActionName` | the name of switch action(optional) |
> Don't be afraid of this long file. In fact you just need to do some clickable things. You could even copy and paste [our plist source code](https://github.com/caiyue1993/PrefsMate/blob/master/Example/PrefsMate/Prefs.plist) first just for your convenience.
## 2. Create the table view and do the parsing job
```swift
let tableView = Mate.createPrefsTableView()
```
You can add the parsing code in viewDidLoad():
```swift
do {
try Mate.parseWithSource(self, plistUrl: pListUrl) {
tableView.reloadData()
}
} catch {
// Handle with the error
}
```
## 3. If needed, let your view controller conform to PrefsSupportable protocol
If you have select and switch action to handle, PrefsSupportable protocol already considered for you.
```swift
public protocol PrefsSupportable {
/// Return a bunch of switchableItems, including their behavior in SwitchableItemHandler.
var switchableItems: [SwitchActionName: SwitchableItemHandler]? { get }
/// Return a bunch of selectableItems, including their behavior in SelectableItemHandler.
var selectableItems: [SelectActionName: SelectableItemHandler]? { get }
}
```
Taking the switch of night theme for example:
```swift
var switchableItems: [SwitchActionName : SwitchableItemHandler]? {
return [
"handleThemeMode": { isOn in
print("Dark theme mode is \(isOn)")
}
]
}
var selectableItems: [SelectActionName : SelectableItemHandler]? {
return [
“changeIcon”: {
print(“Handle change icon action here”)
}
...
...
]
}
```
Then we are done! PrefsMate will do right things for you.
> Keep in mind: the "handleThemeMode" String must be the same value of `switchActionName` in the plist file. Same on `selectActionName`.
> In switch actions, PrefsMate already take care of the **data persistence**. So you don’t need to store the user preferences yourself.
You could refer to [Example project](https://github.com/caiyue1993/PrefsMate/tree/master/Example) for more detail.
## Suggestions
- Being familiar with plist file structure will help you a lot. Sometimes you can directly edit the plist file through "Open As Source Code".
- If you have an issue, please don't hesitate. Just let me know :)
## Example
To run the example project, clone the repo, and run `pod install` from the Example directory.
(Cuz this is a new Pod, you may need to `pod update` first.)
## Requirements
- Swift 5
- iOS 9 or later
## Installation
PrefsMate is available through Swift Package Manager & [CocoaPods](http://cocoapods.org).
### Swift Package Manager
From Xcode 11, you can use Swift Package Manager to add Kingfisher to your project.
1. Select File > Swift Packages > Add Package Dependency. Enter https://github.com/caiyue1993/PrefsMate.git in the "Choose Package Repository" dialog.
2. In the next page, specify the version resolving rule as "Up to Next Major" with latest release version
3. After Xcode checking out the source and resolving the version, you can choose the "PrefsMate" library and add it to your app target.
If you encounter any problem or have a question on adding package to an Xcode project, I suggest the [Adding Package Dependencies to Your App guide](https://developer.apple.com/documentation/xcode/adding_package_dependencies_to_your_app) article from Apple.
### CocoaPods
To install it, simply add the following line to your Podfile:
```ruby
pod 'PrefsMate'
```
## Contact
- Weibo: [@CaiYue_](http://weibo.com/caiyue233)
- Twitter: [@caiyue5](https://twitter.com/caiyue5)
## License
PrefsMate is available under the MIT license. See the LICENSE file for more info.